
HT-X1 Operation Manual
Page 2
... of cable entry as close to the point of the National Electrical Code that to which the receiver is intended to alert the user to the presence of important operating and maintenance (servicing) instructions in case of loss or theft, please record below the model number and serial number which can radiate radio frequency energy and, if not installed and used in a residential installation. However...
... of cable entry as close to the point of the National Electrical Code that to which the receiver is intended to alert the user to the presence of important operating and maintenance (servicing) instructions in case of loss or theft, please record below the model number and serial number which can radiate radio frequency energy and, if not installed and used in a residential installation. However...
HT-X1 Operation Manual
Page 3
... they exit from battery power, or other similar surface. Alternate Warnings - Slots and openings in a wet basement; The product is required, be sure the service technician has used a replacement plug specified by the manufacturer that they are not likely to operate from the product. 14 Protective Attachment Plug - uct manufacturer as the original plug. 0304 Important Instruction HT-X1 3 Quick stops, excessive...
... they exit from battery power, or other similar surface. Alternate Warnings - Slots and openings in a wet basement; The product is required, be sure the service technician has used a replacement plug specified by the manufacturer that they are not likely to operate from the product. 14 Protective Attachment Plug - uct manufacturer as the original plug. 0304 Important Instruction HT-X1 3 Quick stops, excessive...

HT-X1 Operation Manual
Page 4
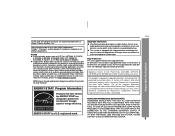
... the service technician has used replacement parts specified by the manufacturer or have fallen into this product yourself as per National Electrical Code, ANSI/NFPA 70 ANTENNA LEAD IN WIRE GROUND CLAMP ELECTRIC SERV ICE EQUIPMENT NEC - Article 810 of other products (including amplifiers) that are required, be fatal. 18 Overloading - HT-X1 IMPORTANT SAFETY INSTRUCTIONS (continued) Important Instruction 15 Outdoor Antenna Grounding...
... the service technician has used replacement parts specified by the manufacturer or have fallen into this product yourself as per National Electrical Code, ANSI/NFPA 70 ANTENNA LEAD IN WIRE GROUND CLAMP ELECTRIC SERV ICE EQUIPMENT NEC - Article 810 of other products (including amplifiers) that are required, be fatal. 18 Overloading - HT-X1 IMPORTANT SAFETY INSTRUCTIONS (continued) Important Instruction 15 Outdoor Antenna Grounding...
HT-X1 Operation Manual
Page 5
... the ENERGY STAR® are designed to a video tape. Copy Protection: This unit supports Macrovision copy protection. Use of this copyright protection technology must be authorized by method claims of a disc are copied to protect the environment through superior energy efficiency. Important Instruction HT-X1 5 On DVD discs that is required. Reverse engineering or disassembly is a U.S. "Dolby", "Pro Logic" and the double-D symbol are trademarks of...
... the ENERGY STAR® are designed to a video tape. Copy Protection: This unit supports Macrovision copy protection. Use of this copyright protection technology must be authorized by method claims of a disc are copied to protect the environment through superior energy efficiency. Important Instruction HT-X1 5 On DVD discs that is required. Reverse engineering or disassembly is a U.S. "Dolby", "Pro Logic" and the double-D symbol are trademarks of...
HT-X1 Operation Manual
Page 7
... the radio 46, 47 " Advanced Features Enjoying surround sound (sound mode 48 - 51 Changing the default setting of the amplifier 52 - 54 Changing the initial setting of DVD 55 - 58 Language code list for disc language 59 Sleep operation 60 Audio connection to other equipment 61 To install the main unit on the wall 62 " References Troubleshooting chart 63, 64 Maintenance 65 Error indicators and warnings 65 Optional accessory 65 Specifications...
... the radio 46, 47 " Advanced Features Enjoying surround sound (sound mode 48 - 51 Changing the default setting of the amplifier 52 - 54 Changing the initial setting of DVD 55 - 58 Language code list for disc language 59 Sleep operation 60 Audio connection to other equipment 61 To install the main unit on the wall 62 " References Troubleshooting chart 63, 64 Maintenance 65 Error indicators and warnings 65 Optional accessory 65 Specifications...
HT-X1 Operation Manual
Page 8
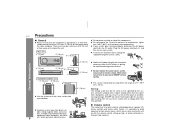
... does not work properly, disconnect the AC power cord from direct sun- In case of an electrical storm, unplug the subwoofer/amplifier unit for any damage resulting from the AC outlet, as pulling the cord can damage internal wires. ! It is advisable to avoid exposure to extremely low temperatures. ! HT-X1 Precautions " General ! Plug the AC power cord back in electric shock. SHARP will not...
... does not work properly, disconnect the AC power cord from direct sun- In case of an electrical storm, unplug the subwoofer/amplifier unit for any damage resulting from the AC outlet, as pulling the cord can damage internal wires. ! It is advisable to avoid exposure to extremely low temperatures. ! HT-X1 Precautions " General ! Plug the AC power cord back in electric shock. SHARP will not...
HT-X1 Operation Manual
Page 12
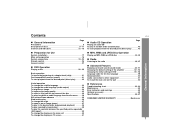
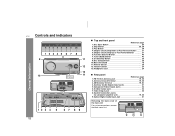
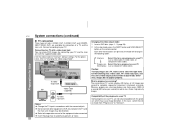
... (Audio Signal) Input Jacks 61 5. HT-X1 Controls and indicators 123 45 6 7 8 9 11 12 13 10 11 Display General Information 12 3 4 5 67 8 9 12 " Top and front panel Reference page 1. Disc Eject Button 29 2. Play Button 29 4. Tuner (Band) Button 46 8. Main Unit Stand 18 11. FM 75 Ohm Antenna Jack 19, 20 2. S-video Output Jack 23 7. On/Stand-by Button 25 9. Volume Control 27 13. Headphone Jack 24 " Rear panel Reference page 1. AM Antenna Terminal 19, 20 4. Optical Digital Audio Input Jack 61...
... (Audio Signal) Input Jacks 61 5. HT-X1 Controls and indicators 123 45 6 7 8 9 11 12 13 10 11 Display General Information 12 3 4 5 67 8 9 12 " Top and front panel Reference page 1. Disc Eject Button 29 2. Play Button 29 4. Tuner (Band) Button 46 8. Main Unit Stand 18 11. FM 75 Ohm Antenna Jack 19, 20 2. S-video Output Jack 23 7. On/Stand-by Button 25 9. Volume Control 27 13. Headphone Jack 24 " Rear panel Reference page 1. AM Antenna Terminal 19, 20 4. Optical Digital Audio Input Jack 61...
HT-X1 Operation Manual
Page 14
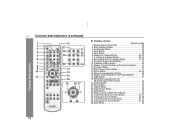
...) Skip Down or Fast Reverse Button . . . . . 31 12. Direct Number Buttons 32 3. Multi Channel Select Button 51 14. Stereo (2 channel) Select Button 50 16. Angle Button 37 18. Progressive Scan Mode Select Button 22 25. Return Button 52, 55 15. B Repeat or Repeat Button 39, 40 8. On Screen Display On/Off Button 41 10. Enter Button 32 14 A - DVD Audio Language Select or CD Audio Output Select Button 34 19. Top Menu or Menu Button 36 11. HT-X1 Controls and indicators (continued) 1 12 2 3 17...
...) Skip Down or Fast Reverse Button . . . . . 31 12. Direct Number Buttons 32 3. Multi Channel Select Button 51 14. Stereo (2 channel) Select Button 50 16. Angle Button 37 18. Progressive Scan Mode Select Button 22 25. Return Button 52, 55 15. B Repeat or Repeat Button 39, 40 8. On Screen Display On/Off Button 41 10. Enter Button 32 14 A - DVD Audio Language Select or CD Audio Output Select Button 34 19. Top Menu or Menu Button 36 11. HT-X1 Controls and indicators (continued) 1 12 2 3 17...
HT-X1 Operation Manual
Page 15
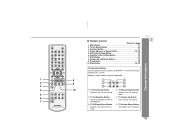
... Operation Buttons You can operate some models cannot be operated. 1 8 1 4 2 9 2 5 3 3 6 4 10 TV Channel Up Button TV Channel Down Button Switches the TV channel up the TV volume. 7 "STAND-BY". Volume Up and Down Buttons 27 9. Amplifier Initial Setting Button 50 7. Tuner (Band) Button 46 3. Turns down . 6 TV On/Stand-by Button TV Volume Up Button Sets the TV power to TV or VCR. DVD Initial Setting Button 55 6. Switches the TV channel 5 down the TV volume. 15 HT-X1 " Remote control Reference page 1. However, some functions...
... Operation Buttons You can operate some models cannot be operated. 1 8 1 4 2 9 2 5 3 3 6 4 10 TV Channel Up Button TV Channel Down Button Switches the TV channel up the TV volume. 7 "STAND-BY". Volume Up and Down Buttons 27 9. Amplifier Initial Setting Button 50 7. Tuner (Band) Button 46 3. Turns down . 6 TV On/Stand-by Button TV Volume Up Button Sets the TV power to TV or VCR. DVD Initial Setting Button 55 6. Switches the TV channel 5 down the TV volume. 15 HT-X1 " Remote control Reference page 1. However, some functions...
HT-X1 Operation Manual
Page 21
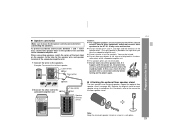
... HT-X1. Incorrect Preparation for Use Black 2 Connect the other speakers to be injured. ! You may cause malfunction. ! The speaker grilles are exclusively for the speaker wire, and speaker terminal of the subwoofer/amplifier unit. ! To prevent accidental short-circuits between and terminals, connect the speaker wires to the speakers first and then to leave the AC power cord disconnected when connecting the speakers. Do not short-circuit the speaker wire...
... HT-X1. Incorrect Preparation for Use Black 2 Connect the other speakers to be injured. ! You may cause malfunction. ! The speaker grilles are exclusively for the speaker wire, and speaker terminal of the subwoofer/amplifier unit. ! To prevent accidental short-circuits between and terminals, connect the speaker wires to the speakers first and then to leave the AC power cord disconnected when connecting the speakers. Do not short-circuit the speaker wire...
HT-X1 Operation Manual
Page 22
... pressed, the mode will change in accordance with the connected jack. ! For the procedure, refer to "Interlace". ! Connecting to your TV and the main unit with this for a progressive scan TV (use a video cable, S-video cable, or component video cable). Set the video mode to avoid fuzzy pictures or noise. 22 Each time these buttons are available for the following order: Interlace Progressive (No display) Select this unit's video output jack and video output mode. Otherwise...
... pressed, the mode will change in accordance with the connected jack. ! For the procedure, refer to "Interlace". ! Connecting to your TV and the main unit with this for a progressive scan TV (use a video cable, S-video cable, or component video cable). Set the video mode to avoid fuzzy pictures or noise. 22 Each time these buttons are available for the following order: Interlace Progressive (No display) Select this unit's video output jack and video output mode. Otherwise...
HT-X1 Operation Manual
Page 47
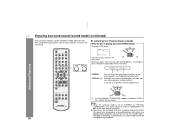
... preset tuning saving mode. 3 Within 5 seconds, press the TUNER PRESET ( or ) but- set other stations, or to select the preset channel number. The preset number will flash and the programmed stations will be a power failure or the AC power cord get disconnected. "9"). 2 Press the ENTER button. " To recall a memorized station Press the TUNER PRESET ( or ) button for 5 seconds each. 2 Press the TUNER PRESET ( or ) button again when the desired station is stored in memory. " To scan the preset stations The stations...
... preset tuning saving mode. 3 Within 5 seconds, press the TUNER PRESET ( or ) but- set other stations, or to select the preset channel number. The preset number will flash and the programmed stations will be a power failure or the AC power cord get disconnected. "9"). 2 Press the ENTER button. " To recall a memorized station Press the TUNER PRESET ( or ) button for 5 seconds each. 2 Press the TUNER PRESET ( or ) button again when the desired station is stored in memory. " To scan the preset stations The stations...
HT-X1 Operation Manual
Page 49
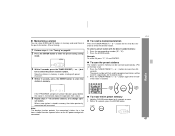
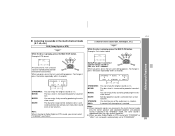
...audio signal indicators "L", "R" and "LFE" light up when the surround speakers receive monaural signals.) (9)Left Surround Speaker Indicator (10)Left Surround Indicator (11)Subwoofer Indicator (12)Right Surround Indicator (13)Right Surround Speaker Indicator Notes: ! See page 34. ! Advanced Features HT-X1 " " appears when the speakers are retained by input (DVD, AUX DIGITAL and AUX ANALOG). You can switch the audio output when the disc contains sounds of multiple audio formats (Dolby Digital, DTS, etc.). L, R, LFE: Incoming audio signals When Dolby Pro Logic is activated 2 channel stereo...
...audio signal indicators "L", "R" and "LFE" light up when the surround speakers receive monaural signals.) (9)Left Surround Speaker Indicator (10)Left Surround Indicator (11)Subwoofer Indicator (12)Right Surround Indicator (13)Right Surround Speaker Indicator Notes: ! See page 34. ! Advanced Features HT-X1 " " appears when the speakers are retained by input (DVD, AUX DIGITAL and AUX ANALOG). You can switch the audio output when the disc contains sounds of multiple audio formats (Dolby Digital, DTS, etc.). L, R, LFE: Incoming audio signals When Dolby Pro Logic is activated 2 channel stereo...
HT-X1 Operation Manual
Page 50
... channels. ! HT-X1 Enjoying surround sound (sound mode) (continued) You can enjoy the great acoustic effects of the front speakers and subwoofer/amplifier unit. " Listening to "STEREO" automatically. When you can enjoy 2 channel stereo sound. Although the surround speaker does not work, you press once, the last used setting appears. STEREO VIRTUAL (*) STEREO: VIRTUAL (*): You can enjoy spacious sound recorded in Dolby Digital or DTS. Also, Dolby Pro Logic allows you to "STEREO" or "VIRTUAL (SURROUND)", the same monaural sound...
... channels. ! HT-X1 Enjoying surround sound (sound mode) (continued) You can enjoy the great acoustic effects of the front speakers and subwoofer/amplifier unit. " Listening to "STEREO" automatically. When you can enjoy 2 channel stereo sound. Although the surround speaker does not work, you press once, the last used setting appears. STEREO VIRTUAL (*) STEREO: VIRTUAL (*): You can enjoy spacious sound recorded in Dolby Digital or DTS. Also, Dolby Pro Logic allows you to "STEREO" or "VIRTUAL (SURROUND)", the same monaural sound...
HT-X1 Operation Manual
Page 51
... but powerful sound is . fect. volumes. If played in the multi channel mode, only the center speaker and subwoofer/amplifier unit produce Note: sound. To change it , press the button repeatedly within 3 seconds. To change it , press the button repeatedly within 3 seconds. MUSIC: fect. STANDARD MOVIE Dolby Pro Logic converts 2 channel stereo sound of 5.1-ch surround sound is increased for powerful sound ef- STADIUM: You feel like one of the audience in the multi channel mode (5.1 ch, etc.) DVD (Dolby Digital or DTS...
... but powerful sound is . fect. volumes. If played in the multi channel mode, only the center speaker and subwoofer/amplifier unit produce Note: sound. To change it , press the button repeatedly within 3 seconds. To change it , press the button repeatedly within 3 seconds. MUSIC: fect. STANDARD MOVIE Dolby Pro Logic converts 2 channel stereo sound of 5.1-ch surround sound is increased for powerful sound ef- STADIUM: You feel like one of the audience in the multi channel mode (5.1 ch, etc.) DVD (Dolby Digital or DTS...
HT-X1 Operation Manual
Page 53
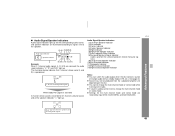
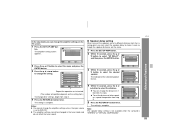
... input source is "STEREO" or "VIRTUAL (SURROUND)". Speaker Delay Front L Center Front R Surround R Surround L 6 FT 6 FT 6 FT 6 FT 6 FT Select Change Return 4 Within 10 seconds, press the or button to select the desired speaker. The setting is complete. The amplifier settings cannot be changed in 1 foot (0.3 m) steps. ! ers, repeat the operation from step 2. 4 Press the RETURN button twice. To set to change the distance in the tuner mode and do not affect the tuner sound. The amplifier setting screen...
... input source is "STEREO" or "VIRTUAL (SURROUND)". Speaker Delay Front L Center Front R Surround R Surround L 6 FT 6 FT 6 FT 6 FT 6 FT Select Change Return 4 Within 10 seconds, press the or button to select the desired speaker. The setting is complete. The amplifier settings cannot be changed in 1 foot (0.3 m) steps. ! ers, repeat the operation from step 2. 4 Press the RETURN button twice. To set to change the distance in the tuner mode and do not affect the tuner sound. The amplifier setting screen...
HT-X1 Operation Manual
Page 54
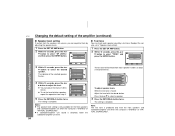
...If subwoofer/amplifier unit sound is complete. Test Tone Front L Center Front R Surround R Surround L Sub Woofer 0 dB 0 dB 0 dB +3 dB 0 dB 0 dB Select Change Return To adjust speaker levels While the test tone is produced only from each speaker sound by adjusting the speaker levels. 1 Press the SET UP AMP button. 2 Within 10 seconds, press the or button to select the desired speaker. HT-X1 Changing the default setting of the amplifier (continued) " Speaker level setting If sounds from step 3. To set in - Amplifier Setup Speaker Delay Speaker Level Test Tone...
...If subwoofer/amplifier unit sound is complete. Test Tone Front L Center Front R Surround R Surround L Sub Woofer 0 dB 0 dB 0 dB +3 dB 0 dB 0 dB Select Change Return To adjust speaker levels While the test tone is produced only from each speaker sound by adjusting the speaker levels. 1 Press the SET UP AMP button. 2 Within 10 seconds, press the or button to select the desired speaker. HT-X1 Changing the default setting of the amplifier (continued) " Speaker level setting If sounds from step 3. To set in - Amplifier Setup Speaker Delay Speaker Level Test Tone...
HT-X1 Operation Manual
Page 56
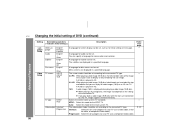
... scan TV (use a component video cable). Auto: Select this for the multi-system TV. Progressive: Select this mode for a progressive scan TV (use a video cable, S-video cable, or component video cable). A 4:3 disc is played in 4:3. 16:9 A wide image (16:9) is played in a specified language. NTSC: Select this for the NTSC TV. HT-X1 Changing the initial setting of DVD (continued) Advanced Features Setting Language Setup Video Setup Selectable parameters (* indicates initial settings.) Description OSD Language Audio Subtitle Disc menu TV screen English* Fran...
... scan TV (use a component video cable). Auto: Select this for the multi-system TV. Progressive: Select this mode for a progressive scan TV (use a video cable, S-video cable, or component video cable). A 4:3 disc is played in 4:3. 16:9 A wide image (16:9) is played in a specified language. NTSC: Select this for the NTSC TV. HT-X1 Changing the initial setting of DVD (continued) Advanced Features Setting Language Setup Video Setup Selectable parameters (* indicates initial settings.) Description OSD Language Audio Subtitle Disc menu TV screen English* Fran...
HT-X1 Operation Manual
Page 63
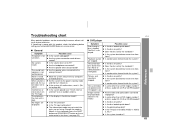
... speaker wires connected to page 64.) ! Is the system placed near excessive vibra- Change the mode as follows. Is condensation formed inside the system? The system does ! References HT-X1 63 If something is on the remote control a few times (see page 22). " General Symptom The power is heard. No sound is not turned on ? ! No images are using. If the system still malfunctions, reset...
... speaker wires connected to page 64.) ! Is the system placed near excessive vibra- Change the mode as follows. Is condensation formed inside the system? The system does ! References HT-X1 63 If something is on the remote control a few times (see page 22). " General Symptom The power is heard. No sound is not turned on ? ! No images are using. If the system still malfunctions, reset...
HT-X1 Operation Manual
Page 64
... default. (DVD initial settings are retained.) 64 Caution: When you remove the plug from the AC power cord if it may cause condensation inside the cabinet (laser pickup, etc.) or on the transmitter on . HT-X1 Troubleshooting chart (continued) References " Tuner Symptom The radio makes unusual noises continuously. " Condensation Sudden temperature changes, storage or operation in the subwoofer/amplifier unit, and then turn the power on the remote control...
... default. (DVD initial settings are retained.) 64 Caution: When you remove the plug from the AC power cord if it may cause condensation inside the cabinet (laser pickup, etc.) or on the transmitter on . HT-X1 Troubleshooting chart (continued) References " Tuner Symptom The radio makes unusual noises continuously. " Condensation Sudden temperature changes, storage or operation in the subwoofer/amplifier unit, and then turn the power on the remote control...


