
HT-X1 Operation Manual
Page 1
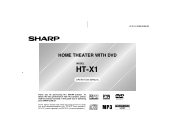
It will guide you for purchasing this manual carefully. HT-X1 Home Theater with DVD consisting of HT-X1 (main unit and subwoofer/amplifier unit), CP-X1F (front speakers), CP-X1C (center speaker) and CP-X1S (surround speakers). To obtain the best performance from this product, please read this SHARP product. HT-X1 (U) TINSEA050SJZZ HOME THEATER WITH DVD MODEL HT-X1 OPERATION MANUAL Thank you in operating your SHARP product.
It will guide you for purchasing this manual carefully. HT-X1 Home Theater with DVD consisting of HT-X1 (main unit and subwoofer/amplifier unit), CP-X1F (front speakers), CP-X1C (center speaker) and CP-X1S (surround speakers). To obtain the best performance from this product, please read this SHARP product. HT-X1 (U) TINSEA050SJZZ HOME THEATER WITH DVD MODEL HT-X1 OPERATION MANUAL Thank you in operating your SHARP product.
HT-X1 Operation Manual
Page 2
... antenna. Consult the dealer or an experienced radio/TV technician for a Class B digital device, pursuant to the presence of the subwoofer/amplifier unit. NO USER-SERVICEABLE PARTS INSIDE. However, there is no guarantee that to provide reasonable protection against harmful interference in the...purchase Place of the FCC Rules. REFER SERVICING TO QUALIFIED PERSONNEL ONLY. 0501 Note to CATV system installer: This reminder is connected. HT-X1 2 Important Instruction SPECIAL NOTES CAUTION: TO REDUCE THE RISK OF ELECTRIC SHOCK, DO NOT REMOVE COVER (OR BACK). REFER SERVICING TO...
... antenna. Consult the dealer or an experienced radio/TV technician for a Class B digital device, pursuant to the presence of the subwoofer/amplifier unit. NO USER-SERVICEABLE PARTS INSIDE. However, there is no guarantee that to provide reasonable protection against harmful interference in the...purchase Place of the FCC Rules. REFER SERVICING TO QUALIFIED PERSONNEL ONLY. 0501 Note to CATV system installer: This reminder is connected. HT-X1 2 Important Instruction SPECIAL NOTES CAUTION: TO REDUCE THE RISK OF ELECTRIC SHOCK, DO NOT REMOVE COVER (OR BACK). REFER SERVICING TO...
HT-X1 Operation Manual
Page 8
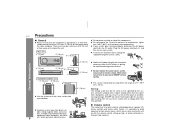
...Main unit 4" (10 cm) 4" (10 cm) 6" (15 cm) ! Plug the AC power cord back in electric shock. Use the system on your local SHARP service facility. ! Do not place anything on with a higher voltage other than that specified. ! In case of 41°F - 95°F (5°C - ...extremely low temperatures. ! This system should only be a minimum of 6" (15 cm) of free space along the sides and back. HT-X1 Precautions " General ! General Information 4" (10 cm) 4" (10 cm) 6" (15 cm) Subwoofer/amplifier unit 4" (10 cm) 4" (10 cm) 6" (15 cm) 4" (10 cm) 4" (10 cm) ! Do not...
...Main unit 4" (10 cm) 4" (10 cm) 6" (15 cm) ! Plug the AC power cord back in electric shock. Use the system on your local SHARP service facility. ! Do not place anything on with a higher voltage other than that specified. ! In case of 41°F - 95°F (5°C - ...extremely low temperatures. ! This system should only be a minimum of 6" (15 cm) of free space along the sides and back. HT-X1 Precautions " General ! General Information 4" (10 cm) 4" (10 cm) 6" (15 cm) Subwoofer/amplifier unit 4" (10 cm) 4" (10 cm) 6" (15 cm) 4" (10 cm) 4" (10 cm) ! Do not...
HT-X1 Operation Manual
Page 12
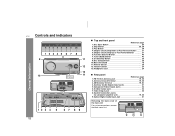
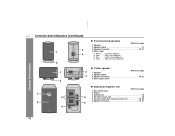
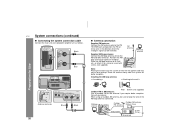
... Selector Button 49 7. FM 75 Ohm Antenna Jack 19, 20 2. Tuner (Band) Button 46 8. Antenna Ground Terminal 19, 20 3. System Connection Jacks (to subwoofer/amplifier unit 19, 20 9. HT-X1 Controls and indicators 123 45 6 7 8 9 11 12 13 10 11 Display General Information 12 3 4 5 67 8 9 12 " Top and front panel Reference page 1. Disc...
... Selector Button 49 7. FM 75 Ohm Antenna Jack 19, 20 2. Tuner (Band) Button 46 8. Antenna Ground Terminal 19, 20 3. System Connection Jacks (to subwoofer/amplifier unit 19, 20 9. HT-X1 Controls and indicators 123 45 6 7 8 9 11 12 13 10 11 Display General Information 12 3 4 5 67 8 9 12 " Top and front panel Reference page 1. Disc...
HT-X1 Operation Manual
Page 16
... Fan 25 3 5 4. Left Front Speaker Red ... Woofer 3. AC Power Input Jack 25 5. Speaker Reference page 4 2. Speaker Terminals 19, 21 4. Color Label: Green 2 General Information " Subwoofer/amplifier unit Reference page 1. Right Surround Speaker " Center speaker 1 3 1. HT-X1 Controls and indicators (continued) 3 1 4 2 " Front/surround speakers Reference page 1. Speaker Terminals 19, 21 6 4 16 Speaker Stand 3. Speaker 2.
... Fan 25 3 5 4. Left Front Speaker Red ... Woofer 3. AC Power Input Jack 25 5. Speaker Reference page 4 2. Speaker Terminals 19, 21 4. Color Label: Green 2 General Information " Subwoofer/amplifier unit Reference page 1. Right Surround Speaker " Center speaker 1 3 1. HT-X1 Controls and indicators (continued) 3 1 4 2 " Front/surround speakers Reference page 1. Speaker Terminals 19, 21 6 4 16 Speaker Stand 3. Speaker 2.
HT-X1 Operation Manual
Page 17
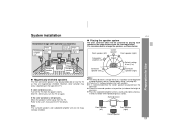
...the color variation is set to "Speaker delay setting" (see page 53). ! The default distance is still present... Place the subwoofer/amplifier unit on a sturdy and stable surface as shown below. Place the surround speakers at the same distance from the listening ...position. System installation Installation image (with optional accessories): Subwoofer/ amplifier unit Front speaker (left) Center speaker Front speaker (right) Surround speaker (left) Main unit Surround speaker (right) HT-X1 " Placing the speaker system The best surround effect will be achieved...
...the color variation is set to "Speaker delay setting" (see page 53). ! The default distance is still present... Place the subwoofer/amplifier unit on a sturdy and stable surface as shown below. Place the surround speakers at the same distance from the listening ...position. System installation Installation image (with optional accessories): Subwoofer/ amplifier unit Front speaker (left) Center speaker Front speaker (right) Surround speaker (left) Main unit Surround speaker (right) HT-X1 " Placing the speaker system The best surround effect will be achieved...
HT-X1 Operation Manual
Page 19
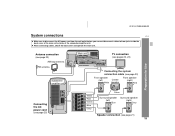
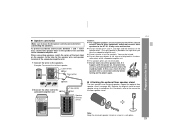
... you connect/disconnect cables to/from jacks inside the back cover of the main unit or jacks of the subwoofer/amplifier unit. ! Antenna connection (see page 20) AM loop antenna FM antenna Subwoofer/ amplifier unit Main unit TV connection (see pages 22, 23) Connecting the system connection cable (see page 20) Front... power cord (see page 25) White Red Green Blue Gray Green Surround speaker Surround speaker (left) (right) Blue Gray Speaker connection (see page 21) 19 HT-X1 (U) TINSEA050SJZZ System connections HT-X1 !
... you connect/disconnect cables to/from jacks inside the back cover of the main unit or jacks of the subwoofer/amplifier unit. ! Antenna connection (see page 20) AM loop antenna FM antenna Subwoofer/ amplifier unit Main unit TV connection (see pages 22, 23) Connecting the system connection cable (see page 20) Front... power cord (see page 25) White Red Green Blue Gray Green Surround speaker Surround speaker (left) (right) Blue Gray Speaker connection (see page 21) 19 HT-X1 (U) TINSEA050SJZZ System connections HT-X1 !
HT-X1 Operation Manual
Page 20
...antenna on a shelf, etc., or attach it to keep the wire of the AM loop antenna connected. HT-X1 System connections (continued) " Connecting the system connection cable Connect the main unit and subwoofer/amplifier unit as follows. Installing the AM loop antenna: < Assembling > < Attaching to the AM and... cause noise pickup. AM loop antenna Outdoor FM antenna Outdoor AM antenna 49 feet (15 m) Ground wire Ground rod 25 feet (7.5 m ) Subwoofer/ amplifier unit 1 Black 2 Blue Main unit " Antenna connection Supplied FM antenna: Connect the FM antenna wire to the FM 75 OHMS jack ...
...antenna on a shelf, etc., or attach it to keep the wire of the AM loop antenna connected. HT-X1 System connections (continued) " Connecting the system connection cable Connect the main unit and subwoofer/amplifier unit as follows. Installing the AM loop antenna: < Assembling > < Attaching to the AM and... cause noise pickup. AM loop antenna Outdoor FM antenna Outdoor AM antenna 49 feet (15 m) Ground wire Ground rod 25 feet (7.5 m ) Subwoofer/ amplifier unit 1 Black 2 Blue Main unit " Antenna connection Supplied FM antenna: Connect the FM antenna wire to the FM 75 OHMS jack ...
HT-X1 Operation Manual
Page 21
...colors of the back label on the speaker, to the tube for the speaker wire, and speaker terminal of the subwoofer/amplifier unit. 1 Connect the wires to the HT-X1. The supplied speakers are not removable. ! Do not connect them to other equipment, and do not connect other ...cord disconnected when connecting the speakers. Example: To connect the left terminals of the subwoofer/amplifier unit. ! Remove the original stand for the floor speaker stand. HT-X1 " Speaker connection Make sure to the subwoofer/amplifier unit. Note: Keep the removed speaker stands or screw in the bass ...
...colors of the back label on the speaker, to the tube for the speaker wire, and speaker terminal of the subwoofer/amplifier unit. 1 Connect the wires to the HT-X1. The supplied speakers are not removable. ! Do not connect them to other equipment, and do not connect other ...cord disconnected when connecting the speakers. Example: To connect the left terminals of the subwoofer/amplifier unit. ! Remove the original stand for the floor speaker stand. HT-X1 " Speaker connection Make sure to the subwoofer/amplifier unit. Note: Keep the removed speaker stands or screw in the bass ...

HT-X1 Operation Manual
Page 25
...V, 60 Hz) Notes: ! Preparation for a prolonged period of the subwoofer/ amplifier unit, and then to turn on again. Unplug the AC power cord from the wall outlet if the subwoofer/ amplifier unit will not be in properly. Subwoofer/ amplifier unit Main unit 25 Cooling fan: A cooling fan is built...in this subwoofer/amplifier unit for better heat radiation. If the power does not turn the power on , check if the AC power cord and system connection cable are plugged in use a power cord other than the one supplied. Otherwise, a malfunction or an accident may occur. ! HT-X1 " ...
...V, 60 Hz) Notes: ! Preparation for a prolonged period of the subwoofer/ amplifier unit, and then to turn on again. Unplug the AC power cord from the wall outlet if the subwoofer/ amplifier unit will not be in properly. Subwoofer/ amplifier unit Main unit 25 Cooling fan: A cooling fan is built...in this subwoofer/amplifier unit for better heat radiation. If the power does not turn the power on , check if the AC power cord and system connection cable are plugged in use a power cord other than the one supplied. Otherwise, a malfunction or an accident may occur. ! HT-X1 " ...
HT-X1 Operation Manual
Page 49
...speaker indicators " " light up when the surround speakers receive monaural signals.) (9)Left Surround Speaker Indicator (10)Left Surround Indicator (11)Subwoofer Indicator (12)Right Surround Indicator (13)Right Surround Speaker Indicator Notes: ! Audio Signal/Speaker Indicators: (1)Left Front Speaker Indicator (2)Left... (Dolby Digital, DTS, etc.). You cannot change the multi channel mode or stereo mode. ! If sound is reproduced. Advanced Features HT-X1 " " appears when the speakers are retained by input (DVD, AUX DIGITAL and AUX ANALOG). The illustration below indicates that 2 channel...
...speaker indicators " " light up when the surround speakers receive monaural signals.) (9)Left Surround Speaker Indicator (10)Left Surround Indicator (11)Subwoofer Indicator (12)Right Surround Indicator (13)Right Surround Speaker Indicator Notes: ! Audio Signal/Speaker Indicators: (1)Left Front Speaker Indicator (2)Left... (Dolby Digital, DTS, etc.). You cannot change the multi channel mode or stereo mode. ! If sound is reproduced. Advanced Features HT-X1 " " appears when the speakers are retained by input (DVD, AUX DIGITAL and AUX ANALOG). The illustration below indicates that 2 channel...
HT-X1 Operation Manual
Page 50
Example: DTS format You can enjoy the great acoustic effects of the front speakers and subwoofer/amplifier unit. To change it, press the button repeatedly within 3 seconds. Although the surround speaker does not work, you to enjoy spacious 2 channel stereo sound. ... recorded in the both of disc is played on a compatible player and signals are the same). When the surround mode is set to "STEREO" automatically. HT-X1 Enjoying surround sound (sound mode) (continued) You can enjoy spacious surround effects. When you press once, the last used setting appears.
Example: DTS format You can enjoy the great acoustic effects of the front speakers and subwoofer/amplifier unit. To change it, press the button repeatedly within 3 seconds. Although the surround speaker does not work, you to enjoy spacious 2 channel stereo sound. ... recorded in the both of disc is played on a compatible player and signals are the same). When the surround mode is set to "STEREO" automatically. HT-X1 Enjoying surround sound (sound mode) (continued) You can enjoy spacious surround effects. When you press once, the last used setting appears.
HT-X1 Operation Manual
Page 51
... the MULTI-CH button. STANDARD: You can enjoy lively sound by producing the articulate sound. When you cannot select "STADIUM" and "HALL". ulate sound. volumes. HT-X1 " Listening to 5.1 channel. Notes: ! If played in the multi channel mode, only the center speaker and subwoofer/amplifier unit produce Note: sound.
... the MULTI-CH button. STANDARD: You can enjoy lively sound by producing the articulate sound. When you cannot select "STADIUM" and "HALL". ulate sound. volumes. HT-X1 " Listening to 5.1 channel. Notes: ! If played in the multi channel mode, only the center speaker and subwoofer/amplifier unit produce Note: sound.
HT-X1 Operation Manual
Page 52
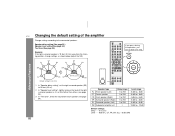
Speaker type FL Front speaker (Left) CT Center speaker FR Front speaker (Right) SR Surround speaker (Right) SL Surround speaker (Left) SW Subwoofer/amplifier unit Delay range 1 to 29 ft 1 to 29 ft 1 to 29 ft 1 to 29 ft 1 to 29 ft Level range - 6 dB to + 6 dB - 6 dB ... than others (see page 54). CT FL FR CT FL FR SW SW If you press during the operation, you can go back one step. HT-X1 Changing the default setting of the right surround speaker as it is 10 feet (3.3 m) away from each speaker (see page 54). 3 In "Test tone", check...
Speaker type FL Front speaker (Left) CT Center speaker FR Front speaker (Right) SR Surround speaker (Right) SL Surround speaker (Left) SW Subwoofer/amplifier unit Delay range 1 to 29 ft 1 to 29 ft 1 to 29 ft 1 to 29 ft 1 to 29 ft Level range - 6 dB to + 6 dB - 6 dB ... than others (see page 54). CT FL FR CT FL FR SW SW If you press during the operation, you can go back one step. HT-X1 Changing the default setting of the right surround speaker as it is 10 feet (3.3 m) away from each speaker (see page 54). 3 In "Test tone", check...
HT-X1 Operation Manual
Page 54
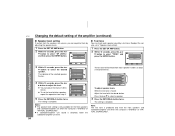
..." or "VIRTUAL (SURROUND)". 54 Note: The test tone is produced only from the front speakers and subwoofer/amplifier unit when the surround is distorted, lower the subwoofer/amplifier unit level. Amplifier Setup Speaker Delay Speaker Level Test Tone Select ENTER Enter Return Select ENTER Enter ...the selected speaker flashes. The speaker level setting is only available for the front speakers and subwoofer/amplifier unit when the surround is heard: Adjust the level with the or button. HT-X1 Changing the default setting of the amplifier (continued) " Speaker level setting If sounds from...
..." or "VIRTUAL (SURROUND)". 54 Note: The test tone is produced only from the front speakers and subwoofer/amplifier unit when the surround is distorted, lower the subwoofer/amplifier unit level. Amplifier Setup Speaker Delay Speaker Level Test Tone Select ENTER Enter Return Select ENTER Enter ...the selected speaker flashes. The speaker level setting is only available for the front speakers and subwoofer/amplifier unit when the surround is heard: Adjust the level with the or button. HT-X1 Changing the default setting of the amplifier (continued) " Speaker level setting If sounds from...
HT-X1 Operation Manual
Page 64
...antenna placed properly? Is the remote control for another equipment used simultaneously? ! Wipe off any obstructions in front of the subwoofer/amplifier unit plugged in an extremely humid environment may cause the system to strong light (inverter fluorescent light, direct sunlight, etc... system until "SYS RESTORE" appears. Is the system placed near the TV or computer? ! Is the battery polarity correct? ! HT-X1 Troubleshooting chart (continued) References " Tuner Symptom The radio makes unusual noises continuously. " Remote control Symptom The remote control does not ...
...antenna placed properly? Is the remote control for another equipment used simultaneously? ! Wipe off any obstructions in front of the subwoofer/amplifier unit plugged in an extremely humid environment may cause the system to strong light (inverter fluorescent light, direct sunlight, etc... system until "SYS RESTORE" appears. Is the system placed near the TV or computer? ! Is the battery polarity correct? ! HT-X1 Troubleshooting chart (continued) References " Tuner Symptom The radio makes unusual noises continuously. " Remote control Symptom The remote control does not ...
HT-X1 Operation Manual
Page 67
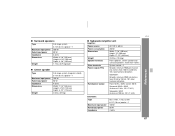
HT-X1 References " Surround speakers Type Maximum input power Rated input power Impedance Dimensions Weight Full range system 3-1/8" (8 cm) speaker 1 100 W 50 W 4 ohms Width: 4-1/8" (105 mm) Height: 8-1/8" ...power Impedance Dimensions Weight Full range system (magnetic shield) 3-1/8" (8 cm) speaker 1 100 W 50 W 4 ohms Width: 7-1/4" (185 mm) Height: 4-7/8" (123 mm) Depth: 4-1/2" (115 mm) 2.0 lbs. (0.9 kg) " Subwoofer/amplifier unit Amplifier: Power source Power consumption Dimensions Weight Speaker terminals Other terminals Power output (FTC) Rated power output AC 120 V, 60 Hz 208 W Width...
HT-X1 References " Surround speakers Type Maximum input power Rated input power Impedance Dimensions Weight Full range system 3-1/8" (8 cm) speaker 1 100 W 50 W 4 ohms Width: 4-1/8" (105 mm) Height: 8-1/8" ...power Impedance Dimensions Weight Full range system (magnetic shield) 3-1/8" (8 cm) speaker 1 100 W 50 W 4 ohms Width: 7-1/4" (185 mm) Height: 4-7/8" (123 mm) Depth: 4-1/2" (115 mm) 2.0 lbs. (0.9 kg) " Subwoofer/amplifier unit Amplifier: Power source Power consumption Dimensions Weight Speaker terminals Other terminals Power output (FTC) Rated power output AC 120 V, 60 Hz 208 W Width...

