
HT-X1 Operation Manual
Page 1
HT-X1 (U) TINSEA050SJZZ HOME THEATER WITH DVD MODEL HT-X1 OPERATION MANUAL Thank you in operating your SHARP product. It will guide you for purchasing this manual carefully. To obtain the best performance from this product, please read this SHARP product. HT-X1 Home Theater with DVD consisting of HT-X1 (main unit and subwoofer/amplifier unit), CP-X1F (front speakers), CP-X1C (center speaker) and CP-X1S (surround speakers).
HT-X1 (U) TINSEA050SJZZ HOME THEATER WITH DVD MODEL HT-X1 OPERATION MANUAL Thank you in operating your SHARP product. It will guide you for purchasing this manual carefully. To obtain the best performance from this product, please read this SHARP product. HT-X1 Home Theater with DVD consisting of HT-X1 (main unit and subwoofer/amplifier unit), CP-X1F (front speakers), CP-X1C (center speaker) and CP-X1S (surround speakers).
HT-X1 Operation Manual
Page 2
... This equipment has been tested and found to the presence of important operating and maintenance (servicing) instructions in case of the subwoofer/amplifier unit. However, there is intended to alert the user to comply with the limits for help. Increase the separation between...outlet on a circuit different from that any unauthorized changes or modifications to radio or television reception, which are designed to radio communications. HT-X1 2 Important Instruction SPECIAL NOTES CAUTION: TO REDUCE THE RISK OF ELECTRIC SHOCK, DO NOT REMOVE COVER (OR BACK). Explanation of Graphical...
... This equipment has been tested and found to the presence of important operating and maintenance (servicing) instructions in case of the subwoofer/amplifier unit. However, there is intended to alert the user to comply with the limits for help. Increase the separation between...outlet on a circuit different from that any unauthorized changes or modifications to radio or television reception, which are designed to radio communications. HT-X1 2 Important Instruction SPECIAL NOTES CAUTION: TO REDUCE THE RISK OF ELECTRIC SHOCK, DO NOT REMOVE COVER (OR BACK). Explanation of Graphical...
HT-X1 Operation Manual
Page 8
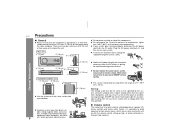
... given volume setting depends on the top of 41°F - 95°F (5°C - 35°C). ! HT-X1 Precautions " General ! Do not place anything on with a voltage other factors. Do not remove the outer cover, ... 8 etc.) which occurs while turning the unit on top of an electrical storm, unplug the subwoofer/amplifier unit for any damage resulting from the AC outlet, as that specified. ! If your ... unit 4" (10 cm) 4" (10 cm) 6" (15 cm) ! Use the system on your local SHARP service facility. ! In case of the components. ! Hold the AC power plug by this may result in...
... given volume setting depends on the top of 41°F - 95°F (5°C - 35°C). ! HT-X1 Precautions " General ! Do not place anything on with a voltage other factors. Do not remove the outer cover, ... 8 etc.) which occurs while turning the unit on top of an electrical storm, unplug the subwoofer/amplifier unit for any damage resulting from the AC outlet, as that specified. ! If your ... unit 4" (10 cm) 4" (10 cm) 6" (15 cm) ! Use the system on your local SHARP service facility. ! In case of the components. ! Hold the AC power plug by this may result in...
HT-X1 Operation Manual
Page 12
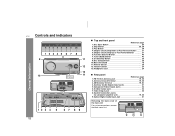
...7. Function Selector Button 49 7. Main Unit Stand 18 11. Antenna Ground Terminal 19, 20 3. AM Antenna Terminal 19, 20 4. Video Output Jack 22 8. HT-X1 Controls and indicators 123 45 6 7 8 9 11 12 13 10 11 Display General Information 12 3 4 5 67 8 9 12 " Top and front ...25 9. Auxiliary (Audio Signal) Input Jacks 61 5. Play Button 29 4. Headphone Jack 24 " Rear panel Reference page 1. System Connection Jacks (to subwoofer/amplifier unit 19, 20 9. Remote Sensor 26 12. Chapter (Track) Skip Up or Fast Forward Button 31 6. FM 75 Ohm Antenna Jack 19...
...7. Function Selector Button 49 7. Main Unit Stand 18 11. Antenna Ground Terminal 19, 20 3. AM Antenna Terminal 19, 20 4. Video Output Jack 22 8. HT-X1 Controls and indicators 123 45 6 7 8 9 11 12 13 10 11 Display General Information 12 3 4 5 67 8 9 12 " Top and front ...25 9. Auxiliary (Audio Signal) Input Jacks 61 5. Play Button 29 4. Headphone Jack 24 " Rear panel Reference page 1. System Connection Jacks (to subwoofer/amplifier unit 19, 20 9. Remote Sensor 26 12. Chapter (Track) Skip Up or Fast Forward Button 31 6. FM 75 Ohm Antenna Jack 19...
HT-X1 Operation Manual
Page 16
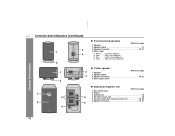
... 4. AC Power Input Jack 25 5. Color Label White ... Left Surround Speaker Gray ... Right Surround Speaker " Center speaker 1 3 1. Speaker Reference page 4 2. Speaker 2. Left Front Speaker Red ... HT-X1 Controls and indicators (continued) 3 1 4 2 " Front/surround speakers Reference page 1. Speaker Stand 21 3. Color Label: Green 2 General Information " Subwoofer/amplifier unit Reference page 1.
... 4. AC Power Input Jack 25 5. Color Label White ... Left Surround Speaker Gray ... Right Surround Speaker " Center speaker 1 3 1. Speaker Reference page 4 2. Speaker 2. Left Front Speaker Red ... HT-X1 Controls and indicators (continued) 3 1 4 2 " Front/surround speakers Reference page 1. Speaker Stand 21 3. Color Label: Green 2 General Information " Subwoofer/amplifier unit Reference page 1.
HT-X1 Operation Manual
Page 17
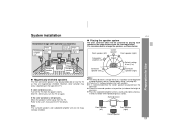
... and center speakers may occur, depending on the type of your ears. ! It is still present... Front speaker (left) Center speaker Front speaker (right) Subwoofer/ amplifier unit Surround speaker (left) Default setting: 6 feet (2 m) Surround speaker (right) Preparation for details. If speakers cannot be placed beside or near ...surface as it tends to arrange the speakers as they are not magnetically shielded. Front speaker (left ) Main unit Surround speaker (right) HT-X1 " Placing the speaker system The best surround effect will be placed near the TV as shown below.
... and center speakers may occur, depending on the type of your ears. ! It is still present... Front speaker (left) Center speaker Front speaker (right) Subwoofer/ amplifier unit Surround speaker (left) Default setting: 6 feet (2 m) Surround speaker (right) Preparation for details. If speakers cannot be placed beside or near ...surface as it tends to arrange the speakers as they are not magnetically shielded. Front speaker (left ) Main unit Surround speaker (right) HT-X1 " Placing the speaker system The best surround effect will be placed near the TV as shown below.
HT-X1 Operation Manual
Page 19
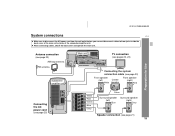
Antenna connection (see page 20) AM loop antenna FM antenna Subwoofer/ amplifier unit Main unit TV connection (see pages 22, 23) Connecting the system connection cable (see page 20) Front speaker (left) Center White speaker Front ... cord from the wall outlet before you connect/disconnect cables to/from jacks inside the back cover of the main unit or jacks of the subwoofer/amplifier unit. ! HT-X1 (U) TINSEA050SJZZ System connections HT-X1 !
Antenna connection (see page 20) AM loop antenna FM antenna Subwoofer/ amplifier unit Main unit TV connection (see pages 22, 23) Connecting the system connection cable (see page 20) Front speaker (left) Center White speaker Front ... cord from the wall outlet before you connect/disconnect cables to/from jacks inside the back cover of the main unit or jacks of the subwoofer/amplifier unit. ! HT-X1 (U) TINSEA050SJZZ System connections HT-X1 !
HT-X1 Operation Manual
Page 20
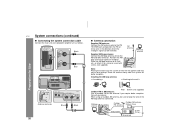
Position the AM loop antenna for better reception. Consult your dealer. HT-X1 System connections (continued) " Connecting the system connection cable Connect the main unit and subwoofer/amplifier unit as follows. FM antenna AM loop antenna Note: Placing the antenna on a shelf, etc., or attach it to ... for optimum reception. AM loop antenna Outdoor FM antenna Outdoor AM antenna 49 feet (15 m) Ground wire Ground rod 25 feet (7.5 m ) Subwoofer/ amplifier unit 1 Black 2 Blue Main unit " Antenna connection Supplied FM antenna: Connect the FM antenna wire to the FM 75 OHMS jack ...
Position the AM loop antenna for better reception. Consult your dealer. HT-X1 System connections (continued) " Connecting the system connection cable Connect the main unit and subwoofer/amplifier unit as follows. FM antenna AM loop antenna Note: Placing the antenna on a shelf, etc., or attach it to ... for optimum reception. AM loop antenna Outdoor FM antenna Outdoor AM antenna 49 feet (15 m) Ground wire Ground rod 25 feet (7.5 m ) Subwoofer/ amplifier unit 1 Black 2 Blue Main unit " Antenna connection Supplied FM antenna: Connect the FM antenna wire to the FM 75 OHMS jack ...
HT-X1 Operation Manual
Page 21
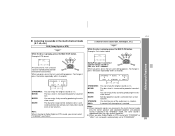
... manual for Use Black 2 Connect the other speakers to the tube for the HT-X1. Do not connect them to other equipment, and do not connect other end to the speakers. Black Subwoofer/ amplifier unit Tube (white) Red Speaker terminal (white) " Attaching the optional...surround speakers support the optional floor speaker stand (see page 65). HT-X1 " Speaker connection Make sure to the subwoofer/amplifier unit. When connecting speakers, match the colors of the subwoofer/amplifier unit. 1 Connect the wires to the subwoofer/amplifier unit. Label (white) Red Tube (white) Caution: ...
... manual for Use Black 2 Connect the other speakers to the tube for the HT-X1. Do not connect them to other equipment, and do not connect other end to the speakers. Black Subwoofer/ amplifier unit Tube (white) Red Speaker terminal (white) " Attaching the optional...surround speakers support the optional floor speaker stand (see page 65). HT-X1 " Speaker connection Make sure to the subwoofer/amplifier unit. When connecting speakers, match the colors of the subwoofer/amplifier unit. 1 Connect the wires to the subwoofer/amplifier unit. Label (white) Red Tube (white) Caution: ...

HT-X1 Operation Manual
Page 25
... on again. Note: After the system enters the power stand-by mode: Press the ON/STAND-BY button again. Preparation for a prolonged period of the subwoofer/ amplifier unit, and then to the AC outlet. Never use for Use AC outlet (AC 120 V, 60 Hz) Notes: ! If the power does not turn... unit for better heat radiation. Unplug the AC power cord from the wall outlet if the subwoofer/ amplifier unit will not be in use a power cord other than the one supplied. HT-X1 " Connecting the AC power cord After checking all the connections have been made correctly, plug the AC power cord to...
... on again. Note: After the system enters the power stand-by mode: Press the ON/STAND-BY button again. Preparation for a prolonged period of the subwoofer/ amplifier unit, and then to the AC outlet. Never use for Use AC outlet (AC 120 V, 60 Hz) Notes: ! If the power does not turn... unit for better heat radiation. Unplug the AC power cord from the wall outlet if the subwoofer/ amplifier unit will not be in use a power cord other than the one supplied. HT-X1 " Connecting the AC power cord After checking all the connections have been made correctly, plug the AC power cord to...
HT-X1 Operation Manual
Page 49
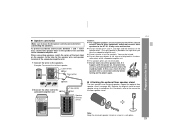
... indicators are illuminated according to signals sent to 5.1 channel surround sound, and all the speaker indicators " " light up. Advanced Features HT-X1 " " appears when the speakers are retained by input (DVD, AUX DIGITAL and AUX ANALOG). The illustration below indicates that 2 channel... Indicator (Lights up when the surround speakers receive monaural signals.) (9)Left Surround Speaker Indicator (10)Left Surround Indicator (11)Subwoofer Indicator (12)Right Surround Indicator (13)Right Surround Speaker Indicator Notes: ! " Audio Signal/Speaker Indicators Audio signal indicators light...
... indicators are illuminated according to signals sent to 5.1 channel surround sound, and all the speaker indicators " " light up. Advanced Features HT-X1 " " appears when the speakers are retained by input (DVD, AUX DIGITAL and AUX ANALOG). The illustration below indicates that 2 channel... Indicator (Lights up when the surround speakers receive monaural signals.) (9)Left Surround Speaker Indicator (10)Left Surround Indicator (11)Subwoofer Indicator (12)Right Surround Indicator (13)Right Surround Speaker Indicator Notes: ! " Audio Signal/Speaker Indicators Audio signal indicators light...
HT-X1 Operation Manual
Page 50
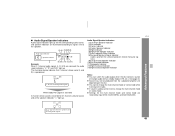
... is changed during playback. Advanced Features (*) For CD playback, "SURROUND" appears instead of the front speakers and subwoofer/amplifier unit. Although the surround speaker does not work, you press once, the last used setting appears. HT-X1 Enjoying surround sound (sound mode) (continued) You can enjoy spacious sound recorded in . STEREO VIRTUAL (*) STEREO...
... is changed during playback. Advanced Features (*) For CD playback, "SURROUND" appears instead of the front speakers and subwoofer/amplifier unit. Although the surround speaker does not work, you press once, the last used setting appears. HT-X1 Enjoying surround sound (sound mode) (continued) You can enjoy spacious sound recorded in . STEREO VIRTUAL (*) STEREO...
HT-X1 Operation Manual
Page 51
... change it is . To change it is . STADIUM: You feel like one of the audience in the multi channel mode, only the center speaker and subwoofer/amplifier unit produce Note: sound. STANDARD MOVIE HALL STADIUM MUSIC NIGHT NIGHT MUSIC STANDARD: You can enjoy lively sound by producing the articulate sound. reproduced... is playing, press the MULTI-CH button. even at low MUSIC: You can enjoy the original sound as it , press the button repeatedly within 3 seconds. HT-X1 " Listening to 5.1 channel.
... change it is . To change it is . STADIUM: You feel like one of the audience in the multi channel mode, only the center speaker and subwoofer/amplifier unit produce Note: sound. STANDARD MOVIE HALL STADIUM MUSIC NIGHT NIGHT MUSIC STANDARD: You can enjoy lively sound by producing the articulate sound. reproduced... is playing, press the MULTI-CH button. even at low MUSIC: You can enjoy the original sound as it , press the button repeatedly within 3 seconds. HT-X1 " Listening to 5.1 channel.
HT-X1 Operation Manual
Page 52
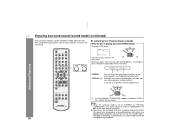
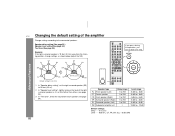
...), + 5 dB (SW) 52 Speaker type FL Front speaker (Left) CT Center speaker FR Front speaker (Right) SR Surround speaker (Right) SL Surround speaker (Left) SW Subwoofer/amplifier unit Delay range 1 to 29 ft 1 to 29 ft 1 to 29 ft 1 to 29 ft 1 to 29 ft Level range - 6 dB to + 6 dB - 6 dB... position, change settings as it is a little farther than others (see page 54). 3 In "Test tone", check the sound from each speaker (see page 54). HT-X1 Changing the default setting of the right surround speaker as shown below (adjust the SR).
...), + 5 dB (SW) 52 Speaker type FL Front speaker (Left) CT Center speaker FR Front speaker (Right) SR Surround speaker (Right) SL Surround speaker (Left) SW Subwoofer/amplifier unit Delay range 1 to 29 ft 1 to 29 ft 1 to 29 ft 1 to 29 ft 1 to 29 ft Level range - 6 dB to + 6 dB - 6 dB... position, change settings as it is a little farther than others (see page 54). 3 In "Test tone", check the sound from each speaker (see page 54). HT-X1 Changing the default setting of the right surround speaker as shown below (adjust the SR).
HT-X1 Operation Manual
Page 54
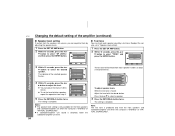
...dB 0 dB +3 dB 0 dB 0 dB Select Change Return To adjust speaker levels While the test tone is distorted, lower the subwoofer/amplifier unit level. Amplifier Setup Speaker Delay Speaker Level Test Tone Select ENTER Enter Return Select ENTER Enter Return Advanced Features 3 Within 10 ...subwoofer/amplifier unit when the surround is complete. The setting is "STEREO" or "VIRTUAL (SURROUND)". 54 Notes: ! Speaker Level Front L Center Front R Surround R Surround L Sub Woofer 0 dB 0 dB 0 dB +3 dB 0 dB 0 dB Select Change Return 5 Press the RETURN button twice. HT-X1...
...dB 0 dB +3 dB 0 dB 0 dB Select Change Return To adjust speaker levels While the test tone is distorted, lower the subwoofer/amplifier unit level. Amplifier Setup Speaker Delay Speaker Level Test Tone Select ENTER Enter Return Select ENTER Enter Return Advanced Features 3 Within 10 ...subwoofer/amplifier unit when the surround is complete. The setting is "STEREO" or "VIRTUAL (SURROUND)". 54 Notes: ! Speaker Level Front L Center Front R Surround R Surround L Sub Woofer 0 dB 0 dB 0 dB +3 dB 0 dB 0 dB Select Change Return 5 Press the RETURN button twice. HT-X1...
HT-X1 Operation Manual
Page 64
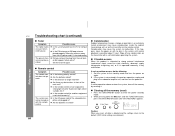
HT-X1 Troubleshooting chart (continued) References " Tuner Symptom The radio makes unusual noises continuously. The preset channel cannot be turned on the transmitter with the remote control. ... antenna or AM loop antenna placed properly? Is the remote control sensor exposed to malfunction. Wipe off any obstructions in front of the subwoofer/amplifier unit plugged in the subwoofer/amplifier unit, and then turn the power on the remote control. Move the antenna away from the wall jack, or did a power...
HT-X1 Troubleshooting chart (continued) References " Tuner Symptom The radio makes unusual noises continuously. The preset channel cannot be turned on the transmitter with the remote control. ... antenna or AM loop antenna placed properly? Is the remote control sensor exposed to malfunction. Wipe off any obstructions in front of the subwoofer/amplifier unit plugged in the subwoofer/amplifier unit, and then turn the power on the remote control. Move the antenna away from the wall jack, or did a power...
HT-X1 Operation Manual
Page 67
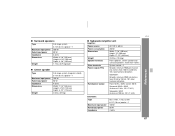
HT-X1 References " Surround speakers Type Maximum input power Rated input power Impedance Dimensions Weight Full range system 3-1/8" (8 cm) speaker 1 100 W 50 W 4 ohms Width: 4-1/8" (105 mm) Height: 8-1/8" ...power Impedance Dimensions Weight Full range system (magnetic shield) 3-1/8" (8 cm) speaker 1 100 W 50 W 4 ohms Width: 7-1/4" (185 mm) Height: 4-7/8" (123 mm) Depth: 4-1/2" (115 mm) 2.0 lbs. (0.9 kg) " Subwoofer/amplifier unit Amplifier: Power source Power consumption Dimensions Weight Speaker terminals Other terminals Power output (FTC) Rated power output AC 120 V, 60 Hz 208 W Width...
HT-X1 References " Surround speakers Type Maximum input power Rated input power Impedance Dimensions Weight Full range system 3-1/8" (8 cm) speaker 1 100 W 50 W 4 ohms Width: 4-1/8" (105 mm) Height: 8-1/8" ...power Impedance Dimensions Weight Full range system (magnetic shield) 3-1/8" (8 cm) speaker 1 100 W 50 W 4 ohms Width: 7-1/4" (185 mm) Height: 4-7/8" (123 mm) Depth: 4-1/2" (115 mm) 2.0 lbs. (0.9 kg) " Subwoofer/amplifier unit Amplifier: Power source Power consumption Dimensions Weight Speaker terminals Other terminals Power output (FTC) Rated power output AC 120 V, 60 Hz 208 W Width...

