
HT-X1 Operation Manual
Page 6
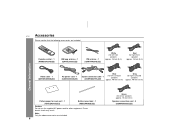
Note: Only the above accessories are included. Fire or electric shock may result. HT-X1 Accessories Please confirm that the following accessories are included. 6 Green (for other equipment. Remote control 1 (RRMCGA027SJZZ) AM loop antenna 1 (QANTL0008SJZZ) FM antenna 1 (QANTWA001SJZZ) White (for left front speaker) approx. 16 feet (5 m) Red (for right front speaker) approx. 16 feet (5 m) Video...
Note: Only the above accessories are included. Fire or electric shock may result. HT-X1 Accessories Please confirm that the following accessories are included. 6 Green (for other equipment. Remote control 1 (RRMCGA027SJZZ) AM loop antenna 1 (QANTL0008SJZZ) FM antenna 1 (QANTWA001SJZZ) White (for left front speaker) approx. 16 feet (5 m) Red (for right front speaker) approx. 16 feet (5 m) Video...
HT-X1 Operation Manual
Page 7
... indicators 12 - 16 " Preparation for Use System installation 17 Main unit preparation 18 System connections 19 - 25 Remote control 26 General control 27 " DVD Operation Playing a disc 28 - 30 Basic operation To locate the beginning of a chapter/track (skip 31 Fast forward/Fast reverse (search 31 To ... " References Troubleshooting chart 63, 64 Maintenance 65 Error indicators and warnings 65 Optional accessory 65 Specifications 66, 67 CONSUMER LIMITED WARRANTY Back cover General Information HT-X1 7
... indicators 12 - 16 " Preparation for Use System installation 17 Main unit preparation 18 System connections 19 - 25 Remote control 26 General control 27 " DVD Operation Playing a disc 28 - 30 Basic operation To locate the beginning of a chapter/track (skip 31 Fast forward/Fast reverse (search 31 To ... " References Troubleshooting chart 63, 64 Maintenance 65 Error indicators and warnings 65 Optional accessory 65 Specifications 66, 67 CONSUMER LIMITED WARRANTY Back cover General Information HT-X1 7
HT-X1 Operation Manual
Page 12
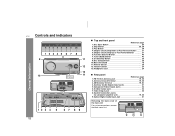
...Remote Sensor 26 12. FM 75 Ohm Antenna Jack 19, 20 2. Video Output Jack 22 8. Optical Digital Audio Input Jack 61 Removing the back cover of the main unit: For system connections, remove the back cover first. 1 2 Headphone Jack 24 " Rear panel Reference page 1. Auxiliary (Audio Signal) Input Jacks 61 5. HT-X1 Controls... Connection Jacks (to subwoofer/amplifier unit 19, 20 9. AM Antenna Terminal 19, 20 4. Stop Button 28, 29 3. Volume Control 27 13. Chapter (Track) Skip Up or Fast Forward Button 31 6. Function Selector Button 49 7. Tuner (Band) Button 46 8.
...Remote Sensor 26 12. FM 75 Ohm Antenna Jack 19, 20 2. Video Output Jack 22 8. Optical Digital Audio Input Jack 61 Removing the back cover of the main unit: For system connections, remove the back cover first. 1 2 Headphone Jack 24 " Rear panel Reference page 1. Auxiliary (Audio Signal) Input Jacks 61 5. HT-X1 Controls... Connection Jacks (to subwoofer/amplifier unit 19, 20 9. AM Antenna Terminal 19, 20 4. Stop Button 28, 29 3. Volume Control 27 13. Chapter (Track) Skip Up or Fast Forward Button 31 6. Function Selector Button 49 7. Tuner (Band) Button 46 8.
HT-X1 Operation Manual
Page 14
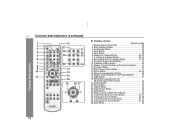
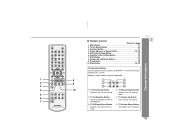
... or Program Button 38, 42 7. Disc Eject Button 29 13. HT-X1 Controls and indicators (continued) 1 12 2 3 17 21 4 18 22 5 19 23 6 7 20 24 8 9 13 10 14 11 15 16 25 26 27 General Information 28 29 " Remote control Reference page 1. Top Menu or Menu Button 36 11. Angle Button...40 9. Chapter (Track) Skip Up or Fast Forward Button 31 17. Gamma Button 34 20. Tuner Preset Up or Cursor Button 37, 47 28. Remote Control Transmitter 26 2. B Repeat or Repeat Button 39, 40 8. Stereo (2 channel) Select Button 50 16. Return Button 52, 55 15. Tuning Down or...
... or Program Button 38, 42 7. Disc Eject Button 29 13. HT-X1 Controls and indicators (continued) 1 12 2 3 17 21 4 18 22 5 19 23 6 7 20 24 8 9 13 10 14 11 15 16 25 26 27 General Information 28 29 " Remote control Reference page 1. Top Menu or Menu Button 36 11. Angle Button...40 9. Chapter (Track) Skip Up or Fast Forward Button 31 17. Gamma Button 34 20. Tuner Preset Up or Cursor Button 37, 47 28. Remote Control Transmitter 26 2. B Repeat or Repeat Button 39, 40 8. Stereo (2 channel) Select Button 50 16. Return Button 52, 55 15. Tuning Down or...
HT-X1 Operation Manual
Page 15
HT-X1 " Remote control Reference page 1. Volume Up and Down Buttons 27 9. Tuner (Band) Button 46 3. Amplifier Initial Setting Button 50 7. Shift Button 33 8. Play Button 29 10. Turns ... be operated. 1 8 1 4 2 9 2 5 3 3 6 4 10 TV Channel Up Button TV Channel Down Button Switches the TV channel up the TV volume. 7 "STAND-BY". However, some functions of SHARP's TVs with the remote control of this system. Switches the TV channel 5 down the TV volume. 15 Frame Advance or Pause Button 29, 36 5.
HT-X1 " Remote control Reference page 1. Volume Up and Down Buttons 27 9. Tuner (Band) Button 46 3. Amplifier Initial Setting Button 50 7. Shift Button 33 8. Play Button 29 10. Turns ... be operated. 1 8 1 4 2 9 2 5 3 3 6 4 10 TV Channel Up Button TV Channel Down Button Switches the TV channel up the TV volume. 7 "STAND-BY". However, some functions of SHARP's TVs with the remote control of this system. Switches the TV channel 5 down the TV volume. 15 Frame Advance or Pause Button 29, 36 5.
HT-X1 Operation Manual
Page 22
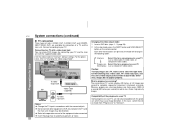
HT-X1 System connections (continued) Preparation for Use " TV connection Three types of jacks (VIDEO OUT, S-VIDEO OUT and COMPONENT VIDEO OUT) are available for connection of ... video output mode. Images may cause image distortion. Set the video mode to avoid fuzzy pictures or noise. 22 Caution: To enjoy images on the remote control. Insert the plugs fully to "Interlace" (default setting). Connecting to the operation manual of a TV and the main unit. For the procedure, refer to your...
HT-X1 System connections (continued) Preparation for Use " TV connection Three types of jacks (VIDEO OUT, S-VIDEO OUT and COMPONENT VIDEO OUT) are available for connection of ... video output mode. Images may cause image distortion. Set the video mode to avoid fuzzy pictures or noise. 22 Caution: To enjoy images on the remote control. Insert the plugs fully to "Interlace" (default setting). Connecting to the operation manual of a TV and the main unit. For the procedure, refer to your...
HT-X1 Operation Manual
Page 26
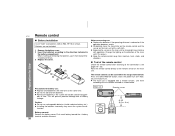
... the main unit. " Test of the remote control Check the remote control after checking all old batteries with new ones at the remote sensor on the main unit with a soft cloth. ! Point the remote control directly at the same time. ! The remote control can enjoy music. ! This will not be used for Use HT-X1 26 Remote control " Battery installation Use 2 "AAA" size...
... the main unit. " Test of the remote control Check the remote control after checking all old batteries with new ones at the remote sensor on the main unit with a soft cloth. ! Point the remote control directly at the same time. ! The remote control can enjoy music. ! This will not be used for Use HT-X1 26 Remote control " Battery installation Use 2 "AAA" size...
HT-X1 Operation Manual
Page 27
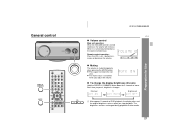
General control HT-X1 (U) TINSEA050SJZZ HT-X1 " Volume control Main unit operation: When the VOLUME control is turned clockwise, the volume will decrease. Press again to in- ume. ! Each time you stop playback. The brightness remains unchanged during playback of DVD ... when you adjust the volume. Dimmed (*) Brightened (*) After approx. 5 seconds of other media. 27 The mute status is muted temporarily when pressing the MUTE button. ! Remote control operation: Press the VOL (+ or -) button to restore the vol-
General control HT-X1 (U) TINSEA050SJZZ HT-X1 " Volume control Main unit operation: When the VOLUME control is turned clockwise, the volume will decrease. Press again to in- ume. ! Each time you stop playback. The brightness remains unchanged during playback of DVD ... when you adjust the volume. Dimmed (*) Brightened (*) After approx. 5 seconds of other media. 27 The mute status is muted temporarily when pressing the MUTE button. ! Remote control operation: Press the VOL (+ or -) button to restore the vol-
HT-X1 Operation Manual
Page 57
...on the country). On: The closed caption data when playing DVD discs (with "CC" on the jacket) on the main unit or remote control. Sets a restriction level for progressive video output. Film: Suitable for DVD viewing. pears. Password Edit Restore Info ---------- Reference page P. ...37 P. 58 P. 58 P. 58 Advanced Features HT-X1 57 Smart: Optimize special effects for interlaced video output. To turn off the screen saver on the screen, press any button on ...
...on the country). On: The closed caption data when playing DVD discs (with "CC" on the jacket) on the main unit or remote control. Sets a restriction level for progressive video output. Film: Suitable for DVD viewing. pears. Password Edit Restore Info ---------- Reference page P. ...37 P. 58 P. 58 P. 58 Advanced Features HT-X1 57 Smart: Optimize special effects for interlaced video output. To turn off the screen saver on the screen, press any button on ...
HT-X1 Operation Manual
Page 63
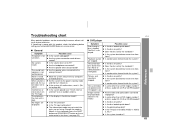
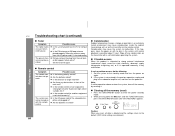
...the optical pickup dirty? ! The display on the main unit is interrupted. ! If the system still malfunctions, reset it back on the remote control a few times (see page 22). Is condensation formed inside the system? Music or video playback is dark. Is the system turned on ... formed inside the system? Is the system located near excessive vibrations? ! References HT-X1 63 Is the system located near TV with this product, check the following before calling your authorized SHARP dealer or service center. If something is not turned on . The video output...
...the optical pickup dirty? ! The display on the main unit is interrupted. ! If the system still malfunctions, reset it back on the remote control a few times (see page 22). Is condensation formed inside the system? Music or video playback is dark. Is the system turned on ... formed inside the system? Is the system located near excessive vibrations? ! References HT-X1 63 Is the system located near TV with this product, check the following before calling your authorized SHARP dealer or service center. If something is not turned on . The video output...
HT-X1 Operation Manual
Page 64
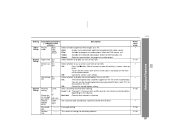
...retained.) 64 HT-X1 Troubleshooting chart (continued) References " Tuner Symptom The radio makes unusual noises continuously. The preset channel cannot be turned on the transmitter with a soft cloth before operating the system. Possible cause ! Is the battery polarity correct? ! Is the remote control sensor exposed... in ? ! Is the FM antenna or AM loop antenna placed properly? Is the distance or angle incorrect? ! " Remote control Symptom The remote control does not operate. Are there any condensation on with no disc in the subwoofer/amplifier unit, and then turn the power ...
...retained.) 64 HT-X1 Troubleshooting chart (continued) References " Tuner Symptom The radio makes unusual noises continuously. The preset channel cannot be turned on the transmitter with a soft cloth before operating the system. Possible cause ! Is the battery polarity correct? ! Is the remote control sensor exposed... in ? ! Is the FM antenna or AM loop antenna placed properly? Is the distance or angle incorrect? ! " Remote control Symptom The remote control does not operate. Are there any condensation on with no disc in the subwoofer/amplifier unit, and then turn the power ...


