
HT-X1 Operation Manual
Page 1
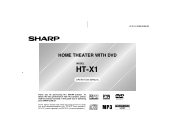
HT-X1 (U) TINSEA050SJZZ HOME THEATER WITH DVD MODEL HT-X1 OPERATION MANUAL Thank you in operating your SHARP product. It will guide you for purchasing this manual carefully. To obtain the best performance from this product, please read this SHARP product. HT-X1 Home Theater with DVD consisting of HT-X1 (main unit and subwoofer/amplifier unit), CP-X1F (front speakers), CP-X1C (center speaker) and CP-X1S (surround speakers).
HT-X1 (U) TINSEA050SJZZ HOME THEATER WITH DVD MODEL HT-X1 OPERATION MANUAL Thank you in operating your SHARP product. It will guide you for purchasing this manual carefully. To obtain the best performance from this product, please read this SHARP product. HT-X1 Home Theater with DVD consisting of HT-X1 (main unit and subwoofer/amplifier unit), CP-X1F (front speakers), CP-X1C (center speaker) and CP-X1S (surround speakers).
HT-X1 Operation Manual
Page 2
The exclamation point within the product's enclosure that may cause harmful interference to Part 15 of the subwoofer/amplifier unit. USE OF CONTROLS OR ADJUSTMENTS OR PERFORMANCE OF PROCEDURES OTHER THAN THOSE SPECIFIED HEREIN MAY RESULT IN HAZARDOUS RADIATION EXPOSURE.... technician for a Class B digital device, pursuant to radio communications. Model number Serial number Date of purchase Place of the building, as practical. HT-X1 2 Important Instruction SPECIAL NOTES CAUTION: TO REDUCE THE RISK OF ELECTRIC SHOCK, DO NOT REMOVE COVER (OR BACK). REFER SERVICING TO QUALIFIED SERVICE ...
The exclamation point within the product's enclosure that may cause harmful interference to Part 15 of the subwoofer/amplifier unit. USE OF CONTROLS OR ADJUSTMENTS OR PERFORMANCE OF PROCEDURES OTHER THAN THOSE SPECIFIED HEREIN MAY RESULT IN HAZARDOUS RADIATION EXPOSURE.... technician for a Class B digital device, pursuant to radio communications. Model number Serial number Date of purchase Place of the building, as practical. HT-X1 2 Important Instruction SPECIAL NOTES CAUTION: TO REDUCE THE RISK OF ELECTRIC SHOCK, DO NOT REMOVE COVER (OR BACK). REFER SERVICING TO QUALIFIED SERVICE ...

HT-X1 Operation Manual
Page 4
... periods of other products (including amplifiers) that the product is grounded so as the original part. NATIONAL ELECTRICAL CODE S2898A ANTENNA DISCHARGE UNIT (NEC SECTION 810-20) GROUNDING CONDUCTORS (NEC SECTION 810-21) GROUND CLAMPS P OWER SERVICE GROUNDING ELECTRODE SYSTEM (NEC ART 250, PART H) 16 Lightning - HT-X1 IMPORTANT SAFETY INSTRUCTIONS (continued) Important...
... periods of other products (including amplifiers) that the product is grounded so as the original part. NATIONAL ELECTRICAL CODE S2898A ANTENNA DISCHARGE UNIT (NEC SECTION 810-20) GROUNDING CONDUCTORS (NEC SECTION 810-21) GROUND CLAMPS P OWER SERVICE GROUNDING ELECTRODE SYSTEM (NEC ART 250, PART H) 16 Lightning - HT-X1 IMPORTANT SAFETY INSTRUCTIONS (continued) Important...
HT-X1 Operation Manual
Page 7
... disc 44, 45 " Radio Listening to the radio 46, 47 " Advanced Features Enjoying surround sound (sound mode 48 - 51 Changing the default setting of the amplifier 52 - 54 Changing the initial setting of DVD 55 - 58 Language code list for disc language 59 Sleep operation 60 Audio connection to other equipment... " References Troubleshooting chart 63, 64 Maintenance 65 Error indicators and warnings 65 Optional accessory 65 Specifications 66, 67 CONSUMER LIMITED WARRANTY Back cover General Information HT-X1 7
... disc 44, 45 " Radio Listening to the radio 46, 47 " Advanced Features Enjoying surround sound (sound mode 48 - 51 Changing the default setting of the amplifier 52 - 54 Changing the initial setting of DVD 55 - 58 Language code list for disc language 59 Sleep operation 60 Audio connection to other equipment... " References Troubleshooting chart 63, 64 Maintenance 65 Error indicators and warnings 65 Optional accessory 65 Specifications 66, 67 CONSUMER LIMITED WARRANTY Back cover General Information HT-X1 7
HT-X1 Operation Manual
Page 8
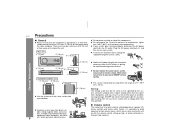
... space on the top of the components. ! Main unit 4" (10 cm) 4" (10 cm) 6" (15 cm) ! If your local SHARP service facility. ! General Information 4" (10 cm) 4" (10 cm) 6" (15 cm) Subwoofer/amplifier unit 4" (10 cm) 4" (10 cm) 6" (15 cm) 4" (10 cm) 4" (10 cm) ! Do not remove the outer... a given volume setting depends on a firm, level surface free from the use of 41°F - 95°F (5°C - 35°C). ! HT-X1 Precautions " General ! Do not expose the system to moisture, to temperatures higher than that there is dangerous and may result in a fire or other than...
... space on the top of the components. ! Main unit 4" (10 cm) 4" (10 cm) 6" (15 cm) ! If your local SHARP service facility. ! General Information 4" (10 cm) 4" (10 cm) 6" (15 cm) Subwoofer/amplifier unit 4" (10 cm) 4" (10 cm) 6" (15 cm) 4" (10 cm) 4" (10 cm) ! Do not remove the outer... a given volume setting depends on a firm, level surface free from the use of 41°F - 95°F (5°C - 35°C). ! HT-X1 Precautions " General ! Do not expose the system to moisture, to temperatures higher than that there is dangerous and may result in a fire or other than...
HT-X1 Operation Manual
Page 12
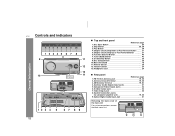
...4. FM 75 Ohm Antenna Jack 19, 20 2. AM Antenna Terminal 19, 20 4. Component Video Output Jacks 23 6. System Connection Jacks (to subwoofer/amplifier unit 19, 20 9. On/Stand-by Button 25 9. Video Output Jack 22 8. Stop Button 28, 29 3. Main Unit Stand 18 11. Volume..., remove the back cover first. 1 2 Chapter (Track) Skip Up or Fast Forward Button 31 6. Remote Sensor 26 12. Antenna Ground Terminal 19, 20 3. HT-X1 Controls and indicators 123 45 6 7 8 9 11 12 13 10 11 Display General Information 12 3 4 5 67 8 9 12 " Top and front panel Reference...
...4. FM 75 Ohm Antenna Jack 19, 20 2. AM Antenna Terminal 19, 20 4. Component Video Output Jacks 23 6. System Connection Jacks (to subwoofer/amplifier unit 19, 20 9. On/Stand-by Button 25 9. Video Output Jack 22 8. Stop Button 28, 29 3. Main Unit Stand 18 11. Volume..., remove the back cover first. 1 2 Chapter (Track) Skip Up or Fast Forward Button 31 6. Remote Sensor 26 12. Antenna Ground Terminal 19, 20 3. HT-X1 Controls and indicators 123 45 6 7 8 9 11 12 13 10 11 Display General Information 12 3 4 5 67 8 9 12 " Top and front panel Reference...
HT-X1 Operation Manual
Page 15
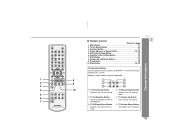
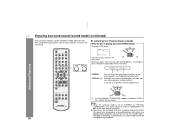
...-by Button TV Volume Up Button Sets the TV power to TV or VCR. DVD Initial Setting Button 55 6. However, some functions of SHARP's TVs with the remote control of this system. Auxiliary Button 61 4. Stop Button 28, 29 General Information TV Operation Buttons You can operate...channel up the TV volume. 7 "STAND-BY". TV/VCR Input Select Button TV Volume Down Button Switches the input to "ON" or Turns up . Amplifier Initial Setting Button 50 7. Shift Button 33 8. Switches the TV channel 5 down the TV volume. 15 Volume Up and Down Buttons 27 9. Tuner (...
...-by Button TV Volume Up Button Sets the TV power to TV or VCR. DVD Initial Setting Button 55 6. However, some functions of SHARP's TVs with the remote control of this system. Auxiliary Button 61 4. Stop Button 28, 29 General Information TV Operation Buttons You can operate...channel up the TV volume. 7 "STAND-BY". TV/VCR Input Select Button TV Volume Down Button Switches the input to "ON" or Turns up . Amplifier Initial Setting Button 50 7. Shift Button 33 8. Switches the TV channel 5 down the TV volume. 15 Volume Up and Down Buttons 27 9. Tuner (...
HT-X1 Operation Manual
Page 16
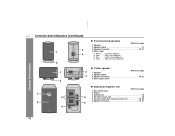
... 1 3 1. Speaker Terminals 19, 21 4. Speaker Terminals 19, 21 4. Right Front Speaker Blue ... Color Label White ... Color Label: Green 2 General Information " Subwoofer/amplifier unit Reference page 1. Speaker Terminals 19, 21 6 4 16 HT-X1 Controls and indicators (continued) 3 1 4 2 " Front/surround speakers Reference page 1. Speaker Stand 21 3. Left Surround Speaker Gray ... System Connection Jacks (to main...
... 1 3 1. Speaker Terminals 19, 21 4. Speaker Terminals 19, 21 4. Right Front Speaker Blue ... Color Label White ... Color Label: Green 2 General Information " Subwoofer/amplifier unit Reference page 1. Speaker Terminals 19, 21 6 4 16 HT-X1 Controls and indicators (continued) 3 1 4 2 " Front/surround speakers Reference page 1. Speaker Stand 21 3. Left Surround Speaker Gray ... System Connection Jacks (to main...
HT-X1 Operation Manual
Page 17
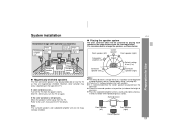
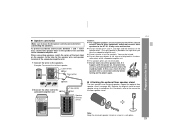
... the TV. Move the speakers further away from the power switch). Notes: ! Same distance Note: The surround speakers and subwoofer/amplifier unit are magnetically shielded. After 15 - 30 minutes, turn the TV on a sturdy and stable surface as it tends to ...) Center speaker 17 System installation Installation image (with optional accessories): Subwoofer/ amplifier unit Front speaker (left) Center speaker Front speaker (right) Surround speaker (left) Main unit Surround speaker (right) HT-X1 " Placing the speaker system The best surround effect will be placed near the...
... the TV. Move the speakers further away from the power switch). Notes: ! Same distance Note: The surround speakers and subwoofer/amplifier unit are magnetically shielded. After 15 - 30 minutes, turn the TV on a sturdy and stable surface as it tends to ...) Center speaker 17 System installation Installation image (with optional accessories): Subwoofer/ amplifier unit Front speaker (left) Center speaker Front speaker (right) Surround speaker (left) Main unit Surround speaker (right) HT-X1 " Placing the speaker system The best surround effect will be placed near the...
HT-X1 Operation Manual
Page 19
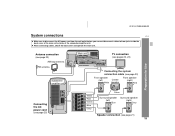
Antenna connection (see page 20) AM loop antenna FM antenna Subwoofer/ amplifier unit Main unit TV connection (see pages 22, 23) Connecting the system connection cable (see page 20) Front speaker (left) Center White speaker Front speaker (... from the wall outlet before you connect/disconnect cables to/from jacks inside the back cover of the main unit or jacks of the subwoofer/amplifier unit. ! After connecting cables, attach the back cover and operate the main unit. HT-X1 (U) TINSEA050SJZZ System connections HT-X1 !
Antenna connection (see page 20) AM loop antenna FM antenna Subwoofer/ amplifier unit Main unit TV connection (see pages 22, 23) Connecting the system connection cable (see page 20) Front speaker (left) Center White speaker Front speaker (... from the wall outlet before you connect/disconnect cables to/from jacks inside the back cover of the main unit or jacks of the subwoofer/amplifier unit. ! After connecting cables, attach the back cover and operate the main unit. HT-X1 (U) TINSEA050SJZZ System connections HT-X1 !
HT-X1 Operation Manual
Page 20
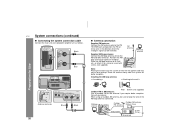
Subwoofer/ amplifier unit 1 Black 2 Blue Main unit " Antenna connection Supplied FM antenna: Connect the FM antenna wire to the wall > Preparation for Use Antenna terminals 2 1 Blue Black ... antenna wire to the AM and GND terminals. Place the antenna away from the system for optimum reception. HT-X1 System connections (continued) " Connecting the system connection cable Connect the main unit and subwoofer/amplifier unit as follows. Consult your dealer. AM loop antenna Outdoor FM antenna Outdoor AM antenna 49 feet (15...
Subwoofer/ amplifier unit 1 Black 2 Blue Main unit " Antenna connection Supplied FM antenna: Connect the FM antenna wire to the wall > Preparation for Use Antenna terminals 2 1 Blue Black ... antenna wire to the AM and GND terminals. Place the antenna away from the system for optimum reception. HT-X1 System connections (continued) " Connecting the system connection cable Connect the main unit and subwoofer/amplifier unit as follows. Consult your dealer. AM loop antenna Outdoor FM antenna Outdoor AM antenna 49 feet (15...
HT-X1 Operation Manual
Page 21
...! Do not connect them to other equipment, and do not connect other end to the HT-X1. Incorrect Preparation for Use Black 2 Connect the other speakers to the subwoofer/amplifier unit. Black Subwoofer/ amplifier unit Tube (white) Red Speaker terminal (white) " Attaching the optional floor speaker stand... and speaker terminal of the back label on , the protection circuit is placed on the right when you face the subwoofer/amplifier unit.) ! HT-X1 " Speaker connection Make sure to the manual for the floor speaker stand. To prevent accidental short-circuits between and terminals, ...
...! Do not connect them to other equipment, and do not connect other end to the HT-X1. Incorrect Preparation for Use Black 2 Connect the other speakers to the subwoofer/amplifier unit. Black Subwoofer/ amplifier unit Tube (white) Red Speaker terminal (white) " Attaching the optional floor speaker stand... and speaker terminal of the back label on , the protection circuit is placed on the right when you face the subwoofer/amplifier unit.) ! HT-X1 " Speaker connection Make sure to the manual for the floor speaker stand. To prevent accidental short-circuits between and terminals, ...

HT-X1 Operation Manual
Page 25
... the ON/STAND-BY button again. Cooling fan: A cooling fan is built into this section with any obstacles to avoid damage to the AC outlet. HT-X1 " Connecting the AC power cord After checking all the connections have been made correctly, plug the AC power cord to the AC power input jack... on , check if the AC power cord and system connection cable are plugged in properly. Otherwise, a malfunction or an accident may occur. ! Cooling fan Subwoofer/ amplifier unit To set the system to stand-by mode, wait a few seconds to turn the power on Press the ON/STAND-BY button. Unplug the...
... the ON/STAND-BY button again. Cooling fan: A cooling fan is built into this section with any obstacles to avoid damage to the AC outlet. HT-X1 " Connecting the AC power cord After checking all the connections have been made correctly, plug the AC power cord to the AC power input jack... on , check if the AC power cord and system connection cable are plugged in properly. Otherwise, a malfunction or an accident may occur. ! Cooling fan Subwoofer/ amplifier unit To set the system to stand-by mode, wait a few seconds to turn the power on Press the ON/STAND-BY button. Unplug the...
HT-X1 Operation Manual
Page 49
You can switch the audio output when the disc contains sounds of multiple audio formats (Dolby Digital, DTS, etc.). Advanced Features HT-X1 " " appears when the speakers are retained by input (DVD, AUX DIGITAL and AUX ANALOG). You cannot change the multi channel mode...stereo mode while listening to 5.1 channel surround sound, and all the speaker indicators " " light up. Sound may not be produced from the subwoofer/amplifier unit depending on the disc. ! See page 34. ! Audio Signal/Speaker Indicators: (1)Left Front Speaker Indicator (2)Left Indicator (3)Center Indicator (4)Center ...
You can switch the audio output when the disc contains sounds of multiple audio formats (Dolby Digital, DTS, etc.). Advanced Features HT-X1 " " appears when the speakers are retained by input (DVD, AUX DIGITAL and AUX ANALOG). You cannot change the multi channel mode...stereo mode while listening to 5.1 channel surround sound, and all the speaker indicators " " light up. Sound may not be produced from the subwoofer/amplifier unit depending on the disc. ! See page 34. ! Audio Signal/Speaker Indicators: (1)Left Front Speaker Indicator (2)Left Indicator (3)Center Indicator (4)Center ...
HT-X1 Operation Manual
Page 50
HT-X1 Enjoying surround sound (sound mode) (continued) You can enjoy spacious sound recorded in . Also, Dolby Pro Logic allows you to 2 channel stereo sounds While the ... Dolby Digital or DTS. When you can enjoy 2 channel stereo sound. Advanced Features (*) For CD playback, "SURROUND" appears instead of the front speakers and subwoofer/amplifier unit. When this unit, the sound mode is played on a compatible player and signals are recorded at 96 kHz (sampling frequency). " Listening to enjoy spacious...
HT-X1 Enjoying surround sound (sound mode) (continued) You can enjoy spacious sound recorded in . Also, Dolby Pro Logic allows you to 2 channel stereo sounds While the ... Dolby Digital or DTS. When you can enjoy 2 channel stereo sound. Advanced Features (*) For CD playback, "SURROUND" appears instead of the front speakers and subwoofer/amplifier unit. When this unit, the sound mode is played on a compatible player and signals are recorded at 96 kHz (sampling frequency). " Listening to enjoy spacious...
HT-X1 Operation Manual
Page 51
HT-X1 " Listening to sounds in the multi channel mode (5.1 ch, etc.) DVD (Dolby Digital or DTS) While the disc is achieved even at low volumes. To ... select "STADIUM" and "HALL". Example: 2-ch stereo sound Advanced Features A maximum of the audience in the multi channel mode, only the center speaker and subwoofer/amplifier unit produce Note: sound. STANDARD MOVIE Dolby Pro Logic converts 2 channel stereo sound of CDs, etc. Example: DTS format 2 channel stereo sound (CD, videotapes, etc...
HT-X1 " Listening to sounds in the multi channel mode (5.1 ch, etc.) DVD (Dolby Digital or DTS) While the disc is achieved even at low volumes. To ... select "STADIUM" and "HALL". Example: 2-ch stereo sound Advanced Features A maximum of the audience in the multi channel mode, only the center speaker and subwoofer/amplifier unit produce Note: sound. STANDARD MOVIE Dolby Pro Logic converts 2 channel stereo sound of CDs, etc. Example: DTS format 2 channel stereo sound (CD, videotapes, etc...
HT-X1 Operation Manual
Page 52
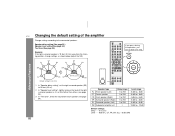
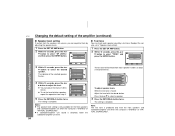
...(Left) CT Center speaker FR Front speaker (Right) SR Surround speaker (Right) SL Surround speaker (Left) SW Subwoofer/amplifier unit Delay range 1 to 29 ft 1 to 29 ft 1 to 29 ft 1 to 29 ft 1 to 29...dB to + 6 dB - 10 dB to 10 feet (3.3 m). 2 In "Speaker level setting", slightly increase the level of the amplifier Change settings according to the connected speakers. Speaker delay setting (See page 53.) Speaker level setting (See page 54.) Test tone (See ... sound from each speaker (see page 54). HT-X1 Changing the default setting of the right surround speaker as shown below (adjust the SR).
...(Left) CT Center speaker FR Front speaker (Right) SR Surround speaker (Right) SL Surround speaker (Left) SW Subwoofer/amplifier unit Delay range 1 to 29 ft 1 to 29 ft 1 to 29 ft 1 to 29 ft 1 to 29...dB to + 6 dB - 10 dB to 10 feet (3.3 m). 2 In "Speaker level setting", slightly increase the level of the amplifier Change settings according to the connected speakers. Speaker delay setting (See page 53.) Speaker level setting (See page 54.) Test tone (See ... sound from each speaker (see page 54). HT-X1 Changing the default setting of the right surround speaker as shown below (adjust the SR).
HT-X1 Operation Manual
Page 53
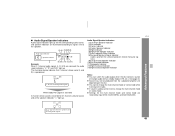
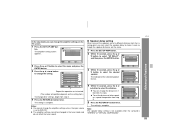
... from the listening point, you can change the distance in the tuner mode and do not affect the tuner sound. Advanced Features HT-X1 53 Amplifier Setup Speaker Delay Speaker Level Test Tone Select ENTER Enter Return 2 Press the or button to select the menu and press the ENTER...6 FT Select Change Return Repeat the operation as though the speaker distances are at a different distance from step 3. 5 Press the RETURN button twice. The amplifier settings cannot be changed in 1 foot (0.3 m) steps. ! In the stop mode, you can select the speaker delay to make it seem as instructed. ...
... from the listening point, you can change the distance in the tuner mode and do not affect the tuner sound. Advanced Features HT-X1 53 Amplifier Setup Speaker Delay Speaker Level Test Tone Select ENTER Enter Return 2 Press the or button to select the menu and press the ENTER...6 FT Select Change Return Repeat the operation as though the speaker distances are at a different distance from step 3. 5 Press the RETURN button twice. The amplifier settings cannot be changed in 1 foot (0.3 m) steps. ! In the stop mode, you can select the speaker delay to make it seem as instructed. ...
HT-X1 Operation Manual
Page 54
... 0 dB 0 dB Select Change Return To adjust speaker levels While the test tone is "STEREO" or "VIRTUAL (SURROUND)". ! HT-X1 Changing the default setting of the amplifier (continued) " Speaker level setting If sounds from step 3. Amplifier Setup Speaker Delay Speaker Level Test Tone " Test tone You can equalize them by a test tone. Readjust the...
... 0 dB 0 dB Select Change Return To adjust speaker levels While the test tone is "STEREO" or "VIRTUAL (SURROUND)". ! HT-X1 Changing the default setting of the amplifier (continued) " Speaker level setting If sounds from step 3. Amplifier Setup Speaker Delay Speaker Level Test Tone " Test tone You can equalize them by a test tone. Readjust the...
HT-X1 Operation Manual
Page 64
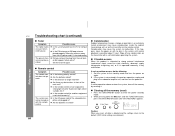
...the settings return to malfunction. " Clearing all data is possible (about 1 hour). " Condensation Sudden temperature changes, storage or operation in the subwoofer/amplifier unit, and then turn the power on the transmitter with the remote control. " Remote control Symptom The remote control does not operate. " If ... humid environment may cause the system to the default. (DVD initial settings are retained.) 64 The system cannot be recalled. HT-X1 Troubleshooting chart (continued) References " Tuner Symptom The radio makes unusual noises continuously.
...the settings return to malfunction. " Clearing all data is possible (about 1 hour). " Condensation Sudden temperature changes, storage or operation in the subwoofer/amplifier unit, and then turn the power on the transmitter with the remote control. " Remote control Symptom The remote control does not operate. " If ... humid environment may cause the system to the default. (DVD initial settings are retained.) 64 The system cannot be recalled. HT-X1 Troubleshooting chart (continued) References " Tuner Symptom The radio makes unusual noises continuously.