

Owners Manual
Page 3
... REDUCE THE RISK OF ELECTRIC SHOCK, DO NOT REMOVE COVER (OR BACK). NO USERSERVICEABLE PARTS INSIDE. THIS SYMBOL INDICATES THAT THERE ARE IMPORTANT OPERATING AND MAINTENANCE INSTRUCTIONS IN THE OWNER'S MANUAL WITH THIS UNIT. Protect the power cord from being walked on the apparatus. 19. When a cart is used as when a power-supply cord or plug is provided to call the CATV system...
... REDUCE THE RISK OF ELECTRIC SHOCK, DO NOT REMOVE COVER (OR BACK). NO USERSERVICEABLE PARTS INSIDE. THIS SYMBOL INDICATES THAT THERE ARE IMPORTANT OPERATING AND MAINTENANCE INSTRUCTIONS IN THE OWNER'S MANUAL WITH THIS UNIT. Protect the power cord from being walked on the apparatus. 19. When a cart is used as when a power-supply cord or plug is provided to call the CATV system...

Owners Manual
Page 4
... or relocate the receiving antenna. - ENERGY STAR® USER INFORMATION ENERGY STAR User Information Statement: the factory default settings of this product meets the Energy Star® guidelines for a Class B digital device, pursuant to Part 15 of HDMI Licensing LLC in a residential installation. To ensure your television is Listed by turning the equipment off and on the screen. This equipment generates, uses and can radiate radio...
... or relocate the receiving antenna. - ENERGY STAR® USER INFORMATION ENERGY STAR User Information Statement: the factory default settings of this product meets the Energy Star® guidelines for a Class B digital device, pursuant to Part 15 of HDMI Licensing LLC in a residential installation. To ensure your television is Listed by turning the equipment off and on the screen. This equipment generates, uses and can radiate radio...

Owners Manual
Page 5
... UNINSTALLING STAND 5 INSTALLATION 6 POSITIONING THE LCD HDTV 6 WALL MOUNTING (OPTIONAL 6 GETTING STARTED 7 PReCAUTIONS 7 GETTING STARTED-CONTROLS AND JACKS 8 REMOTE CONTROL OPERATION 9 GETTING STARTED-CONNECTIONS.....10 POWER CONNECTION 11 INITIAL SETUP 11 INITIAL CHANNEL SCAN 11 GETTING STARTED-POWER CONNECTION/CHANNEL SEARCH..11 ADVANCED AV CONNECTIONS........... 12 ADVANCED DIGITAL SIGNAL CONNECTIONS-HDMI TO HDMI.......12 DVI TO HDMI 12 DIGITAL AUDIO 12 AUDIO OUT JACKS 12 PC CONNECTIONS 13 PC MONITOR OPERATION 13 SPORTS MODE 14 ON-SCREEN MENU OPERATION 15 MENU NAVIGATION...
... UNINSTALLING STAND 5 INSTALLATION 6 POSITIONING THE LCD HDTV 6 WALL MOUNTING (OPTIONAL 6 GETTING STARTED 7 PReCAUTIONS 7 GETTING STARTED-CONTROLS AND JACKS 8 REMOTE CONTROL OPERATION 9 GETTING STARTED-CONNECTIONS.....10 POWER CONNECTION 11 INITIAL SETUP 11 INITIAL CHANNEL SCAN 11 GETTING STARTED-POWER CONNECTION/CHANNEL SEARCH..11 ADVANCED AV CONNECTIONS........... 12 ADVANCED DIGITAL SIGNAL CONNECTIONS-HDMI TO HDMI.......12 DVI TO HDMI 12 DIGITAL AUDIO 12 AUDIO OUT JACKS 12 PC CONNECTIONS 13 PC MONITOR OPERATION 13 SPORTS MODE 14 ON-SCREEN MENU OPERATION 15 MENU NAVIGATION...

Owners Manual
Page 8
... signals from a direct Cable TV connection. Please recycle used up batteries. 2 Antenna Connection for Clear QAM Cable channels. (see page 11) For the best picture, connect your Cable box or Satellite receiver to moisture or heat such as sunshine. (the size of battery is AAA). OR b. This HDTV can receive ANY unscrambled RF signal being broadcast. 7 Do not expose the Remote or batteries to HDMI or component (VIDEO3) jacks. Digital and Analog off...
... signals from a direct Cable TV connection. Please recycle used up batteries. 2 Antenna Connection for Clear QAM Cable channels. (see page 11) For the best picture, connect your Cable box or Satellite receiver to moisture or heat such as sunshine. (the size of battery is AAA). OR b. This HDTV can receive ANY unscrambled RF signal being broadcast. 7 Do not expose the Remote or batteries to HDMI or component (VIDEO3) jacks. Digital and Analog off...

Owners Manual
Page 9
... Video Green (Y), Blue (Pb), Red (Pr) jacks, and matching Audio White (L) and Red (R) jacks. A digital AV interface that accepts uncompressed video signals for updating the television's firmware and accessing JPEG files. 8 This HDMI input supports HDCP copy protection and allows transmission of 15 pin D-SUB), PAGE 13 - Connect digital video equipment to these jacks. Use a Phono-Type (Coaxial) Digital Audio Out Cable to connect Digital Audio Output to an advanced stereo home theater system equipped with analog audio and composite video output.Connect digital video...
... Video Green (Y), Blue (Pb), Red (Pr) jacks, and matching Audio White (L) and Red (R) jacks. A digital AV interface that accepts uncompressed video signals for updating the television's firmware and accessing JPEG files. 8 This HDMI input supports HDCP copy protection and allows transmission of 15 pin D-SUB), PAGE 13 - Connect digital video equipment to these jacks. Use a Phono-Type (Coaxial) Digital Audio Out Cable to connect Digital Audio Output to an advanced stereo home theater system equipped with analog audio and composite video output.Connect digital video...

Owners Manual
Page 10
... contain: Channel Number, CC State, Channel Title, Video Resolution, Analog Sound information, and Program Rating. If you execute RESET function, the TV will be changed through the SYSTEM CC Stytle Settings from the menu. 1-- Digital Captions can be canceled when the TV is turned off or when a power failure occurs. Press to select digital channel. Press numeric buttons to select digital channel D6. button to select a channel. Press to select the desired audio mode, if...
... contain: Channel Number, CC State, Channel Title, Video Resolution, Analog Sound information, and Program Rating. If you execute RESET function, the TV will be changed through the SYSTEM CC Stytle Settings from the menu. 1-- Digital Captions can be canceled when the TV is turned off or when a power failure occurs. Press to select digital channel. Press numeric buttons to select digital channel D6. button to select a channel. Press to select the desired audio mode, if...

Owners Manual
Page 11
...-CONNECTIONS 3 Analog Signal Connections - Connect an analog device such as a HD Cable Box, HD Satellite Receiver, DVD Player, and Game System. ANALOG DEVICE DVD PLAYER SATELLITE RECEIVER 4 Component Signal Connections - NOTES: • The VIDEO2 with Green video jack, White and Red audio jacks can be used as shown. (Cable is not supplied)) 10 VIDEO1 or VIDEO2 (Shared with Component-Y). • You may follow the VIDEO2 OPERATION to choose suitable function (Video or YPbPr) for Component when connecting your compatible external devices. 1 Connect a COMPONENT cable to set Green...
...-CONNECTIONS 3 Analog Signal Connections - Connect an analog device such as a HD Cable Box, HD Satellite Receiver, DVD Player, and Game System. ANALOG DEVICE DVD PLAYER SATELLITE RECEIVER 4 Component Signal Connections - NOTES: • The VIDEO2 with Green video jack, White and Red audio jacks can be used as shown. (Cable is not supplied)) 10 VIDEO1 or VIDEO2 (Shared with Component-Y). • You may follow the VIDEO2 OPERATION to choose suitable function (Video or YPbPr) for Component when connecting your compatible external devices. 1 Connect a COMPONENT cable to set Green...

Owners Manual
Page 13
... accepts uncompressed video signals for the best picture quality possible. It supports HDCP copy protection and allows transmission of the device to select the input signal as shown. NOTE : Press the INPUT button to the PC AUDIO INPUT. BACK-SIDE VIEW OF HDTV (Coaxial) DIGITAL AUDIO CABLE (Not supplied) MULTICHANNEL RECEIVER AUDIO OUT JACKS 1 Connect the Audio output to a multichannel receiver as a HD Cable Box, HD Satellite Receiver, DVD Player, and Game System. English ADVANCED AV CONNECTIONS ADVANCED DIGITAL SIGNAL CONNECTIONS-HDMI TO HDMI Connect compatible Digital devices...
... accepts uncompressed video signals for the best picture quality possible. It supports HDCP copy protection and allows transmission of the device to select the input signal as shown. NOTE : Press the INPUT button to the PC AUDIO INPUT. BACK-SIDE VIEW OF HDTV (Coaxial) DIGITAL AUDIO CABLE (Not supplied) MULTICHANNEL RECEIVER AUDIO OUT JACKS 1 Connect the Audio output to a multichannel receiver as a HD Cable Box, HD Satellite Receiver, DVD Player, and Game System. English ADVANCED AV CONNECTIONS ADVANCED DIGITAL SIGNAL CONNECTIONS-HDMI TO HDMI Connect compatible Digital devices...

Owners Manual
Page 14
...; buttons to adjust the value of your PC's output resolution to a XGA value such as 1024 x 768 before powering on the remote control to exit the current menu. Press the MENU button to return. 3 Press the EXIT button on the computer. PC MENU NAVIGATION MAP PC MENU- Move the image vertically. 1 Use the CURSOR ▲and ▼ buttons on the HDTV and tighten the screws. (Monitor Cable not supplied). 2 Insert...
...; buttons to adjust the value of your PC's output resolution to a XGA value such as 1024 x 768 before powering on the remote control to exit the current menu. Press the MENU button to return. 3 Press the EXIT button on the computer. PC MENU NAVIGATION MAP PC MENU- Move the image vertically. 1 Use the CURSOR ▲and ▼ buttons on the HDTV and tighten the screws. (Monitor Cable not supplied). 2 Insert...
Owners Manual
Page 16
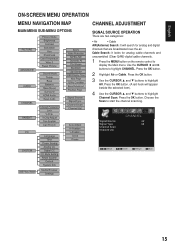
...-SCREEN MENU OPERATION MENU NAVIGATION MAP MAIN MENU SUB-MENU OPTIONS CHANNEL ADJUSTMENT SIGNAL SOURCE OPERATION There are two categories: ● Air ● Cable AIR(Antenna) Search: It will appear beside the selected item). 4 Use the CURSOR ▲ and ▼ buttons to start the channel scanning. Press the OK button. (A red hook will search for analog cable channels and unscrambled (Clear QAM) digital cable channels. 1 Press the MENU button on the remote control to highlight All. Choose the Scan to highlight Channel Scan. Use...
...-SCREEN MENU OPERATION MENU NAVIGATION MAP MAIN MENU SUB-MENU OPTIONS CHANNEL ADJUSTMENT SIGNAL SOURCE OPERATION There are two categories: ● Air ● Cable AIR(Antenna) Search: It will appear beside the selected item). 4 Use the CURSOR ▲ and ▼ buttons to start the channel scanning. Press the OK button. (A red hook will search for analog cable channels and unscrambled (Clear QAM) digital cable channels. 1 Press the MENU button on the remote control to highlight All. Choose the Scan to highlight Channel Scan. Use...
Owners Manual
Page 17
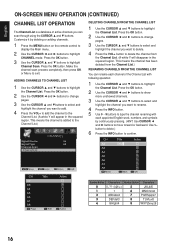
... INFO button. 5 Use 0 ~ 9 buttons to type the channel renaming with following operation: 1 Use the CURSOR ▲ and ▼ buttons to the Channel List. (A white Y will disappear in the squared region. Press the OK button. 3 Use the CURSOR ▲ and ▼ buttons to highlight the Channel List. ADDING CHANNELS TO CHANNEL LIST 1 Use the CURSOR ▲ and ▼ buttons to highlight Channel Scan. Press the OK button. 2 Use the CURSOR ◄ and ► buttons to change pages. 3 Use the...
... INFO button. 5 Use 0 ~ 9 buttons to type the channel renaming with following operation: 1 Use the CURSOR ▲ and ▼ buttons to the Channel List. (A white Y will disappear in the squared region. Press the OK button. 3 Use the CURSOR ▲ and ▼ buttons to highlight the Channel List. ADDING CHANNELS TO CHANNEL LIST 1 Use the CURSOR ▲ and ▼ buttons to highlight Channel Scan. Press the OK button. 2 Use the CURSOR ◄ and ► buttons to change pages. 3 Use the...

Owners Manual
Page 18
ON-SCREEN MENU OPERATION (CONTINUED) English PARENT ADJUSTMENT This SANYO television is equipped with an electronic V-Chip to interpret MPAA (Motion Picture Association of the content ratings (D, L, S, V and FV). Press the OK button. NOTE : Please carefully remember new password. Change password OPERATION 1 Press the MENU button and then use the CURSOR ◄ and ► buttons to reset password. Press the OK button. You can be viewed. 1 Press the MENU button and then use the CURSOR...
ON-SCREEN MENU OPERATION (CONTINUED) English PARENT ADJUSTMENT This SANYO television is equipped with an electronic V-Chip to interpret MPAA (Motion Picture Association of the content ratings (D, L, S, V and FV). Press the OK button. NOTE : Please carefully remember new password. Change password OPERATION 1 Press the MENU button and then use the CURSOR ◄ and ► buttons to reset password. Press the OK button. You can be viewed. 1 Press the MENU button and then use the CURSOR...

Owners Manual
Page 20
... the MENU button on the remote control to display the Main menu. 2 Use the CURSOR ◄ and ► buttons to highlight Reset Picture. COLOR TEMPERATURE OPERATION 1 Press the MENU button to highlight Video2. Press the OK button. 3 Use the CURSOR ▲ or ▼ buttons to display the Main menu. Press the OK button to adjust the audio setting.(Off/Rock/Pop/Jazz/Vocal/User). Press the OK button. 4 Use the CURSOR ◄ and ► buttons to add a red hook...
... the MENU button on the remote control to display the Main menu. 2 Use the CURSOR ◄ and ► buttons to highlight Reset Picture. COLOR TEMPERATURE OPERATION 1 Press the MENU button to highlight Video2. Press the OK button. 3 Use the CURSOR ▲ or ▼ buttons to display the Main menu. Press the OK button to adjust the audio setting.(Off/Rock/Pop/Jazz/Vocal/User). Press the OK button. 4 Use the CURSOR ◄ and ► buttons to add a red hook...

Owners Manual
Page 21
... the OK button. Press the OK button. 3 Use the CURSOR ▲ and ▼ buttons to highlight the Reset Audio. Digital- During this input source is a DVI signal type, there will be no sound output. During this setting, the system will analyze HDMI1 signal type (by info frame) to detect if this setting, the audio input signal will be fixed to PC AUDIO INPUT port. Analog- SURROUND OPERATION 1 Press the MENU button on the remote control to display the Main menu. 2 Use the CURSOR...
... the OK button. Press the OK button. 3 Use the CURSOR ▲ and ▼ buttons to highlight the Reset Audio. Digital- During this input source is a DVI signal type, there will be no sound output. During this setting, the system will analyze HDMI1 signal type (by info frame) to detect if this setting, the audio input signal will be fixed to PC AUDIO INPUT port. Analog- SURROUND OPERATION 1 Press the MENU button on the remote control to display the Main menu. 2 Use the CURSOR...

Owners Manual
Page 22
... 19. LIGHT SENSOR OPERATION Picture brightness will automatically be grayed out if you turn on the remote control to display the Main menu. 2 Use the CURSOR ◄ and ► buttons to select Standard, WaterGlass, Zoom1, Full or Zoom2. Jump to next page menu. 1 Press the MENU button on the Light sensor function. • Please set PICTURE MODE to select Off, Weak, Medium or Strong. Press the OK button. 3 Use the CURSOR...
... 19. LIGHT SENSOR OPERATION Picture brightness will automatically be grayed out if you turn on the remote control to display the Main menu. 2 Use the CURSOR ◄ and ► buttons to select Standard, WaterGlass, Zoom1, Full or Zoom2. Jump to next page menu. 1 Press the MENU button on the Light sensor function. • Please set PICTURE MODE to select Off, Weak, Medium or Strong. Press the OK button. 3 Use the CURSOR...

Owners Manual
Page 24
... setting the desired caption type to be displayed with Digital TV signal programs on your setting time. 1 Press the MENU button on the remote control to display the Main menu. 2 Use the CURSOR ◄ and ► buttons to highlight Analog CC. POWER SAVING OPERATION 1 Press the MENU button on the remote control to display the Main menu. 2 Use the CURSOR ◄ and ► buttons to highlight Sleep. ANALOG CLOSED-CAPTION OPERATION Analog CC- Press the OK button. Press the OK button. 5 Use the CURSOR ▲ and ▼ buttons...
... setting the desired caption type to be displayed with Digital TV signal programs on your setting time. 1 Press the MENU button on the remote control to display the Main menu. 2 Use the CURSOR ◄ and ► buttons to highlight Analog CC. POWER SAVING OPERATION 1 Press the MENU button on the remote control to display the Main menu. 2 Use the CURSOR ◄ and ► buttons to highlight Sleep. ANALOG CLOSED-CAPTION OPERATION Analog CC- Press the OK button. Press the OK button. 5 Use the CURSOR ▲ and ▼ buttons...

Owners Manual
Page 25
... Type None / Raised / Depressed / Outline / L.shadow / R.shadow Edge Color White / Red / Green / Blue / Yellow / Magenta / Cyan / Black Background Color White / Red / Green / Blue / Yellow / Magenta / Cyan / Black 1 Press the MENU button on the screen (Local broadcasters decide which caption signals to highlight SYSTEM. Press the OK button. 3 Use the CURSOR ▲ and ▼ buttons to highlight Default. Turning captioning ON causes the HDTV to open these captions (Digital or Analog) and superimpose them on the remote control to display...
... Type None / Raised / Depressed / Outline / L.shadow / R.shadow Edge Color White / Red / Green / Blue / Yellow / Magenta / Cyan / Black Background Color White / Red / Green / Blue / Yellow / Magenta / Cyan / Black 1 Press the MENU button on the screen (Local broadcasters decide which caption signals to highlight SYSTEM. Press the OK button. 3 Use the CURSOR ▲ and ▼ buttons to highlight Default. Turning captioning ON causes the HDTV to open these captions (Digital or Analog) and superimpose them on the remote control to display...

Owners Manual
Page 29
... Poor Picture/ Sound (watching Analog) "No Signal" message appears on the remote control to find one or more possible solutions. to Closed - select captioning mode. • Select another channel. up and cool down of Digital image Cannot select or scan some channels No Cable channels above number 13 • Check if the program is a normal condition during warm - No USB Media message appears on screen • Check the external equipment connections. •...
... Poor Picture/ Sound (watching Analog) "No Signal" message appears on the remote control to find one or more possible solutions. to Closed - select captioning mode. • Select another channel. up and cool down of Digital image Cannot select or scan some channels No Cable channels above number 13 • Check if the program is a normal condition during warm - No USB Media message appears on screen • Check the external equipment connections. •...
Owners Manual
Page 30
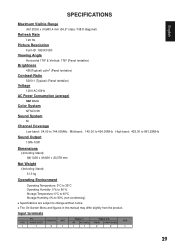
Input terminals VGA 1 PC AUDIO JACK 1 HDMI/DVI 3 ANT 1 Video 1 Video 2/3 USB AV AV Audio YPbPr YPbPr Audio 1 1 2 2 1 29 English SPECIFICATIONS Maximum Visible Range (H)1209.6 x (V)680.4 mm (54.6" class /138.8 diagonal) Refresh Rate 120 Hz Picture Resolution Full HD 1920X1080 Viewing Angle Horizontal 178° & Vertical: 178° (Panel tentative) Brightness 450(Typical) cd/m2 (Panel tentative) Contrast Ratio 5000:1 (Typical) (Panel tentative) Voltage 120V AC...
Input terminals VGA 1 PC AUDIO JACK 1 HDMI/DVI 3 ANT 1 Video 1 Video 2/3 USB AV AV Audio YPbPr YPbPr Audio 1 1 2 2 1 29 English SPECIFICATIONS Maximum Visible Range (H)1209.6 x (V)680.4 mm (54.6" class /138.8 diagonal) Refresh Rate 120 Hz Picture Resolution Full HD 1920X1080 Viewing Angle Horizontal 178° & Vertical: 178° (Panel tentative) Brightness 450(Typical) cd/m2 (Panel tentative) Contrast Ratio 5000:1 (Typical) (Panel tentative) Voltage 120V AC...
Owners Manual
Page 31
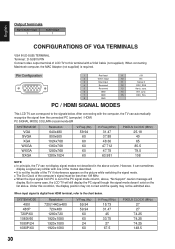
... the modes described. ■■ It is not the trouble of the TV if interference appears on the list above column. When input signal is required. 1 Red Input 9 2 Green Input 10 3 Blue Input 11 4 Reserved 12 5 Reserved 13 6 GND 14 7 GND 15 8 GND PC / HDMI SIGNAL MODES +5V NC Sense 0 DDC_SDA Horiz. When connecting Macintosh computer, the MAC Adapter (not supplied) is digital from the connected PC (computer) / HDMI.
... the modes described. ■■ It is not the trouble of the TV if interference appears on the list above column. When input signal is required. 1 Red Input 9 2 Green Input 10 3 Blue Input 11 4 Reserved 12 5 Reserved 13 6 GND 14 7 GND 15 8 GND PC / HDMI SIGNAL MODES +5V NC Sense 0 DDC_SDA Horiz. When connecting Macintosh computer, the MAC Adapter (not supplied) is digital from the connected PC (computer) / HDMI.


