

Owners Manual
Page 5
... THE LCD HDTV 6 WALL MOUNTING (OPTIONAL 6 GETTING STARTED 7 PReCAUTIONS 7 GETTING STARTED-CONTROLS AND JACKS 8 REMOTE CONTROL OPERATION 9 GETTING STARTED-CONNECTIONS.....10 POWER CONNECTION 11 INITIAL SETUP 11 INITIAL CHANNEL SCAN 11 GETTING STARTED-POWER CONNECTION/CHANNEL SEARCH..11 ADVANCED AV CONNECTIONS........... 12 ADVANCED DIGITAL SIGNAL CONNECTIONS-HDMI TO HDMI.......12 DVI...
... THE LCD HDTV 6 WALL MOUNTING (OPTIONAL 6 GETTING STARTED 7 PReCAUTIONS 7 GETTING STARTED-CONTROLS AND JACKS 8 REMOTE CONTROL OPERATION 9 GETTING STARTED-CONNECTIONS.....10 POWER CONNECTION 11 INITIAL SETUP 11 INITIAL CHANNEL SCAN 11 GETTING STARTED-POWER CONNECTION/CHANNEL SEARCH..11 ADVANCED AV CONNECTIONS........... 12 ADVANCED DIGITAL SIGNAL CONNECTIONS-HDMI TO HDMI.......12 DVI...
Owners Manual
Page 12
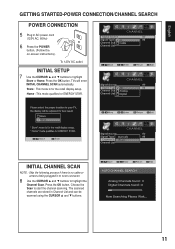
... CHANNEL SCAN automatically. The scanned channels are stored in AC power cord (120V AC, 60Hz) 6 Press the POWER button, (Follow the on-screen instructions). INITIAL setup 7 Use the CURSOR ▲ and ▼ buttons to start the channel scanning. Move OK Enter INITIAL CHANNEL SCAN NOTE : Skip the following process if there... CONNECTION 5 Plug in Channel List and can be scanned using the CURSOR ▲ and ▼ buttons. 11 Home : This mode qualifies for the retail display setup.
... CHANNEL SCAN automatically. The scanned channels are stored in AC power cord (120V AC, 60Hz) 6 Press the POWER button, (Follow the on-screen instructions). INITIAL setup 7 Use the CURSOR ▲ and ▼ buttons to start the channel scanning. Move OK Enter INITIAL CHANNEL SCAN NOTE : Skip the following process if there... CONNECTION 5 Plug in Channel List and can be scanned using the CURSOR ▲ and ▼ buttons. 11 Home : This mode qualifies for the retail display setup.

Owners Manual
Page 14
.... 1 Use the CURSOR ▲and ▼ buttons on the remote control to highlight H-Position, V-Position, Clock or Phase. buttons. 3 Select Auto Adjustment from the PC Setup Menu. PC MENU OPERATING TIPS The Picture settings in the PC input will not affect other peripheral equipment before you disconnect it from your PC...
.... 1 Use the CURSOR ▲and ▼ buttons on the remote control to highlight H-Position, V-Position, Clock or Phase. buttons. 3 Select Auto Adjustment from the PC Setup Menu. PC MENU OPERATING TIPS The Picture settings in the PC input will not affect other peripheral equipment before you disconnect it from your PC...


