

Owners Manual
Page 4
...only. Consult the dealer or an experienced radio/TV technician for ENERGY STAR qualification. "As an Energy Star® Partner, Sanyo Electric co., Ltd. It is Listed by one or more of fire, casualty and electrical hazards. CONTAINS MERCURY LAMPS, DISPOSE...Services Taiwan Ltd. Reorient or relocate the receiving antenna. - Do not use excessive pressure when cleaning the screen; Changing Picture Settings may cause harmful interference to radio communications. safety standards against harmful interference in a particular installation. TRADEMARKS Manufactured under warranty....
...only. Consult the dealer or an experienced radio/TV technician for ENERGY STAR qualification. "As an Energy Star® Partner, Sanyo Electric co., Ltd. It is Listed by one or more of fire, casualty and electrical hazards. CONTAINS MERCURY LAMPS, DISPOSE...Services Taiwan Ltd. Reorient or relocate the receiving antenna. - Do not use excessive pressure when cleaning the screen; Changing Picture Settings may cause harmful interference to radio communications. safety standards against harmful interference in a particular installation. TRADEMARKS Manufactured under warranty....

Owners Manual
Page 13
...connect a DVI device to a HDMI1 input jack. NOTE : Press the INPUT button to a multichannel receiver as shown. NOTE : HDMI Audio setting is available from the Digital Audio output terminal only when receiving a part of copy-protected digital content. BACK-SIDE VIEW OF HDTV SATELLITE PC RECEIVER... is compatible with HDMI cable. DVI TO HDMI (Only HDMI1 is a digital AV interface that accepts uncompressed video signals for the best picture quality possible. It supports HDCP copy protection and allows transmission of a Digital input on the screen. BACK-SIDE VIEW OF HDTV DIGITAL ...
...connect a DVI device to a HDMI1 input jack. NOTE : Press the INPUT button to a multichannel receiver as shown. NOTE : HDMI Audio setting is available from the Digital Audio output terminal only when receiving a part of copy-protected digital content. BACK-SIDE VIEW OF HDTV SATELLITE PC RECEIVER... is compatible with HDMI cable. DVI TO HDMI (Only HDMI1 is a digital AV interface that accepts uncompressed video signals for the best picture quality possible. It supports HDCP copy protection and allows transmission of a Digital input on the screen. BACK-SIDE VIEW OF HDTV DIGITAL ...

Owners Manual
Page 14
Clock- V-Position- PC MENU OPERATING TIPS The Picture settings in the PC menu. NOTE: Power on the computer. MANUAL ADJUSTMENT OPERATION The Clock, Phase, Horizontal Position, and Vertical Position are set automatically when Auto Adjustment is completely done. Press the MENU button to return. 3 Press the EXIT button ...jack and the other end into the HDTV PC AUDIO INPUT jack. (Stereo Mini-Audio Cable not supplied). Adjust the phase when the picture appears flicker or blur. Move the image horizontally. Move the image vertically. 1 Use the CURSOR ▲and ▼ buttons on the...
Clock- V-Position- PC MENU OPERATING TIPS The Picture settings in the PC menu. NOTE: Power on the computer. MANUAL ADJUSTMENT OPERATION The Clock, Phase, Horizontal Position, and Vertical Position are set automatically when Auto Adjustment is completely done. Press the MENU button to return. 3 Press the EXIT button ...jack and the other end into the HDTV PC AUDIO INPUT jack. (Stereo Mini-Audio Cable not supplied). Adjust the phase when the picture appears flicker or blur. Move the image horizontally. Move the image vertically. 1 Use the CURSOR ▲and ▼ buttons on the...

Owners Manual
Page 15
Once the channel or the input source is changed , the sports mode will automatically be set to "Off", and the "Sports Off" OSD will appear on the lower left of the screen. If the channel or input source is changed under ... right of the screen. 14 English SPORTS MODE By simply pressing the " SPORTS" button on the remote control, the TV will automatically optimize both picture and sound settings for the programs shown. ■■ Off ■■ Football −− For golf, football programs etc. −− Fresh greenness of the lawn...
Once the channel or the input source is changed , the sports mode will automatically be set to "Off", and the "Sports Off" OSD will appear on the lower left of the screen. If the channel or input source is changed under ... right of the screen. 14 English SPORTS MODE By simply pressing the " SPORTS" button on the remote control, the TV will automatically optimize both picture and sound settings for the programs shown. ■■ Off ■■ Football −− For golf, football programs etc. −− Fresh greenness of the lawn...

Owners Manual
Page 18
...to adjust and press the OK button. ON-SCREEN MENU OPERATION (CONTINUED) English PARENT ADJUSTMENT This SANYO television is equipped with an electronic V-Chip to highlight PARENT. Press the OK button. If you make when setting up the PARENT menu. Block the broadcast of TV-14, for your password. You can enter...,you selected will appear in PARENT menu. 1 Press the MENU button and then use the CURSOR ◄ and ► buttons to interpret MPAA (Motion Picture Association of the content ratings (D, L, S, V and FV). button 4 times to highlight PARENT. Press the OK button.
...to adjust and press the OK button. ON-SCREEN MENU OPERATION (CONTINUED) English PARENT ADJUSTMENT This SANYO television is equipped with an electronic V-Chip to highlight PARENT. Press the OK button. If you make when setting up the PARENT menu. Block the broadcast of TV-14, for your password. You can enter...,you selected will appear in PARENT menu. 1 Press the MENU button and then use the CURSOR ◄ and ► buttons to interpret MPAA (Motion Picture Association of the content ratings (D, L, S, V and FV). button 4 times to highlight PARENT. Press the OK button.

Owners Manual
Page 20
...Use the CURSOR ◄ and ► buttons to the PICTURE mode menu. Press the OK button. 4 Use the CURSOR ◄ and ► buttons to display the Main menu. VIDEO2 OPERATION 1 Press the MENU button to adjust the picture setting. Press the OK button. 3 Use the CURSOR ▲ ...or ▼ buttons to highlight Reset Picture. RESET PICTURE OPERATION Reset Picture- Press the OK button. 2 Use the CURSOR ▲ and ▼ buttons to...
...Use the CURSOR ◄ and ► buttons to the PICTURE mode menu. Press the OK button. 4 Use the CURSOR ◄ and ► buttons to display the Main menu. VIDEO2 OPERATION 1 Press the MENU button to adjust the picture setting. Press the OK button. 3 Use the CURSOR ▲ ...or ▼ buttons to highlight Reset Picture. RESET PICTURE OPERATION Reset Picture- Press the OK button. 2 Use the CURSOR ▲ and ▼ buttons to...

Owners Manual
Page 22
... ◄ and ► buttons to highlight ADVANCED. Divided into three categories. LIGHT SENSOR OPERATION Picture brightness will automatically be grayed out if you turn on the Light sensor function. • Please set PICTURE MODE to User then can turn on the remote control to display the Main menu. 2 Use... buttons to select the OSD Display Time option. OSD DISPLAY TIME OPERATION OSD Display Time 1 Press the MENU button on this setting to Middle, Low or Off if a picture is too dark in the Home mode is High. • Change this function. Press the OK button. 3 Use the CURSOR...
... ◄ and ► buttons to highlight ADVANCED. Divided into three categories. LIGHT SENSOR OPERATION Picture brightness will automatically be grayed out if you turn on the Light sensor function. • Please set PICTURE MODE to User then can turn on the remote control to display the Main menu. 2 Use... buttons to select the OSD Display Time option. OSD DISPLAY TIME OPERATION OSD Display Time 1 Press the MENU button on this setting to Middle, Low or Off if a picture is too dark in the Home mode is High. • Change this function. Press the OK button. 3 Use the CURSOR...

Owners Manual
Page 25
...buttons to highlight System Info. A function linked to transmit). Press the OK button. 2 Use the CURSOR ▲ and ▼ buttons to select CC Setting, CC Priority, Digital CC, Present, Font Size, Font Color, Font Style, Edge Type, Edge Color or Background Color. Press the OK button. SYSTEM INFO...SYSTEM menu or use the EXIT button to select Reset or Cancel. Caption is a textual information transmitted along with the picture and sound. Category Title Subcatalog of the CC Style Setting as shown. Press the OK button. 2 Use the CURSOR ▲ and ▼ buttons to highlight SYSTEM. ...
...buttons to highlight System Info. A function linked to transmit). Press the OK button. 2 Use the CURSOR ▲ and ▼ buttons to select CC Setting, CC Priority, Digital CC, Present, Font Size, Font Color, Font Style, Edge Type, Edge Color or Background Color. Press the OK button. SYSTEM INFO...SYSTEM menu or use the EXIT button to select Reset or Cancel. Caption is a textual information transmitted along with the picture and sound. Category Title Subcatalog of the CC Style Setting as shown. Press the OK button. 2 Use the CURSOR ▲ and ▼ buttons to highlight SYSTEM. ...
Owners Manual
Page 27
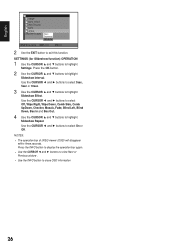
...26 Press the INFO button to display the operation bar again. • Use the CURSOR ◄ and ► buttons to view Next or Previous picture . • Use the INFO button to highlight Slideshow Effect. Use the CURSOR ◄ and ► buttons to exit this function. English 2... Use the EXIT button to select On or Off. SETTINGS (for Slideshow function) OPERATION 1 Use the CURSOR ▲ and ▼ buttons to highlight Slideshow Repeat. Use the CURSOR ◄ and ► ...
...26 Press the INFO button to display the operation bar again. • Use the CURSOR ◄ and ► buttons to view Next or Previous picture . • Use the INFO button to highlight Slideshow Effect. Use the CURSOR ◄ and ► buttons to exit this function. English 2... Use the EXIT button to select On or Off. SETTINGS (for Slideshow function) OPERATION 1 Use the CURSOR ▲ and ▼ buttons to highlight Slideshow Repeat. Use the CURSOR ◄ and ► ...

Owners Manual
Page 29
...Check the external equipment connections. • Check the external equipment settings. • Check the antenna connection. • Press the INFO button and check • Turn antenna, install signal booster. No picture, sound (Digital Picture) • Check the antenna / external connections. • ... program is a normal condition during warm - select captioning mode. • Select another channel. to change settings. 7, 11, 15 - 16 9, 23 9, 21 Poor Picture/ Sound (watching Analog) "No Signal" message appears on screen Pixilation of the plastic cabinet parts. Problems ...
...Check the external equipment connections. • Check the external equipment settings. • Check the antenna connection. • Press the INFO button and check • Turn antenna, install signal booster. No picture, sound (Digital Picture) • Check the antenna / external connections. • ... program is a normal condition during warm - select captioning mode. • Select another channel. to change settings. 7, 11, 15 - 16 9, 23 9, 21 Poor Picture/ Sound (watching Analog) "No Signal" message appears on screen Pixilation of the plastic cabinet parts. Problems ...


