
Sanyo DP55441 Support Question
Sanyo DP55441 Support Question
Find answers below for this question about Sanyo DP55441.Need a Sanyo DP55441 manual? We have 1 online manual for this item!
Question posted by djrica on September 7th, 2013
What Are The Best Picture Settings For A Sanyo Dp55441
The person who posted this question about this Sanyo product did not include a detailed explanation. Please use the "Request More Information" button to the right if more details would help you to answer this question.
Current Answers
Related Sanyo DP55441 Manual Pages
Owners Manual - Page 3

...power lines or circuits as when a power-supply cord or plug is connected to the television equipment, be exposed to grounding electrodes, and requirements
for replacement of antenna discharge
unit, connection...system installer's
attention to Article 820-40 of the NEC that provides guidelines
for choosing SANYO. Do not
cover the ventilation slot on the top, sides and rear
of the
...
Owners Manual - Page 4

... installation. "As an Energy Star® Partner, Sanyo Electric co., Ltd. It is not covered under ...of the FCC Rules. If this television meet rigid U.L. To ensure your television is no guarantee that improper modifications ... User Information Statement: the factory default settings of the following measures:
- Changing Picture Settings may increase energy consumption, possibly beyond the...
Owners Manual - Page 5

... 13
SPORTS MODE 14
ON-SCREEN MENU OPERATION 15 MENU NAVIGATION MAP 15 CHANNEL ADJUSTMENT 15 CHANNEL LIST OPERATION 16 PARENT ADJUSTMENT 17 PICTURE/ AUDIO/ ADVANCED ADJUSTMENT 19 PICTURE 19 AUDIO 19 ADVANCED 20 SYSTEM 22 USB PHOTO VIEWER 25
4
HELPFUL HINTS - Problems / Solutions .28 SPECIFICATIONS 29 CONFIGURATIONS OF VGA
TERMINALS 30...
Owners Manual - Page 7

NOTE: 1. English
INSTALLATION POSITIONING THE LCD HDTV
Always use a firm-flat surface when positioning your HDTV to secure it to sustain at least 3 times of your HDTV. Wall Mounting kit is not supplied. 2.
VESA ... adequate space for proper ventilation.
52.3
4
36.5 33.5
3
29.3
14.9
NOTE: All dimensions are threaded into the standmounting inserts on the back of set weight.
Owners Manual - Page 8

... or Clear QAM cable channels from an antenna.
Please recycle used up batteries.
2 Antenna Connection for Clear QAM Cable channels. (see page 11)
For the best picture, connect your Cable box or Satellite receiver to moisture or heat such as sunshine. (the size of battery is AAA). English
GETTING STARTED
1 Install batteries...
Owners Manual - Page 9

...PAGE 10 - Use for updating the television's firmware and accessing JPEG files.
8...PANEL BACK-SIDE PANEL
Y
PC INPUT
PC AUDIO
INPUT
Pb
Pr
Pb
L
Pr
R
L
R
DEO3 INPUT V DEO2 INPUT
Y/VIDEO
DV
L
INPUT1
INPUT2
ANT R
COMPOSITE VIDEO INPUT VIDEO1, PAGE 10 - Standard (composite) video and audio inputs while using for PC audio input but also sharing the HDMI audio input for the best picture...
Owners Manual - Page 10

...this button to exit from the menu, when required. CAPTION Button- INPUT Button- Press to set Off Timer function among "Off", "CC Display" and "Muted=On". ECO Button - Press...channel.
NOTE : The Channel Scan Memory database will be changed through the SYSTEM CC Stytle Settings from menu.
9 English
REMOTE CONTROL OPERATION
MUTE Button-
OK Button -
Press to switch to...
Owners Manual - Page 11

... or Video2.
3 Press the INPUT button to choose suitable function (Video or YPbPr) for Component when connecting your compatible external devices.
1 Connect a COMPONENT cable to set Green, Blue, and Red video jacks asVIDEO2 or VIDEO3(YPbPr) on the HDTV andto your digital device as shown. (Cable is not supplied)
2 Connect an...
Owners Manual - Page 13

...AUDIO INPUT. NOTE: NOTE: Dolby Digital audio signal is a digital AV interface that accepts uncompressed video signals for the best picture quality possible. BACK-SIDE VIEW OF HDTV
SATELLITE
PC
RECEIVER
STEREO AMPLIFIER
Cable not supplied
12 DVI TO HDMI
(Only... devices such as shown.
HDMI-High-Definition Multimedia Interface.
NOTE : HDMI Audio setting is compatible with HDMI cable.
Owners Manual - Page 14

... computer.
AUTO ADJUSTMENTS OPERATION
1 Use the CURSOR ▲ and ▼ buttons on the
remote control to start automatically adjust function.
PC MENU OPERATING TIPS
The Picture settings in the PC menu. English
PC CONNECTIONS
NOTE: Before connecting any other peripheral equipment before you disconnect it from the monitor output on your PC...
Owners Manual - Page 15

... upper right of the screen. English
SPORTS MODE
By simply pressing the " SPORTS" button on the remote control, the TV will automatically optimize both picture and sound settings for the programs shown.
■■ Off ■■ Football
−− For golf, football programs etc. −− Fresh greenness of the lawn...
Owners Manual - Page 18

... OPERATION (CONTINUED)
English
PARENT ADJUSTMENT
This SANYO television is equipped with an electronic V-Chip to interpret MPAA (Motion Picture Association of the current displayed channel directly or...then use the CURSOR ◄ and ► buttons to highlight PARENT menu. PASSWORD SETTING You will automatically display or block the program, depending upon choices you can enter password ...
Owners Manual - Page 20

... the OK button.
4 Use the CURSOR ◄ and ► buttons to adjust the
picture setting. Press the OK button.
4 Use the CURSOR ◄ and ► buttons to adjust the
audio setting.(Off/Rock/Pop/Jazz/Vocal/User).
RESET PICTURE OPERATION Reset Picture- AUDIO
SOUND MODE OPERATION
1 Press the MENU button on the remote control to...
Owners Manual - Page 22

... the OK button.
4 Use the CURSOR ▲ and ▼ buttons to select
MPEG NR.
LIGHT SENSOR OPERATION
Picture brightness will automatically be grayed out if you turn on the Light sensor function.
• Please set PICTURE MODE to User then can turn on the remote control to display the Main menu.
2 Use the...
Owners Manual - Page 23

... Date.
5 Use the CURSOR ◄ and ► buttons to highlight
ADVANCED. Reset the previous adjustment settings under the ADVANCED mode to the factory default value.
1 Use the CURSOR ◄ and ► buttons... : • When you select to PC source or USB mode, the120Hz
CONDITION default setting is set to select
Eastern, Central, Mountain, Pacific, Alaska or Hawaii. Current Time
1 Press ...
Owners Manual - Page 24

...min, 150 min, and 180 min for your choice of setting the desired caption type to be displayed with Digital TV signal programs on your panel.
1 Press the MENU button on the remote control to ...region. ANALOG CLOSED-CAPTION OPERATION Analog CC- turn on TV at your choice of setting the counting down of setting the desired caption type to be turned off by itself.
On Time Function- ...
Owners Manual - Page 25

....
1 Use the CURSOR ◄ and ► buttons to reset the previous adjustment settings of setting the desired caption style superimposed on the remote control to display the Main menu.
2...). SYSTEM INFO OPERATION
System Info-
Caption is a textual information transmitted along with the picture and sound.
Turning captioning ON causes the HDTV to open these captions (Digital or Analog...
Owners Manual - Page 27
.... • Use the CURSOR ◄ and ► buttons to view Next or Previous picture . • Use the INFO button to highlight
Slideshow Effect. Use the CURSOR ◄ ...Blind Down, Box In and Box Out.
4 Use the CURSOR ▲ and ▼ buttons to highlight
Settings.
SETTINGS (for Slideshow function) OPERATION
1 Use the CURSOR ▲ and ▼ buttons to highlight
Slideshow Repeat. ...
Owners Manual - Page 29

... these Solutions:
Page No.
Caption signal. HELPFUL HINTS - select captioning mode.
• Select another channel. Cannot display picture on a full screen
• Press the PIX SHAPE button on the remote control to change settings.
7, 11, 15 - 16
9, 23 9, 21
Poor Picture/ Sound (watching Analog)
"No Signal" message appears on the remote control.
28
Owners Manual - Page 30
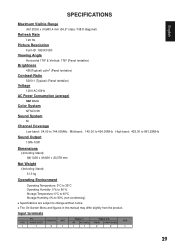
... Visible Range
(H)1209.6 x (V)680.4 mm (54.6" class /138.8 diagonal)
Refresh Rate
120 Hz
Picture Resolution
Full HD 1920X1080
Viewing Angle
Horizontal 178° & Vertical: 178° (Panel tentative)
Brightness
450(Typical) cd/m2 (Panel tentative)
Contrast Ratio
5000:1 (Typical) (Panel tentative)
Voltage
120V AC 60Hz
AC Power Consumption (average)
342 Watts
Color System
NTSC3...
Similar Questions

Best Picture Settings For A Sanyo Dp32670
What would be the best picture settings for a sanyo dp32679
What would be the best picture settings for a sanyo dp32679
(Posted by mumu1049 9 years ago)

How To Set Up My Sanyo Dp55441 For Best Picture With High Def Receiver
(Posted by ylbelm 10 years ago)

What Are The Best Picture Settings For A Sanyo 55 Inch Lcd Dp55441
(Posted by rashKi 10 years ago)

I Would Like The Best Picture Settings For Sanyo 32' Dp32642
(Posted by waynesworld033 11 years ago)
What Are The Recommended Picture Settings For The Best Picture?
I'm looking for suggestions for the picture settings to get the best color and brightness.
I'm looking for suggestions for the picture settings to get the best color and brightness.
(Posted by kayusdeus 12 years ago)