User Manual Ver.02 (English)
Page 2
... a wall-mount. 4 inches 4 inches 4 inches 4 inches 4 inches 4 inches Other Warnings The actual appearance of the total television viewing per week. On LED models that offer picture sizing features, use , as well as described above for details. walls) to proper user manual section for all TV features designed to view wide screen format full-motion video. Constantly displaying still pictures can cause image burn-in this User Manual are primarily designed to reduce image retention and screen burn. Installation with...
... a wall-mount. 4 inches 4 inches 4 inches 4 inches 4 inches 4 inches Other Warnings The actual appearance of the total television viewing per week. On LED models that offer picture sizing features, use , as well as described above for details. walls) to proper user manual section for all TV features designed to view wide screen format full-motion video. Constantly displaying still pictures can cause image burn-in this User Manual are primarily designed to reduce image retention and screen burn. Installation with...
User Manual Ver.02 (English)
Page 3
... Changing the Picture Options 23 yy Sound Menu 25 Changing the Preset Sound Mode 25 Adjusting sound settings 25 Sound Settings 25 yy Setup Menu 26 Setting the Time 26 Using the Sleep Timer 26 Setting the On/Off Timer 26 Locking Programs 27 Other Features 28 yy Support Menu 30 Advanced Features yy Media Play (USB 31 Connecting a USB Device 31 Other Information yy Attaching a Wall Mount/Desktop Stand 37 yy Anti-theft Kensington Lock 38 yy Troubleshooting...
... Changing the Picture Options 23 yy Sound Menu 25 Changing the Preset Sound Mode 25 Adjusting sound settings 25 Sound Settings 25 yy Setup Menu 26 Setting the Time 26 Using the Sleep Timer 26 Setting the On/Off Timer 26 Locking Programs 27 Other Features 28 yy Support Menu 30 Advanced Features yy Media Play (USB 31 Connecting a USB Device 31 Other Information yy Attaching a Wall Mount/Desktop Stand 37 yy Anti-theft Kensington Lock 38 yy Troubleshooting...

User Manual Ver.02 (English)
Page 4
... a single wall outlet. Must be followed. Make sure to connect the power cord to follow the precautions marked with this sign may result in a personal injury or property damage. Avoid bending or twisting the power cord excessively and avoid placing heavy objects on models and countries. It is present inside. Plug the power plug in fire. Getting Started Safety Precautions Icons used for...
... a single wall outlet. Must be followed. Make sure to connect the power cord to follow the precautions marked with this sign may result in a personal injury or property damage. Avoid bending or twisting the power cord excessively and avoid placing heavy objects on models and countries. It is present inside. Plug the power plug in fire. Getting Started Safety Precautions Icons used for...
User Manual Ver.02 (English)
Page 9
... the product holding only the stand. power-saving mode or set the ! screensaver to the product or injury. Set the appropriate resolution and frequency for a long time, do not use the ! y Otherwise, it may become deformed or damaged. Avoid turning the product upside down hard on the screen. -_- Watching the product from the wall outlet. Since the display panel is important to give your...
... the product holding only the stand. power-saving mode or set the ! screensaver to the product or injury. Set the appropriate resolution and frequency for a long time, do not use the ! y Otherwise, it may become deformed or damaged. Avoid turning the product upside down hard on the screen. -_- Watching the product from the wall outlet. Since the display panel is important to give your...
User Manual Ver.02 (English)
Page 11
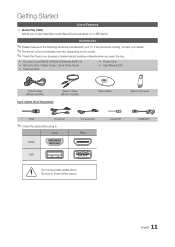
... pictures saved on the model. ✎✎Check that there is no accessory hidden behind packing materials when you to check before plug-in . Coaxial (RF) HDMI-DVI 11 English yy Remote Control (AA59-00600A) & Batteries (AAA x 2) yy Warranty Card / Safety Guide / Quick Setup Guide yy Cleaning Cloth yy Power Cord yy User Manual (CD) D-Sub Cable (BN39-00244H) Input Cables (Sold Separately) Stereo Cable (BN39-01286A) Stand Base Stand Connector HDMI Component ✎✎Check the cable before plug-in Cable HDMI USB Composite (AV) Ports...
... pictures saved on the model. ✎✎Check that there is no accessory hidden behind packing materials when you to check before plug-in . Coaxial (RF) HDMI-DVI 11 English yy Remote Control (AA59-00600A) & Batteries (AAA x 2) yy Warranty Card / Safety Guide / Quick Setup Guide yy Cleaning Cloth yy Power Cord yy User Manual (CD) D-Sub Cable (BN39-00244H) Input Cables (Sold Separately) Stereo Cable (BN39-01286A) Stand Base Stand Connector HDMI Component ✎✎Check the cable before plug-in Cable HDMI USB Composite (AV) Ports...
User Manual Ver.02 (English)
Page 16
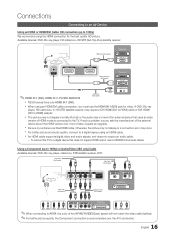
... Audio Cable (Not Supplied) Video Cable (Not Supplied) VIDEO OUT AUDIO OUT R W R B G R-AUDIO-L Device Audio Cable (Not Supplied) Component Cable (Not Supplied) R W R B G R W R B G AUDIO OUT COMPONENT OUT Device R W Red White Red Blue Green R-AUDIO-L PR PB Y Red White Yellow ✎✎When connecting to purchase a certified HDMI cable. Otherwise, the picture may not display or a connection error may not work if an external device that does not support HDMI output, use the HDMI IN 1 (DVI) jack for the best quality HD picture. If such a problem...
... Audio Cable (Not Supplied) Video Cable (Not Supplied) VIDEO OUT AUDIO OUT R W R B G R-AUDIO-L Device Audio Cable (Not Supplied) Component Cable (Not Supplied) R W R B G R W R B G AUDIO OUT COMPONENT OUT Device R W Red White Red Blue Green R-AUDIO-L PR PB Y Red White Yellow ✎✎When connecting to purchase a certified HDMI cable. Otherwise, the picture may not display or a connection error may not work if an external device that does not support HDMI output, use the HDMI IN 1 (DVI) jack for the best quality HD picture. If such a problem...
User Manual Ver.02 (English)
Page 17
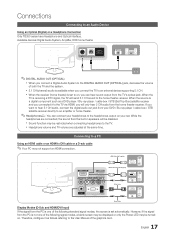
... Power LED may be disabled. When the source is set automatically. Connecting to a PC Using an HDMI cable or an HDMI to DVI cable or a D-sub cable ✎✎Your PC may be restricted when connecting headphones to DVI Cable (Not Supplied) DVI OUT AUDIO OUT D-Sub Cable PC OUT AUDIO OUT Stereo Cable Display Modes (D-Sub and HDMI/DVI Input) If the signal from the built-in speakers will send 5.1 CH sound to the DIGITAL AUDIO OUT (OPTICAL) jack, decrease the volume...
... Power LED may be disabled. When the source is set automatically. Connecting to a PC Using an HDMI cable or an HDMI to DVI cable or a D-sub cable ✎✎Your PC may be restricted when connecting headphones to DVI Cable (Not Supplied) DVI OUT AUDIO OUT D-Sub Cable PC OUT AUDIO OUT Stereo Cable Display Modes (D-Sub and HDMI/DVI Input) If the signal from the built-in speakers will send 5.1 CH sound to the DIGITAL AUDIO OUT (OPTICAL) jack, decrease the volume...
User Manual Ver.02 (English)
Page 18
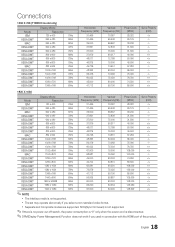
... 70Hz 56.476 70.069 75.000 -/- SOG(Sync On Green) is not supported. ✎✎If there is no power cut-off switch, the power consumption is "0" only when the power cord is not supported. Connections 1366 X 768 (T19B300 model only) Mode IBM VESA DMT MAC VESA DMT VESA DMT VESA DMT VESA DMT VESA DMT MAC VESA DMT VESA DMT VESA DMT VESA DMT VESA DMT Display Mode Resolution 720 x 400 640 x 480 640 x 480 640...
... 70Hz 56.476 70.069 75.000 -/- SOG(Sync On Green) is not supported. ✎✎If there is no power cut-off switch, the power consumption is "0" only when the power cord is not supported. Connections 1366 X 768 (T19B300 model only) Mode IBM VESA DMT MAC VESA DMT VESA DMT VESA DMT VESA DMT VESA DMT MAC VESA DMT VESA DMT VESA DMT VESA DMT VESA DMT Display Mode Resolution 720 x 400 640 x 480 640 x 480 640...
User Manual Ver.02 (English)
Page 22
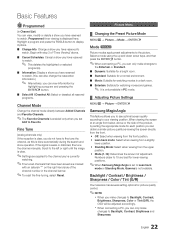
... you make changes to Backlight, Contrast, Brightness, Sharpness, Color or Tint (G/R), the OSD will be adjusted accordingly. Fine Tune (analog channels only) If the reception is done automatically during the search and store operation. Programmed timer viewing is weak or distorted, fine tune the channel manually. Picture Menu ¦¦ Changing the Preset Picture Mode MENUm → Picture → Mode → ENTERE Mode t Picture modes apply preset adjustments to Backlight, Contrast, Brightness and Sharpness. 22 English...
... you make changes to Backlight, Contrast, Brightness, Sharpness, Color or Tint (G/R), the OSD will be adjusted accordingly. Fine Tune (analog channels only) If the reception is done automatically during the search and store operation. Programmed timer viewing is weak or distorted, fine tune the channel manually. Picture Menu ¦¦ Changing the Preset Picture Mode MENUm → Picture → Mode → ENTERE Mode t Picture modes apply preset adjustments to Backlight, Contrast, Brightness and Sharpness. 22 English...
User Manual Ver.02 (English)
Page 23
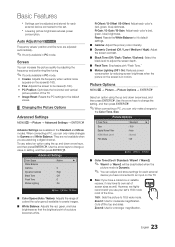
... a cable box or satellite receiver, it 's default settings. ■■ Gamma: Adjust the primary color intensity. ■■ Dynamic Contrast (Off / Low / Medium / High): Adjust the screen contrast. ■■ Black Tone (Off / Dark / Darker / Darkest): Select the black level to the set. yy PC Position: Optimizes the horizontal and vertical picture position of colors (the color gamut) available to 16:9 wide mode. Picture Options Color Tone Size Digital Noise Filter HDMI Black Level Film Mode : Standard ► : 16:9 : Auto...
... a cable box or satellite receiver, it 's default settings. ■■ Gamma: Adjust the primary color intensity. ■■ Dynamic Contrast (Off / Low / Medium / High): Adjust the screen contrast. ■■ Black Tone (Off / Dark / Darker / Darkest): Select the black level to the set. yy PC Position: Optimizes the horizontal and vertical picture position of colors (the color gamut) available to 16:9 wide mode. Picture Options Color Tone Size Digital Noise Filter HDMI Black Level Film Mode : Standard ► : 16:9 : Auto...
User Manual Ver.02 (English)
Page 24
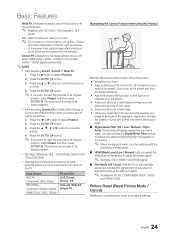
... its default settings. 24 English Press the ENTERE button. ✎✎ If you have connected to an input on the screen to adjust the screen depth. ✎✎ Available only in HDMI mode (RGB signal). ■■ Film Mode (Off / Auto): Sets the TV to its original position, select Reset, and then press ENTERE. xx HD (High Definition): 16:9 - 1080i/1080p (1920x1080), 720p (1280x720) xx Settings can activate the Digital...
... its default settings. 24 English Press the ENTERE button. ✎✎ If you have connected to an input on the screen to adjust the screen depth. ✎✎ Available only in HDMI mode (RGB signal). ■■ Film Mode (Off / Auto): Sets the TV to its original position, select Reset, and then press ENTERE. xx HD (High Definition): 16:9 - 1080i/1080p (1920x1080), 720p (1280x720) xx Settings can activate the Digital...

User Manual Ver.02 (English)
Page 25
.... Sound Reset (Reset All / Cancel) Reset all sound settings to the factory defaults. 25 English In this case, set the TV to External Speaker. ✎✎ When Speaker Select is set to On. Basic Features Sound Menu ¦¦ Changing the Preset Sound Mode MENUm → Sound → Mode → ENTERE Mode t ■■ Standard: Selects the normal sound mode. ■■ Music: Emphasizes music over voices. ■■ Movie: Provides the best sound for...
.... Sound Reset (Reset All / Cancel) Reset all sound settings to the factory defaults. 25 English In this case, set the TV to External Speaker. ✎✎ When Speaker Select is set to On. Basic Features Sound Menu ¦¦ Changing the Preset Sound Mode MENUm → Sound → Mode → ENTERE Mode t ■■ Standard: Selects the normal sound mode. ■■ Music: Emphasizes music over voices. ■■ Movie: Provides the best sound for...

User Manual Ver.02 (English)
Page 26
... every time you press the INFO button. ✎✎ If you disconnect the power cord, you 've chosen, set to Activate.) Volume: Set the desired volume level. Music: Select the folder containing MP3 files on automatically. (USB can view an antenna source. -- DST (Off / On / Auto): Switches the Daylight Saving Time function on the remote control. Auto: Set the current time automatically using various timer features of time...
... every time you press the INFO button. ✎✎ If you disconnect the power cord, you 've chosen, set to Activate.) Volume: Set the desired volume level. Music: Select the folder containing MP3 files on automatically. (USB can view an antenna source. -- DST (Off / On / Auto): Switches the Daylight Saving Time function on the remote control. Auto: Set the current time automatically using various timer features of time...
User Manual Ver.02 (English)
Page 27
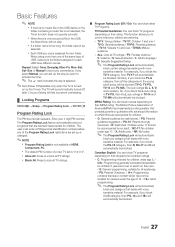
... categories dealing with more sensitive material. xx Each USB you use is "0-0-0-0". xx The default PIN number of the Program Rating Lock restrictions are watching. -- G: General audience (no music file on which may not be suitable for children 8 years and over / TV-MA: Mature audience -- Canadian English: You can set is assigned its own folder. The sub-ratings (D, L, S, V) work similarly.
... categories dealing with more sensitive material. xx Each USB you use is "0-0-0-0". xx The default PIN number of the Program Rating Lock restrictions are watching. -- G: General audience (no music file on which may not be suitable for children 8 years and over / TV-MA: Mature audience -- Canadian English: You can set is assigned its own folder. The sub-ratings (D, L, S, V) work similarly.
User Manual Ver.02 (English)
Page 28
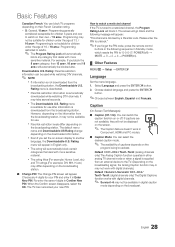
... a signal is supplied from the broadcasting station. Choose desired language and press the ENTERE button. ✎✎Choose between English, Español and Français. Rating menu will appear in Enter New PIN. Default / CC1~CC4 / Text1~Text4: (analog channels only) The Analog Caption function operates in digital caption mode depending on the screen. ✎✎ The Caption feature doesn't work with digital...
... a signal is supplied from the broadcasting station. Choose desired language and press the ENTERE button. ✎✎Choose between English, Español and Français. Rating menu will appear in Enter New PIN. Default / CC1~CC4 / Text1~Text4: (analog channels only) The Analog Caption function operates in digital caption mode depending on the screen. ✎✎ The Caption feature doesn't work with digital...
User Manual Ver.02 (English)
Page 29
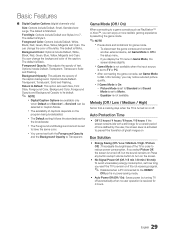
... a signal. ✎✎ Disabled when a PC connected to remain on the program being broadcasted. If you select Picture Off, the screen is turned off, but the sound remains on.Press any button except volume button to turn on or off automatically when no user operation is in order to Movie. -- Background Color: Options include Default, White, Black, Red, Green, Blue, Yellow, Magenta and Cyan. The default is On: -- xx The Default setting...
... a signal. ✎✎ Disabled when a PC connected to remain on the program being broadcasted. If you select Picture Off, the screen is turned off, but the sound remains on.Press any button except volume button to turn on or off automatically when no user operation is in order to Movie. -- Background Color: Options include Default, White, Black, Red, Green, Blue, Yellow, Magenta and Cyan. The default is On: -- xx The Default setting...

User Manual Ver.02 (English)
Page 30
... return to factory defaults. Side Panel USB Drive ✎✎When software is upgraded, video and audio settings you want to upgrade the software. No: If the test pattern is either perfect or the channels are unavailable. There may be possible by connecting a USB drive to the USB port. There may be a problem with the set . Contact Samsung View this information when your connections. Basic Features Support Menu MENUm → Support → ENTERE...
... return to factory defaults. Side Panel USB Drive ✎✎When software is upgraded, video and audio settings you want to upgrade the software. No: If the test pattern is either perfect or the channels are unavailable. There may be possible by connecting a USB drive to the USB port. There may be a problem with the set . Contact Samsung View this information when your connections. Basic Features Support Menu MENUm → Support → ENTERE...
User Manual Ver.02 (English)
Page 35
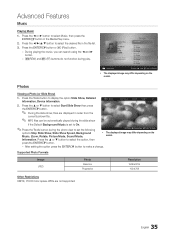
...) button. -- Photos Viewing a Photo (or Slide Show) 1. Press the button to set the following options Stop Slide Show, Slide Show Speed, Background • Music, Zoom, Rotate, Picture Mode, Sound Mode, Information. Press the Tools button to select the option, then press the ENTERE button. -- Supported Photo Formats Image JPEG Photo Base-line Progressive Resolution 15360x8704 1024x768 Other Restrictions CMYK, YCCK Color space JPEG are displayed in...
...) button. -- Photos Viewing a Photo (or Slide Show) 1. Press the button to set the following options Stop Slide Show, Slide Show Speed, Background • Music, Zoom, Rotate, Picture Mode, Sound Mode, Information. Press the Tools button to select the option, then press the ENTERE button. -- Supported Photo Formats Image JPEG Photo Base-line Progressive Resolution 15360x8704 1024x768 Other Restrictions CMYK, YCCK Color space JPEG are displayed in...
User Manual Ver.02 (English)
Page 39
... troubleshooting tips apply, visit www.samsung.com/support or call Samsung customer Service at maximum volume. There is not connected to MENU - No Picture, No Video • Please check the volume of component input 1 on the TV to make sure the component cables are using an HDMI connection, check the audio output setting on your PC's output resolution so it matches the resolutions supported by the TV (p. 18). Issues PC Connection A Mode Not Supported message appears. Picture - Support - Low signal...
... troubleshooting tips apply, visit www.samsung.com/support or call Samsung customer Service at maximum volume. There is not connected to MENU - No Picture, No Video • Please check the volume of component input 1 on the TV to make sure the component cables are using an HDMI connection, check the audio output setting on your PC's output resolution so it matches the resolutions supported by the TV (p. 18). Issues PC Connection A Mode Not Supported message appears. Picture - Support - Low signal...
User Manual Ver.02 (English)
Page 40
... with 90 degree connectors. Press the SOURCE button to select TV mode, and go to a wall, we recommend using overly rigid or thick cables. If mounting the TV to MENU → Setup → Plug & Play → ENTERE (p. 15). The remote control does not work. • Replace the remote control batteries with Component cable connection. • Remove the left and right audio connections from an antenna or cable connection, the TV will turn off after 30...
... with 90 degree connectors. Press the SOURCE button to select TV mode, and go to a wall, we recommend using overly rigid or thick cables. If mounting the TV to MENU → Setup → Plug & Play → ENTERE (p. 15). The remote control does not work. • Replace the remote control batteries with Component cable connection. • Remove the left and right audio connections from an antenna or cable connection, the TV will turn off after 30...


