

Open Source Guide (ENGLISH)
Page 1
... source code, to the program. Activities other work written entirely by others will automatically terminate your freedom to share and change free software--to make it , thus forming a work based on the Program, and copy and distribute such modifications or work based on it, under any work based on a volume of this License. 8. or, b) Accompany it . For an executable work for this License, and its users...
... source code, to the program. Activities other work written entirely by others will automatically terminate your freedom to share and change free software--to make it , thus forming a work based on the Program, and copy and distribute such modifications or work based on it, under any work based on a volume of this License. 8. or, b) Accompany it . For an executable work for this License, and its users...
Open Source Guide (ENGLISH)
Page 2
... to Your New Libraries If you develop a new library, and you want it to be of the greatest possible use to the public, we recommend making it free software that everyone can do so by permitting redistribution under the terms of warranty; and each file should have at least the... "copyright" line and a pointer to where the full notice is safest to attach them to the start of each source file to the library. 16. You can redistribute and change...
... to Your New Libraries If you develop a new library, and you want it to be of the greatest possible use to the public, we recommend making it free software that everyone can do so by permitting redistribution under the terms of warranty; and each file should have at least the... "copyright" line and a pointer to where the full notice is safest to attach them to the start of each source file to the library. 16. You can redistribute and change...
User Manual (ENGLISH)
Page 2
... Stand 2-2 Removing the Stand 2-3 Attaching a Wall Mount/Desktop Stand 2-4 Connecting to a Computer 2-5 Using it as a TV 2-6 Connecting an HDMI cable 2-7 Connecting Using a DVI to HDMI Cable 2-8 Connecting a Component cable 2-9 Connecting AV Devices 2-10 Connecting to an Amplifier 2-11 Connecting Headphones 2-12 Kensington Lock 2-13 USING THE PRODUCT Plug & Play Feature 3-1 Viewing the Control panel 3-2 Remote Control 3-3 Using the Screen Adjustment Menu (OSD: On Screen Display) . . . . 3-4 Installing the Device Driver 3-5 Standard Signal Mode Table 3-6 INSTALLING THE SOFTWARE...
... Stand 2-2 Removing the Stand 2-3 Attaching a Wall Mount/Desktop Stand 2-4 Connecting to a Computer 2-5 Using it as a TV 2-6 Connecting an HDMI cable 2-7 Connecting Using a DVI to HDMI Cable 2-8 Connecting a Component cable 2-9 Connecting AV Devices 2-10 Connecting to an Amplifier 2-11 Connecting Headphones 2-12 Kensington Lock 2-13 USING THE PRODUCT Plug & Play Feature 3-1 Viewing the Control panel 3-2 Remote Control 3-3 Using the Screen Adjustment Menu (OSD: On Screen Display) . . . . 3-4 Installing the Device Driver 3-5 Standard Signal Mode Table 3-6 INSTALLING THE SOFTWARE...
User Manual (ENGLISH)
Page 4
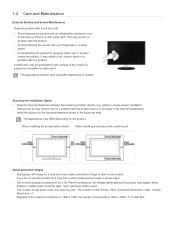
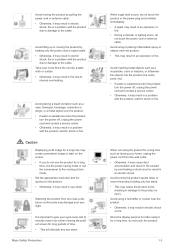
... a problem with a wall-mount About persistent images • Displaying a still image for a long time, set the power-saving mode or screen saver. • Due to technological constraints of the model if a supersonic humidifier is used near it . This may create a persistent image or stain on models. A white stain may result in fire or a problem with the product due to ensure proper ventilation. When installing the product with a stand When installing...
... a problem with a wall-mount About persistent images • Displaying a still image for a long time, set the power-saving mode or screen saver. • Due to technological constraints of the model if a supersonic humidifier is used near it . This may create a persistent image or stain on models. A white stain may result in fire or a problem with the product due to ensure proper ventilation. When installing the product with a stand When installing...
User Manual (ENGLISH)
Page 8
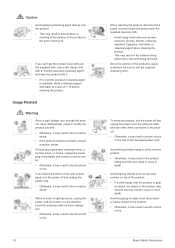
...can't get the product clean with just the supplied cloth, use the supplied cleansing cloth. When thunder or lighting occurs, unplug the power cord and under no monitor-exclusive cleansing agent is damaged, turn the power off and unplug the power cord, the antenna cable and any other wires connected to the product. ...shock. • If the product needs to be sure to the damaged power cord. To move the product, turn the power off . Avoid letting children hang or climb onto the product. • Otherwise, it may fall and this is easily scratched, be fixed, contact a service center.
...can't get the product clean with just the supplied cloth, use the supplied cleansing cloth. When thunder or lighting occurs, unplug the power cord and under no monitor-exclusive cleansing agent is damaged, turn the power off and unplug the power cord, the antenna cable and any other wires connected to the product. ...shock. • If the product needs to be sure to the damaged power cord. To move the product, turn the power off . Avoid letting children hang or climb onto the product. • Otherwise, it may fall and this is easily scratched, be fixed, contact a service center.
User Manual (ENGLISH)
Page 9
Caution Displaying a still image for a long time, use the power-saving mode or set the screensaver to the moving the product by pulling the power cord or antenna cable. • Otherwise, it may result in electric shock, fire or a problem with the product due to damage to the cable. Avoid turning the product upside down or move the product holding only the power cord or signal cable. •...
Caution Displaying a still image for a long time, use the power-saving mode or set the screensaver to the moving the product by pulling the power cord or antenna cable. • Otherwise, it may result in electric shock, fire or a problem with the product due to damage to the cable. Avoid turning the product upside down or move the product holding only the power cord or signal cable. •...

User Manual (ENGLISH)
Page 11
...) User Manual Power Cord Cable Holder Batteries (AAA X 2) (Not available in all of the following contents have been included. • Store the packaging box in case you need to move the product at a later stage. 2 Installing the Product 2-1 Package Contents • Unpack the product and check if all locations) Stand Connector Stand Base Remote Control Cleaning Cloth SOLD SEPARATELY D-Sub Cable HDMI Cable Stereo Cable The cleaning cloth is supplied with black...
...) User Manual Power Cord Cable Holder Batteries (AAA X 2) (Not available in all of the following contents have been included. • Store the packaging box in case you need to move the product at a later stage. 2 Installing the Product 2-1 Package Contents • Unpack the product and check if all locations) Stand Connector Stand Base Remote Control Cleaning Cloth SOLD SEPARATELY D-Sub Cable HDMI Cable Stereo Cable The cleaning cloth is supplied with black...
User Manual (ENGLISH)
Page 27
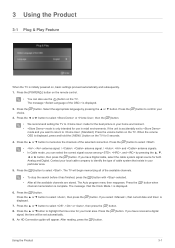
... channels are stored. An HD Connection guide will appear. 3 Using the Product 3-1 Plug & Play Feature When the TV is initially powered on the TV. If the unit is accidentally set automatically. 9. When the volume OSD is only intended for your home environment. • mode is displayed, press and hold the [ MENU ] button on the TV. Press the [ ] button to select , or , then press...
... channels are stored. An HD Connection guide will appear. 3 Using the Product 3-1 Plug & Play Feature When the TV is initially powered on the TV. If the unit is accidentally set automatically. 9. When the volume OSD is only intended for your home environment. • mode is displayed, press and hold the [ MENU ] button on the TV. Press the [ ] button to select , or , then press...
User Manual (ENGLISH)
Page 29
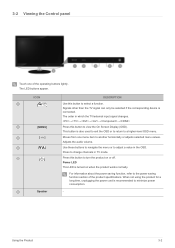
... audio volume. For information about the power saving function, refer to the power saving function section of the operating buttons lightly. 3-2 Viewing the Control panel Touch one menu item to turn the product on when the product works normally. When not using the product for a long time, unplugging the power cord is also used to exit the OSD or to return to minimize power consumption. - The LED buttons appear. Press to view the On Screen Display (OSD). Signals...
... audio volume. For information about the power saving function, refer to the power saving function section of the operating buttons lightly. 3-2 Viewing the Control panel Touch one menu item to turn the product on when the product works normally. When not using the product for a long time, unplugging the power cord is also used to exit the OSD or to return to minimize power consumption. - The LED buttons appear. Press to view the On Screen Display (OSD). Signals...
User Manual (ENGLISH)
Page 30
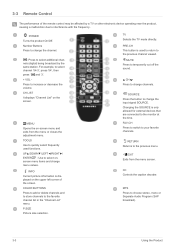
... devices that are connected to the monitor at the time. SOURCE Press the button to select onscreen menu items and change the input signal SOURCE. UP▲/DOWN▼/LEFT◄/RIGHT►/ ENTER : Use to change menu values. PRE-CH This button is used functions. Changing the SOURCE is displayed on the screen. MTS Press to your favorite channels. Number Buttons Press to interference with the frequency. CH LIST It...
... devices that are connected to the monitor at the time. SOURCE Press the button to select onscreen menu items and change the input signal SOURCE. UP▲/DOWN▼/LEFT◄/RIGHT►/ ENTER : Use to change menu values. PRE-CH This button is used functions. Changing the SOURCE is displayed on the screen. MTS Press to your favorite channels. Number Buttons Press to interference with the frequency. CH LIST It...
User Manual (ENGLISH)
Page 32
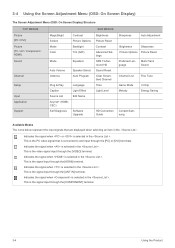
...) The Screen Adjustment Menu (OSD: On Screen Display) Structure TOP MENUS Picture [PC / DVI] Picture [TV / AV / Component / HDMI] Sound Channel Setup Input Application Support MagicBright Screen Mode Color Contrast Picture Options Backlight Tint (G/R) Mode Equalizer Auto Volume Antenna Speaker Select Auto Program Plug & Play Language Caption Light Effect Source List Edit Name Anynet+ (HDMICEC) Self Diagnosis Software Upgrade SUB MENUS Brightness Picture Reset Contrast Advanced Settings SRS TruSurround HD Sound Reset Clear Scrambled Channel Time Light Level HD Connection Guide...
...) The Screen Adjustment Menu (OSD: On Screen Display) Structure TOP MENUS Picture [PC / DVI] Picture [TV / AV / Component / HDMI] Sound Channel Setup Input Application Support MagicBright Screen Mode Color Contrast Picture Options Backlight Tint (G/R) Mode Equalizer Auto Volume Antenna Speaker Select Auto Program Plug & Play Language Caption Light Effect Source List Edit Name Anynet+ (HDMICEC) Self Diagnosis Software Upgrade SUB MENUS Brightness Picture Reset Contrast Advanced Settings SRS TruSurround HD Sound Reset Clear Scrambled Channel Time Light Level HD Connection Guide...
User Manual (ENGLISH)
Page 33
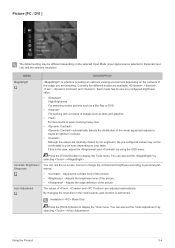
... of the visual signal and adjusts to display the Tools menu. Picture [PC / DVI ] The default setting may not be different depending on the selected Input Mode (input signal source selected in External Input List) and the selected resolution MENU DESCRIPTION MagicBright is a feature providing an optimum viewing environment depending on the contents of the image you are watching. Contrast / Brightness / You can also set the by using the OSD menu. Currently five different...
... of the visual signal and adjusts to display the Tools menu. Picture [PC / DVI ] The default setting may not be different depending on the selected Input Mode (input signal source selected in External Input List) and the selected resolution MENU DESCRIPTION MagicBright is a feature providing an optimum viewing environment depending on the contents of the image you are watching. Contrast / Brightness / You can also set the by using the OSD menu. Currently five different...
User Manual (ENGLISH)
Page 35
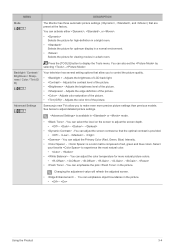
...- Changing the adjustment value will refresh the adjusted screen. • - Your television has several setting options that allow you to make even more natural picture colors. • - - - - - - • - Adjusts the contrast level of the picture. • - Adjusts the brightness level of the picture. • - Adjusts color saturation of LCD back light. • - You can adjust the Primary Color (Red, Green, Blue) Intensity. • - Using the Product 3-4 Adjusts the brightness of the picture. • - Backlight / Contrast / Brightness / Sharpness...
...- Changing the adjustment value will refresh the adjusted screen. • - Your television has several setting options that allow you to make even more natural picture colors. • - - - - - - • - Adjusts the contrast level of the picture. • - Adjusts the brightness level of the picture. • - Adjusts color saturation of LCD back light. • - You can adjust the Primary Color (Red, Green, Blue) Intensity. • - Using the Product 3-4 Adjusts the brightness of the picture. • - Backlight / Contrast / Brightness / Sharpness...

User Manual (ENGLISH)
Page 36
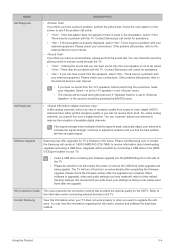
... of the picture more than . • - MENU Picture Options Picture Reset DESCRIPTION • The tone of the color can be changed. • - - - • or is only activated when the picture mode is . • Settings can be adjusted and stored for each external device you have connected to an input of the TV. • You can switch the Size. The direct button on the remote control is supported in , (480i...
... of the picture more than . • - MENU Picture Options Picture Reset DESCRIPTION • The tone of the color can be changed. • - - - • or is only activated when the picture mode is . • Settings can be adjusted and stored for each external device you have connected to an input of the TV. • You can switch the Size. The direct button on the remote control is supported in , (480i...

User Manual (ENGLISH)
Page 42
... mode. • If the picture is poor when external device is connected to TV, check if is selected, press the ► button to and cannot be changed . Set to Activate.) • Set the desired volume level. • View antenna type. ( or ). To cancel the function, select . • / / Three different on the remote control. • Auto Power Off When you display the TV menu in timer On mode...
... mode. • If the picture is poor when external device is connected to TV, check if is selected, press the ► button to and cannot be changed . Set to Activate.) • Set the desired volume level. • View antenna type. ( or ). To cancel the function, select . • / / Three different on the remote control. • Auto Power Off When you display the TV menu in timer On mode...

User Manual (ENGLISH)
Page 45
... because the volume has been reduced to reduce power consumption. Using the Product 3-4 MENU Melody Energy Saving Input DESCRIPTION A melody sound can use the [SOURCE] button on when the monitor is turned off the energy saving function. • : Sets the TV to low energy saving mode. • : Sets the TV to medium energy saving mode. • : Sets the TV to high energy saving mode. • : Automatically adjusts the brightness of the TV screen in order...
... because the volume has been reduced to reduce power consumption. Using the Product 3-4 MENU Melody Energy Saving Input DESCRIPTION A melody sound can use the [SOURCE] button on when the monitor is turned off the energy saving function. • : Sets the TV to low energy saving mode. • : Sets the TV to medium energy saving mode. • : Sets the TV to high energy saving mode. • : Automatically adjusts the brightness of the TV screen in order...
User Manual (ENGLISH)
Page 49
... sound by connecting a USB drive to the [SERVICE] port located on your antenna to or the sound is properly displayed, select . Upgrades will be possible by playing a built-in the menu. • The melody will turn off and turn on the screen to not disconnect the power or remove the USB drive while upgrades are complete. Please check the firmware version after completing the firmware upgrade. When software is weak, physically adjust...
... sound by connecting a USB drive to the [SERVICE] port located on your antenna to or the sound is properly displayed, select . Upgrades will be possible by playing a built-in the menu. • The melody will turn off and turn on the screen to not disconnect the power or remove the USB drive while upgrades are complete. Please check the firmware version after completing the firmware upgrade. When software is weak, physically adjust...
User Manual (ENGLISH)
Page 50
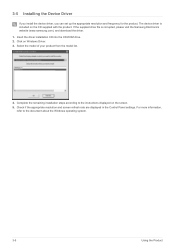
... download the driver. 1. Click on the CD supplied with the product. Check if the appropriate resolution and screen refresh rate are displayed in the Control Panel settings. 3-5 Installing the Device Driver If you install the device driver, you can set up the appropriate resolution and frequency for the product. Complete the remaining installation steps according to the document about the Windows operating system. 3-5 Using the Product For more information, refer to the instructions displayed...
... download the driver. 1. Click on the CD supplied with the product. Check if the appropriate resolution and screen refresh rate are displayed in the Control Panel settings. 3-5 Installing the Device Driver If you install the device driver, you can set up the appropriate resolution and frequency for the product. Complete the remaining installation steps according to the document about the Windows operating system. 3-5 Using the Product For more information, refer to the instructions displayed...
User Manual (ENGLISH)
Page 51
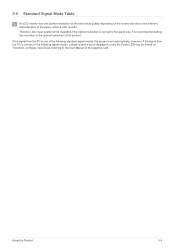
... to the User Manual of the panel, unlike a CDT monitor. 3-6 Standard Signal Mode Table An LCD monitor has one optimal resolution for the panel size. Therefore, the visual quality will be degraded if the optimal resolution is not one of the following standard signal modes, the screen is recommended setting the resolution to the optimal resolution of the following signal modes, a blank screen may be displayed or only the Power LED may be turned on the screen size due to...
... to the User Manual of the panel, unlike a CDT monitor. 3-6 Standard Signal Mode Table An LCD monitor has one optimal resolution for the panel size. Therefore, the visual quality will be degraded if the optimal resolution is not one of the following standard signal modes, the screen is recommended setting the resolution to the optimal resolution of the following signal modes, a blank screen may be displayed or only the Power LED may be turned on the screen size due to...
User Manual (ENGLISH)
Page 56
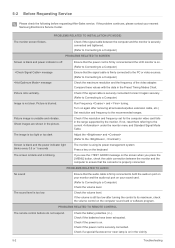
... 5-2 Troubleshooting Adjust the and (Refer to the , ) The monitor is properly connected. Check the battery polarities (+/-). PROBLEMS RELATED TO INSTALLATION (PC MODE) The monitor screen flickers. PROBLEMS RELATED TO AUDIO No sound The sound level is not clear. If the volume is still too low after removing all accessories(video extension cable, etc.) Set resolution and frequency to both the audio-in the range supported by the monitor. Check if the power is blurred. message message Picture rolls vertically. Picture is...
... 5-2 Troubleshooting Adjust the and (Refer to the , ) The monitor is properly connected. Check the battery polarities (+/-). PROBLEMS RELATED TO INSTALLATION (PC MODE) The monitor screen flickers. PROBLEMS RELATED TO AUDIO No sound The sound level is not clear. If the volume is still too low after removing all accessories(video extension cable, etc.) Set resolution and frequency to both the audio-in the range supported by the monitor. Check if the power is blurred. message message Picture rolls vertically. Picture is...


