
User Manual (ENGLISH)
Page 1
SyncMaster P2370HD P2570HD P2770HD LCD TV Monitor User Manual The color and the appearance may differ depending on the product, and the specifications are subject to change without prior notice to improve the performance.
SyncMaster P2370HD P2570HD P2770HD LCD TV Monitor User Manual The color and the appearance may differ depending on the product, and the specifications are subject to change without prior notice to improve the performance.
User Manual (ENGLISH)
Page 2
... Control 3-3 Using the Screen Adjustment Menu (OSD: On Screen Display) . . . . 3-4 Installing the Device Driver 3-5 Standard Signal Mode Table 3-6 INSTALLING THE SOFTWARE Natural Color 4-1 MultiScreen 4-2 TROUBLESHOOTING Monitor Self-Diagnosis 5-1 Before Requesting Service 5-2 FAQ 5-3 MORE INFORMATION Specifications 6-1 Power Saving Function 6-2 Contact...
... Control 3-3 Using the Screen Adjustment Menu (OSD: On Screen Display) . . . . 3-4 Installing the Device Driver 3-5 Standard Signal Mode Table 3-6 INSTALLING THE SOFTWARE Natural Color 4-1 MultiScreen 4-2 TROUBLESHOOTING Monitor Self-Diagnosis 5-1 Before Requesting Service 5-2 FAQ 5-3 MORE INFORMATION Specifications 6-1 Power Saving Function 6-2 Contact...
User Manual (ENGLISH)
Page 8
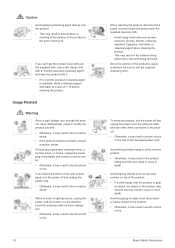
.... • Otherwise, it may result in fire or electric shock. • If the product needs to use a soft, damp cloth with a "monitor-exclusive cleansing agent" and wipe the product with it. • If no circumstance touch the antenna cable as this may result in injury or death.... When thunder or lighting occurs, unplug the power cord and under no monitor-exclusive cleansing agent is dangerous. • Otherwise, it may result in the product falling and this is available, dilute a cleansing agent with...
.... • Otherwise, it may result in fire or electric shock. • If the product needs to use a soft, damp cloth with a "monitor-exclusive cleansing agent" and wipe the product with it. • If no circumstance touch the antenna cable as this may result in injury or death.... When thunder or lighting occurs, unplug the power cord and under no monitor-exclusive cleansing agent is dangerous. • Otherwise, it may result in the product falling and this is available, dilute a cleansing agent with...
User Manual (ENGLISH)
Page 15
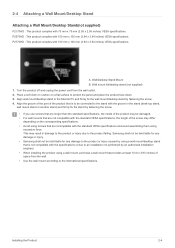
...longer than the standard specifications, the inside of space from the wall outlet. 2. P2570HD : This product complies with 100 mm x 100 mm (3.94 x 3.94 inches) VESA specifications. Align wall mount/desktop stand to the Monitor/TV and firmly fix the wall mount/desktop stand by using excessive force. Installing...the power cord from the wall. • Use the wall mount according to the product or injury caused by fastening the screw. 4. Samsung shall not be held liable for any damage or injury. • Samsung shall not be held liable for any damage to the international specifications.
...longer than the standard specifications, the inside of space from the wall outlet. 2. P2570HD : This product complies with 100 mm x 100 mm (3.94 x 3.94 inches) VESA specifications. Align wall mount/desktop stand to the Monitor/TV and firmly fix the wall mount/desktop stand by using excessive force. Installing...the power cord from the wall. • Use the wall mount according to the product or injury caused by fastening the screw. 4. Samsung shall not be held liable for any damage or injury. • Samsung shall not be held liable for any damage to the international specifications.
User Manual (ENGLISH)
Page 17
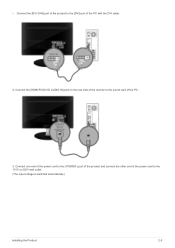
Connect the [HDMI/PC/DVI-D AUDIO IN] port on the rear side of the monitor to the [DVI] port of the PC with the DVI cable. 2. • Connect the [DVI-D IN] port of the product to the sound card of the PC. 3. Connect one end of the power cord to the [ POWER ] port of the product and connect the other end of the power cord to the 110V or 220V wall outlet. (The input voltage is switched automatically.) Installing the Product 2-5
Connect the [HDMI/PC/DVI-D AUDIO IN] port on the rear side of the monitor to the [DVI] port of the PC with the DVI cable. 2. • Connect the [DVI-D IN] port of the product to the sound card of the PC. 3. Connect one end of the power cord to the [ POWER ] port of the product and connect the other end of the power cord to the 110V or 220V wall outlet. (The input voltage is switched automatically.) Installing the Product 2-5
User Manual (ENGLISH)
Page 18
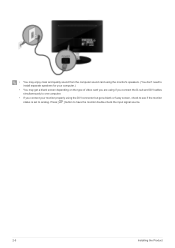
Press [ ] button to analog. • You may enjoy clear and quality sound from the computer sound card using the monitor's speakers. (You don't need to install separate speakers for your computer.) • You may get a blank screen depending on the type of video card you are using if you connect the D-sub and DVI cables simultaneously to one computer. • If you connect your monitor properly using the DVI connector but get a blank or fuzzy screen, check to see if the monitor status is set to have the monitor double-check the input signal source. 2-5 Installing the Product
Press [ ] button to analog. • You may enjoy clear and quality sound from the computer sound card using the monitor's speakers. (You don't need to install separate speakers for your computer.) • You may get a blank screen depending on the type of video card you are using if you connect the D-sub and DVI cables simultaneously to one computer. • If you connect your monitor properly using the DVI connector but get a blank or fuzzy screen, check to see if the monitor status is set to have the monitor double-check the input signal source. 2-5 Installing the Product
User Manual (ENGLISH)
Page 19
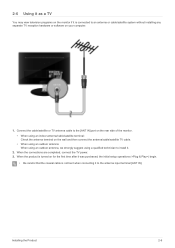
Connect the cable/satellite or TV antenna cable to the [ANT IN] port on the rear side of the monitor. • When using an indoor antenna/cable/satellite terminal: Check the antenna terminal on the wall and then connect the antenna/cable/satellite TV cable. &#... your computer. 1. Installing the Product 2-6 When the connections are completed, connect the TV power. 3. 2-6 Using it as a TV You may view television programs on the monitor if it . 2.
Connect the cable/satellite or TV antenna cable to the [ANT IN] port on the rear side of the monitor. • When using an indoor antenna/cable/satellite terminal: Check the antenna terminal on the wall and then connect the antenna/cable/satellite TV cable. &#... your computer. 1. Installing the Product 2-6 When the connections are completed, connect the TV power. 3. 2-6 Using it as a TV You may view television programs on the monitor if it . 2.
User Manual (ENGLISH)
Page 20
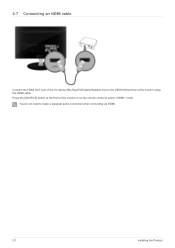
You do not need to select mode. Press the [SOURCE] button at the front of the monitor using the HDMI cable. 2-7 Connecting an HDMI cable Connect the HDMI OUT port of the AV device (Blu-Ray/DVD/Cable/Satellite box) to the [HDMI IN] terminal of the monitor or on the remote control to make a separate audio connection when connecting via HDMI. 2-7 Installing the Product
You do not need to select mode. Press the [SOURCE] button at the front of the monitor using the HDMI cable. 2-7 Connecting an HDMI cable Connect the HDMI OUT port of the AV device (Blu-Ray/DVD/Cable/Satellite box) to the [HDMI IN] terminal of the monitor or on the remote control to make a separate audio connection when connecting via HDMI. 2-7 Installing the Product
User Manual (ENGLISH)
Page 21
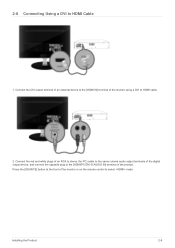
Press the [SOURCE] button at the front of the monitor or on the remote control to the [HDMI/PC/DVI-D AUDIO IN] terminal of the product. Connect the red and white plugs of an RCA to stereo (for PC) cable to the same colored audio output terminals of the monitor using a DVI to HDMI Cable 1. Installing the Product 2-8 Connect the DVI output terminal of an external device to the [HDMI IN] terminal of the digital output device, and connect the opposite plug to select mode. 2-8 Connecting Using a DVI to HDMI cable. 2.
Press the [SOURCE] button at the front of the monitor or on the remote control to the [HDMI/PC/DVI-D AUDIO IN] terminal of the product. Connect the red and white plugs of an RCA to stereo (for PC) cable to the same colored audio output terminals of the monitor using a DVI to HDMI Cable 1. Installing the Product 2-8 Connect the DVI output terminal of an external device to the [HDMI IN] terminal of the digital output device, and connect the opposite plug to select mode. 2-8 Connecting Using a DVI to HDMI cable. 2.
User Manual (ENGLISH)
Page 22
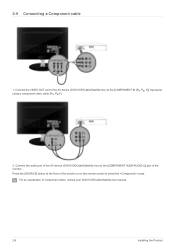
Press the [SOURCE] button at the front of Component video, consult your DVD/VCR/Cable/Satellite box manual. 2-9 Installing the Product For an explanation of the monitor or on the remote control to the [COMPONENT IN [PR, PB, Y]] input ports using a component video cable [PR, PB,Y]. 2. Connect the VIDEO OUT port of the monitor. Connect the audio port of the AV device (DVD/VCR/Cable/Satellite box) to the [COMPONENT IN [[R-AUDIO-L]] port of the AV device (DVD/VCR/Cable/Satellite box) to select the mode. 2-9 Connecting a Component cable 1.
Press the [SOURCE] button at the front of Component video, consult your DVD/VCR/Cable/Satellite box manual. 2-9 Installing the Product For an explanation of the monitor or on the remote control to the [COMPONENT IN [PR, PB, Y]] input ports using a component video cable [PR, PB,Y]. 2. Connect the VIDEO OUT port of the monitor. Connect the audio port of the AV device (DVD/VCR/Cable/Satellite box) to the [COMPONENT IN [[R-AUDIO-L]] port of the AV device (DVD/VCR/Cable/Satellite box) to select the mode. 2-9 Connecting a Component cable 1.
User Manual (ENGLISH)
Page 23
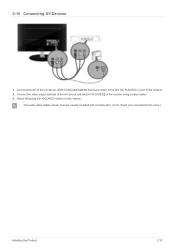
Connect the video output terminal of the AV device and the [AV IN [VIDEO]] of the product. 2. Connect the port of the AV device (DVD/VCR/Cable/Satellite box/Camcorder) to the [AV IN [ R-AUDIO-L ] port of the monitor using the button on the remote. • The audio-video cables shown here are usually included with a Camcorder. (If not, check your local electronics store.) Installing the Product 2-10 2-10 Connecting AV Devices 1. Select [AV]using a video cable. 3.
Connect the video output terminal of the AV device and the [AV IN [VIDEO]] of the product. 2. Connect the port of the AV device (DVD/VCR/Cable/Satellite box/Camcorder) to the [AV IN [ R-AUDIO-L ] port of the monitor using the button on the remote. • The audio-video cables shown here are usually included with a Camcorder. (If not, check your local electronics store.) Installing the Product 2-10 2-10 Connecting AV Devices 1. Select [AV]using a video cable. 3.
User Manual (ENGLISH)
Page 24
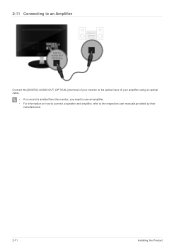
2-11 Connecting to an Amplifier Connect the [DIGITAL AUDIO OUT (OPTICAL)] terminal of your monitor to the optical input of your amplifier using an optical cable. • If no sound is emitted from the monitor, you need to use an amplifier. • For information on how to connect a speaker and amplifier, refer to the respective user manuals provided by their manufacturers. 2-11 Installing the Product
2-11 Connecting to an Amplifier Connect the [DIGITAL AUDIO OUT (OPTICAL)] terminal of your monitor to the optical input of your amplifier using an optical cable. • If no sound is emitted from the monitor, you need to use an amplifier. • For information on how to connect a speaker and amplifier, refer to the respective user manuals provided by their manufacturers. 2-11 Installing the Product
User Manual (ENGLISH)
Page 30
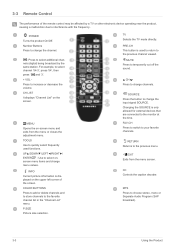
... Returns to increase or decrease the volume. POWER Turns the product On/Off. UP▲/DOWN▼/LEFT◄/RIGHT►/ ENTER : Use to the monitor at the time. Changing the SOURCE is displayed on the upper left corner of the remote control may be affected by the same station.
... Returns to increase or decrease the volume. POWER Turns the product On/Off. UP▲/DOWN▼/LEFT◄/RIGHT►/ ENTER : Use to the monitor at the time. Changing the SOURCE is displayed on the upper left corner of the remote control may be affected by the same station.
User Manual (ENGLISH)
Page 35
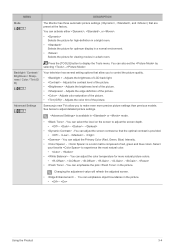
MENU DESCRIPTION Mode The Monitor has three automatic picture settings (, , and ) that allow you ...You can adjust the screen contrast so that the optimal contrast is provided. • - - - • - Samsung's new TVs allow you to display the Tools menu. See below to experience the most natural color. • - ...the [TOOLS] button to make even more natural picture colors. • - - - - - - • - Adjusts the color tint of LCD back light. • - You can activate either , , or . • Selects the picture for high-definition in a bright room. •...
MENU DESCRIPTION Mode The Monitor has three automatic picture settings (, , and ) that allow you ...You can adjust the screen contrast so that the optimal contrast is provided. • - - - • - Samsung's new TVs allow you to display the Tools menu. See below to experience the most natural color. • - ...the [TOOLS] button to make even more natural picture colors. • - - - - - - • - Adjusts the color tint of LCD back light. • - You can activate either , , or . • Selects the picture for high-definition in a bright room. •...
User Manual (ENGLISH)
Page 44
... and Background cannot be set to adjust the light level i.e., the brightness of the light. • ~ The higher the number, the brighter the light of monitor. MENU Caption(On-Screen Text Messages) Light Effect Light Level DESCRIPTION • You can turn the LED on/off on the front of the LED...
... and Background cannot be set to adjust the light level i.e., the brightness of the light. • ~ The higher the number, the brighter the light of monitor. MENU Caption(On-Screen Text Messages) Light Effect Light Level DESCRIPTION • You can turn the LED on/off on the front of the LED...

User Manual (ENGLISH)
Page 45
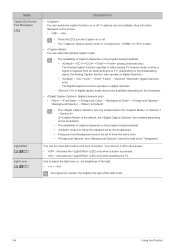
MENU Melody Energy Saving Input DESCRIPTION A melody sound can use the [SOURCE] button on when the monitor is output from the TV because the volume has been reduced to reduce power consumption. Name the input device connected to the input jacks to ... brightness of your input source selection easier. - - - - - - < Game> - - - - - - - - - MENU Source List Edit Name DESCRIPTION Use to select , or an external input source connected to the Monitor.Use to select the screen of the TV screen in order to minimum with the scenes. You can be set the mode option to to...
MENU Melody Energy Saving Input DESCRIPTION A melody sound can use the [SOURCE] button on when the monitor is output from the TV because the volume has been reduced to reduce power consumption. Name the input device connected to the input jacks to ... brightness of your input source selection easier. - - - - - - < Game> - - - - - - - - - MENU Source List Edit Name DESCRIPTION Use to select , or an external input source connected to the Monitor.Use to select the screen of the TV screen in order to minimum with the scenes. You can be set the mode option to to...
User Manual (ENGLISH)
Page 51
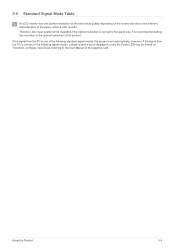
... or only the Power LED may be turned on the screen size due to the User Manual of the panel, unlike a CDT monitor. 3-6 Standard Signal Mode Table An LCD monitor has one optimal resolution for the panel size. Therefore, configure it as follows referring to the inherent characteristics of the graphics card. It...
... or only the Power LED may be turned on the screen size due to the User Manual of the panel, unlike a CDT monitor. 3-6 Standard Signal Mode Table An LCD monitor has one optimal resolution for the panel size. Therefore, configure it as follows referring to the inherent characteristics of the graphics card. It...
User Manual (ENGLISH)
Page 53
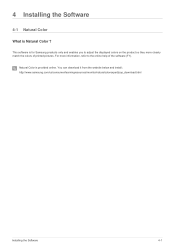
This software is Natural Color ? http://www.samsung.com/us/consumer/learningresources/monitor/naturalcolorexpert/pop_download.html Installing the Software 4-1 For more closely match the colors of the software (F1). You can download it from the website below and install; 4 Installing the Software 4-1 Natural Color What is for Samsung products only and enables you to adjust the displayed colors on the product so they more information, refer to the online help of printed pictures. Natural Color is provided online.
This software is Natural Color ? http://www.samsung.com/us/consumer/learningresources/monitor/naturalcolorexpert/pop_download.html Installing the Software 4-1 For more closely match the colors of the software (F1). You can download it from the website below and install; 4 Installing the Software 4-1 Natural Color What is for Samsung products only and enables you to adjust the displayed colors on the product so they more information, refer to the online help of printed pictures. Natural Color is provided online.

User Manual (ENGLISH)
Page 54
... the installation CD into the CD-ROM drive. 2. Select the MultiScreen setup program. MultiScreen Installation Requirements The MultiScreen installation may not appear depending on the Monitor. Installing the Software 1. Select MultiScreen from the program list and click the [Add/Delete] button. 4-2 Installing the Software
... the installation CD into the CD-ROM drive. 2. Select the MultiScreen setup program. MultiScreen Installation Requirements The MultiScreen installation may not appear depending on the Monitor. Installing the Software 1. Select MultiScreen from the program list and click the [Add/Delete] button. 4-2 Installing the Software
User Manual (ENGLISH)
Page 55
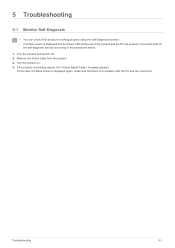
... the self-diagnosis function according to the procedures below. 1. Remove the D-Sub cable from the product. 3. Troubleshooting 5-1 Turn the product and the PC off. 2. 5 Troubleshooting 5-1 Monitor Self-Diagnosis • You can check if the product is working properly, the message appears.
... the self-diagnosis function according to the procedures below. 1. Remove the D-Sub cable from the product. 3. Troubleshooting 5-1 Turn the product and the PC off. 2. 5 Troubleshooting 5-1 Monitor Self-Diagnosis • You can check if the product is working properly, the message appears.


