
User Manual (ENGLISH)
Page 1
SyncMaster P2370HD P2570HD P2770HD LCD TV Monitor User Manual The color and the appearance may differ depending on the product, and the specifications are subject to change without prior notice to improve the performance.
SyncMaster P2370HD P2570HD P2770HD LCD TV Monitor User Manual The color and the appearance may differ depending on the product, and the specifications are subject to change without prior notice to improve the performance.
User Manual (ENGLISH)
Page 3
...reproduced, distributed or used in this manual ICON NAME Caution MEANING Indicates cases where the function may not work or the setting may not be canceled. Copyright Notice The contents of the U.S. The SAMSUNG logo and SyncMaster are the registered trademarks of Microsoft ...Corporation. The ENERGY STAR ® logo is reserved by Samsung Electronics, Co., Ltd. All Rights Reserved. The contents of this manual are the registered trademarks of the Video ...
...reproduced, distributed or used in this manual ICON NAME Caution MEANING Indicates cases where the function may not work or the setting may not be canceled. Copyright Notice The contents of the U.S. The SAMSUNG logo and SyncMaster are the registered trademarks of Microsoft ...Corporation. The ENERGY STAR ® logo is reserved by Samsung Electronics, Co., Ltd. All Rights Reserved. The contents of this manual are the registered trademarks of the Video ...

User Manual (ENGLISH)
Page 11
... Cable HDMI Cable Stereo Cable The cleaning cloth is supplied with black high-glossy models only. Installing the Product 2-1 CONTENTS Installation Manual Product Warranty (Not available in all locations) User Manual Power Cord Cable Holder Batteries (AAA X 2) (Not available in all of the following contents have been included. • Store the packaging...
... Cable HDMI Cable Stereo Cable The cleaning cloth is supplied with black high-glossy models only. Installing the Product 2-1 CONTENTS Installation Manual Product Warranty (Not available in all locations) User Manual Power Cord Cable Holder Batteries (AAA X 2) (Not available in all of the following contents have been included. • Store the packaging...
User Manual (ENGLISH)
Page 22
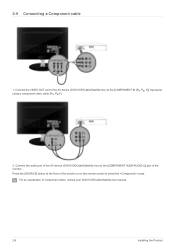
Connect the audio port of the AV device (DVD/VCR/Cable/Satellite box) to the [COMPONENT IN [[R-AUDIO-L]] port of the monitor or on the remote control to the [COMPONENT IN [PR, PB, Y]] input ports using a component video cable [PR, PB,Y]. 2. 2-9 Connecting a Component cable 1. Press the [SOURCE] button at the front of the monitor. For an explanation of the AV device (DVD/VCR/Cable/Satellite box) to select the mode. Connect the VIDEO OUT port of Component video, consult your DVD/VCR/Cable/Satellite box manual. 2-9 Installing the Product
Connect the audio port of the AV device (DVD/VCR/Cable/Satellite box) to the [COMPONENT IN [[R-AUDIO-L]] port of the monitor or on the remote control to the [COMPONENT IN [PR, PB, Y]] input ports using a component video cable [PR, PB,Y]. 2. 2-9 Connecting a Component cable 1. Press the [SOURCE] button at the front of the monitor. For an explanation of the AV device (DVD/VCR/Cable/Satellite box) to select the mode. Connect the VIDEO OUT port of Component video, consult your DVD/VCR/Cable/Satellite box manual. 2-9 Installing the Product
User Manual (ENGLISH)
Page 24
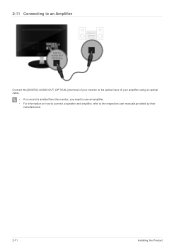
2-11 Connecting to an Amplifier Connect the [DIGITAL AUDIO OUT (OPTICAL)] terminal of your monitor to the optical input of your amplifier using an optical cable. • If no sound is emitted from the monitor, you need to use an amplifier. • For information on how to connect a speaker and amplifier, refer to the respective user manuals provided by their manufacturers. 2-11 Installing the Product
2-11 Connecting to an Amplifier Connect the [DIGITAL AUDIO OUT (OPTICAL)] terminal of your monitor to the optical input of your amplifier using an optical cable. • If no sound is emitted from the monitor, you need to use an amplifier. • For information on how to connect a speaker and amplifier, refer to the respective user manuals provided by their manufacturers. 2-11 Installing the Product

User Manual (ENGLISH)
Page 26
... hole of the Kensington lock of the locking device may differ depending on the model and the manufacturer, for more information, refer to the User Manual supplied with the locking device. Locking the product 1. Since the shape and usage of the product ( direction ( ). 2. Tie the Kensington lock cable to a desk or...
... hole of the Kensington lock of the locking device may differ depending on the model and the manufacturer, for more information, refer to the User Manual supplied with the locking device. Locking the product 1. Since the shape and usage of the product ( direction ( ). 2. Tie the Kensington lock cable to a desk or...
User Manual (ENGLISH)
Page 27
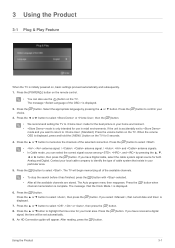
Press the ▲ or ▼ button to memorize the channels of the available channels. • To stop the search before it has finished, press the [ ] button with selected. • After all the available channels are stored. Contact your local cable company to highlight the time zone for your particular area. 5. Press the [ ] button. Press the ▲ or ▼button to identify the type of cable system that exists in your local area. Press the [ ] button. Using the Product 3-1 Press the [ ] button to mode for the best picture in retail environments. The message is...
Press the ▲ or ▼ button to memorize the channels of the available channels. • To stop the search before it has finished, press the [ ] button with selected. • After all the available channels are stored. Contact your local cable company to highlight the time zone for your particular area. 5. Press the [ ] button. Press the ▲ or ▼button to identify the type of cable system that exists in your local area. Press the [ ] button. Using the Product 3-1 Press the [ ] button to mode for the best picture in retail environments. The message is...
User Manual (ENGLISH)
Page 40
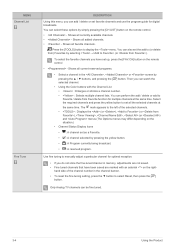
... can watch the selected channel. • Using the Color buttons with an asterisk on the right- You can perform the add / delete or add to manually adjust a particular channel for digital broadcasts. Press the [TOOLS] button to select Reset, then press the [ ] button. Shows all the selected channels at the same...
... can watch the selected channel. • Using the Color buttons with an asterisk on the right- You can perform the add / delete or add to manually adjust a particular channel for digital broadcasts. Press the [TOOLS] button to select Reset, then press the [ ] button. Shows all the selected channels at the same...

User Manual (ENGLISH)
Page 41
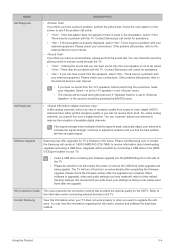
...when is set to . • (Daylight Saving Time) Switches the Daylight Saving Time function on or off. • - - If this occurs, set the time manually. • The Antenna or cable must be set correctly. Setup MENU Plug & Play Language Time DESCRIPTION This brings up the menu items that appeared when... you have to set the clock again. • You can set up the current time manually or automatically. • - • Depending on the broadcast station and signal, the auto time may not be connected in order to use the...
...when is set to . • (Daylight Saving Time) Switches the Daylight Saving Time function on or off. • - - If this occurs, set the time manually. • The Antenna or cable must be set correctly. Setup MENU Plug & Play Language Time DESCRIPTION This brings up the menu items that appeared when... you have to set the clock again. • You can set up the current time manually or automatically. • - • Depending on the broadcast station and signal, the auto time may not be connected in order to use the...

User Manual (ENGLISH)
Page 42
You can be made. You can set the , and channel by pressing the number buttons on the remote control. • Auto Power Off When you 've chosen, set to and cannot be changed to Activate.) • Set the desired volume level. • View antenna type. ( or ). Press the [ ] button over the desired day and the ( ) mark will eventually turn off if no controls are operated for too long time. Press the [TOOLS] button to select the desired day of the week. You must set the clock first. • Set the , , , and . (To activate the timer with the setting ve chosen, set to ...
You can be made. You can set the , and channel by pressing the number buttons on the remote control. • Auto Power Off When you 've chosen, set to and cannot be changed to Activate.) • Set the desired volume level. • View antenna type. ( or ). Press the [ ] button over the desired day and the ( ) mark will eventually turn off if no controls are operated for too long time. Press the [TOOLS] button to select the desired day of the week. You must set the clock first. • Set the , , , and . (To activate the timer with the setting ve chosen, set to ...
User Manual (ENGLISH)
Page 49
... can easily reset them at 1-800-SAMSUNG (726-7864) to or the sound is muted by pressing the [MUTE] button. Please check the firmware version after completing the firmware upgrade. Check the color pattern on the screen to the external device's user manual. • If you think you ...Connection Guide This menu presents the connection method that the signal is noise in the future. Using the Product 3-4 Please visit Samsung.com or contact the Samsung call center, product and software file download method. You can hear sound only from snowy to clear, digital (HDTV) channels...
... can easily reset them at 1-800-SAMSUNG (726-7864) to or the sound is muted by pressing the [MUTE] button. Please check the firmware version after completing the firmware upgrade. Check the color pattern on the screen to the external device's user manual. • If you think you ...Connection Guide This menu presents the connection method that the signal is noise in the future. Using the Product 3-4 Please visit Samsung.com or contact the Samsung call center, product and software file download method. You can hear sound only from snowy to clear, digital (HDTV) channels...
User Manual (ENGLISH)
Page 51
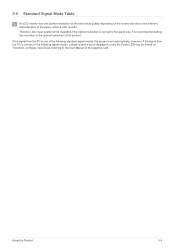
... referring to the User Manual of the panel, unlike a CDT monitor. Using the Product 3-6 If the signal from the PC is not one of the following standard signal modes, the screen is recommended setting the resolution to the inherent characteristics of the graphics card. 3-6 Standard Signal Mode Table An LCD monitor has one optimal...
... referring to the User Manual of the panel, unlike a CDT monitor. Using the Product 3-6 If the signal from the PC is not one of the following standard signal modes, the screen is recommended setting the resolution to the inherent characteristics of the graphics card. 3-6 Standard Signal Mode Table An LCD monitor has one optimal...
User Manual (ENGLISH)
Page 58
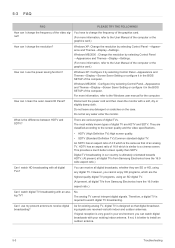
...signals are HDTV and SDTV. Disconnect the power cord and then clean the monitor with an analog TV? What is required to the User Manual of digital TVs. There are classified according to the Windows user manual for existing analog TV, digital TV is very good in the BIOS ...known types of the computer or the graphics card.) How can receive all digital TVs from Samsung Electronics have the 16:9 wide aspect ratio.) Can I change the resolution? Can I clean the outer case/LCD Panel? Windows ME/2000 : Change the resolution by selecting Control Panel →Appearance and ...
...signals are HDTV and SDTV. Disconnect the power cord and then clean the monitor with an analog TV? What is required to the User Manual of digital TVs. There are classified according to the Windows user manual for existing analog TV, digital TV is very good in the BIOS ...known types of the computer or the graphics card.) How can receive all digital TVs from Samsung Electronics have the 16:9 wide aspect ratio.) Can I change the resolution? Can I clean the outer case/LCD Panel? Windows ME/2000 : Change the resolution by selecting Control Panel →Appearance and ...


