
User Guide
Page 4
... Start Menu 40 Understanding a Window 41 Control Panel 42 Opening the Control Panel 42 User Account 43 Changing the Resolution and Colors 45 Chapter 4. Using the Computer Stylus Pen 20 Entering Text 22 Using the Tablet PC Input Panel 22 Dialkeys 25 Volume Control 26 Using the Buttons 27 The Menu Button 27 The Quick Launch Button 28 The Auto Scaler Button 30 CF Card Slot 31 Connecting a Monitor 33 Connecting a Monitor 33 Viewing on the computer 18 To turn off the computer 18 Chapter 2. Using the Network Connecting...
... Start Menu 40 Understanding a Window 41 Control Panel 42 Opening the Control Panel 42 User Account 43 Changing the Resolution and Colors 45 Chapter 4. Using the Computer Stylus Pen 20 Entering Text 22 Using the Tablet PC Input Panel 22 Dialkeys 25 Volume Control 26 Using the Buttons 27 The Menu Button 27 The Quick Launch Button 28 The Auto Scaler Button 30 CF Card Slot 31 Connecting a Monitor 33 Connecting a Monitor 33 Viewing on the computer 18 To turn off the computer 18 Chapter 2. Using the Network Connecting...
User Guide
Page 5
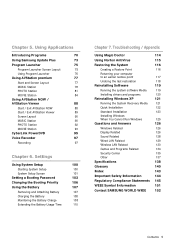
Settings Using System Setup Starting System Setup System Setup Screen Setting a Booting Password Changing the Booting Priority Using the Battery Removing and Attaching Battery Charging the Battery Monitoring the Battery Charge Extending the Battery Usage Time 100 100 101 103 106 107 107 108 108 110 Chapter 7. Using Applications Introducing Programs 70 Using Samsung Update Plus 73 Program Launcher 75 Program Launcher Screen Layout 75 Using Program Launcher 76 Using AVStation premium 77 Start and Screen Layout 77 MUSIC Station 78 PHOTO Station...
Settings Using System Setup Starting System Setup System Setup Screen Setting a Booting Password Changing the Booting Priority Using the Battery Removing and Attaching Battery Charging the Battery Monitoring the Battery Charge Extending the Battery Usage Time 100 100 101 103 106 107 107 108 108 110 Chapter 7. Using Applications Introducing Programs 70 Using Samsung Update Plus 73 Program Launcher 75 Program Launcher Screen Layout 75 Using Program Launcher 76 Using AVStation premium 77 Start and Screen Layout 77 MUSIC Station 78 PHOTO Station...

User Guide
Page 15
... Card Slot A slot into which an Ethernet cable is operating. Status Indicators z HDD x Wireless LAN c Charge Status v Power Status z HDD v Power Status x Wireless LAN c Charge Status This turns on while the hard disk drive is emitted through these holes. This shows the computer operating status. Off : When the computer is the same as pressing the ++ keys on the Button keyboard. connects the computer to AC power. Green: When the battery is fully charged...
... Card Slot A slot into which an Ethernet cable is operating. Status Indicators z HDD x Wireless LAN c Charge Status v Power Status z HDD v Power Status x Wireless LAN c Charge Status This turns on while the hard disk drive is emitted through these holes. This shows the computer operating status. Off : When the computer is the same as pressing the ++ keys on the Button keyboard. connects the computer to AC power. Green: When the battery is fully charged...

User Guide
Page 16
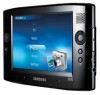
... Strap Hole You can keep the Stylus Pen in the HOLD status, the Charge LED ( ) blinks for a moment. v Volume Control Button A button used to control the volume. ( p.26) b HOLD Switch When sliding the HOLD switch into the HOLD position (upwards), no buttons will work. face. ( p.33) z x USB Port A port used to connect a USB device such as a USB keyboard, mouse, USB ODD, etc. n Stylus Pen / Stylus Slot The Stylus is used to enter information through the touch screen. ( p.20) You can connect the Hand Strap here.
... Strap Hole You can keep the Stylus Pen in the HOLD status, the Charge LED ( ) blinks for a moment. v Volume Control Button A button used to control the volume. ( p.26) b HOLD Switch When sliding the HOLD switch into the HOLD position (upwards), no buttons will work. face. ( p.33) z x USB Port A port used to connect a USB device such as a USB keyboard, mouse, USB ODD, etc. n Stylus Pen / Stylus Slot The Stylus is used to enter information through the touch screen. ( p.20) You can connect the Hand Strap here.

User Guide
Page 38
Select Start > All Programs > Tablet PC > Tablet PC Tutorials. Before running the Tutorials, select the Start > Control Panel > Appearance and Themes > Display > Settings tab and change the screen resolution to the system. The Tablet PC Tour screen appears. Click Next to learn how to hand-write on the Writing Pad through the Tablet PC Tour. Tablet PC Tutorials You can use the system recovery media by connecting the external USB ODD to 1024x768...
Select Start > All Programs > Tablet PC > Tablet PC Tutorials. Before running the Tutorials, select the Start > Control Panel > Appearance and Themes > Display > Settings tab and change the screen resolution to the system. The Tablet PC Tour screen appears. Click Next to learn how to hand-write on the Writing Pad through the Tablet PC Tour. Tablet PC Tutorials You can use the system recovery media by connecting the external USB ODD to 1024x768...

User Guide
Page 42
... the volume, select a sound scheme, and set up speakers. Performance and Maintenance Using this function, you can add or remove a program from Windows. Add or Remove Programs Using this function, you can set a Windows XP user account. User Accounts Using this function, you can check the current security status to change the appearance of Windows. Accessibility Options Using this function, you can add or set Windows performance options. Security Center Using this function, you can manage the hard disk drive and hardware. Network and Internet Using this function...
... the volume, select a sound scheme, and set up speakers. Performance and Maintenance Using this function, you can add or remove a program from Windows. Add or Remove Programs Using this function, you can set a Windows XP user account. User Accounts Using this function, you can check the current security status to change the appearance of Windows. Accessibility Options Using this function, you can add or set Windows performance options. Security Center Using this function, you can manage the hard disk drive and hardware. Network and Internet Using this function...
User Guide
Page 54
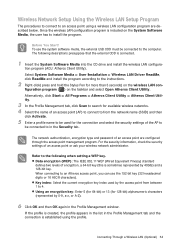
... System Software Media, the user has to install the program. The network authentication, encryption type and password of an access point or ask your wireless network administrator. Connecting Through a Wireless LAN (Optional) 54 tion program (ACU: Atheros Client Utility). For the security information, check the security settings of an access point are described below. Wireless Network Setup Using the Wireless LAN Setup Program The procedures to connect to an access point using the profile. Before You Start...
... System Software Media, the user has to install the program. The network authentication, encryption type and password of an access point or ask your wireless network administrator. Connecting Through a Wireless LAN (Optional) 54 tion program (ACU: Atheros Client Utility). For the security information, check the security settings of an access point are described below. Wireless Network Setup Using the Wireless LAN Setup Program The procedures to connect to an access point using the profile. Before You Start...

User Guide
Page 62
... access a wireless LAN in Ad-Hoc mode or connect to the Internet through an AP or Internet Connecting Sharing Server. • Network Access through a Phone Connection ( ) You can connect to the Internet through the computer. • HID Connections ( ) You can exchange files between 2 Bluetooth devices. Before You Start! • The Bluetooth function is only available between devices supporting the Bluetooth function without a cable connection. For more information about using the Bluetooth function, refer to a keyboard, mouse and printer between devices supporting Bluetooth...
... access a wireless LAN in Ad-Hoc mode or connect to the Internet through an AP or Internet Connecting Sharing Server. • Network Access through a Phone Connection ( ) You can connect to the Internet through the computer. • HID Connections ( ) You can exchange files between 2 Bluetooth devices. Before You Start! • The Bluetooth function is only available between devices supporting the Bluetooth function without a cable connection. For more information about using the Bluetooth function, refer to a keyboard, mouse and printer between devices supporting Bluetooth...

User Guide
Page 80
... a library holding music files used in Help. As an example, the procedures to add a folder are automatically added to add music files saved on Add by MUSIC Station. You can collect, manage and play your favorite music files. The procedures to the Library. • Play a Track not registered to the Library Click File > Open, select a music file to the Library and played. • Creating...
... a library holding music files used in Help. As an example, the procedures to add a folder are automatically added to add music files saved on Add by MUSIC Station. You can collect, manage and play your favorite music files. The procedures to the Library. • Play a Track not registered to the Library Click File > Open, select a music file to the Library and played. • Creating...

User Guide
Page 99
Settings Using System Setup Starting System Setup System Setup Screen Setting a Booting Password Changing the Booting Priority Using the Battery Removing and Attaching Battery Charging the Battery Monitoring the Battery Charge Extending the Battery Usage Time 100 100 101 103 106 107 107 108 108 110 Chapter 6.
Settings Using System Setup Starting System Setup System Setup Screen Setting a Booting Password Changing the Booting Priority Using the Battery Removing and Attaching Battery Charging the Battery Monitoring the Battery Charge Extending the Battery Usage Time 100 100 101 103 106 107 107 108 108 110 Chapter 6.
User Guide
Page 103
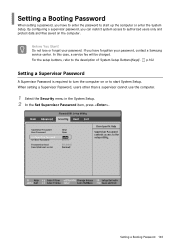
... protect data and files saved on or to start up the computer or enter the System Setup. Setting a Booting Password 103 p.102 Setting a Supervisor Password A Supervisor Password is required to turn the computer on the computer. Do not lose or forget your password, contact a Samsung service center. For the setup buttons, refer to the description of 'System Setup Buttons(Keys)'. When setting a Supervisor Password, users other than a supervisor cannot use the computer. 1 Select the Security menu...
... protect data and files saved on or to start up the computer or enter the System Setup. Setting a Booting Password 103 p.102 Setting a Supervisor Password A Supervisor Password is required to turn the computer on the computer. Do not lose or forget your password, contact a Samsung service center. For the setup buttons, refer to the description of 'System Setup Buttons(Keys)'. When setting a Supervisor Password, users other than a supervisor cannot use the computer. 1 Select the Security menu...

User Guide
Page 121
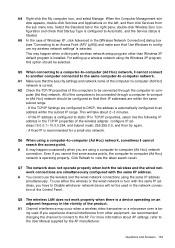
... the system recovery media, a USB external keyboard is not liable for Regional and Language Options, Date and Time, Computer Name, User Accounts, etc. Before turning the computer on the hard disk drive such as files, programs, etc. In order to minimize damage from data loss, please remember to the compu- Samsung Electronics is necessary. during the installation, the system will not recognize the USB keyboard. If you can change options, and...
... the system recovery media, a USB external keyboard is not liable for Regional and Language Options, Date and Time, Computer Name, User Accounts, etc. Before turning the computer on the hard disk drive such as files, programs, etc. In order to minimize damage from data loss, please remember to the compu- Samsung Electronics is necessary. during the installation, the system will not recognize the USB keyboard. If you can change options, and...
User Guide
Page 124
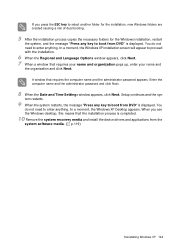
... message "Press any key to boot from the system software media. ( p.119) Reinstalling Windows XP 124 In a moment, the Windows XP Desktop appears. Enter the computer name and the administrator password and click Next. 8 When the Date and Time Settings window appears, click Next. You do not need to enter anything . In a moment, the Windows XP installation screen will appear to enter anything . A window that requires your name...
... message "Press any key to boot from the system software media. ( p.119) Reinstalling Windows XP 124 In a moment, the Windows XP Desktop appears. Enter the computer name and the administrator password and click Next. 8 When the Date and Time Settings window appears, click Next. You do not need to enter anything . In a moment, the Windows XP installation screen will appear to enter anything . A window that requires your name...

User Guide
Page 130
... properly installed. A3 Referring to Q4, check that the network key is a yellow exclamation mark, please reinstall the device driver with the system software Media. If the wireless LAN function is operating properly. If there is correct. A2 Referring to A2 of the AP is incorrect. It is case sensitive. A1 Check that the wireless network connection has been set to "Enable" in Start > Control Panel > Network Connections. - The network name...
... properly installed. A3 Referring to Q4, check that the network key is a yellow exclamation mark, please reinstall the device driver with the system software Media. If the wireless LAN function is operating properly. If there is correct. A2 Referring to A2 of the AP is incorrect. It is case sensitive. A1 Check that the wireless network connection has been set to "Enable" in Start > Control Panel > Network Connections. - The network name...

User Guide
Page 131
... a specific program. A2 Check if there is a signal for a standard environment and thus may cause compatibility problems. - Windows XP sup- ports wireless LAN connections through the Wireless Zero Configuration (WZC) service. Therefore, an additional program for an AP. A3 Initialize the device driver. Click Start > Control Panel > Performance and Maintenance > System > Hardware tab > Device Manager > Network adapters, and select the wireless LAN adapter. Then right-click over the network adaptor and select 'Enable...
... a specific program. A2 Check if there is a signal for a standard environment and thus may cause compatibility problems. - Windows XP sup- ports wireless LAN connections through the Wireless Zero Configuration (WZC) service. Therefore, an additional program for an AP. A3 Initialize the device driver. Click Start > Control Panel > Performance and Maintenance > System > Hardware tab > Device Manager > Network adapters, and select the wireless LAN adapter. Then right-click over the network adaptor and select 'Enable...
User Guide
Page 132
... than Windows XP default program is being used in the TCP/IP properties of the product. A1 Channel interference may occur when a wireless video transceiver or a microwave oven is installed. Select the Standard tab in the [Wireless Network Connection] dialog box (see "Connecting to an Access Point (AP)" (p50)) and make sure that Startup Type is Started. A1 Make sure that the security settings and network name of Windows XP...
... than Windows XP default program is being used in the TCP/IP properties of the product. A1 Channel interference may occur when a wireless video transceiver or a microwave oven is installed. Select the Standard tab in the [Wireless Network Connection] dialog box (see "Connecting to an Access Point (AP)" (p50)) and make sure that Startup Type is Started. A1 Make sure that the security settings and network name of Windows XP...

User Guide
Page 133
... use the Wireless LAN power saving function to extend the system battery use time. A3 If the AP is configured to 'Use network authentication (Shared Key)' If the AP is configured to authentication shared mode, all computers to , and select Shared Mode in the wireless network settings. If the Preferred networks window in the Wireless Network tab is selected, deselect the option on the Authentication tab. Select Start > Control Panel > Network and Internet Connections > Network Connections, right-click the Wireless Network Connection...
... use the Wireless LAN power saving function to extend the system battery use time. A3 If the AP is configured to 'Use network authentication (Shared Key)' If the AP is configured to authentication shared mode, all computers to , and select Shared Mode in the wireless network settings. If the Preferred networks window in the Wireless Network tab is selected, deselect the option on the Authentication tab. Select Start > Control Panel > Network and Internet Connections > Network Connections, right-click the Wireless Network Connection...

User Guide
Page 135
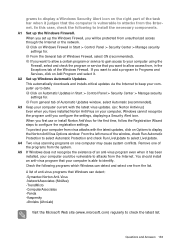
... installing an ActiveX control on Internet Options in Start > Control Panel > Security Center > Manage security settings for security reasons. A1 To display most of Internet Properties, click on Add. In this case, change the screen resolution to 800x600 pixels or press the Auto Scaler button to change the popup window display settings when connected to certain Web sites for . In this site from This Site. x In the Privacy tab of the popup windows when connected...
... installing an ActiveX control on Internet Options in Start > Control Panel > Security Center > Manage security settings for security reasons. A1 To display most of Internet Properties, click on Add. In this case, change the screen resolution to 800x600 pixels or press the Auto Scaler button to change the popup window display settings when connected to certain Web sites for . In this site from This Site. x In the Privacy tab of the popup windows when connected...
User Guide
Page 136
... the first time, follow the Registration Wizard steps to install the necessary components. To protect your computer from unauthorized access through the Internet or the network. You should install an anti-virus program that Windows can detect and select one of the programs from the system. Remove one from the list. z Click on Windows Firewall in Start > Control Panel > Security Center > Manage security settings for...
... the first time, follow the Registration Wizard steps to install the necessary components. To protect your computer from unauthorized access through the Internet or the network. You should install an anti-virus program that Windows can detect and select one of the programs from the system. Remove one from the list. z Click on Windows Firewall in Start > Control Panel > Security Center > Manage security settings for...

User Guide
Page 143
... / AP Connection 50 Auto Scaler Button 30 AVStation NOW 88 AVStation premium 77 B Battery 107 Battery Calibration 112 Battery Remaining Charge 112 BIOS (BIOS, Setup) Setting 100 Bluetooth / Help 62 Booting Priority 106 C Charge Click Control Panel CyberLink PowerDVD 108 20 42 71, 95 D Desktop Dual View DVD Play 39 34 85, 95 I Internet Sharing 58 M Magic Doctor 114 Maximum Battery Saving Mode 110 Menu Button 27 Monitor Connection / Output 33 Multimedia 70 Music Play 90 N Network 46 Network Status Diagnosis...
... / AP Connection 50 Auto Scaler Button 30 AVStation NOW 88 AVStation premium 77 B Battery 107 Battery Calibration 112 Battery Remaining Charge 112 BIOS (BIOS, Setup) Setting 100 Bluetooth / Help 62 Booting Priority 106 C Charge Click Control Panel CyberLink PowerDVD 108 20 42 71, 95 D Desktop Dual View DVD Play 39 34 85, 95 I Internet Sharing 58 M Magic Doctor 114 Maximum Battery Saving Mode 110 Menu Button 27 Monitor Connection / Output 33 Multimedia 70 Music Play 90 N Network 46 Network Status Diagnosis...


