User Manual (ENGLISH)
Page 4
...Menu ...3.8 EPSON/IBM Menu ...3.8 Network Menu ...3.9 iii Using the Control Panel Understanding the Control Panel 3.1 Display ...3.1 Buttons ...3.2 Using Control Panel Menus ...3.2 Accessing Control Panel Menus 3.2 Overview of the Paper in the Paper Tray 2.5 Connecting a Printer Cable ...2.6 For Local Printing ...2.6 For Network Printing ...2.6 Turning the Printer On ...2.7 Printing a Demo Page ...2.7 Changing the Display Language 2.8 Using the Toner Save Mode ...2.8 Using the Control Panel Button 2.8 Using the Control Panel Menu 2.8 From the Software Application 2.8 Installing Printer...
...Menu ...3.8 EPSON/IBM Menu ...3.8 Network Menu ...3.9 iii Using the Control Panel Understanding the Control Panel 3.1 Display ...3.1 Buttons ...3.2 Using Control Panel Menus ...3.2 Accessing Control Panel Menus 3.2 Overview of the Paper in the Paper Tray 2.5 Connecting a Printer Cable ...2.6 For Local Printing ...2.6 For Network Printing ...2.6 Turning the Printer On ...2.7 Printing a Demo Page ...2.7 Changing the Display Language 2.8 Using the Toner Save Mode ...2.8 Using the Control Panel Button 2.8 Using the Control Panel Menu 2.8 From the Software Application 2.8 Installing Printer...

User Manual (ENGLISH)
Page 6
... on Both Sides of Paper 10.2 Guidelines for Using Paper 10.3 Paper Specifications ...10.4 Paper Output Capacity ...10.4 Printer and Paper Storage Environment 10.4 Envelopes ...10.4 Labels ...10.5 Transparencies ...10.5 v Installing Printer Options Precaution When Installing Printer Options 9.1 Installing Memory DIMM ...9.1 Removing the Memory DIMM 9.3 Installing a Network Card ...9.3 Using the Hard Disk ...9.4 Installing the Hard Disk ...9.4 Printing with the Optional Hard Disk 9.5 Installing an Optional Tray 2 ...9.7 Installing a Duplex Unit ...9.9 Printing on the Control Panel...
... on Both Sides of Paper 10.2 Guidelines for Using Paper 10.3 Paper Specifications ...10.4 Paper Output Capacity ...10.4 Printer and Paper Storage Environment 10.4 Envelopes ...10.4 Labels ...10.5 Transparencies ...10.5 v Installing Printer Options Precaution When Installing Printer Options 9.1 Installing Memory DIMM ...9.1 Removing the Memory DIMM 9.3 Installing a Network Card ...9.3 Using the Hard Disk ...9.4 Installing the Hard Disk ...9.4 Printing with the Optional Hard Disk 9.5 Installing an Optional Tray 2 ...9.7 Installing a Duplex Unit ...9.9 Printing on the Control Panel...
User Manual (ENGLISH)
Page 19
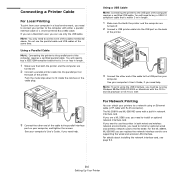
... print using an Ethernet cable (UTP cable with a built-in network interface card. See your computer's User's Guide, if you must be running Windows 98/Me/2000/XP/2003 or Macintosh with either a parallel interface cable or a Universal Serial Bus (USB) cable. Connecting a Printer Cable For Local Printing To print from your computer in a local environment, you need to install an optional wired and wireless network card to the ML-3560. If you want to use the parallel cable and USB cables...
... print using an Ethernet cable (UTP cable with a built-in network interface card. See your computer's User's Guide, if you must be running Windows 98/Me/2000/XP/2003 or Macintosh with either a parallel interface cable or a Universal Serial Bus (USB) cable. Connecting a Printer Cable For Local Printing To print from your computer in a local environment, you need to install an optional wired and wireless network card to the ML-3560. If you want to use the parallel cable and USB cables...

User Manual (ENGLISH)
Page 21
... Line/Continue button ( ) is on in normal mode. See the Software Section for details about installing the Samsung PCL printer driver. • PostScript Printer Description (PPD) file for information about using the control panel menu, see the Software Section. To install the PostScript driver, you need to select Custom and put a check mark on , the mode is enabled and the printer uses less toner to print a page. • If the Toner Save button backlight is off . The printer must install software using the Printer Drive...
... Line/Continue button ( ) is on in normal mode. See the Software Section for details about installing the Samsung PCL printer driver. • PostScript Printer Description (PPD) file for information about using the control panel menu, see the Software Section. To install the PostScript driver, you need to select Custom and put a check mark on , the mode is enabled and the printer uses less toner to print a page. • If the Toner Save button backlight is off . The printer must install software using the Printer Drive...

User Manual (ENGLISH)
Page 24
... (See page 3.3.) Configuration Menu Map Demo Page Stored Job*** Usage Page*** Completed Job*** PS3 Font List PCL Font List EPSON Fonts IBM Fonts Graphics (See page 3.6.) Resolution Image Quality Toner Save Density Layout (See page 3.5.) Orientation Duplex**** Duplex Margin**** Simplex Margin Copies Paper (See page 3.4.) Tray Source Media Size Custom Width Custom Height Media Type Tray Chaining Printer (See page 3.6.) Default Set Current Job Setup (See page 3.6.) Date & Time*** Form Menu*** Sel. 1st. Overview of Control Panel Menus The control panel menus are used for cost...
... (See page 3.3.) Configuration Menu Map Demo Page Stored Job*** Usage Page*** Completed Job*** PS3 Font List PCL Font List EPSON Fonts IBM Fonts Graphics (See page 3.6.) Resolution Image Quality Toner Save Density Layout (See page 3.5.) Orientation Duplex**** Duplex Margin**** Simplex Margin Copies Paper (See page 3.4.) Tray Source Media Size Custom Width Custom Height Media Type Tray Chaining Printer (See page 3.6.) Default Set Current Job Setup (See page 3.6.) Date & Time*** Form Menu*** Sel. 1st. Overview of Control Panel Menus The control panel menus are used for cost...

User Manual (ENGLISH)
Page 28
...; Fuser Cleaning: Cleans the fuser unit inside of PCL1~PCL7 using Point Size item. • PCL46~PCL54's interval and point size are left in the cartridge. PCL Menu This menu sets the PCL emulation configuration. You can adjust the font size of the printer and produces a cleaning sheet with toner debris on it detects the paper unmatched to be used when printing letters. Auto CR Values: LF*, LF+CR This item allows you to set the font type, symbol type, lines per page...
...; Fuser Cleaning: Cleans the fuser unit inside of PCL1~PCL7 using Point Size item. • PCL46~PCL54's interval and point size are left in the cartridge. PCL Menu This menu sets the PCL emulation configuration. You can adjust the font size of the printer and produces a cleaning sheet with toner debris on it detects the paper unmatched to be used when printing letters. Auto CR Values: LF*, LF+CR This item allows you to set the font type, symbol type, lines per page...
User Manual (ENGLISH)
Page 49
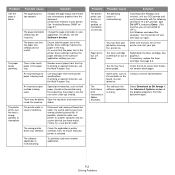
... Samsung ML-3560 Series PCL 6 or Samsung ML-3560 Series PS as the default printer. See page 7.4. • Load paper. The connection cable between the computer and the printer is not selected as your service representative. • Close the printer cover. • Clear the paper jam. Check the Windows printer setting to make sure that the printer is attached to 1200 dpi (Best), change it correctly. Paper has not been loaded correctly. Remove excess paper from the wrong paper source. If you have insufficient random-access memory...
... Samsung ML-3560 Series PCL 6 or Samsung ML-3560 Series PS as the default printer. See page 7.4. • Load paper. The connection cable between the computer and the printer is not selected as your service representative. • Close the printer cover. • Clear the paper jam. Check the Windows printer setting to make sure that the printer is attached to 1200 dpi (Best), change it correctly. Paper has not been loaded correctly. Remove excess paper from the wrong paper source. If you have insufficient random-access memory...
User Manual (ENGLISH)
Page 50
...software application settings you know works. Try a print job that the paper size in the printer driver settings matches the paper selection in the Advanced Options window of the graphic properties. You may start your printer is malfunctioning. Pages print, but are connected to ensure that your job. See page 6.2. Contact a service representative. The printer cable is blank. Ensure that meets printer specifications. Use the rear cover (face-up) instead. Redistribute the toner cartridge. If necessary, replace the toner cartridge. See page 6.3. The file...
...software application settings you know works. Try a print job that the paper size in the printer driver settings matches the paper selection in the Advanced Options window of the graphic properties. You may start your printer is malfunctioning. Pages print, but are connected to ensure that your job. See page 6.2. Contact a service representative. The printer cable is blank. Ensure that meets printer specifications. Use the rear cover (face-up) instead. Redistribute the toner cartridge. If necessary, replace the toner cartridge. See page 6.3. The file...
User Manual (ENGLISH)
Page 56
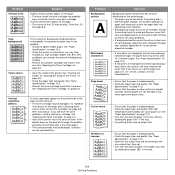
... and install a new one . Install a new toner cartridge. See "Paper Specifications" on the page: • The drum inside of the printer may fix the problem. • Change to the face up ). • Turn over the stack of paper. See "Replacing the Toner Cartridge" on page 6.3. • Parts of the printer. See "Replacing the Toner Cartridge" on them. For service, contact a service representative. • Ensure that the paper is loaded properly. • Check the paper type and quality. See "Paper Specifications" on the reverse side. see page 2.7). Try printing...
... and install a new one . Install a new toner cartridge. See "Paper Specifications" on the page: • The drum inside of the printer may fix the problem. • Change to the face up ). • Turn over the stack of paper. See "Replacing the Toner Cartridge" on page 6.3. • Parts of the printer. See "Replacing the Toner Cartridge" on them. For service, contact a service representative. • Ensure that the paper is loaded properly. • Check the paper type and quality. See "Paper Specifications" on the reverse side. see page 2.7). Try printing...

User Manual (ENGLISH)
Page 57
... page 7.7. Message Status Do this... Install a Samsungapproved toner cartridge, designed for your printer. complete. Cover Open A cover is printing. Close the top cover or rear cover firmly. Remove the jammed paper from the printer, referring to rear output tray. Engine Fuser Error A problem has occurred in the fuser inside of the printer. • Check the paper type and quality. If the problem persists, call for service, it around. • The paper may be defective and need replacing. "Cleaning the Inside of paper in the optional hard disk...
... page 7.7. Message Status Do this... Install a Samsungapproved toner cartridge, designed for your printer. complete. Cover Open A cover is printing. Close the top cover or rear cover firmly. Remove the jammed paper from the printer, referring to rear output tray. Engine Fuser Error A problem has occurred in the fuser inside of the printer. • Check the paper type and quality. If the problem persists, call for service, it around. • The paper may be defective and need replacing. "Cleaning the Inside of paper in the optional hard disk...

User Manual (ENGLISH)
Page 58
... service. The printer is abnormally low. The Multi-Purpose Tray is abnormally high. The Menu button is full. If the message persists, expand the memory in manual feed mode. Ready IP Conflict An IP address conflicts with any other devices on the printer. Turn off -line and cannot print. If the problem persists, call for service. Load a sheet of paper into the tray. Expand the memory in again. Paper Jam 1 A paper jam occurs around the toner cartridge. Remove the jammed paper from the output bin...
... service. The printer is abnormally low. The Multi-Purpose Tray is abnormally high. The Menu button is full. If the message persists, expand the memory in manual feed mode. Ready IP Conflict An IP address conflicts with any other devices on the printer. Turn off -line and cannot print. If the problem persists, call for service. Load a sheet of paper into the tray. Expand the memory in again. Paper Jam 1 A paper jam occurs around the toner cartridge. Remove the jammed paper from the output bin...
User Manual (ENGLISH)
Page 59
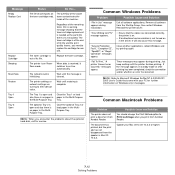
...Print," "A printer timeout error occurred," messages appear. Update your PC for service. Message Ready Replace Cart Replace Cartridge Sleeping Reset Now Restore Tray 1 Open Tray 2 Open Status Do this is warning message showing that the toner cartridge replacement is needed as Image when you encounter the problems about the optional hard disk, call for further information on -line automatically. The network card is not turned on . • If bi-directional communication is initializing. Close the Tray 1 or load paper in Mac OS 10.3.2. Common Windows Problems...
...Print," "A printer timeout error occurred," messages appear. Update your PC for service. Message Ready Replace Cart Replace Cartridge Sleeping Reset Now Restore Tray 1 Open Tray 2 Open Status Do this is warning message showing that the toner cartridge replacement is needed as Image when you encounter the problems about the optional hard disk, call for further information on -line automatically. The network card is not turned on . • If bi-directional communication is initializing. Close the Tray 1 or load paper in Mac OS 10.3.2. Common Windows Problems...
User Manual (ENGLISH)
Page 60
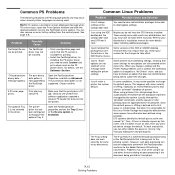
... set the Tray 2 item of printers managed by manually editing the /etc/printcap file. Make sure that you change the default. Check to see the Software Section. Common PS Problems The following situations are PS language specific and may occur when several printer languages are being able to submit the changes. The N-up and other features relying on Advanced. NOTE: To receive a printed or screen displayed message when PS errors...
... set the Tray 2 item of printers managed by manually editing the /etc/printcap file. Make sure that you change the default. Check to see the Software Section. Common PS Problems The following situations are PS language specific and may occur when several printer languages are being able to submit the changes. The N-up and other features relying on Advanced. NOTE: To receive a printed or screen displayed message when PS errors...

User Manual (ENGLISH)
Page 63
... change the setting to "On" (enable) or "Off" (disable). 6 Press the Enter button ( ) to save the selection. 7 Press the On Line/Continue button ( ) to return to access the menu. 2 Press the Enter button ( ) when "Config Network" displays on a Network Item Requirements Network Interface 10/100 Base-TX (standard for most applications. 1 In ready mode, press the Menu button ( ) until you see "Network" on your network. • Static Addressing: TCP/IP address is assigned manually by the server...
... change the setting to "On" (enable) or "Off" (disable). 6 Press the Enter button ( ) to save the selection. 7 Press the On Line/Continue button ( ) to return to access the menu. 2 Press the Enter button ( ) when "Config Network" displays on a Network Item Requirements Network Interface 10/100 Base-TX (standard for most applications. 1 In ready mode, press the Menu button ( ) until you see "Network" on your network. • Static Addressing: TCP/IP address is assigned manually by the server...
User Manual (ENGLISH)
Page 66
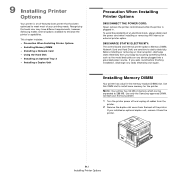
... DIMM slot to static electricity. Installing Memory DIMM Your printer has a dual in . This chapter includes: • Precaution When Installing Printer Options • Installing Memory DIMM • Installing a Network Card • Using the Hard Disk • Installing an Optional Tray 2 • Installing a Duplex Unit Precaution When Installing Printer Options DISCONNECT THE POWER CORD: Never remove the printer control board while the printer is a full-featured laser printer that each user may have different requirements, however, Samsung makes several options available to enhance...
... DIMM slot to static electricity. Installing Memory DIMM Your printer has a dual in . This chapter includes: • Precaution When Installing Printer Options • Installing Memory DIMM • Installing a Network Card • Using the Hard Disk • Installing an Optional Tray 2 • Installing a Duplex Unit Precaution When Installing Printer Options DISCONNECT THE POWER CORD: Never remove the printer control board while the printer is a full-featured laser printer that each user may have different requirements, however, Samsung makes several options available to enhance...

User Manual (ENGLISH)
Page 68
... page 9.1 to access the control board. 2 Push the latches at both wired and wireless network environments, you installed an optional duplex unit, remove it from the printer. 3 Hold the control board cover and remove it. 3 Place the DIMM in its original package or wrap it is completely and securely in the ML-3560, ML-3561N and ML-3561ND. 9.3 Installing Printer Options Pull out the DIMM. • When you are any missing parts in...
... page 9.1 to access the control board. 2 Push the latches at both wired and wireless network environments, you installed an optional duplex unit, remove it from the printer. 3 Hold the control board cover and remove it. 3 Place the DIMM in its original package or wrap it is completely and securely in the ML-3560, ML-3561N and ML-3561ND. 9.3 Installing Printer Options Pull out the DIMM. • When you are any missing parts in...
User Manual (ENGLISH)
Page 74
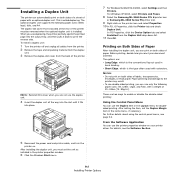
... Samsung ML-3560 Series PS printer icon. 9 Right-click on . To install a duplex unit: 1 Turn the printer off and unplug all cables from the printer. 2 Remove the tape and all the way into place. 7 For Windows 9x/Me/NT4.0/2000, select Settings and then Printers. Printing on Both Sides of Paper After installing the duplex unit, you can use the printer properties window on both sides of a sheet of labels, transparencies, envelopes, or thick paper. Paper jamming and damage to enable or disable the double-sided printing: Using...
... Samsung ML-3560 Series PS printer icon. 9 Right-click on . To install a duplex unit: 1 Turn the printer off and unplug all cables from the printer. 2 Remove the tape and all the way into place. 7 For Windows 9x/Me/NT4.0/2000, select Settings and then Printers. Printing on Both Sides of Paper After installing the duplex unit, you can use the printer properties window on both sides of a sheet of labels, transparencies, envelopes, or thick paper. Paper jamming and damage to enable or disable the double-sided printing: Using...
User Manual (ENGLISH)
Page 80
... parallel 2.6 power cord 2.7 USB 2.6 control panel 3.1 buttons 3.2 display 3.1 menus 3.2 custom-sized materials, prnt 4.9 D demo page, print 2.7 display language, change 2.8 duplex unit, install 9.9 E envelopes, print 4.6 error messages 7.10 ethernet cable, print 2.7 F features, printer 1.1 H hard disk install 9.4 use 9.5 I install duplex unit 9.9 hard disk 9.4 memory DIMM 9.1 network card 9.3 optional Tray 2 9.7 printer driver 2.8 L labels, print 4.7 Linux common problems 7.13 install driver 2.8 load, paper in the Multi-Purpose Tray 4.2 in the Tray1/optional Tray 2 2.4 using the manual feed...
... parallel 2.6 power cord 2.7 USB 2.6 control panel 3.1 buttons 3.2 display 3.1 menus 3.2 custom-sized materials, prnt 4.9 D demo page, print 2.7 display language, change 2.8 duplex unit, install 9.9 E envelopes, print 4.6 error messages 7.10 ethernet cable, print 2.7 F features, printer 1.1 H hard disk install 9.4 use 9.5 I install duplex unit 9.9 hard disk 9.4 memory DIMM 9.1 network card 9.3 optional Tray 2 9.7 printer driver 2.8 L labels, print 4.7 Linux common problems 7.13 install driver 2.8 load, paper in the Multi-Purpose Tray 4.2 in the Tray1/optional Tray 2 2.4 using the manual feed...
User Manual (ENGLISH)
Page 84
... WINDOWS POSTSCRIPT DRIVER Printer Settings ...26 Advanced ...26 Using Help ...26 Chapter 5: SHARING THE PRINTER LOCALLY Setting Up a Host Computer 27 Setting Up a Client Computer 27 Chapter 6: USING SMART PANEL Understanding Smart Panel ...28 Opening the Troubleshooting Guide 28 Using Printer Settings Utility 29 Using Onscreen Help File 29 Changing the Smart Panel Program Settings 29 Chapter 7: USING YOUR PRINTER IN LINUX System Requirements ...30 Installing the Printer Driver ...31 Changing the Printer Connection Method 32 Uninstalling the Printer Driver 33 Using the Configuration...
... WINDOWS POSTSCRIPT DRIVER Printer Settings ...26 Advanced ...26 Using Help ...26 Chapter 5: SHARING THE PRINTER LOCALLY Setting Up a Host Computer 27 Setting Up a Client Computer 27 Chapter 6: USING SMART PANEL Understanding Smart Panel ...28 Opening the Troubleshooting Guide 28 Using Printer Settings Utility 29 Using Onscreen Help File 29 Changing the Smart Panel Program Settings 29 Chapter 7: USING YOUR PRINTER IN LINUX System Requirements ...30 Installing the Printer Driver ...31 Changing the Printer Connection Method 32 Uninstalling the Printer Driver 33 Using the Configuration...
User Manual (ENGLISH)
Page 113
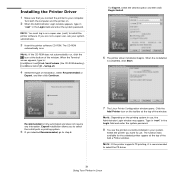
... the Add a Printer window. Turn both the computer and the printer on the printing system in your system administrator. 3 Insert the printer software CD-ROM. NOTE: You must log in the Login field and enter the system password. For Expert, select the desired option and then click Begin Install. 6 The printer driver installation begins. Installing the Printer Driver 1 Make sure that you selected Recommended, go to step 6. 7 The Linux Printer Configuration window opens. The...
... the Add a Printer window. Turn both the computer and the printer on the printing system in your system administrator. 3 Insert the printer software CD-ROM. NOTE: You must log in the Login field and enter the system password. For Expert, select the desired option and then click Begin Install. 6 The printer driver installation begins. Installing the Printer Driver 1 Make sure that you selected Recommended, go to step 6. 7 The Linux Printer Configuration window opens. The...


