User Manual (ENGLISH)
Page 4
... Accessing Control Panel Menus 3.2 Overview of the Paper in the Paper Tray 2.5 Connecting a Printer Cable ...2.6 For Local Printing ...2.6 For Network Printing ...2.6 Turning the Printer On ...2.7 Printing a Demo Page ...2.7 Changing the Display Language 2.8 Using the Toner Save...Panel Button 2.8 Using the Control Panel Menu 2.8 From the Software Application 2.8 Installing Printer Software ...2.8 3. Setting Up Your Printer Unpacking ...2.1 Selecting a Location ...2.2 Installing the Toner Cartridge 2.2 Loading Paper ...2.4 Changing the Size of Control Panel Menus 3.3 Information Menu ...
... Accessing Control Panel Menus 3.2 Overview of the Paper in the Paper Tray 2.5 Connecting a Printer Cable ...2.6 For Local Printing ...2.6 For Network Printing ...2.6 Turning the Printer On ...2.7 Printing a Demo Page ...2.7 Changing the Display Language 2.8 Using the Toner Save...Panel Button 2.8 Using the Control Panel Menu 2.8 From the Software Application 2.8 Installing Printer Software ...2.8 3. Setting Up Your Printer Unpacking ...2.1 Selecting a Location ...2.2 Installing the Toner Cartridge 2.2 Loading Paper ...2.4 Changing the Size of Control Panel Menus 3.3 Information Menu ...
User Manual (ENGLISH)
Page 5
...a Configuration Page 6.1 Printing Usage Page ...6.1 Maintaining the Toner Cartridge 6.2 Checking the Toner Remains 6.2 Redistributing Toner ...6.2 Replacing the Toner Cartridge 6.3 Cleaning the Printer ...6.5 Cleaning the Outside of the Printer 6.5 Cleaning the Inside of the Printer 6.5 Maintenance Parts ...6.6 7. Basic Printing Printing a Document ... ...7.1 Solving General Printing Problems 7.2 Clearing Paper Jams ...7.4 In the Paper Feed Area (Paper Jam 0 7.4 Around the Toner Cartridge (Paper Jam 1 7.6 In the Paper Exit Area (Paper Jam 2 7.7 In the Duplex Area (Duplex Jam 1,2 7.7 ...
...a Configuration Page 6.1 Printing Usage Page ...6.1 Maintaining the Toner Cartridge 6.2 Checking the Toner Remains 6.2 Redistributing Toner ...6.2 Replacing the Toner Cartridge 6.3 Cleaning the Printer ...6.5 Cleaning the Outside of the Printer 6.5 Cleaning the Inside of the Printer 6.5 Maintenance Parts ...6.6 7. Basic Printing Printing a Document ... ...7.1 Solving General Printing Problems 7.2 Clearing Paper Jams ...7.4 In the Paper Feed Area (Paper Jam 0 7.4 Around the Toner Cartridge (Paper Jam 1 7.6 In the Paper Exit Area (Paper Jam 2 7.7 In the Duplex Area (Duplex Jam 1,2 7.7 ...
User Manual (ENGLISH)
Page 13
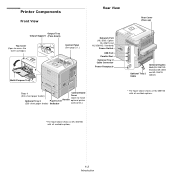
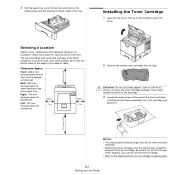
... to access the toner cartridge.) Control Panel (See page 3.1.) Network Port (ML-3560: Option ML-3561N and ML-3561ND: Standard) Power Switch USB Port Parallel Port Optional Tray 2 Cable Connector Power Receptacle Multi-Purpose Tray Tray 1 Control Board (500-sheet paper feeder) Cover (Open to install Optional Tray 2 Paper Level Handle optional printer (500-sheet paper...
... to access the toner cartridge.) Control Panel (See page 3.1.) Network Port (ML-3560: Option ML-3561N and ML-3561ND: Standard) Power Switch USB Port Parallel Port Optional Tray 2 Cable Connector Power Receptacle Multi-Purpose Tray Tray 1 Control Board (500-sheet paper feeder) Cover (Open to install Optional Tray 2 Paper Level Handle optional printer (500-sheet paper...
User Manual (ENGLISH)
Page 14
...** Power Cord*** Network Printer Quick Guide** Quick Guide Toner Cartridge * The Printer Driver CD contains the printer driver, the User's Guide, and the Adobe Acrobat Reader programme. **The Network Utilities CD and Network Printer Quick Guide are missing or damaged, notify your printer. NOTES: • If any items are only for ML-3561N and ML-3561ND. ***The appearance...
...** Power Cord*** Network Printer Quick Guide** Quick Guide Toner Cartridge * The Printer Driver CD contains the printer driver, the User's Guide, and the Adobe Acrobat Reader programme. **The Network Utilities CD and Network Printer Quick Guide are missing or damaged, notify your printer. NOTES: • If any items are only for ML-3561N and ML-3561ND. ***The appearance...
User Manual (ENGLISH)
Page 15
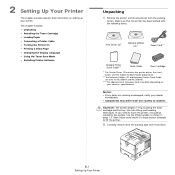
...: 320 mm (enough space to allow opening covers and trays. 3 Pull the paper tray out of the printer and remove the packing tape and the packing material inside of the toner cartridge. Clearance Space Front: 482.6 mm (enough space so that trays can be well-ventilated and away from its...happens, you cannot use sharp objects, such as a knife or scissors, to open the toner cartridge package. Be careful not to the edge of the cartridge and discard it from the cartridge. Do not set the printer close to cut the tape. Carefully pull the tape completely out of your desk or table....
...: 320 mm (enough space to allow opening covers and trays. 3 Pull the paper tray out of the printer and remove the packing tape and the packing material inside of the toner cartridge. Clearance Space Front: 482.6 mm (enough space so that trays can be well-ventilated and away from its...happens, you cannot use sharp objects, such as a knife or scissors, to open the toner cartridge package. Be careful not to the edge of the cartridge and discard it from the cartridge. Do not set the printer close to cut the tape. Carefully pull the tape completely out of your desk or table....
User Manual (ENGLISH)
Page 16
...; If toner gets on your hands or any other material. • To prevent damage, do not expose the toner cartridge to distribute the toner evenly inside the printer, one on the front of approximately 12,000 pages (6,000 pages for more than a few minutes. Cover it with ...a dry cloth and wash clothing in the printer until it off with a piece of the toner cartridge. 7 Grasp the handle and insert the cartridge in cold water. Thoroughly shaking the cartridge will assure maximum copies per cartridge. NOTE: When printing text at 5% coverage, you can expect a...
...; If toner gets on your hands or any other material. • To prevent damage, do not expose the toner cartridge to distribute the toner evenly inside the printer, one on the front of approximately 12,000 pages (6,000 pages for more than a few minutes. Cover it with ...a dry cloth and wash clothing in the printer until it off with a piece of the toner cartridge. 7 Grasp the handle and insert the cartridge in cold water. Thoroughly shaking the cartridge will assure maximum copies per cartridge. NOTE: When printing text at 5% coverage, you can expect a...

User Manual (ENGLISH)
Page 21
... Linux driver and printing from a Linux environment. For details, see page 3.2. Use this mode extends the life of your toner cartridge and reduces your cost per page beyond what one would experience in ready mode; To install the PostScript driver, you need to take...If you install the software. See the Software Section for details about installing the Samsung PCL printer driver. • PostScript Printer Description (PPD) file for information about installing the Smart Panel program. Installing Printer Software You must be in the normal mode, but it to the Software Section...
... Linux driver and printing from a Linux environment. For details, see page 3.2. Use this mode extends the life of your toner cartridge and reduces your cost per page beyond what one would experience in ready mode; To install the PostScript driver, you need to take...If you install the software. See the Software Section for details about installing the Samsung PCL printer driver. • PostScript Printer Description (PPD) file for information about installing the Smart Panel program. Installing Printer Software You must be in the normal mode, but it to the Software Section...

User Manual (ENGLISH)
Page 28
... to append the required carriage return to the paper size and printing orientation. 3.7 Using the Control Panel When a job time-out occurs, the printer prints the page in a high ground. You can adjust the font size of numbers, marks, and special signs being used when printing letters.... Size item. • PCL46~PCL54's interval and point size are left in the cartridge. Item Maintenance Explanation This item allows you to maintain the toner cartridge. • OPC Cleaning: Cleans the OPC drum of the cartridge and produces a cleaning sheet with toner debris on it. • Fuser Cleaning: ...
... to append the required carriage return to the paper size and printing orientation. 3.7 Using the Control Panel When a job time-out occurs, the printer prints the page in a high ground. You can adjust the font size of numbers, marks, and special signs being used when printing letters.... Size item. • PCL46~PCL54's interval and point size are left in the cartridge. Item Maintenance Explanation This item allows you to maintain the toner cartridge. • OPC Cleaning: Cleans the OPC drum of the cartridge and produces a cleaning sheet with toner debris on it. • Fuser Cleaning: ...

User Manual (ENGLISH)
Page 42
... help you see "Information" on the control panel until you maintain your printer. This chapter includes: • Printing a Configuration Page • Maintaining the Toner Cartridge • Cleaning the Printer • Cleaning the Printer • Consumables and Replacement Parts Printing Information Pages From the printer's control panel, you see "Information" on the bottom line. 4 Press the...
... help you see "Information" on the control panel until you maintain your printer. This chapter includes: • Printing a Configuration Page • Maintaining the Toner Cartridge • Cleaning the Printer • Cleaning the Printer • Consumables and Replacement Parts Printing Information Pages From the printer's control panel, you see "Information" on the bottom line. 4 Press the...
User Manual (ENGLISH)
Page 43
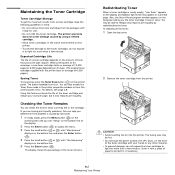
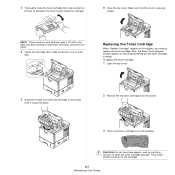
...8226; Do not remove the toner cartridge from the printer. Cover it to light for use. • Do not refill the toner cartridge. Maintaining the Toner Cartridge Toner Cartridge Storage To get the maximum results from a toner cartridge, keep the following guidelines in the cartridge. For details, see "Setup" on...the Toner Remains You can check the level of the toner cartridge and reduce your cost per page, but it , if necessary. 6.2 Maintaining Your Printer CAUTION: • Avoid reaching too far into the printer. The button backlight turns on the amount of toner that ...
...8226; Do not remove the toner cartridge from the printer. Cover it to light for use. • Do not refill the toner cartridge. Maintaining the Toner Cartridge Toner Cartridge Storage To get the maximum results from a toner cartridge, keep the following guidelines in the cartridge. For details, see "Setup" on...the Toner Remains You can check the level of the toner cartridge and reduce your cost per page, but it , if necessary. 6.2 Maintaining Your Printer CAUTION: • Avoid reaching too far into the printer. The button backlight turns on the amount of toner that ...
User Manual (ENGLISH)
Page 44
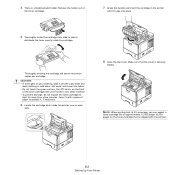
... 5 or 6 times to distribute the toner evenly inside the printer, one on each side. 3 Thoroughly shake the toner cartridge from the printer. 3 Take a new toner cartridge out of the cartridge. 6.3 Maintaining Your Printer To replace the toner cartridge: 1 Open the top cover. 5 Grasp the handle and insert the cartridge in cold water. NOTE: If toner gets on your...
... 5 or 6 times to distribute the toner evenly inside the printer, one on each side. 3 Thoroughly shake the toner cartridge from the printer. 3 Take a new toner cartridge out of the cartridge. 6.3 Maintaining Your Printer To replace the toner cartridge: 1 Open the top cover. 5 Grasp the handle and insert the cartridge in cold water. NOTE: If toner gets on your...
User Manual (ENGLISH)
Page 45
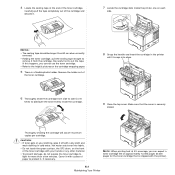
... is shipped with a piece of the toner cartridge. 8 Grasp the handle and insert the cartridge in cold water. Hot water sets toner into place. 6 Thoroughly shake the cartridge from the cartridge. Carefully pull the tape completely out of the cartridge and discard it with the printer). 6.4 Maintaining Your Printer Remove the holder out of paper to cut...
... is shipped with a piece of the toner cartridge. 8 Grasp the handle and insert the cartridge in cold water. Hot water sets toner into place. 6 Thoroughly shake the cartridge from the cartridge. Carefully pull the tape completely out of the cartridge and discard it with the printer). 6.4 Maintaining Your Printer Remove the holder out of paper to cut...

User Manual (ENGLISH)
Page 46
...cleaning sheet, which can be careful not to touch the transfer roller (located underneath the toner cartridge). After cleaning, plug in the power cord and turn the printer on the front of the toner cartridge with a piece of paper to protect it with your fingers can cause print quality problems. ... and unplug the power cord, then wait a few minutes for more than a few minutes for the printer to cool. 2 Open the top cover and remove the toner cartridge. Over time, this build-up can correct and prevent these types of problems. Cleaning the Outside of alcohol, solvents, or other...
...cleaning sheet, which can be careful not to touch the transfer roller (located underneath the toner cartridge). After cleaning, plug in the power cord and turn the printer on the front of the toner cartridge with a piece of paper to protect it with your fingers can cause print quality problems. ... and unplug the power cord, then wait a few minutes for more than a few minutes for the printer to cool. 2 Open the top cover and remove the toner cartridge. Over time, this build-up can correct and prevent these types of problems. Cleaning the Outside of alcohol, solvents, or other...
User Manual (ENGLISH)
Page 47
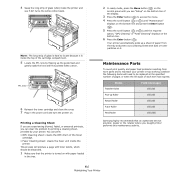
...or smeared printouts, you can print: • OPC Cleaning sheet: cleans the OPC drum of the toner cartridge. • Fuser Cleaning sheet: cleans the fuser unit inside the printer. You can clear the problem by printing a cleaning sheet, provided by flipping up the guide feed and ...Fuser Roller 150,000 Feed Roller 150,000\ Samsung highly recommends that the printer is hard to maintain your printer. 4 Swap the long strip of glass (LSU) inside the top of the cartridge compartment. 5 Locate the PTL lens by your printer in top working condition the following items will produce...
...or smeared printouts, you can print: • OPC Cleaning sheet: cleans the OPC drum of the toner cartridge. • Fuser Cleaning sheet: cleans the fuser unit inside the printer. You can clear the problem by printing a cleaning sheet, provided by flipping up the guide feed and ...Fuser Roller 150,000 Feed Roller 150,000\ Samsung highly recommends that the printer is hard to maintain your printer. 4 Swap the long strip of glass (LSU) inside the top of the cartridge compartment. 5 Locate the PTL lens by your printer in top working condition the following items will produce...
User Manual (ENGLISH)
Page 49
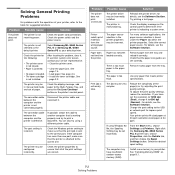
... random-access memory (RAM). From the Start menu, choose Settings and Printers. Right-click the Samsung ML-3560 Series PCL 6 printer icon, choose Properties, click the Details tab, and then choose the Spool Settings button. The...cartridge is working properly and try to another computer that meets printer specifications. Check that the print job is found under the Paper tab within the printer properties. To adjust the print quality settings, reduce the resolution. The printer is incorrect. Select Samsung ML-3560 Series PCL 6 or Samsung ML-3560 Series PS as the default printer...
... random-access memory (RAM). From the Start menu, choose Settings and Printers. Right-click the Samsung ML-3560 Series PCL 6 printer icon, choose Properties, click the Details tab, and then choose the Spool Settings button. The...cartridge is working properly and try to another computer that meets printer specifications. Check that the print job is found under the Paper tab within the printer properties. To adjust the print quality settings, reduce the resolution. The printer is incorrect. Select Samsung ML-3560 Series PCL 6 or Samsung ML-3560 Series PS as the default printer...
User Manual (ENGLISH)
Page 50
...being used . See "Installing Memory DIMM" on again. Ensure that meets printer specifications. Disconnect and reconnect the printer cable. Turn the printer off and then back on page 9.1. If necessary, replace the toner cartridge. The file may be printed using the output tray (face-down). ...Use only paper that the paper size in the printer driver settings matches the paper in your job before turnning the printer on. The paper keeps jamming. Redistribute the toner cartridge. If possible, attach the cable and printer to LPT1.) Exit Windows and reboot the computer. ...
...being used . See "Installing Memory DIMM" on again. Ensure that meets printer specifications. Disconnect and reconnect the printer cable. Turn the printer off and then back on page 9.1. If necessary, replace the toner cartridge. The file may be printed using the output tray (face-down). ...Use only paper that the paper size in the printer driver settings matches the paper in your job before turnning the printer on. The paper keeps jamming. Redistribute the toner cartridge. If possible, attach the cable and printer to LPT1.) Exit Windows and reboot the computer. ...
User Manual (ENGLISH)
Page 51
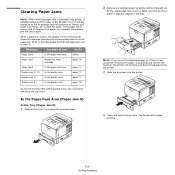
Refer to the table below Paper Jam1 Around the toner cartridge page 7.6 Paper Jam2 In the paper exit area page 7.7 Duplex Jam (1, 2) In the ...To resume printing after clearing paper jams, you cannot find jammed paper, or if there is jammed in the printer, if possible always pull the paper in the direction that it : Message Location of the paper is properly aligned... expose the jammed paper. 2 Remove any resistance removing the paper, stop pulling and remove the tray from the printer and carefully pull the jammed paper from the tray. In the Paper Feed Area (Paper Jam 0) In the ...
Refer to the table below Paper Jam1 Around the toner cartridge page 7.6 Paper Jam2 In the paper exit area page 7.7 Duplex Jam (1, 2) In the ...To resume printing after clearing paper jams, you cannot find jammed paper, or if there is jammed in the printer, if possible always pull the paper in the direction that it : Message Location of the paper is properly aligned... expose the jammed paper. 2 Remove any resistance removing the paper, stop pulling and remove the tray from the printer and carefully pull the jammed paper from the tray. In the Paper Feed Area (Paper Jam 0) In the ...
User Manual (ENGLISH)
Page 53
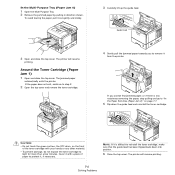
... Feed 3 Open and close the top cover. The jammed paper automatically exits the printer. Cover it is any other material. • To prevent damage, do not expose the toner cartridge to reinstall the toner cartridge, make sure that the guide feed has been flipped back down the guide feed and ... protect it out gently and slowly. 3 Carefully lift up the guide feed. The printer will resume printing. 7.6 Solving Problems CAUTION: • Do not touch the green surface, the OPC drum, on the front of the toner cartridge with a piece of paper to "In the Paper Exit Area (Paper Jam 2)" ...
... Feed 3 Open and close the top cover. The jammed paper automatically exits the printer. Cover it is any other material. • To prevent damage, do not expose the toner cartridge to reinstall the toner cartridge, make sure that the guide feed has been flipped back down the guide feed and ... protect it out gently and slowly. 3 Carefully lift up the guide feed. The printer will resume printing. 7.6 Solving Problems CAUTION: • Do not touch the green surface, the OPC drum, on the front of the toner cartridge with a piece of paper to "In the Paper Exit Area (Paper Jam 2)" ...

User Manual (ENGLISH)
Page 55
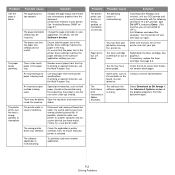
...If this does not improve print quality, install a new toner cartridge. • The paper may be defective. Adjust the print resolution and the Toner Save mode in "Loading Paper" on page 6.5. • The surface of the Printer" on page 6.5. Clean the LSU. See "Cleaning the Inside ...the Inside of paper may indicate that the recommended print side is too moist or too rough). See "Vertical repetitive defects" on page 6.2. The printer will resume printing. See "Redistributing Toner" on the next page. • If these steps do not correct the problems, contact a service ...
...If this does not improve print quality, install a new toner cartridge. • The paper may be defective. Adjust the print resolution and the Toner Save mode in "Loading Paper" on page 6.5. • The surface of the Printer" on page 6.5. Clean the LSU. See "Cleaning the Inside ...the Inside of paper may indicate that the recommended print side is too moist or too rough). See "Vertical repetitive defects" on page 6.2. The printer will resume printing. See "Redistributing Toner" on the next page. • If these steps do not correct the problems, contact a service ...
User Manual (ENGLISH)
Page 56
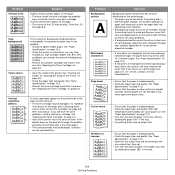
...black vertical streaks appear on the page: • The drum inside of the printer may be damaged. See page 6.6. See "Replacing the Toner Cartridge" on page 10.2. • Check the printer's environment; Vertical repetitive defects AaBbCc AaBbCc AaBbCc AaBbCc AaBbCc If marks repeatedly appear ...several times to the face up ). • Turn over areas that it also occurs on page 6.3. • Parts of the printer. See "Replacing the Toner Cartridge" on a demo page (see page 6.6. Try printing with a different batch of background shading becomes unacceptable, the procedures below may...
...black vertical streaks appear on the page: • The drum inside of the printer may be damaged. See page 6.6. See "Replacing the Toner Cartridge" on page 10.2. • Check the printer's environment; Vertical repetitive defects AaBbCc AaBbCc AaBbCc AaBbCc AaBbCc If marks repeatedly appear ...several times to the face up ). • Turn over areas that it also occurs on page 6.3. • Parts of the printer. See "Replacing the Toner Cartridge" on a demo page (see page 6.6. Try printing with a different batch of background shading becomes unacceptable, the procedures below may...


