User Manual (ENGLISH)
Page 2
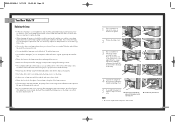
... National Electrical Code (Section 54 of these laws. Important Safety Information Always be careful when using , and maintaining your safety, this TV is equipped with any unauthorized changes or modifications to this equipment may be connected to the grounding system of the building as close to...held that there is designed with this appliance to -use liquid or aerosol cleaners. • Never add any part inside this product. Your new Samsung projection TV represents the latest in fire or electric shock, do not use on a bed, sofa, rug, or other . Quick stops, excessive force, and...
... National Electrical Code (Section 54 of these laws. Important Safety Information Always be careful when using , and maintaining your safety, this TV is equipped with any unauthorized changes or modifications to this equipment may be connected to the grounding system of the building as close to...held that there is designed with this appliance to -use liquid or aerosol cleaners. • Never add any part inside this product. Your new Samsung projection TV represents the latest in fire or electric shock, do not use on a bed, sofa, rug, or other . Quick stops, excessive force, and...
User Manual (ENGLISH)
Page 3
.... Overloading can touch dangerous voltage points or damage parts. EXAMPLE OF ANTENNA GROUNDING GROUND CLAMP ELECTRIC SERVICE EQUIPMENT NEC - The TV exhibits a distinct degradation in the unit, where they exit from lightning and power-line surges. • Avoid overhead power lines... 15 of television closed captioning in accordance with IEC320 style terminations. U N G enced radio/television technician for product compliance: SAMSUNG ELECTRONICS CO., LTD America QA Lab of the FCC Rules. Warning User must accept any interference received, including interference that may...
.... Overloading can touch dangerous voltage points or damage parts. EXAMPLE OF ANTENNA GROUNDING GROUND CLAMP ELECTRIC SERVICE EQUIPMENT NEC - The TV exhibits a distinct degradation in the unit, where they exit from lightning and power-line surges. • Avoid overhead power lines... 15 of television closed captioning in accordance with IEC320 style terminations. U N G enced radio/television technician for product compliance: SAMSUNG ELECTRONICS CO., LTD America QA Lab of the FCC Rules. Warning User must accept any interference received, including interference that may...
User Manual (ENGLISH)
Page 4
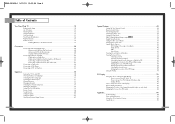
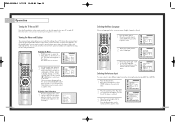
... 5/27/03 10:09 AM Page 6 Table of Contents Your New Wide TV 10 Replacing the Lamp 10 List of Features ...12 Checking Parts...12 Side Panel Buttons 13 Side Panel Jacks 13 Front Panel LED Indicators 14 Rear Panel Jacks 15 Remote Control ...16 Installing Batteries in the Remote Control 17... Connections ...20 Connecting VHF and UHF Antennas 20 Antennas with 300-ohm Flat Twin Leads 20 Antennas with 75-ohm Round Leads 20 Separate VHF and UHF Antennas 21 Connecting Cable TV and VCR 22...
... 5/27/03 10:09 AM Page 6 Table of Contents Your New Wide TV 10 Replacing the Lamp 10 List of Features ...12 Checking Parts...12 Side Panel Buttons 13 Side Panel Jacks 13 Front Panel LED Indicators 14 Rear Panel Jacks 15 Remote Control ...16 Installing Batteries in the Remote Control 17... Connections ...20 Connecting VHF and UHF Antennas 20 Antennas with 300-ohm Flat Twin Leads 20 Antennas with 75-ohm Round Leads 20 Separate VHF and UHF Antennas 21 Connecting Cable TV and VCR 22...
User Manual (ENGLISH)
Page 6
... the lamp cover. • The TV will help cool the lamp so you wish to time for lamp regulation and usage is marked on the left side of the Lamp. 4 Separate the Lamp from the engine by the manufac- HLN467W/HLN567W 11 You should only replace the lamp with a new one on... and then unplug after waiting 1 minute. • The cooling fan will be connected to tighten the lamp cover on the left and one of your projection TV to remove the screws securing the Lamp. If you remove the lamp, you may have been completely unfastened, they will not function if the lamp...
... the lamp cover. • The TV will help cool the lamp so you wish to time for lamp regulation and usage is marked on the left side of the Lamp. 4 Separate the Lamp from the engine by the manufac- HLN467W/HLN567W 11 You should only replace the lamp with a new one on... and then unplug after waiting 1 minute. • The cooling fan will be connected to tighten the lamp cover on the left and one of your projection TV to remove the screws securing the Lamp. If you remove the lamp, you may have been completely unfastened, they will not function if the lamp...
User Manual (ENGLISH)
Page 7
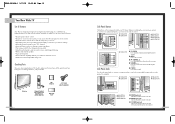
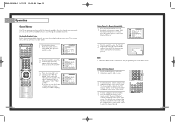
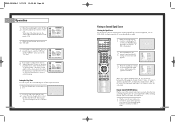
...; Easy-to-operate remote control • Easy-to-use the remote control. œ HLN467W œ HLN567W œ HLN437W œ HLN507W œ HLN4365W œ HLN5065W Side Panel Jacks œ HLN617W Œ TV/VIDEO Press to switch between items on the on and off . To use the more ...ˆ POWER Press to turn the TV on -screen menu. ¨ VOLUME +, - Use the side panel jacks to reduce or eliminate reception problems • Fine tuning control for the sharpest picture possible • A built-in multi-channel sound decoder for example). œ HLN467W œ HLN567W œ HLN437W &#...
...; Easy-to-operate remote control • Easy-to-use the remote control. œ HLN467W œ HLN567W œ HLN437W œ HLN507W œ HLN4365W œ HLN5065W Side Panel Jacks œ HLN617W Œ TV/VIDEO Press to switch between items on the on and off . To use the more ...ˆ POWER Press to turn the TV on -screen menu. ¨ VOLUME +, - Use the side panel jacks to reduce or eliminate reception problems • Fine tuning control for the sharpest picture possible • A built-in multi-channel sound decoder for example). œ HLN467W œ HLN567W œ HLN437W &#...
User Manual (ENGLISH)
Page 8
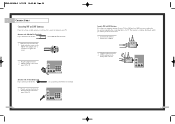
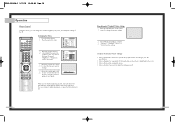
... in RF, Video and S-Video modes. ˆ Component1 jacks (Y, Pb, Pr, L, R) Use these to the audio-output jacks on your PC. Rear Panel Jacks Use the rear panel jacks to ANT-A. ´ S-VIDEO INPUT jacks Connects an S-Video signal from an S-VHS VCR or DVD player. ˇ VIDEO/AUDIO INPUT... the inside the set will automatically appear in about 25 seconds. Lamp may not appear immediately. • The TV has a fan to the video output port on the rear panel of your TV. You'll occasionally hear it working. 14 Œ ANTENNA terminals Two independent cables or antennas can connect two...
... in RF, Video and S-Video modes. ˆ Component1 jacks (Y, Pb, Pr, L, R) Use these to the audio-output jacks on your PC. Rear Panel Jacks Use the rear panel jacks to ANT-A. ´ S-VIDEO INPUT jacks Connects an S-Video signal from an S-VHS VCR or DVD player. ˇ VIDEO/AUDIO INPUT... the inside the set will automatically appear in about 25 seconds. Lamp may not appear immediately. • The TV has a fan to the video output port on the rear panel of your TV. You'll occasionally hear it working. 14 Œ ANTENNA terminals Two independent cables or antennas can connect two...
User Manual (ENGLISH)
Page 9
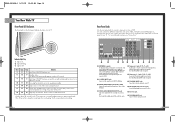
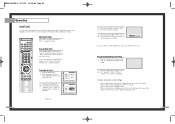
... dry place. 1 Slide the back cover all of the preset factory settings (or select your personal, customized sound settings.) 19. P.Mode Adjust the TV picture by the Samsung remote control (i.e., TV, VCR, Cable, or DVD). 11. Press to the previous channel. 12. Sleep Press to change channels in the PIP window only.) 22...
... dry place. 1 Slide the back cover all of the preset factory settings (or select your personal, customized sound settings.) 19. P.Mode Adjust the TV picture by the Samsung remote control (i.e., TV, VCR, Cable, or DVD). 11. Press to the previous channel. 12. Sleep Press to change channels in the PIP window only.) 22...
User Manual (ENGLISH)
Page 11
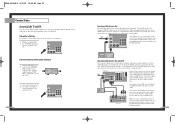
... flat twin leads. 1 Place the wires from the twin leads under the screws on the back panel of the TV. This requires a combiner attachment, which you can buy at an electronics store. 1 Connect both antenna leads to... VHF and UHF Antennas If you have a cable system, you will need to connect an antenna to your TV. Antennas with 75-ohm Round Leads If your antenna looks like this : it is an antenna with 300-...1 Plug the antenna lead into the ANT-A terminal on the back panel of the TV. 21 Use a screwdriver to tighten the screws. 2 Plug the adapter into the ANT-A terminal on the back panel ...
... flat twin leads. 1 Place the wires from the twin leads under the screws on the back panel of the TV. This requires a combiner attachment, which you can buy at an electronics store. 1 Connect both antenna leads to... VHF and UHF Antennas If you have a cable system, you will need to connect an antenna to your TV. Antennas with 75-ohm Round Leads If your antenna looks like this : it is an antenna with 300-...1 Plug the antenna lead into the ANT-A terminal on the back panel of the TV. 21 Use a screwdriver to tighten the screws. 2 Plug the adapter into the ANT-A terminal on the back panel ...
User Manual (ENGLISH)
Page 12
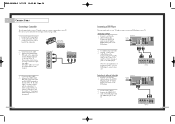
...as well as watch cable and premium channels. BP68-00142A-2 5/27/03 10:09 AM Page 22 Connections Connecting Cable TV and VCR You can connect different cable systems to your TV, including cable without a Cable Box If you want to record one audio cable. When viewing premium channels, select ANT...the S-video connections and remove the video cable. You will need to ANT-A so that descrambles some or all channels. You should keep your TV selected to use a converter box with your cable box. If you can use the converter box to video1 simultaneously. You should keep your favorite...
...as well as watch cable and premium channels. BP68-00142A-2 5/27/03 10:09 AM Page 22 Connections Connecting Cable TV and VCR You can connect different cable systems to your TV, including cable without a Cable Box If you want to record one audio cable. When viewing premium channels, select ANT...the S-video connections and remove the video cable. You will need to ANT-A so that descrambles some or all channels. You should keep your TV selected to use a converter box with your cable box. If you can use the converter box to video1 simultaneously. You should keep your favorite...
User Manual (ENGLISH)
Page 13
... side of Component video, see your TV. Connecting to your camera's instructions and the section on "Viewing an External Signal Source" in this manual. 24 Connecting a DVD Player The rear panel jacks on the TV. 25 Note: For an explanation of the TV. If your camcorder is usually included ...with the camcorder.) To watch a tape, follow your TV. Connecting to your DVD player's owner's manual. You can use ...
... side of Component video, see your TV. Connecting to your camera's instructions and the section on "Viewing an External Signal Source" in this manual. 24 Connecting a DVD Player The rear panel jacks on the TV. 25 Note: For an explanation of the TV. If your camcorder is usually included ...with the camcorder.) To watch a tape, follow your TV. Connecting to your DVD player's owner's manual. You can use ...
User Manual (ENGLISH)
Page 14
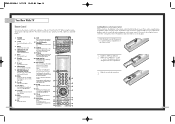
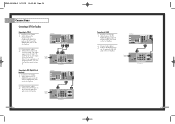
...the AUDIO OUT jacks on the Set Top Box. 2 Connect video cables between the DVI IN jack on the TV and the DVI OUT jack on the Set Top Box. 26 TV Rear Panel Component1 Component1/2 (480i/480p) (480p/720p/10801i) PC AUDIO Y ANT-A Pb ANT A-OUT MONITOR ...OUT Pr VIDEO 2 L L ANT-B S-VIDEO 1 S-VIDEO 2 VIDEO 1 R R V L R DVI PC RS-232C DTV Set Top Box TV Rear Panel Component1 Component1/2 (480i/480p) (480p/720p/10801i) PC AUDIO Y ANT-A Pb ANT A-OUT MONITOR OUT Pr VIDEO 2 L L ANT-B S-VIDEO 1 S-VIDEO 2 VIDEO 1 R R V...
...the AUDIO OUT jacks on the Set Top Box. 2 Connect video cables between the DVI IN jack on the TV and the DVI OUT jack on the Set Top Box. 26 TV Rear Panel Component1 Component1/2 (480i/480p) (480p/720p/10801i) PC AUDIO Y ANT-A Pb ANT A-OUT MONITOR ...OUT Pr VIDEO 2 L L ANT-B S-VIDEO 1 S-VIDEO 2 VIDEO 1 R R V L R DVI PC RS-232C DTV Set Top Box TV Rear Panel Component1 Component1/2 (480i/480p) (480p/720p/10801i) PC AUDIO Y ANT-A Pb ANT A-OUT MONITOR OUT Pr VIDEO 2 L L ANT-B S-VIDEO 1 S-VIDEO 2 VIDEO 1 R R V...
User Manual (ENGLISH)
Page 16
... joystick (up, down to select SETUP, then press the joystick to enter. 2 Press the joystick to select the language. The first line of your TV. Press the Menu button on the remote control to select "A" or "B". Viewing the Menus and Displays The on-screen menu system allows you to exit...on the remote control. Move the joystick down ) or CH( , )buttons to move between menu items, select menu items, and make some adjustments using the TV's side panel buttons. Access the on-screen menu system by choosing the antenna input(ANT A or ANT B). 1 Press the Menu button. Use the joystick (right...
... joystick (up, down to select SETUP, then press the joystick to enter. 2 Press the joystick to select the language. The first line of your TV. Press the Menu button on the remote control to select "A" or "B". Viewing the Menus and Displays The on-screen menu system allows you to exit...on the remote control. Move the joystick down ) or CH( , )buttons to move between menu items, select menu items, and make some adjustments using the TV's side panel buttons. Access the on-screen menu system by choosing the antenna input(ANT A or ANT B). 1 Press the Menu button. Use the joystick (right...
User Manual (ENGLISH)
Page 17
... by using the number buttons on the previous page. NOTE • When the ANT B mode is connected to select the channel directly. 33 The TV will appear in Memory Automatically 1 First, select the broadcast source as described on the remote control to , either an antenna or a cable system. ...1 Press the Menu button. Adding and Erasing Channels 1 Use the number buttons to select the channel you have, contact your TV is selected, the auto programming runs on screen, move the joystick down to select SETUP, then press the joystick to enter. 2 Press the joystick...
... by using the number buttons on the previous page. NOTE • When the ANT B mode is connected to select the channel directly. 33 The TV will appear in Memory Automatically 1 First, select the broadcast source as described on the remote control to , either an antenna or a cable system. ...1 Press the Menu button. Adding and Erasing Channels 1 Use the number buttons to select the channel you have, contact your TV is selected, the auto programming runs on screen, move the joystick down to select SETUP, then press the joystick to enter. 2 Press the joystick...

User Manual (ENGLISH)
Page 18
...To select a channel over 100, press the +100 button first. Scanning channels You can automatically scan all the channels that the TV has memorized. (The TV must have been erased. Using the Channel Buttons Press the CH or CH buttons to change to single-digit channels (0-9) faster, press... "0" before the single digit. The TV changes each available input source (such as Favorite channels. Example: For channel 4, press "0," then "4." Using the Previous Channel Press the Pre-ch...
...To select a channel over 100, press the +100 button first. Scanning channels You can automatically scan all the channels that the TV has memorized. (The TV must have been erased. Using the Channel Buttons Press the CH or CH buttons to change to single-digit channels (0-9) faster, press... "0" before the single digit. The TV changes each available input source (such as Favorite channels. Example: For channel 4, press "0," then "4." Using the Previous Channel Press the Pre-ch...

User Manual (ENGLISH)
Page 19
...". 4 Move the joystick to the right to select the last two digits. Setting The On/Off Melody You can hear clear melody sound when the TV is pressed, the channel label will appear next to the channel number. 1 Press the CH or CH button to tune to the channel that will...
...". 4 Move the joystick to the right to select the last two digits. Setting The On/Off Melody You can hear clear melody sound when the TV is pressed, the channel label will appear next to the channel number. 1 Press the CH or CH button to tune to the channel that will...
User Manual (ENGLISH)
Page 20
...the Menu button to exit. 38 Using Automatic ("Standard") Picture Settings 1 Press the P.Mode button on -screen gauge as your TV's specifications. • Choose Dynamic for viewing the TV during the day or when there is bright light in the room. • Choose Movie when viewing the movie. •... or lower the value of the item, using the on the remote control to change the contrast, brightness, tint, color, and sharpness settings of the TV. The level indicator will disappear and the Video menu will see the items "Contrast", "Brightness", "Sharpness", "Color" and "Tint". 3 Move the ...
...the Menu button to exit. 38 Using Automatic ("Standard") Picture Settings 1 Press the P.Mode button on -screen gauge as your TV's specifications. • Choose Dynamic for viewing the TV during the day or when there is bright light in the room. • Choose Movie when viewing the movie. •... or lower the value of the item, using the on the remote control to change the contrast, brightness, tint, color, and sharpness settings of the TV. The level indicator will disappear and the Video menu will see the items "Contrast", "Brightness", "Sharpness", "Color" and "Tint". 3 Move the ...
User Manual (ENGLISH)
Page 21
... + buttons. BP68-00142A-3 5/27/03 10:08 AM Page 40 Operation Sound Control You can control and customize the sound levels and settings of the TV with the VOL - Customizing the Sound 1 Press the Menu button. Using the Mute Button Press the Mute button on -screen menus, you want to change...
... + buttons. BP68-00142A-3 5/27/03 10:08 AM Page 40 Operation Sound Control You can control and customize the sound levels and settings of the TV with the VOL - Customizing the Sound 1 Press the Menu button. Using the Mute Button Press the Mute button on -screen menus, you want to change...

User Manual (ENGLISH)
Page 22
... the hours, be sure to select the proper time of day (am or pm). 5 Press Menu to exit the menus. 42 Setting the Timers This TV can be sure to select the proper time of day (am or pm). 4 Move the joystick right to select the minute. Move the joystick down... right to select the hour, then Move the joystick up or down to turn on the remote control. When selecting the hours, be set the TV's clock, as described previously. Continued... 43 Setting the On/Off Timer 1 Press the Menu button. Setting this clock also allows you to use it to...
... the hours, be sure to select the proper time of day (am or pm). 5 Press Menu to exit the menus. 42 Setting the Timers This TV can be sure to select the proper time of day (am or pm). 4 Move the joystick right to select the minute. Move the joystick down... right to select the hour, then Move the joystick up or down to turn on the remote control. When selecting the hours, be set the TV's clock, as described previously. Continued... 43 Setting the On/Off Timer 1 Press the Menu button. Setting this clock also allows you to use it to...
User Manual (ENGLISH)
Page 23
... or down to select "on . When any of jacks: Video 1, Video 2, S-video 1, S-video 2, Component 1, Component 2, Component 3, DVI or PC on the TV's rear panel, and Video 3 or S-Video 3 on , move the joystick down to select the "Off Time". Press the Menu button to return to normal viewing. Press...Signal Source Selecting the Signal Source Use the remote control to switch between the following on-screen menu will illuminate (front or side panel of TV.). 6 When you are finished, move the joystick right. 7 If you can control the tape functions of a connected VCR or DVD, including...
... or down to select "on . When any of jacks: Video 1, Video 2, S-video 1, S-video 2, Component 1, Component 2, Component 3, DVI or PC on the TV's rear panel, and Video 3 or S-Video 3 on , move the joystick down to select the "Off Time". Press the Menu button to return to normal viewing. Press...Signal Source Selecting the Signal Source Use the remote control to switch between the following on-screen menu will illuminate (front or side panel of TV.). 6 When you are finished, move the joystick right. 7 If you can control the tape functions of a connected VCR or DVD, including...
User Manual (ENGLISH)
Page 25
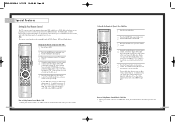
...Note on Using Remote Control Modes: VCR • When your remote control is in four different modes: TV, VCR, Cable, or DVD. Your cable box should turn on if your brand of VCR. Setting Up...the MODE button and make sure that the Cable LED is illuminated. 3 Press the SET button on your TV's remote control. 4 Using the number buttons on your remote control, enter three digits of the cable box ...the MODE button and make sure that the VCR LED is illuminated. 3 Press the Set button on your TV's remote control. 4 Using the number buttons on your remote control, enter three digits of the VCR code...
...Note on Using Remote Control Modes: VCR • When your remote control is in four different modes: TV, VCR, Cable, or DVD. Your cable box should turn on if your brand of VCR. Setting Up...the MODE button and make sure that the Cable LED is illuminated. 3 Press the SET button on your TV's remote control. 4 Using the number buttons on your remote control, enter three digits of the cable box ...the MODE button and make sure that the VCR LED is illuminated. 3 Press the Set button on your TV's remote control. 4 Using the number buttons on your remote control, enter three digits of the VCR code...


