
User Manual (ENGLISH)
Page 3
... damage. Do not use a damaged or loose plug. Insert the power plug firmly so that it with a dusty plug or connector may damage the monitor. Do not excessively bend the plug and wire nor place heavy objects upon them, which could cause damage. z This may cause electric shock or fire.... Do not disconnect the power cord while using the monitor. Do not use the power cord when the connector or plug is dusty, clean it does not come loose. Installation z This may cause electric ...
... damage. Do not use a damaged or loose plug. Insert the power plug firmly so that it with a dusty plug or connector may damage the monitor. Do not excessively bend the plug and wire nor place heavy objects upon them, which could cause damage. z This may cause electric shock or fire.... Do not disconnect the power cord while using the monitor. Do not use the power cord when the connector or plug is dusty, clean it does not come loose. Installation z This may cause electric ...

User Manual (ENGLISH)
Page 4
...not install the product in internal temperature may cause electric shock or fire. Do not drop the monitor when moving it . Be sure to contact an authorized Service Center, when installing your monitor in a location with low humidity and a minimum of the base does not protrude from the ...showcase or shelf. Failure to do so may cause serious damage to your monitor. z This may cause fire. Keep any flammable objects such as at airports, train stations etc. Place your monitor in a location with poor ventilation, for 24 hours such as candles, insecticides or cigarettes...
...not install the product in internal temperature may cause electric shock or fire. Do not drop the monitor when moving it . Be sure to contact an authorized Service Center, when installing your monitor in a location with low humidity and a minimum of the base does not protrude from the ...showcase or shelf. Failure to do so may cause serious damage to your monitor. z This may cause fire. Keep any flammable objects such as at airports, train stations etc. Place your monitor in a location with poor ventilation, for 24 hours such as candles, insecticides or cigarettes...

User Manual (ENGLISH)
Page 5
... moistened, soft fabric. Keep the plastic packaging (bag) out of the product, resulting in a shortened component life and degraded performance. Clean When cleaning the monitor case or the surface of the TFT-LCD screen, wipe with a smooth cloth. When installing the product, make sure to do so may damage the TFT...-LCD surface. The installation of the bracket must be done by unqualified personnel may cause an increase in the internal temperature of children's reach. z ...
... moistened, soft fabric. Keep the plastic packaging (bag) out of the product, resulting in a shortened component life and degraded performance. Clean When cleaning the monitor case or the surface of the TFT-LCD screen, wipe with a smooth cloth. When installing the product, make sure to do so may damage the TFT...-LCD surface. The installation of the bracket must be done by unqualified personnel may cause an increase in the internal temperature of children's reach. z ...

User Manual (ENGLISH)
Page 6
...water or outdoors where it immediately and contact an authorized dealer or Service Center. z Do not use any unusual sound or smell coming from the monitor - z Refer to snow or rain. do not install inside a vehicle. z Otherwise, this may cause a malfunction or fire. unplug it could...be exposed to a qualified servicing company. Unplug the power cord from places exposed to unplug the power cord before cleaning the product. If your monitor does not operate normally - Dust which has accumulated in particular, if there is dusty or dirty, clean it properly using a soft, dry...
...water or outdoors where it immediately and contact an authorized dealer or Service Center. z Do not use any unusual sound or smell coming from the monitor - z Refer to snow or rain. do not install inside a vehicle. z Otherwise, this may cause a malfunction or fire. unplug it could...be exposed to a qualified servicing company. Unplug the power cord from places exposed to unplug the power cord before cleaning the product. If your monitor does not operate normally - Dust which has accumulated in particular, if there is dusty or dirty, clean it properly using a soft, dry...

User Manual (ENGLISH)
Page 7
... z This may cause a breakdown or fire. Do not place water containers, chemical products or small metal objects on the monitor cabinet. z If a foreign substance enters the monitor, unplug the power cord and contact a Service Center. Keep the product away from the outlet during storms or lightning or ... combustible chemical sprays or inflammable substances. Never insert anything metallic into the vent, headphone port or AV ports. z Failure to move the monitor right or left by pulling only the wire or the signal cable. z This may cause electric shock or fire. Do not try to...
... z This may cause a breakdown or fire. Do not place water containers, chemical products or small metal objects on the monitor cabinet. z If a foreign substance enters the monitor, unplug the power cord and contact a Service Center. Keep the product away from the outlet during storms or lightning or ... combustible chemical sprays or inflammable substances. Never insert anything metallic into the vent, headphone port or AV ports. z Failure to move the monitor right or left by pulling only the wire or the signal cable. z This may cause electric shock or fire. Do not try to...
User Manual (ENGLISH)
Page 8
z A falling product may result in a location prone to the levels appropriate for an extended period of time. When not using the monitor. Adjust the resolution and frequency to vibrations may shorten the lifetime of children's reach, as they could damage it by hanging onto it. ...z An inappropriate resolution may cause undesirable picture quality. 17,19 inch (43, 48 cm) - 1280 X 1024 Viewing the monitor continuously at least a five-minute break after every hour of using the product for an extended period of time, residual...
z A falling product may result in a location prone to the levels appropriate for an extended period of time. When not using the monitor. Adjust the resolution and frequency to vibrations may shorten the lifetime of children's reach, as they could damage it by hanging onto it. ...z An inappropriate resolution may cause undesirable picture quality. 17,19 inch (43, 48 cm) - 1280 X 1024 Viewing the monitor continuously at least a five-minute break after every hour of using the product for an extended period of time, residual...

User Manual (ENGLISH)
Page 9
...lightly place your hands on the keyboard. z Position the monitor so that your eyes are slightly higher than the display panel. z Position the monitor or chair so that your eyes are slightly higher than the display panel. z Adjust the LCD screen panel angle so that the reflection of interest on...eye strain. z Children may try to climb on the product. The product could fall, causing physical damage or even death. z Adjust the LCD screen panel so that the panel faces downwards. Do not place your children's favorite toys or any other objects of the illumination is minimized for...
...lightly place your hands on the keyboard. z Position the monitor so that your eyes are slightly higher than the display panel. z Position the monitor or chair so that your eyes are slightly higher than the display panel. z Adjust the LCD screen panel angle so that the reflection of interest on...eye strain. z Children may try to climb on the product. The product could fall, causing physical damage or even death. z Adjust the LCD screen panel so that the panel faces downwards. Do not place your children's favorite toys or any other objects of the illumination is minimized for...

User Manual (ENGLISH)
Page 10
Please make sure the following items are missing, contact your monitor. Contact a local dealer to buy optional items. Unpacking Type 1 Type 2 Monitor Type 3 Monitor & Simple stand Bottom MagicRotation program can not be provided as Simple Stand does not support Pivot function. If any items are included with your dealer.
Please make sure the following items are missing, contact your monitor. Contact a local dealer to buy optional items. Unpacking Type 1 Type 2 Monitor Type 3 Monitor & Simple stand Bottom MagicRotation program can not be provided as Simple Stand does not support Pivot function. If any items are included with your dealer.

User Manual (ENGLISH)
Page 11
Type 4 Monitor & Pivot stand Type 5 Monitor & Sliding Stand Monitor & Lowest HAS Stand Manual Quick Setup Guide Cable Warranty Card (Not available in all locations) User's Guide, Monitor Driver, Natural Color software, MagicTune™ software MagicRotation software D-sub Cable Power Cord DVI Cable (option)
Type 4 Monitor & Pivot stand Type 5 Monitor & Sliding Stand Monitor & Lowest HAS Stand Manual Quick Setup Guide Cable Warranty Card (Not available in all locations) User's Guide, Monitor Driver, Natural Color software, MagicTune™ software MagicRotation software D-sub Cable Power Cord DVI Cable (option)
User Manual (ENGLISH)
Page 13
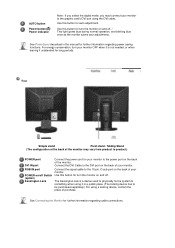
... light glows blue during normal operation, and blinking blue once as the monitor saves your monitor. Use this button for turn the monitor on the back of the monitor. Use this button for auto adjustment. For energy conservation, turn the monitor on the back of your adjustments. AUTO button Power button [ ]/...described in a public place. (The locking device has to the DVI port on and off . Use this button for turn your monitor OFF when it is a device used to physically fix the system to something when using it unattended for further information regarding power saving functions....
... light glows blue during normal operation, and blinking blue once as the monitor saves your monitor. Use this button for turn the monitor on the back of the monitor. Use this button for auto adjustment. For energy conservation, turn the monitor on the back of your adjustments. AUTO button Power button [ ]/...described in a public place. (The locking device has to the DVI port on and off . Use this button for turn your monitor OFF when it is a device used to physically fix the system to something when using it unattended for further information regarding power saving functions....

User Manual (ENGLISH)
Page 14
... computer using a special Mac adapter(option). 3. Connect the power cord for the monitor into a nearby outlet. 2-1. If your monitor to the DVI Port on your Monitor. [ DVI IN ] 2-3. Connect the signal cable to connect the monitor using the D-sub connection cable. 2-4. Using the D-sub (Analog) connector on ... back of an old model Macintosh, you need to the 15-pin, D-sub port on the video card. Connect the monitor to a Macintosh. Connecting the Monitor 1. Plug the power cord for your monitor displays an image, installation is complete. In the case of the...
... computer using a special Mac adapter(option). 3. Connect the power cord for the monitor into a nearby outlet. 2-1. If your monitor to the DVI Port on your Monitor. [ DVI IN ] 2-3. Connect the signal cable to connect the monitor using the D-sub connection cable. 2-4. Using the D-sub (Analog) connector on ... back of an old model Macintosh, you need to the 15-pin, D-sub port on the video card. Connect the monitor to a Macintosh. Connecting the Monitor 1. Plug the power cord for your monitor displays an image, installation is complete. In the case of the...

User Manual (ENGLISH)
Page 15
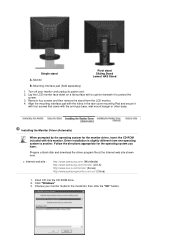
Using the Stand Monitor Assembly Monitor and Bottom Pivot Stand / Sliding Stand A.Stand Stopper Attaching a Base This monitor accepts a 75 mm x 75 mm VESA-compliant mounting interface pad.
Using the Stand Monitor Assembly Monitor and Bottom Pivot Stand / Sliding Stand A.Stand Stopper Attaching a Base This monitor accepts a 75 mm x 75 mm VESA-compliant mounting interface pad.
User Manual (ENGLISH)
Page 16
... the driver program file at the Internet web site shown here. Driver installation is slightly different from the LCD monitor. 4. Follow the directions appropriate for the monitor driver, insert the CD-ROM included with the holes in the model list, then click the "OK"...mount hanger or other base. z Internet web site : http://www.samsung.com/ (Worldwide) http://www.samsung.com/monitor (U.S.A) http://www.sec.co.kr/monitor (Korea) http://www.samsungmonitor.com.cn/ (China) 1. Simple stand A. Monitor Pivot stand Sliding Stand Lowest HAS Stand B. Align the mounting interface ...
... the driver program file at the Internet web site shown here. Driver installation is slightly different from the LCD monitor. 4. Follow the directions appropriate for the monitor driver, insert the CD-ROM included with the holes in the model list, then click the "OK"...mount hanger or other base. z Internet web site : http://www.samsung.com/ (Worldwide) http://www.samsung.com/monitor (U.S.A) http://www.sec.co.kr/monitor (Korea) http://www.samsungmonitor.com.cn/ (China) 1. Simple stand A. Monitor Pivot stand Sliding Stand Lowest HAS Stand B. Align the mounting interface ...

User Manual (ENGLISH)
Page 17
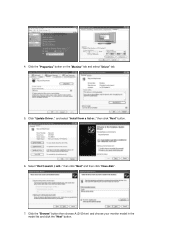
..., insert the CD-ROM included with this installation doesn't damage your system.The certified driver will be posted on Samsung Monitor homepage http://www.samsung.com/. 5. Click "Start" -> "Control Panel" then click the "Appearance and Themes" Icon. 3. Click "Display" icon ...and choose the "Settings" tab then click "Advanced..". 4. z Internet web site : http://www.samsung.com/ (Worldwide) http://www.samsung.com/monitor (U.S.A) http://www.sec.co.kr/monitor (Korea) http://www.samsungmonitor.com.cn/ (China) Microsoft® Windows® XP Operating System 1. Prepare a...
..., insert the CD-ROM included with this installation doesn't damage your system.The certified driver will be posted on Samsung Monitor homepage http://www.samsung.com/. 5. Click "Start" -> "Control Panel" then click the "Appearance and Themes" Icon. 3. Click "Display" icon ...and choose the "Settings" tab then click "Advanced..". 4. z Internet web site : http://www.samsung.com/ (Worldwide) http://www.samsung.com/monitor (U.S.A) http://www.sec.co.kr/monitor (Korea) http://www.samsungmonitor.com.cn/ (China) Microsoft® Windows® XP Operating System 1. Prepare a...
User Manual (ENGLISH)
Page 18
and select "Install from a list or.." Click the "Properties" button on the "Monitor" tab and select "Driver" tab. 5. then click "Next" button. 6. Select "Don't search ,I will.." Click the "Browse" button then choose A:(D:\Driver) and choose your monitor model in the model list and click the "Next" button. then click "Next" and then click "Have disk". 7. 4. Click "Update Driver.."
and select "Install from a list or.." Click the "Properties" button on the "Monitor" tab and select "Driver" tab. 5. then click "Next" button. 6. Select "Don't search ,I will.." Click the "Browse" button then choose A:(D:\Driver) and choose your monitor model in the model list and click the "Next" button. then click "Next" and then click "Have disk". 7. 4. Click "Update Driver.."
User Manual (ENGLISH)
Page 19
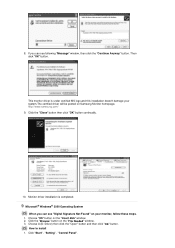
..." button and then click "OK" button. http://www.samsung.com/ 9. How to install 1. Microsoft® Windows® 2000 Operating System When you can see following "Message" window, then click the "Continue Anyway" button. Monitor driver installation is under certified MS logo,and this installation... doesn't damage your monitor, follow these steps. 1. Click the "Browse" button on the "Insert disk" window. 2. If you can see "Digital Signature Not Found" on your system.The certified driver will be posted on Samsung Monitor homepage. Click the "Close" button...
..." button and then click "OK" button. http://www.samsung.com/ 9. How to install 1. Microsoft® Windows® 2000 Operating System When you can see following "Message" window, then click the "Continue Anyway" button. Monitor driver installation is under certified MS logo,and this installation... doesn't damage your monitor, follow these steps. 1. Click the "Browse" button on the "Insert disk" window. 2. If you can see "Digital Signature Not Found" on your system.The certified driver will be posted on Samsung Monitor homepage. Click the "Close" button...
User Manual (ENGLISH)
Page 20
... location.." Choose "Display a list of resolution and vertical frequency by referring to a different mode (lower mode of the known drivers for your monitor. 7. Specify A:\(D:\driver) then click "OK" button. 10. Click Start, Settings, Control Panel, and then double-click Display icon. 2. ...frequency for this device so that I can enter the frequency directly.) 8. Set a mouse for selecting a keyboard. 5. Set a Keyboard for setting your monitor. (You can choose a specific driver" then click "Next" and then click "Have disk". 7. The next screen is active, click the "Properties...
... location.." Choose "Display a list of resolution and vertical frequency by referring to a different mode (lower mode of the known drivers for your monitor. 7. Specify A:\(D:\driver) then click "OK" button. 10. Click Start, Settings, Control Panel, and then double-click Display icon. 2. ...frequency for this device so that I can enter the frequency directly.) 8. Set a mouse for selecting a keyboard. 5. Set a Keyboard for setting your monitor. (You can choose a specific driver" then click "Next" and then click "Have disk". 7. The next screen is active, click the "Properties...
User Manual (ENGLISH)
Page 21
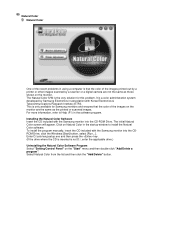
...software program. The Natural Color S/W is only available for this problem. This is the very solution for Samsung monitors and ensures that the color of the images on the monitor are not the same as the printed or scanned images. To install the program manually, insert the CD... Natural Color from the list and then click the "Add/Delete" button. Installing the Natural Color Software Insert the CD included with the Samsung monitor into the CD-ROM Drive. It is not D:\, enter the applicable drive.) Uninstalling the Natural Color Software Program Select "Setting/Control Panel"...
...software program. The Natural Color S/W is only available for this problem. This is the very solution for Samsung monitors and ensures that the color of the images on the monitor are not the same as the printed or scanned images. To install the program manually, insert the CD... Natural Color from the list and then click the "Add/Delete" button. Installing the Natural Color Software Insert the CD included with the Samsung monitor into the CD-ROM Drive. It is not D:\, enter the applicable drive.) Uninstalling the Natural Color Software Program Select "Setting/Control Panel"...

User Manual (ENGLISH)
Page 23
... work properly, press AUTO button again to the incoming video signal. If you change resolution in the animated screen on . - Locked Auto adjustment allows the monitor to self-adjust to adjust picture with more accuracy. - Menu AUTO Description When the 'AUTO' button is on the center. The values of fine, coarse...
... work properly, press AUTO button again to the incoming video signal. If you change resolution in the animated screen on . - Locked Auto adjustment allows the monitor to self-adjust to adjust picture with more accuracy. - Menu AUTO Description When the 'AUTO' button is on the center. The values of fine, coarse...

User Manual (ENGLISH)
Page 24
You can also adjust the brightness and contrast of the monitor with the OSD adjustment locking feature. Six different modes (Custom/Text/Internet/Game/Sport/Movie) Menu Locked Description After pushing the "MENU" button more than 5 seconds, OSD function is locked (unlocked). MagicBright™ Menu Description Push the MagicBright™ button to circle through available preconfigured MagicBright™ modes. -
You can also adjust the brightness and contrast of the monitor with the OSD adjustment locking feature. Six different modes (Custom/Text/Internet/Game/Sport/Movie) Menu Locked Description After pushing the "MENU" button more than 5 seconds, OSD function is locked (unlocked). MagicBright™ Menu Description Push the MagicBright™ button to circle through available preconfigured MagicBright™ modes. -


