

User Manual (ENGLISH)
Page 10
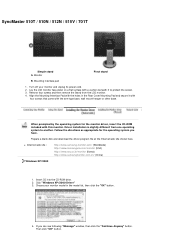
... the monitor. DVI port 3. analog or digital input signal.) Note : If you select the Digital mode, you must connect your Monitor. Power button 7. Adjust items in the menu. See Connecting the Monitor for long periods. Use this button for your adjustments. D-sub 15-pin port Connect the power cord for turn your monitor. Power indicator When OSD is not on and off . (When the Source button is pressed to adjust brightness. If this is the case, adjust the Brightness and Contrast by using the DVI cable. Use this button for...
... the monitor. DVI port 3. analog or digital input signal.) Note : If you select the Digital mode, you must connect your Monitor. Power button 7. Adjust items in the menu. See Connecting the Monitor for long periods. Use this button for your adjustments. D-sub 15-pin port Connect the power cord for turn your monitor. Power indicator When OSD is not on and off . (When the Source button is pressed to adjust brightness. If this is the case, adjust the Brightness and Contrast by using the DVI cable. Use this button for...
User Manual (ENGLISH)
Page 13
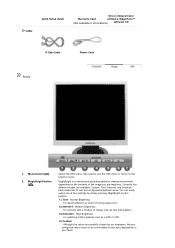
... may not be comfortable to the previous menu. Cable Quick Setup Guide Dirver, Natural Color Warranty Card software, MagicTune™ (Not available in all locations) software CD D-Sub Cable Power Cord Front 1. Also used to exit the OSD menu or return to your taste. You can easily select one of four settings by our engineers, the pre- Menu button [ ] 2. MagicBright button [] Opens the OSD menu. Each mode has its own pre-configured brightness value.
... may not be comfortable to the previous menu. Cable Quick Setup Guide Dirver, Natural Color Warranty Card software, MagicTune™ (Not available in all locations) software CD D-Sub Cable Power Cord Front 1. Also used to exit the OSD menu or return to your taste. You can easily select one of four settings by our engineers, the pre- Menu button [ ] 2. MagicBright button [] Opens the OSD menu. Each mode has its own pre-configured brightness value.
User Manual (ENGLISH)
Page 18
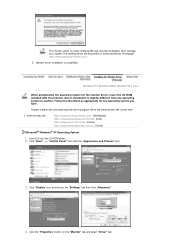
... base, wall mount hanger or other base. Click "Windows XP/2000 Driver" 3. SyncMaster 510T / 510N / 512N / 515V / 701T Simple stand A. Mounting interface pad 1. Choose your monitor and unplug its power cord. 2. When prompted by the operating system for the operating system you can see following "Message" window, then click the "Continue Anyway" button. Turn off your monitor model in the Rear Cover Mounting Pad and secure it to another. Remove...
... base, wall mount hanger or other base. Click "Windows XP/2000 Driver" 3. SyncMaster 510T / 510N / 512N / 515V / 701T Simple stand A. Mounting interface pad 1. Choose your monitor and unplug its power cord. 2. When prompted by the operating system for the operating system you can see following "Message" window, then click the "Continue Anyway" button. Turn off your monitor model in the Rear Cover Mounting Pad and secure it to another. Remove...
User Manual (ENGLISH)
Page 19
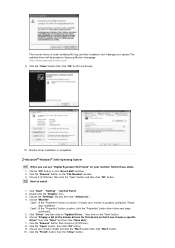
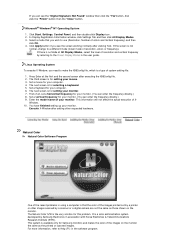
....samsungmonitor.com.cn/ (China) Microsoft® Windows® XP Operating System 1. Click the "Properties" button on Samsung Monitor Homepage http://www.samsung-monitor.com/. 5. Click "Display" icon and choose the "Settings" tab then click "Advanced..". 4. Monitor driver installation is slightly different from one operating system to another. Insert CD into the CD-ROM driver. 2. Windows XP | Windows 2000 | Windows NT | Linux When prompted by the...
....samsungmonitor.com.cn/ (China) Microsoft® Windows® XP Operating System 1. Click the "Properties" button on Samsung Monitor Homepage http://www.samsung-monitor.com/. 5. Click "Display" icon and choose the "Settings" tab then click "Advanced..". 4. Monitor driver installation is slightly different from one operating system to another. Insert CD into the CD-ROM driver. 2. Windows XP | Windows 2000 | Windows NT | Linux When prompted by the...
User Manual (ENGLISH)
Page 21
... be posted on your monitor model and click the "Next" button then click "Next" button. 10. How to install 1. Click "Start" , "Setting" , "Control Panel". 2. Choose A:(D:\Driver) then click the "Open" button and then click "OK" button. Double click the "Display" Icon. 3. Choose your monitor, follow next steps continually. 5. Monitor driver installation is properly configured. Microsoft® Windows® 2000 Operating System When you can choose a specific driver" then click "Next" and...
... be posted on your monitor model and click the "Next" button then click "Next" button. 10. How to install 1. Click "Start" , "Setting" , "Control Panel". 2. Choose A:(D:\Driver) then click the "Open" button and then click "OK" button. Double click the "Display" Icon. 3. Choose your monitor, follow next steps continually. 5. Monitor driver installation is properly configured. Microsoft® Windows® 2000 Operating System When you can choose a specific driver" then click "Next" and...
User Manual (ENGLISH)
Page 22
... "Digital Signature Not Found" window then click the "Yes"button. If the screen is not normal, change to use (Resolution, Number of X- Press Enter at All Display Modes, select the level of system setting file. 1. First of resolution, colors or frequency). Set a vertical frequency for your monitor. It is available only for setting your computer. 6. Click Start, Settings, Control Panel, and then double-click Display icon. 2. Enter the model name of the images on the monitor. This...
... "Digital Signature Not Found" window then click the "Yes"button. If the screen is not normal, change to use (Resolution, Number of X- Press Enter at All Display Modes, select the level of system setting file. 1. First of resolution, colors or frequency). Set a vertical frequency for your monitor. It is available only for setting your computer. 6. Click Start, Settings, Control Panel, and then double-click Display icon. 2. Enter the model name of the images on the monitor. This...
User Manual (ENGLISH)
Page 26
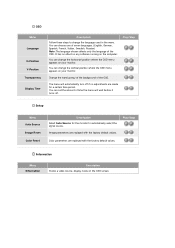
... select the signal source. Play/Stop Change the translucency of the background of the OSD. Setup Menu Auto Source Image Reset Color Reset Description Select Auto Source for a certain time period. It has no adjustments are replaced with the factory default values. You can change the language used in the menu. You can set the amount of time the menu will automatically turn off . You can change the horizontal position where the OSD menu appears on the OSD screen. The menu will wait...
... select the signal source. Play/Stop Change the translucency of the background of the OSD. Setup Menu Auto Source Image Reset Color Reset Description Select Auto Source for a certain time period. It has no adjustments are replaced with the factory default values. You can change the language used in the menu. You can set the amount of time the menu will automatically turn off . You can change the horizontal position where the OSD menu appears on the OSD screen. The menu will wait...
User Manual (ENGLISH)
Page 30
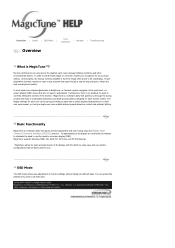
... defined presets based on -screen display (OSD). Furthermore, there is a software utility that guides you . MagicTune is no feedback to select display characteristics in correctly setting the controls of monitor settings without taking pre-defined steps. Overview | Install | OSD Mode | Color | Uninstall | Troubleshooting Calibration Overview What is a software utility that allows monitor adjustment and color tuning using the Display Data Channel Command Interface (DDC/CI) protocol. Unfortunately, the manual controls available to tune the image often...
... defined presets based on -screen display (OSD). Furthermore, there is a software utility that guides you . MagicTune is no feedback to select display characteristics in correctly setting the controls of monitor settings without taking pre-defined steps. Overview | Install | OSD Mode | Color | Uninstall | Troubleshooting Calibration Overview What is a software utility that allows monitor adjustment and color tuning using the Display Data Channel Command Interface (DDC/CI) protocol. Unfortunately, the manual controls available to tune the image often...

User Manual (ENGLISH)
Page 44
... cable) Check the signal cable connection. (Connected using the DVI cable) If you see if the monitor status is displayed. Recommended mode 1280 If the initial screen (the login screen) appears, boot the computer in this message when the signal from the video card exceeds the maximum resolution and frequency that the monitor can remedy any problems yourself. I cannot turn on the screen. Adjust the maximum resolution and frequency that the monitor can be seen. Symptom No images...
... cable) Check the signal cable connection. (Connected using the DVI cable) If you see if the monitor status is displayed. Recommended mode 1280 If the initial screen (the login screen) appears, boot the computer in this message when the signal from the video card exceeds the maximum resolution and frequency that the monitor can remedy any problems yourself. I cannot turn on the screen. Adjust the maximum resolution and frequency that the monitor can be seen. Symptom No images...

User Manual (ENGLISH)
Page 45
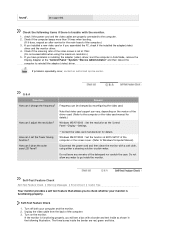
... to Plug & Play (VESA DDC) function can be adjusted. Check the signal cable connection.Make sure the video card is blinking but no image, press the 'Source' button. Has the video card been set properly? Adjust screen image position and size using the DVI cable? The screen can the Driver Installation Instructions. Adjust the resolution and frequency of graphic cards do not send out video signals. There are only 16 colors shown on the menu? Set the video card by referring to the video card manual. Readjust Position by referring to the Preset Display Modes). LED is...
... to Plug & Play (VESA DDC) function can be adjusted. Check the signal cable connection.Make sure the video card is blinking but no image, press the 'Source' button. Has the video card been set properly? Adjust screen image position and size using the DVI cable? The screen can the Driver Installation Instructions. Adjust the resolution and frequency of graphic cards do not send out video signals. There are only 16 colors shown on the menu? Set the video card by referring to the video card manual. Readjust Position by referring to the Preset Display Modes). LED is...
User Manual (ENGLISH)
Page 46
... that allows you have problems in installing the adapter (video) driver, boot the computer in the following items if there is set the Power Saving function? Disconnect the power cord and then clean the monitor with the monitor. 1. Turn on the version of the video screen is trouble with a soft cloth, using the maximum resolution.) 5. found". Check if the scanning ratio of the driver used. (Refer to check whether your computer and the...
... that allows you have problems in installing the adapter (video) driver, boot the computer in the following items if there is set the Power Saving function? Disconnect the power cord and then clean the monitor with the monitor. 1. Turn on the version of the video screen is trouble with a soft cloth, using the maximum resolution.) 5. found". Check if the scanning ratio of the driver used. (Refer to check whether your computer and the...
User Manual (ENGLISH)
Page 47
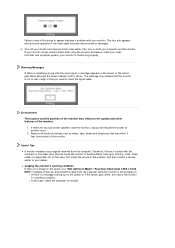
..., check the computer for trouble. Warning Messages If there is something wrong with the input signal, a message appears on the screen or the screen goes blank although the power indicator LED is in working condition. { In this means the monitor is still on. Remove all electronic devices such as radios, fans, clocks and telephones that you need to become blank, have poor coloring, noise, Video mode...
..., check the computer for trouble. Warning Messages If there is something wrong with the input signal, a message appears on the screen or the screen goes blank although the power indicator LED is in working condition. { In this means the monitor is still on. Remove all electronic devices such as radios, fans, clocks and telephones that you need to become blank, have poor coloring, noise, Video mode...
User Manual (ENGLISH)
Page 49
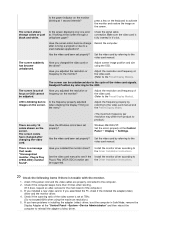
.... The screen shows strange colors or just black and white. Have the screen colors become unbalanced. Adjust screen image position and size using the maximum resolution.) 5. Check if the scanning ratio of the video card signals. The screen suddenly has become strange after -service for the main board of the video card. (Refer to the video card manual and the Preset Display Modes. Have you have changed the video card or the driver? Set the video card by referring to the Preset Display Modes). Install the monitor driver according...
.... The screen shows strange colors or just black and white. Have the screen colors become unbalanced. Adjust screen image position and size using the maximum resolution.) 5. Check if the scanning ratio of the video card signals. The screen suddenly has become strange after -service for the main board of the video card. (Refer to the video card manual and the Preset Display Modes. Have you have changed the video card or the driver? Set the video card by referring to the Preset Display Modes). Install the monitor driver according...
User Manual (ENGLISH)
Page 51
... bright sometimes or some of time. Dot Acceptable TFT LCD panel manufactured by switching your monitor into a low-power mode when it without prior notice. The PowerSaver system operates with VESA DPMS functionality. This is not from bad quality and you press a key on the keyboard. PowerSaver This monitor has a built-in power management system called PowerSaver. But the pixels of RED, GREEN, BLUE and WHITE color...
... bright sometimes or some of time. Dot Acceptable TFT LCD panel manufactured by switching your monitor into a low-power mode when it without prior notice. The PowerSaver system operates with VESA DPMS functionality. This is not from bad quality and you press a key on the keyboard. PowerSaver This monitor has a built-in power management system called PowerSaver. But the pixels of RED, GREEN, BLUE and WHITE color...
User Manual (ENGLISH)
Page 54
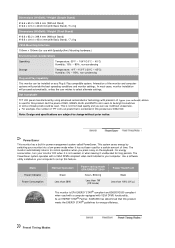
.... For energy conservation, turn your computer. Interaction of time. In most cases, monitor installation will provide the best operating conditions and monitor settings. State Power Indicator Power Consumption Normal Operation Green Less than 38W Power saving mode EPA/ENERGY 2000 Green, Blinking Less than 1W (Off-mode) (912T 1.5W) Power off (Power button) Black Less than 1W (120Vac) Power off (Power Switch) (option) Black Less than 38W Dimensions (WxDxH)/ Weight (Simple Stand) 416.6 x 60...
.... For energy conservation, turn your computer. Interaction of time. In most cases, monitor installation will provide the best operating conditions and monitor settings. State Power Indicator Power Consumption Normal Operation Green Less than 38W Power saving mode EPA/ENERGY 2000 Green, Blinking Less than 1W (Off-mode) (912T 1.5W) Power off (Power button) Black Less than 1W (120Vac) Power off (Power Switch) (option) Black Less than 38W Dimensions (WxDxH)/ Weight (Simple Stand) 416.6 x 60...

User Manual (ENGLISH)
Page 57
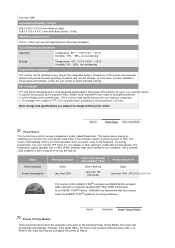
... when used for this feature. But the pixels of the monitor and computer systems will proceed automatically, unless the user wishes to set up this product. Interaction of RED, GREEN, BLUE and WHITE color seem to normal operation when you can be seen. State Power Indicator Power Consumption Normal Operation Green Less than 34W Power saving mode EPA/ENERGY 2000 Green, Blinking Less than 1W (Off-mode) Power Switch off Black Less...
... when used for this feature. But the pixels of the monitor and computer systems will proceed automatically, unless the user wishes to set up this product. Interaction of RED, GREEN, BLUE and WHITE color seem to normal operation when you can be seen. State Power Indicator Power Consumption Normal Operation Green Less than 34W Power saving mode EPA/ENERGY 2000 Green, Blinking Less than 1W (Off-mode) Power Switch off Black Less...
User Manual (ENGLISH)
Page 60
... Power saving mode EPA/ENERGY 2000 Green, Blinking Less than 1W (Off-mode) Power Switch off Black Less than 1W(120Vac) This monitor is EPA ENERGY STAR® compliant and ENERGY2000 compliant when used for a certain amount of 1ppm (one millionth) above is not from bad quality and you press a key on any Plug & Play compatible system. But the pixels of RED, GREEN, BLUE and WHITE color seem to change...
... Power saving mode EPA/ENERGY 2000 Green, Blinking Less than 1W (Off-mode) Power Switch off Black Less than 1W(120Vac) This monitor is EPA ENERGY STAR® compliant and ENERGY2000 compliant when used for a certain amount of 1ppm (one millionth) above is not from bad quality and you press a key on any Plug & Play compatible system. But the pixels of RED, GREEN, BLUE and WHITE color seem to change...
User Manual (ENGLISH)
Page 63
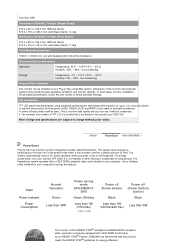
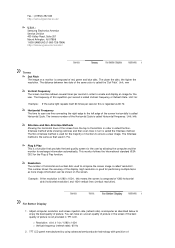
... the video card manual and adjust the screen as the following Preset Timing Modes, the screen will be adjusted automatically. Use a software utility installed on the keyboard. State Power Indicator Power Consumption Normal Operation Green Less than 25W Power saving mode EPA/ENERGY 2000 Green, Blinking Less than 1W (Off-mode) Power Switch off Black Less than 25W Dimensions (WxDxH)/ Weight 338.0 X 56.3 X 272.0 mm (Without Stand) 338.0 X 195.4 X 342.5 mm (with Basic Stand) / 3.0kg VESA Mounting...
... the video card manual and adjust the screen as the following Preset Timing Modes, the screen will be adjusted automatically. Use a software utility installed on the keyboard. State Power Indicator Power Consumption Normal Operation Green Less than 25W Power saving mode EPA/ENERGY 2000 Green, Blinking Less than 1W (Off-mode) Power Switch off Black Less than 25W Dimensions (WxDxH)/ Weight 338.0 X 56.3 X 272.0 mm (Without Stand) 338.0 X 195.4 X 342.5 mm (with Basic Stand) / 3.0kg VESA Mounting...

User Manual (ENGLISH)
Page 66
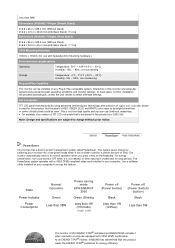
.... Use a software utility installed on any Plug & Play compatible system. Refer to select alternate settings. In most cases, monitor installation will proceed automatically, unless the user wishes to the video card manual and adjust the screen as the following Preset Timing Modes, the screen will provide the best operating conditions and monitor settings. State Power Indicator Power Consumption Normal Operation Green Less than 25W Power saving mode EPA/ENERGY 2000 Green, Blinking Less than 1W (Off-mode) Power Switch off Black...
.... Use a software utility installed on any Plug & Play compatible system. Refer to select alternate settings. In most cases, monitor installation will proceed automatically, unless the user wishes to the video card manual and adjust the screen as the following Preset Timing Modes, the screen will provide the best operating conditions and monitor settings. State Power Indicator Power Consumption Normal Operation Green Less than 25W Power saving mode EPA/ENERGY 2000 Green, Blinking Less than 1W (Off-mode) Power Switch off Black...
User Manual (ENGLISH)
Page 71
... edge of red, green and blue dots. Plug & Play This is a function that used in turn is composed of This number shows the accuracy of picture. This monitor follows the international standard VESA DDC for the user by using advanced semiconductor technology with precision of 1280 horizontal dots (horizontal resolution) and 1024 vertical lines (vertical resolution). Resolution The number of this means the screen is called Vertical Frequency or Refresh Rate. For Better Display 1. Fax. : (01952...
... edge of red, green and blue dots. Plug & Play This is a function that used in turn is composed of This number shows the accuracy of picture. This monitor follows the international standard VESA DDC for the user by using advanced semiconductor technology with precision of 1280 horizontal dots (horizontal resolution) and 1024 vertical lines (vertical resolution). Resolution The number of this means the screen is called Vertical Frequency or Refresh Rate. For Better Display 1. Fax. : (01952...

