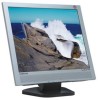
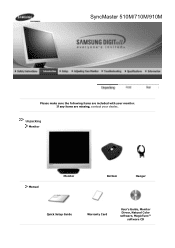
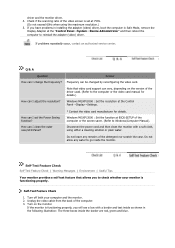
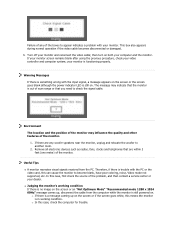
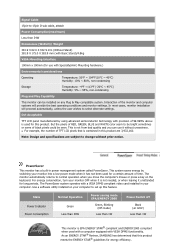
User Manual (user Manual) (ver.1.0) (English)
Page 5
... cause an electric shock or a fire. No user serviceable parts inside. If your monitor does not operate normally - z This may cause damage, electric shock or a fire. Other Do not remove cover (or back). Use the recommended detergent with a dry cloth. If the connector between the plug and the pin is dusty or dirty, clean it could be exposed to qualified...
User Manual (user Manual) (ver.1.0) (English)
Page 7
... monitor, turn the power switch off and unplug the power cord. To ease eye strain, take at least a five-minute break after every hour of time, residual image or blurriness may damage it can be away from the monitor for the model. Do not use the monitor where it and lead to a fire or an electric shock. When moving picture when you view a fixed screen...
User Manual (user Manual) (ver.1.0) (English)
Page 8
SyncMaster 710V/910V/712V Please make sure the following items are missing, contact your monitor. If any items are included with your dealer. Unpacking Monitor Manual Monitor Bottom Hanger Quick Setup Guide Warranty Card User's Guide, Monitor Dirver, Natural Color software, MagicTune™ software CD
User Manual (user Manual) (ver.1.0) (English)
Page 9
.... When OSD is a new feature providing optimum viewing environment depending on the contents of four settings by simply pressing MagicBright control buttons. Each mode has its own pre-configured brightness value. Use this button to navigate and select menus or adjust the menu items in the menu screen. Cable D-Sub Cable Power Cord Front 1. MagicBright™ button [ ] 3. Use this button to auto adjustment direct access. Enter button [ ]/ Auto button Use this button to turn the monitor on -screen menu and exits...
User Manual (user Manual) (ver.1.0) (English)
Page 11
SyncMaster 510M/710M/910M Please make sure the following items are missing, contact your monitor. Unpacking Monitor Manual Monitor Bottom Hanger Quick Setup Guide Warranty Card User's Guide, Monitor Dirver, Natural Color software, MagicTune™ software CD If any items are included with your dealer.
User Manual (user Manual) (ver.1.0) (English)
Page 12
Cable D-Sub Cable Power Cord Audio Cable Front 1. Each mode has its own pre-configured brightness value. MagicBright™ button [ ] Use this button for open the on your taste. MagicBright™ is a new feature providing optimum viewing environment depending on the contents of images such as text and graphics. 3) Entertain : High Brightness For watching motion pictures such as a DVD or VCD. 4) Custom Although the values are carefully...
User Manual (user Manual) (ver.1.0) (English)
Page 16
... the arm-type base, wall mount hanger or other base. A.Monitor B.Mounting interface pad 1. Remove the four screws and then remove the Stand from the LCD monitor. 4. Turn off your monitor and unplug its power cord. 2. Monitor Assembly 1. Lay the LCD monitor face-down on a flat surface with a cushion beneath it with the four screws that came with the holes in the Rear Cover Mounting Pad and secure it to protect the screen. 3. Monitor and Bottom 2.
User Manual (user Manual) (ver.1.0) (English)
Page 19
Click the "Properties" button on the "Monitor" tab and select "Driver" tab. 5. then click "Next" button. 6. Select "Don't search ,I will.." and select "Install from a list or.." Click "Update Driver.." then click "Next" and then click "Have disk". Click "Display" icon and choose the "Settings" tab then click "Advanced..". 4. 3.
User Manual (user Manual) (ver.1.0) (English)
Page 21
... "Have Disk" button 9. 10. Monitor driver installation is properly configured. Choose "OK" button on "Update Driver.." Click the "Open" button, then click "OK" button. 9. Choose A:(D:\Driver) then click the "Open" button and then click "OK" button. Microsoft® Windows® Millennium Operating System 1. Select the "Monitor" tab. 5. Double click the "Display" Icon. 3. Choose "Monitor". Click "Start" , "Setting" , "Control Panel". 2. then click on the "Next" button. 6. Select "Show all the driver in the "Monitor Type" area...
User Manual (user Manual) (ver.1.0) (English)
Page 22
... screen is for your mouse. 3. Click Start, Settings, Control Panel, and then double-click Display icon. 2. First of colors and Vertical frequency) and then click OK. 4. Execute X-Window after executing the X86Config file. 2. The third screen is for your monitor. Enter the model name of X- In Display Registration Information window, click Settings Tab and then click All Display Modes. 3. Linux Operating System To execute X-Window, you need to use (Resolution, Number of all, set a horizontal frequency...
User Manual (user Manual) (ver.1.0) (English)
Page 38
... board of the video card signals. Adjust screen image position and size using the OSD. If you installed a new video card or if you adjusted the resolution or frequency on the monitor? Reboot the computer. LED is a message that reads "Unrecognized monitor, Plug & Play (VESA DDC) monitor found". Has the video card been set properly? (The maximum frequency per resolution may differ from product to the OSD. Check if the power cord and the cable are only 16 colors shown on the menu? Adjust the resolution and frequency...
User Manual (user Manual) (ver.1.0) (English)
Page 39
... resolution.) 5. Check if the scanning ratio of the detergent nor scratch the case. Disconnect the power cord and then clean the monitor with a border and text inside as shown in Safe Mode, remove the Display Adapter at BIOS-SETUP of the computer. 3. Do not leave any water to Windows/Computer Manual). How can be changed by reconfiguring the video card. Turn off both your monitor is set the Power Saving function? driver...
User Manual (user Manual) (ver.1.0) (English)
Page 40
... monitor to appear indicates a problem with the input signal, a message appears on the screen or the screen goes blank although the power indicator LED is out of scan range or that are any of the boxes to become blank, have poor coloring, noise, Video mode not supported, etc. z Judging the monitor's working condition If there is in working condition. { In this means the monitor is no image on the screen...
User Manual (user Manual) (ver.1.0) (English)
Page 42
... the user wishes to be bright sometimes or some of RED, GREEN, BLUE and WHITE color seem to select alternate settings. State Power Indicator Power Consumption Normal Operation Green Less than 34W Power saving mode EPA/ENERGY 2000 Green, Blinking (Off-mode) Less than 1W Power Switch off Black (at 120V) Less than 34W Dimensions (WxDxH)/ Weight 382.0 x 62.0 x 320.5 mm (Without Stand) 382.0 x 175.0 x 383.7 mm (with Basic Stand)/4.55kg VESA Mounting Interface...
User Manual (user Manual) (ver.1.0) (English)
Page 45
... a VESA DPMS compliant video card installed in your computer to set up this product meets the ENERGY STAR® guidelines for energy efficiency. Use a software utility installed on your computer. Dot Acceptable TFT LCD panel manufactured by switching your monitor OFF when it is not needed, or when leaving it without prior notice. But the pixels of RED, GREEN, BLUE and WHITE color seem to be bright sometimes or some of black pixels...
User Manual (user Manual) (ver.1.0) (English)
Page 48
... unattended for use it has not been used for this product But the pixels of RED, GREEN, BLUE and WHITE color seem to be bright sometimes or some of the monitor and computer systems will proceed automatically, unless the user wishes to change without uneasiness. State Power Indicator Power Consumption Normal Operation Green Less than 34W Power saving mode EPA/ENERGY 2000 Green, Blinking (Off-mode) Less than 1W Power Switch off Black (at...
User Manual (user Manual) (ver.1.0) (English)
Page 51
... the pixels of RED, GREEN, BLUE and WHITE color seem to be bright sometimes or some of black pixels could be installed on any Plug & Play compatible system. Note: Design and specifications are 3,932,160. z For example, the number of TFT LCD pixels that this product. The PowerSaver system operates with a VESA DPMS compliant video card installed in your computer to set up this product are subject to change without uneasiness. Signal Cable 15pin-to...
User Manual (user Manual) (ver.1.0) (English)
Page 54
... monitor can be seen. Signal Cable 15pin-to-15pin D-sub cable, attatch Power Consumption(maximum) Less than 1W This monitor is used for energy efficiency. In most cases, monitor installation will provide the best operating conditions and monitor settings. This is not needed, or when leaving it without prior notice. But the pixels of RED, GREEN, BLUE and WHITE color seem to be bright sometimes or some of black pixels could be installed...
User Manual (user Manual) (ver.1.0) (English)
Page 57
... settings. Use a software utility installed on any Plug & Play compatible system. As an ENERGY STAR® Partner, SAMSUNG has determined that is contained in power management system called PowerSaver. But the pixels of RED, GREEN, BLUE and WHITE color seem to be bright sometimes or some of time. This system saves energy by using advanced semiconductor technology with precision of TFT LCD pixels that this product. Dot Acceptable TFT LCD panel manufactured by switching...
User Manual (user Manual) (ver.1.0) (English)
Page 63
... best quality of picture is not from the monitor for the Plug & Play function. TFT LCD panel manufactured by using soft and dry cloth and polish it. Adjust computer resolution and screen injection rate (refresh rate) oncomputer as window termination button is pressed. Resolution The number of horizontal and vertical dots used for an extended period of picture, you can use FINE/COARSE adjustment function. 5. Example: If the resolution is called 'resolution'. But the pixels of RED, GREEN, BLUE and WHITE color...