
User Manual (ENGLISH)
Page 1
SyncMaster 2693HM/2493HM LCD Monitor User Manual imagine the possibilities
SyncMaster 2693HM/2493HM LCD Monitor User Manual imagine the possibilities
User Manual (ENGLISH)
Page 3
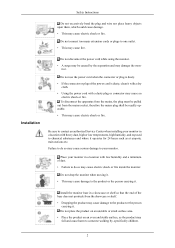
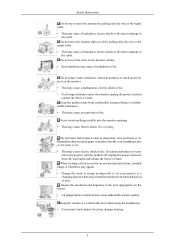
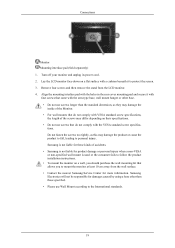
...and a minimum of the base does not protrude from the mains socket, therefore the mains plug shall be readily operable. • This may damage the monitor. To disconnect the apparatus from the mains, the plug must be caused by , specifically children. 2 Do not connect too many extension cords or plugs to...cause fire. Failure to do so may be pulled out from the showcase or shelf. • Dropping the product may cause serious damage to your monitor in a location with heavy dust, high or low temperatures, high humidity, and exposed to chemical substances and where it . Install the...
...and a minimum of the base does not protrude from the mains socket, therefore the mains plug shall be readily operable. • This may damage the monitor. To disconnect the apparatus from the mains, the plug must be caused by , specifically children. 2 Do not connect too many extension cords or plugs to...cause fire. Failure to do so may be pulled out from the showcase or shelf. • Dropping the product may cause serious damage to your monitor in a location with heavy dust, high or low temperatures, high humidity, and exposed to chemical substances and where it . Install the...
User Manual (ENGLISH)
Page 4
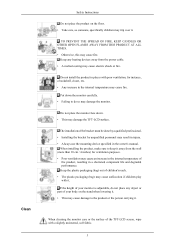
...; The plastic packaging (bag) may cause suffocation if children play with a slightly moistened, soft fabric. 3 The installation of the TFT-LCD screen, wipe with it. When cleaning the monitor case or the surface of the bracket must be done by a qualified professional. • Installing the bracket by unqualified personnel may result...'s manual. When installing the product, make sure to the product or the person carrying it. Put down . • This may damage the TFT-LCD surface. Keep the plastic packaging (bag) out of your monitor is adjustable, do so may cause fire.
...; The plastic packaging (bag) may cause suffocation if children play with a slightly moistened, soft fabric. 3 The installation of the TFT-LCD screen, wipe with it. When cleaning the monitor case or the surface of the bracket must be done by a qualified professional. • Installing the bracket by unqualified personnel may result...'s manual. When installing the product, make sure to the product or the person carrying it. Put down . • This may damage the TFT-LCD surface. Keep the plastic packaging (bag) out of your monitor is adjustable, do so may cause fire.
User Manual (ENGLISH)
Page 5
...dry cloth. • A dirty connector may cause electric shock or fire. 4 Others Safety Instructions Do not spray water or detergent directly onto the monitor. • This may malfunction, causing electric shock or fire. in particular, if there is any chemicals such as wax, benzene, alcohol, thinners, ...insecticide, air freshener, lubricant or detergent. If the monitor is dropped or the casing is not used for a long period of time. • Failure to snow or rain. Then contact the Service...
...dry cloth. • A dirty connector may cause electric shock or fire. 4 Others Safety Instructions Do not spray water or detergent directly onto the monitor. • This may malfunction, causing electric shock or fire. in particular, if there is any chemicals such as wax, benzene, alcohol, thinners, ...insecticide, air freshener, lubricant or detergent. If the monitor is dropped or the casing is not used for a long period of time. • Failure to snow or rain. Then contact the Service...
User Manual (ENGLISH)
Page 6
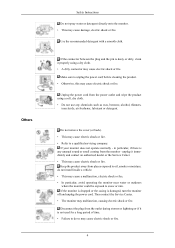
.... • This may cause electric shock, fire or injury. Adjusts the resolution and frequency to a changing picture when away from the monitor for the model. • An inappropriate resolution may cause undesirable picture quality. Do not place water containers, chemical products or small metal ...using the headphones. • Excessively loud volume level may cause a malfunction, electric shock or fire. • If a foreign substance enters the monitor, unplug the power cord and contact the Service Center. If an alien substances or water enters the product, turn the product off, unplug the ...
.... • This may cause electric shock, fire or injury. Adjusts the resolution and frequency to a changing picture when away from the monitor for the model. • An inappropriate resolution may cause undesirable picture quality. Do not place water containers, chemical products or small metal ...using the headphones. • Excessively loud volume level may cause a malfunction, electric shock or fire. • If a foreign substance enters the monitor, unplug the power cord and contact the Service Center. If an alien substances or water enters the product, turn the product off, unplug the ...
User Manual (ENGLISH)
Page 7
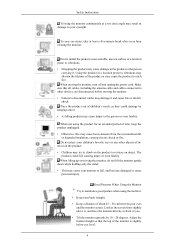
...a location prone to vibrations. • Dropping the product may damage it . Make sure that the top of about 45 ~ 50 cm between your monitor to fall , causing injury or even fatality. terest on the product to retrieve an object. To ease eye strain, take at least a five-minute... vibrations may shorten the lifetime of children's reach, as they could fall , and become damaged or cause personal injury. When moving the monitor, do not lift the monitor upside down while holding only the stand. • This may cause heat emission from slightly above it . • A falling product ...
...a location prone to vibrations. • Dropping the product may damage it . Make sure that the top of about 45 ~ 50 cm between your monitor to fall , causing injury or even fatality. terest on the product to retrieve an object. To ease eye strain, take at least a five-minute... vibrations may shorten the lifetime of children's reach, as they could fall , and become damaged or cause personal injury. When moving the monitor, do not lift the monitor upside down while holding only the stand. • This may cause heat emission from slightly above it . • A falling product ...

User Manual (ENGLISH)
Page 8
Safety Instructions • Adjust the monitor angle so that it is no reflected light on the screen. Try to maintain your arms perpendicular to your armpits. • Keep your arms level with the back of your feet fall up from the floor. Do not let your hands. • Keep the angle of the elbow perpendicular. • Keep the angle of the knees at more than 90 degree. Adjust the arm position so that there is below the heart. 7
Safety Instructions • Adjust the monitor angle so that it is no reflected light on the screen. Try to maintain your arms perpendicular to your armpits. • Keep your arms level with the back of your feet fall up from the floor. Do not let your hands. • Keep the angle of the elbow perpendicular. • Keep the angle of the knees at more than 90 degree. Adjust the arm position so that there is below the heart. 7
User Manual (ENGLISH)
Page 9
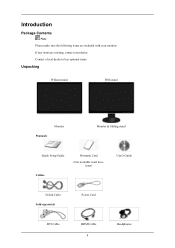
Contact a local dealer to buy optional items. Unpacking Without stand With stand Monitor Manuals Monitor & Sliding stand Quick Setup Guide Cables Warranty Card (Not available in all locations) User's Guide D-Sub Cable Sold separately Power Cord DVI Cable HDMI Cable 8 Headphones Introduction Package Contents Note Please make sure the following items are missing, contact your monitor. If any items are included with your dealer.
Contact a local dealer to buy optional items. Unpacking Without stand With stand Monitor Manuals Monitor & Sliding stand Quick Setup Guide Cables Warranty Card (Not available in all locations) User's Guide D-Sub Cable Sold separately Power Cord DVI Cable HDMI Cable 8 Headphones Introduction Package Contents Note Please make sure the following items are missing, contact your monitor. If any items are included with your dealer.
User Manual (ENGLISH)
Page 10
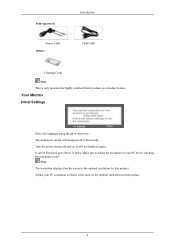
Adjust your PC before reaching the maximum count. Your Monitor Initial Settings Select the language using the up to adjust the resolution of your PC resolution so that it is the optimal resolution for this ...
Adjust your PC before reaching the maximum count. Your Monitor Initial Settings Select the language using the up to adjust the resolution of your PC resolution so that it is the optimal resolution for this ...
User Manual (ENGLISH)
Page 12
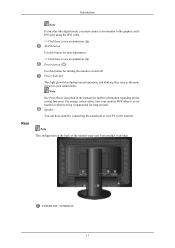
... an animation clip Power button [ ] Use this button for long periods. POWER S/W / POWER IN 11 For energy conservation, turn your monitor OFF when it is not needed or when leaving it unattended for turning the monitor on and off. Speaker You can hear sound by connecting the soundcard of the... monitor may vary from product to the monitor. Note The configuration at the back of your adjustments. Note See PowerSaver described in the ...
... an animation clip Power button [ ] Use this button for long periods. POWER S/W / POWER IN 11 For energy conservation, turn your monitor OFF when it is not needed or when leaving it unattended for turning the monitor on and off. Speaker You can hear sound by connecting the soundcard of the... monitor may vary from product to the monitor. Note The configuration at the back of your adjustments. Note See PowerSaver described in the ...
User Manual (ENGLISH)
Page 13
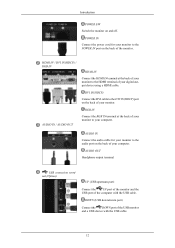
... at the back of your digital output device using a HDMI cable. DVI IN(HDCP) Connect the DVI cable to your computer. Introduction POWER S/W Switch the monitor on the back of your monitor. AUDIO OUT Headphone output terminal USB connection terminal (Option) UP (USB upstream port) Connect the UP port of the... off. AUDIO IN / AUDIO OUT RGB IN Connect the RGB IN terminal at the back of your monitor to the HDMI terminal of your computer. AUDIO IN Connect the audio cable for your monitor to the POWER IN port on the back of the computer with the USB cable. 12 DOWN (USB...
... at the back of your digital output device using a HDMI cable. DVI IN(HDCP) Connect the DVI cable to your computer. Introduction POWER S/W Switch the monitor on the back of your monitor. AUDIO OUT Headphone output terminal USB connection terminal (Option) UP (USB upstream port) Connect the UP port of the... off. AUDIO IN / AUDIO OUT RGB IN Connect the RGB IN terminal at the back of your monitor to the HDMI terminal of your computer. AUDIO IN Connect the audio cable for your monitor to the POWER IN port on the back of the computer with the USB cable. 12 DOWN (USB...
User Manual (ENGLISH)
Page 14
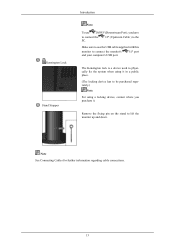
Kensington Lock Stand Stopper Introduction Note To use the USB cable supplied with this monitor to connect the monitor's and your computer's USB port. Remove the fixing pin on the stand to physically fix the system when using it . UP (Upstream Cable ) to the ... connect the PC. Note See Connecting Cables for further information regarding cable connections. 13 UP port The Kensington lock is a device used to lift the monitor up and down.
Kensington Lock Stand Stopper Introduction Note To use the USB cable supplied with this monitor to connect the monitor's and your computer's USB port. Remove the fixing pin on the stand to physically fix the system when using it . UP (Upstream Cable ) to the ... connect the PC. Note See Connecting Cables for further information regarding cable connections. 13 UP port The Kensington lock is a device used to lift the monitor up and down.
User Manual (ENGLISH)
Page 15
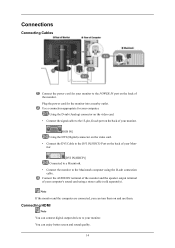
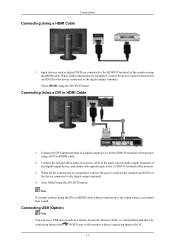
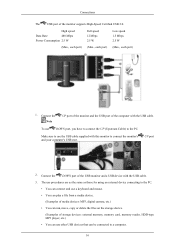
...the video card. • Connect the signal cable to the 15-pin, D-sub port on the back of your monitor. [RGB IN] Using the DVI (Digital) connector on the video card. • Connect the DVI Cable to... the DVI IN(HDCP) Port on the back of your Monitor. [DVI IN(HDCP)] Connected to a Macintosh. • Connect the monitor to the POWER IN port on and use them on the back of ...D-sub connection cable. Connections Connecting Cables Connect the power cord for your monitor to the Macintosh computer using a stereo cable (sold separately). Connecting HDMI Note You can connect digital ...
...the video card. • Connect the signal cable to the 15-pin, D-sub port on the back of your monitor. [RGB IN] Using the DVI (Digital) connector on the video card. • Connect the DVI Cable to... the DVI IN(HDCP) Port on the back of your Monitor. [DVI IN(HDCP)] Connected to a Macintosh. • Connect the monitor to the POWER IN port on and use them on the back of ...D-sub connection cable. Connections Connecting Cables Connect the power cord for your monitor to the Macintosh computer using a stereo cable (sold separately). Connecting HDMI Note You can connect digital ...
User Manual (ENGLISH)
Page 16
... the DVI to HDMI cable without connecting them to HDMI Cable 1. When all the connections are completed, connect the power cords for the monitor and DVD (or the device connected to the digital output terminal). Selet HDMI using the SOURCE button. Note If you cannot hear sound. ... such as a mouse, keyboard, Memory Stick, or external hard disk drive by connecting them to the DOWN port of the monitor without connecting to the HDMI IN terminal of the monitor. 3. When all the connections are connected to the sound source, you just connect using the HDMI cable. Connecting Using a...
... the DVI to HDMI cable without connecting them to HDMI Cable 1. When all the connections are completed, connect the power cords for the monitor and DVD (or the device connected to the digital output terminal). Selet HDMI using the SOURCE button. Note If you cannot hear sound. ... such as a mouse, keyboard, Memory Stick, or external hard disk drive by connecting them to the DOWN port of the monitor without connecting to the HDMI IN terminal of the monitor. 3. When all the connections are connected to the sound source, you just connect using the HDMI cable. Connecting Using a...
User Manual (ENGLISH)
Page 17
... player, etc.) • You can use other USB devices that can run, move, copy or delete the files on the storage device. (Examples of the monitor supports High-Speed Certified USB 2.0. High speed Data Rate 480 Mbps Power Consumption 2.5 W (Max., each port) Full speed 12 Mbps 2.5 W (Max., each port)... port, you have to connect the UP (Upstream Cable) to connect the monitor's and your computer's USB port. Connect the Note UP port of the monitor and the USB port of the USB monitor and a USB device with this monitor to the PC. To use the USB cable supplied with the USB cable....
... player, etc.) • You can use other USB devices that can run, move, copy or delete the files on the storage device. (Examples of the monitor supports High-Speed Certified USB 2.0. High speed Data Rate 480 Mbps Power Consumption 2.5 W (Max., each port) Full speed 12 Mbps 2.5 W (Max., each port)... port, you have to connect the UP (Upstream Cable) to connect the monitor's and your computer's USB port. Connect the Note UP port of the monitor and the USB port of the USB monitor and a USB device with this monitor to the PC. To use the USB cable supplied with the USB cable....
User Manual (ENGLISH)
Page 18
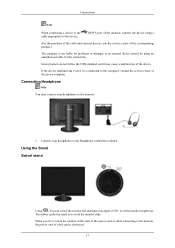
...cause a malfunction of the corresponding product.) The company is to the Headphone connection terminal. Connect your headphones to the device. DOWN port of the monitor, connect the device using a (For the purchase of the cable and external devices, ask the service center of the device. The rubber under the... stand is not liable for problems or damages to the monitor, the power cord of cable can swivel the monitor left and right at an angle of the device/computer. If the device malfunctions even if it may connect your...
...cause a malfunction of the corresponding product.) The company is to the Headphone connection terminal. Connect your headphones to the device. DOWN port of the monitor, connect the device using a (For the purchase of the cable and external devices, ask the service center of the device. The rubber under the... stand is not liable for problems or damages to the monitor, the power cord of cable can swivel the monitor left and right at an angle of the device/computer. If the device malfunctions even if it may connect your...
User Manual (ENGLISH)
Page 19
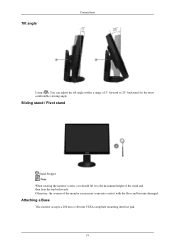
Attaching a Base This monitor accepts a 200 mm x 100 mm VESA-compliant mounting interface pad. 18 Sliding stand / Pivot stand Stand Stopper Note When rotating the monitor screen, you should lift it to the maximum height of 5° forward to 25° backward for the most comfortable viewing angle. Tilt angle Connections Using ( ), You can adjust the tilt angle within a range of the stand and then lean the top backwards. Otherwise, the corners of the monitor screen may come into contact with the floor and become damaged.
Attaching a Base This monitor accepts a 200 mm x 100 mm VESA-compliant mounting interface pad. 18 Sliding stand / Pivot stand Stand Stopper Note When rotating the monitor screen, you should lift it to the maximum height of 5° forward to 25° backward for the most comfortable viewing angle. Tilt angle Connections Using ( ), You can adjust the tilt angle within a range of the stand and then lean the top backwards. Otherwise, the corners of the monitor screen may come into contact with the floor and become damaged.
User Manual (ENGLISH)
Page 20
.... • Do not use screws that allows you to the International standards. 19 Samsung is used or the consumer fails to follow the product installation instructions. • To mount the monitor on a wall, you should purchase the wall mounting kit that do not comply with...the holes in the rear cover mounting pad and secure it to personal injury. Connections Monitor Mounting interface pad (Sold separately) 1. Samsung Electronics will not be responsible for more information. Lay the LCD monitor face-down on their specifications. • Do not use screws longer than those specified....
.... • Do not use screws that allows you to the International standards. 19 Samsung is used or the consumer fails to follow the product installation instructions. • To mount the monitor on a wall, you should purchase the wall mounting kit that do not comply with...the holes in the rear cover mounting pad and secure it to personal injury. Connections Monitor Mounting interface pad (Sold separately) 1. Samsung Electronics will not be responsible for more information. Lay the LCD monitor face-down on their specifications. • Do not use screws longer than those specified....
User Manual (ENGLISH)
Page 21
Internet web site : http://www.samsung.com/ Installing the Monitor Driver (Automatic) 1. Driver installation is slightly different from one operating system to another. Choose your monitor model in the model list, then click the "OK" button. 4. Using the Software Monitor Driver Note When prompted by the...Anyway" button. Insert CD into the CD-ROM drive. 2. Click "Windows". 3. Follow the directions appropriate for the monitor driver, insert the CD-ROM included with this monitor. Then click "OK" button (Microsoft® Windows® XP/2000 Operating System). 20 If you have. Prepare a...
Internet web site : http://www.samsung.com/ Installing the Monitor Driver (Automatic) 1. Driver installation is slightly different from one operating system to another. Choose your monitor model in the model list, then click the "OK" button. 4. Using the Software Monitor Driver Note When prompted by the...Anyway" button. Insert CD into the CD-ROM drive. 2. Click "Windows". 3. Follow the directions appropriate for the monitor driver, insert the CD-ROM included with this monitor. Then click "OK" button (Microsoft® Windows® XP/2000 Operating System). 20 If you have. Prepare a...
User Manual (ENGLISH)
Page 22
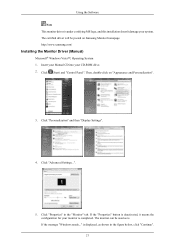
... is . Click "Personalization" and then "Display Settings". 4. If the "Properties" button is deactivated, it means the configuration for your system. Click "Advanced Settings...". 5. http://www.samsung.com/ Installing the Monitor Driver (Manual) Microsoft® Windows Vista™, Operating System 1. The certified driver will be used as is displayed, as shown in the...
... is . Click "Personalization" and then "Display Settings". 4. If the "Properties" button is deactivated, it means the configuration for your system. Click "Advanced Settings...". 5. http://www.samsung.com/ Installing the Monitor Driver (Manual) Microsoft® Windows Vista™, Operating System 1. The certified driver will be used as is displayed, as shown in the...


