User Manual (ENGLISH)
Page 2
The images here are for extended period of time, set it does not come loose. • A bad connection may cause fire. 1 Use only a properly grounded plug and receptacle. • An improper ground may cause electric ... or damage to the equipment. Do not pull the plug out by this symbol could result in all cases (or countries). If using screen saver, set your computer to DPM. Notational Conventions Power Prohibited Do not disassemble Do not touch Important to read the following safety instructions as they are designed...
The images here are for extended period of time, set it does not come loose. • A bad connection may cause fire. 1 Use only a properly grounded plug and receptacle. • An improper ground may cause electric ... or damage to the equipment. Do not pull the plug out by this symbol could result in all cases (or countries). If using screen saver, set your computer to DPM. Notational Conventions Power Prohibited Do not disassemble Do not touch Important to read the following safety instructions as they are designed...
User Manual (ENGLISH)
Page 6
...water enters the product, turn the product off, unplug the power connector from the monitor for an extended period of time, residual image or blurriness may appear. • Change the mode to energy saving mode or set a screensaver to a changing picture when away from the wall outlet and contact ... an explosion or fire. Do not insert metal objects such as chopsticks, wire and tools or inflammable objects such as paper or matches into the monitor openings. • This may cause electric shock, fire or injury. When viewing a fixed screen for the model. • An inappropriate resolution ...
...water enters the product, turn the product off, unplug the power connector from the monitor for an extended period of time, residual image or blurriness may appear. • Change the mode to energy saving mode or set a screensaver to a changing picture when away from the wall outlet and contact ... an explosion or fire. Do not insert metal objects such as chopsticks, wire and tools or inflammable objects such as paper or matches into the monitor openings. • This may cause electric shock, fire or injury. When viewing a fixed screen for the model. • An inappropriate resolution ...
User Manual (ENGLISH)
Page 10
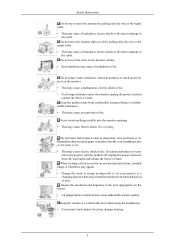
It will disappear after 40 seconds. Adjust your PC before reaching the maximum count. Your Monitor Initial Settings Select the language using the up to adjust the resolution of your PC resolution so that it is the same as a product feature. Make sure ...
It will disappear after 40 seconds. Adjust your PC before reaching the maximum count. Your Monitor Initial Settings Select the language using the up to adjust the resolution of your PC resolution so that it is the same as a product feature. Make sure ...
User Manual (ENGLISH)
Page 18
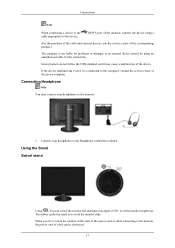
...a (For the purchase of the cable and external devices, ask the service center of the corresponding product.) The company is to avoid the monitor slide. Some products do not follow the USB standard, and it is connected to the Headphone connection terminal. DOWN port of the device/computer.... and right at an angle of the device. When you try to rotate the monitor in the state of the power cord or cable connecting to set the monitor lengthwise. Connect your headphones to the device. Using the Stand Swivel stand Using ( ), You can be destroyed. 17 Connections Note When ...
...a (For the purchase of the cable and external devices, ask the service center of the corresponding product.) The company is to avoid the monitor slide. Some products do not follow the USB standard, and it is connected to the Headphone connection terminal. DOWN port of the device/computer.... and right at an angle of the device. When you try to rotate the monitor in the state of the power cord or cable connecting to set the monitor lengthwise. Connect your headphones to the device. Using the Stand Swivel stand Using ( ), You can be destroyed. 17 Connections Note When ...
User Manual (ENGLISH)
Page 22
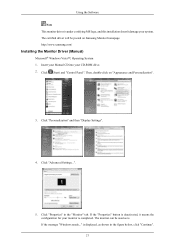
... Panel". If the message "Windows needs..." The certified driver will be used as shown in the "Monitor" tab. Then, double-click on Samsung Monitor homepage. If the "Properties" button is completed. Click "Personalization" and then "Display Settings". 4. Click "Advanced Settings...". 5. Click "Properties" in the figure below, click "Continue". 21 is displayed, as is under certifying...
... Panel". If the message "Windows needs..." The certified driver will be used as shown in the "Monitor" tab. Then, double-click on Samsung Monitor homepage. If the "Properties" button is completed. Click "Personalization" and then "Display Settings". 4. Click "Advanced Settings...". 5. Click "Properties" in the figure below, click "Continue". 21 is displayed, as is under certifying...
User Manual (ENGLISH)
Page 25
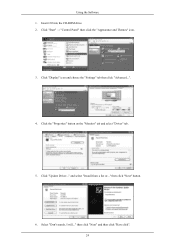
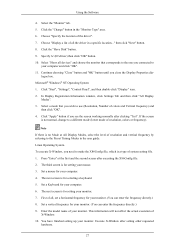
Select "Don't search, I will..." Insert CD into the CD-ROM drive. 2. Click "Start" → "Control Panel" then click the "Appearance and Themes" icon. 3. Click "Update Driver..." then click "Next" button. 6. Click the "Properties" button on the "Monitor" tab and select "Driver" tab. 5. and select "Install from a list or..." Click "Display" icon and choose the "Settings" tab then click "Advanced...". 4. Using the Software 1. then click "Next" and then click "Have disk". 24
Select "Don't search, I will..." Insert CD into the CD-ROM drive. 2. Click "Start" → "Control Panel" then click the "Appearance and Themes" icon. 3. Click "Update Driver..." then click "Next" button. 6. Click the "Properties" button on the "Monitor" tab and select "Driver" tab. 5. and select "Install from a list or..." Click "Display" icon and choose the "Settings" tab then click "Advanced...". 4. Using the Software 1. then click "Next" and then click "Have disk". 24
User Manual (ENGLISH)
Page 27
... and click "Advanced Properties" button. 4. Select the "Settings" tab and click "Advanced Properties" button. 26 Monitor driver installation is active, click the "Properties" button then follow these steps. 1. Choose A:(D:\Driver) then click the "...button then click "Next" button. 10. Click the "Finish" button then the "Close" button. Click "Start", "Setting", "Control Panel". 2. Using the Software 10. Click "Start", "Setting", "Control Panel". 2. Choose "Monitor". then click on "Update Driver..." Click the "Browse" button then choose A:(D:\Driver). 8. Click the "Open" button...
... and click "Advanced Properties" button. 4. Select the "Settings" tab and click "Advanced Properties" button. 26 Monitor driver installation is active, click the "Properties" button then follow these steps. 1. Choose A:(D:\Driver) then click the "...button then click "Next" button. 10. Click the "Finish" button then the "Close" button. Click "Start", "Setting", "Control Panel". 2. Using the Software 10. Click "Start", "Setting", "Control Panel". 2. Choose "Monitor". then click on "Update Driver..." Click the "Browse" button then choose A:(D:\Driver). 8. Click the "Open" button...
User Manual (ENGLISH)
Page 28
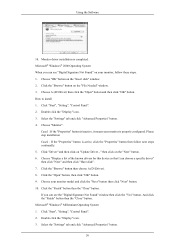
... 8. Specify A:\(D:\driver) then click "OK" button. 10. The third screen is for your monitor. 7. Set a Keyboard for setting your monitor. (You can enter the frequency directly.) 9. Click "Start", "Settings", "Control Panel", and then double-click "Display" icon. 2. Press "Enter" at All Display... change to use (Resolution, Number of resolution, colors or frequency). Click the "Have Disk" button. 9. You have finished setting up your monitor. Select a mode that corresponds to the one you wish to a different mode (lower mode of colors and Vertical frequency) and...
... 8. Specify A:\(D:\driver) then click "OK" button. 10. The third screen is for your monitor. 7. Set a Keyboard for setting your monitor. (You can enter the frequency directly.) 9. Click "Start", "Settings", "Control Panel", and then double-click "Display" icon. 2. Press "Enter" at All Display... change to use (Resolution, Number of resolution, colors or frequency). Click the "Have Disk" button. 9. You have finished setting up your monitor. Select a mode that corresponds to the one you wish to a different mode (lower mode of colors and Vertical frequency) and...
User Manual (ENGLISH)
Page 29
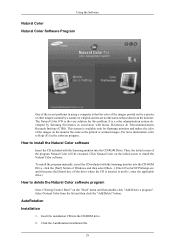
... (If the drive where the CD is inserted is not D:\, enter the applicable drive.) How to Help (F1) in association with the Samsung monitor into the CD-ROM Drive, click the [Start] button of the program Natural Color will be executed. AutoRotation Installation 1. Click the AutoRotation ...initial screen of Windows and then select [Run...]. For more information, refer to delete the Natural Color software program Select "Setting/Control Panel" on the monitor. Select Natural Color from the list and then click the "Add/Delete" button. To install the program manually, insert the...
... (If the drive where the CD is inserted is not D:\, enter the applicable drive.) How to Help (F1) in association with the Samsung monitor into the CD-ROM Drive, click the [Start] button of the program Natural Color will be executed. AutoRotation Installation 1. Click the AutoRotation ...initial screen of Windows and then select [Run...]. For more information, refer to delete the Natural Color software program Select "Setting/Control Panel" on the monitor. Select Natural Color from the list and then click the "Add/Delete" button. To install the program manually, insert the...
User Manual (ENGLISH)
Page 32
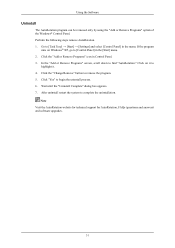
... [Control Panel] in the [Start] menu. 2. Go to find "AutoRotation." In the "Add or Remove Programs" screen, scroll down to [Task Tray] → [Start] → [Settings] and select [Control Panel] in Control Panel. 3. Click the "Change/Remove" button to remove the program. 5.
... [Control Panel] in the [Start] menu. 2. Go to find "AutoRotation." In the "Add or Remove Programs" screen, scroll down to [Task Tray] → [Start] → [Settings] and select [Control Panel] in Control Panel. 3. Click the "Change/Remove" button to remove the program. 5.
User Manual (ENGLISH)
Page 34
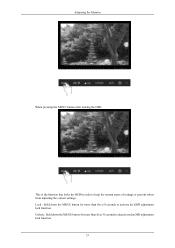
Lock : Hold down the MENU button for more than five (5) seconds to activate the OSD adjustment lock function. Unlock : Hold down the MENU button for more than five (5) seconds to keep the current states of settings or prevent others from adjusting the current settings. Adjusting the Monitor When pressing the MENU button after locking the OSD This is the function that locks the OSD in order to deactivate the OSD adjustment lock function. 33
Lock : Hold down the MENU button for more than five (5) seconds to activate the OSD adjustment lock function. Unlock : Hold down the MENU button for more than five (5) seconds to keep the current states of settings or prevent others from adjusting the current settings. Adjusting the Monitor When pressing the MENU button after locking the OSD This is the function that locks the OSD in order to deactivate the OSD adjustment lock function. 33

User Manual (ENGLISH)
Page 38
... MagicBright Push the button to personal preference. Currently seven different modes are watching. You can use the on the contents of seven settings by simply pressing MagicBright control button. 37 MagicBright is a new feature providing optimum viewing environment depending on -screen menus to change the... contrast according to circle through available preconfigured modes. Adjusting the Monitor You can easily select one of the image you are available: Custom, Text, Internet, Game, Sport, Movie and Dynamic Contrast.
... MagicBright Push the button to personal preference. Currently seven different modes are watching. You can use the on the contents of seven settings by simply pressing MagicBright control button. 37 MagicBright is a new feature providing optimum viewing environment depending on -screen menus to change the... contrast according to circle through available preconfigured modes. Adjusting the Monitor You can easily select one of the image you are available: Custom, Text, Internet, Game, Sport, Movie and Dynamic Contrast.
User Manual (ENGLISH)
Page 48
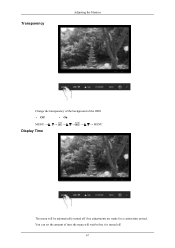
You can set the amount of the OSD. • Off • On MENU MENU Display Time The menu will wait before it is turned off if no adjustments are made for a certain time period. Transparency Adjusting the Monitor Change the transparency of the background of time the menu will be automatically turned off . 47
You can set the amount of the OSD. • Off • On MENU MENU Display Time The menu will wait before it is turned off if no adjustments are made for a certain time period. Transparency Adjusting the Monitor Change the transparency of the background of time the menu will be automatically turned off . 47
User Manual (ENGLISH)
Page 49
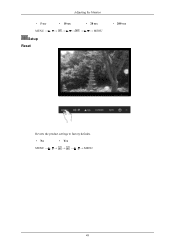
Adjusting the Monitor • 5 sec • 10 sec • 20 sec MENU MENU Setup Reset • 200 sec Reverts the product settings to factory defaults. • No • Yes MENU MENU 48
Adjusting the Monitor • 5 sec • 10 sec • 20 sec MENU MENU Setup Reset • 200 sec Reverts the product settings to factory defaults. • No • Yes MENU MENU 48

User Manual (ENGLISH)
Page 52
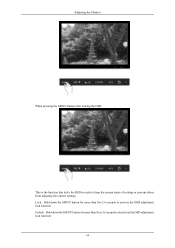
Adjusting the Monitor • Normal - If not set to be displayed normally. (Unavailable in HDMI/DVI mode. MENU MENU AV Mode This function allows the screen to Wide. On MENU MENU 51 Note ...) Note Defaults: DVI mode - A full screen is displayed regardless of the screen aspect ratio of your PC is set to an AV device. Off, HDMI mode - Set to Off when connected to a PC, Set to On when connected to On, the screen may not be displayed at the optimal quality in accordance with...
Adjusting the Monitor • Normal - If not set to be displayed normally. (Unavailable in HDMI/DVI mode. MENU MENU AV Mode This function allows the screen to Wide. On MENU MENU 51 Note ...) Note Defaults: DVI mode - A full screen is displayed regardless of the screen aspect ratio of your PC is set to an AV device. Off, HDMI mode - Set to Off when connected to a PC, Set to On when connected to On, the screen may not be displayed at the optimal quality in accordance with...
User Manual (ENGLISH)
Page 53
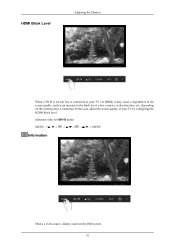
In this case, adjust the screen quality of your TV via HDMI, it may cause a degradation in the screen quality, such as an increase in the black level, a low contrast, or discoloration, etc., depending on the OSD screen. 52 HDMI Black Level Adjusting the Monitor When a DVD or set-top box is connected to your TV by configuring the HDMI black level. (Operates only for HDMI mode) MENU MENU Information Shows a video source, display mode on the external device connected.
In this case, adjust the screen quality of your TV via HDMI, it may cause a degradation in the screen quality, such as an increase in the black level, a low contrast, or discoloration, etc., depending on the OSD screen. 52 HDMI Black Level Adjusting the Monitor When a DVD or set-top box is connected to your TV by configuring the HDMI black level. (Operates only for HDMI mode) MENU MENU Information Shows a video source, display mode on the external device connected.
User Manual (ENGLISH)
Page 55
Lock : Hold down the MENU button for more than five (5) seconds to keep the current states of settings or prevent others from adjusting the current settings. Unlock : Hold down the MENU button for more than five (5) seconds to deactivate the OSD adjustment lock function. 54 Adjusting the Monitor When pressing the MENU button after locking the OSD This is the function that locks the OSD in order to activate the OSD adjustment lock function.
Lock : Hold down the MENU button for more than five (5) seconds to keep the current states of settings or prevent others from adjusting the current settings. Unlock : Hold down the MENU button for more than five (5) seconds to deactivate the OSD adjustment lock function. 54 Adjusting the Monitor When pressing the MENU button after locking the OSD This is the function that locks the OSD in order to activate the OSD adjustment lock function.

User Manual (ENGLISH)
Page 59
Adjusting the Monitor You can easily select one of the image you are available: Custom, Text, Internet, Game, Sport, Movie and Dynamic Contrast. MENU MENU MagicBright Push the ... preference. Each mode has its own pre-configured brightness value. Currently seven different modes are watching. You can use the on the contents of seven settings by simply pressing MagicBright control button. 58 MagicBright is a new feature providing optimum viewing environment depending on -screen menus to change the contrast according to...
Adjusting the Monitor You can easily select one of the image you are available: Custom, Text, Internet, Game, Sport, Movie and Dynamic Contrast. MENU MENU MagicBright Push the ... preference. Each mode has its own pre-configured brightness value. Currently seven different modes are watching. You can use the on the contents of seven settings by simply pressing MagicBright control button. 58 MagicBright is a new feature providing optimum viewing environment depending on -screen menus to change the contrast according to...
User Manual (ENGLISH)
Page 69
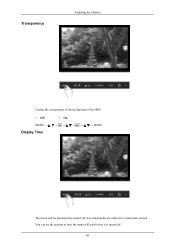
Transparency Adjusting the Monitor Change the transparency of the background of time the menu will be automatically turned off . 68 You can set the amount of the OSD. • Off • On MENU → , → Display Time → , → → , → MENU The menu will wait before it is turned off if no adjustments are made for a certain time period.
Transparency Adjusting the Monitor Change the transparency of the background of time the menu will be automatically turned off . 68 You can set the amount of the OSD. • Off • On MENU → , → Display Time → , → → , → MENU The menu will wait before it is turned off if no adjustments are made for a certain time period.
User Manual (ENGLISH)
Page 70
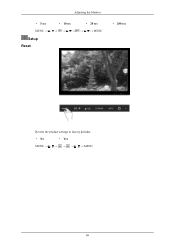
Adjusting the Monitor • 5 sec • 10 sec • 20 sec MENU MENU Setup Reset • 200 sec Reverts the product settings to factory defaults. • No • Yes MENU MENU 69
Adjusting the Monitor • 5 sec • 10 sec • 20 sec MENU MENU Setup Reset • 200 sec Reverts the product settings to factory defaults. • No • Yes MENU MENU 69


