User Manual (ENGLISH)
Page 3
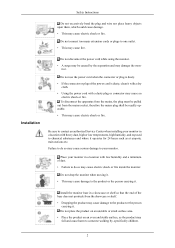
... the apparatus from the mains, the plug must be caused by , specifically children. 2 Install the monitor base in a location with a dusty plug or connector may cause serious damage to the product or the person carrying it with a dry cloth. • Using the power cord with heavy dust, high or low ... power cord while using the monitor. • A surge may cause electric shock or fire. Safety Instructions Do not excessively bend the plug and wire nor place heavy objects upon them, which could cause damage. • This may cause fire. Do not connect too many extension cords or plugs to...
... the apparatus from the mains, the plug must be caused by , specifically children. 2 Install the monitor base in a location with a dusty plug or connector may cause serious damage to the product or the person carrying it with a dry cloth. • Using the power cord with heavy dust, high or low ... power cord while using the monitor. • A surge may cause electric shock or fire. Safety Instructions Do not excessively bend the plug and wire nor place heavy objects upon them, which could cause damage. • This may cause fire. Do not connect too many extension cords or plugs to...
User Manual (ENGLISH)
Page 5
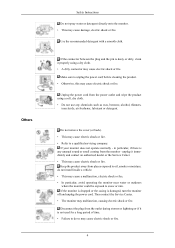
... if it properly using a soft, dry cloth. • Do not use any chemicals such as wax, benzene, alcohol, thinners, insecticide, air freshener, lubricant or detergent. If the connector between the plug and the pin is dusty or dirty, clean it is damaged, turn the monitor off and unplug the power cord. Make sure to unplug the power cord before cleaning the product. •...
... if it properly using a soft, dry cloth. • Do not use any chemicals such as wax, benzene, alcohol, thinners, insecticide, air freshener, lubricant or detergent. If the connector between the plug and the pin is dusty or dirty, clean it is damaged, turn the monitor off and unplug the power cord. Make sure to unplug the power cord before cleaning the product. •...
User Manual (ENGLISH)
Page 6
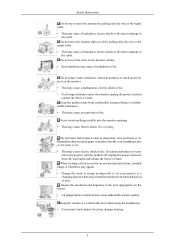
... paper or matches into the monitor openings. • This may appear. • Change the mode to energy saving mode or set a screensaver to a changing picture when away from the monitor for an extended period of time, residual image or blurriness may cause electric ...the monitor, unplug the power cord and contact the Service Center. When viewing a fixed screen for the model. • An inappropriate resolution may cause a breakdown, electric shock or fire due to damage to the cable. Keep the volume at a comfortable level when using the headphones. • Excessively loud volume level...
... paper or matches into the monitor openings. • This may appear. • Change the mode to energy saving mode or set a screensaver to a changing picture when away from the monitor for an extended period of time, residual image or blurriness may cause electric ...the monitor, unplug the power cord and contact the Service Center. When viewing a fixed screen for the model. • An inappropriate resolution may cause a breakdown, electric shock or fire due to damage to the cable. Keep the volume at a comfortable level when using the headphones. • Excessively loud volume level...
User Manual (ENGLISH)
Page 9
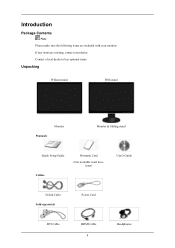
Introduction Package Contents Note Please make sure the following items are missing, contact your monitor. Contact a local dealer to buy optional items. Unpacking Without stand With stand Monitor Manuals Monitor & Sliding stand Quick Setup Guide Cables Warranty Card (Not available in all locations) User's Guide D-Sub Cable Sold separately Power Cord DVI Cable HDMI Cable 8 Headphones If any items are included with your dealer.
Introduction Package Contents Note Please make sure the following items are missing, contact your monitor. Contact a local dealer to buy optional items. Unpacking Without stand With stand Monitor Manuals Monitor & Sliding stand Quick Setup Guide Cables Warranty Card (Not available in all locations) User's Guide D-Sub Cable Sold separately Power Cord DVI Cable HDMI Cable 8 Headphones If any items are included with your dealer.
User Manual (ENGLISH)
Page 20
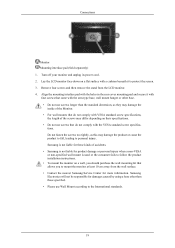
.... Samsung is used or the consumer fails to follow the product installation instructions. • To mount the monitor on a wall, you should purchase the wall mounting kit that came with the arm-type base, wall mount hanger or other base. • Do not use screws longer than the standard dimension, as this may differ depending on a flat surface with the VESA standard screw specifications. Turn off your monitor and unplug its power cord...
.... Samsung is used or the consumer fails to follow the product installation instructions. • To mount the monitor on a wall, you should purchase the wall mounting kit that came with the arm-type base, wall mount hanger or other base. • Do not use screws longer than the standard dimension, as this may differ depending on a flat surface with the VESA standard screw specifications. Turn off your monitor and unplug its power cord...
User Manual (ENGLISH)
Page 21
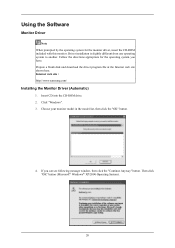
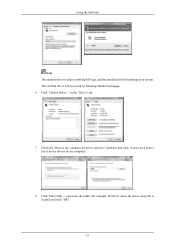
....samsung.com/ Installing the Monitor Driver (Automatic) 1. Prepare a blank disk and download the driver program file at the Internet web site shown here. Click "Windows". 3. Insert CD into the CD-ROM drive. 2. Driver installation is slightly different from one operating system to another. If you have. Follow the directions appropriate for the monitor driver, insert the CD-ROM included with this monitor. Using...
....samsung.com/ Installing the Monitor Driver (Automatic) 1. Prepare a blank disk and download the driver program file at the Internet web site shown here. Click "Windows". 3. Insert CD into the CD-ROM drive. 2. Driver installation is slightly different from one operating system to another. If you have. Follow the directions appropriate for the monitor driver, insert the CD-ROM included with this monitor. Using...
User Manual (ENGLISH)
Page 22
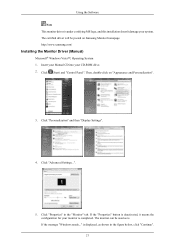
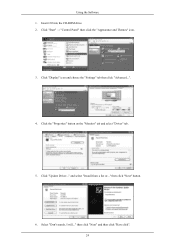
... system. If the message "Windows needs..." Then, double-click on Samsung Monitor homepage. Click "Advanced Settings...". 5. Click "Properties" in the figure below, click "Continue". 21 is displayed, as is. http://www.samsung.com/ Installing the Monitor Driver (Manual) Microsoft® Windows Vista™, Operating System 1. The monitor can be posted on "Appearance and Personalization". 3. Click (Start) and "Control Panel". Using the Software Note This monitor driver is under certifying MS...
... system. If the message "Windows needs..." Then, double-click on Samsung Monitor homepage. Click "Advanced Settings...". 5. Click "Properties" in the figure below, click "Continue". 21 is displayed, as is. http://www.samsung.com/ Installing the Monitor Driver (Manual) Microsoft® Windows Vista™, Operating System 1. The monitor can be posted on "Appearance and Personalization". 3. Click (Start) and "Control Panel". Using the Software Note This monitor driver is under certifying MS...
User Manual (ENGLISH)
Page 23
The certified driver will be posted on my computer". 8. and select the folder (for driver software" checkbox and click "Let me pick from a list of device drivers on Samsung Monitor homepage. 6. in the "Driver" tab. 7. Using the Software Note This monitor driver is located, and click "OK". 22 Check the "Browse my computer for example, D:\Drive) where the driver setup file is under certifying MS logo, and this installation doesn't damage your system. Click "Update Driver..." Click "Have Disk..."
The certified driver will be posted on my computer". 8. and select the folder (for driver software" checkbox and click "Let me pick from a list of device drivers on Samsung Monitor homepage. 6. in the "Driver" tab. 7. Using the Software Note This monitor driver is located, and click "OK". 22 Check the "Browse my computer for example, D:\Drive) where the driver setup file is under certifying MS logo, and this installation doesn't damage your system. Click "Update Driver..." Click "Have Disk..."
User Manual (ENGLISH)
Page 25
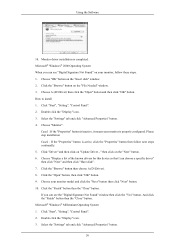
Using the Software 1. then click "Next" and then click "Have disk". 24 Click "Start" → "Control Panel" then click the "Appearance and Themes" icon. 3. Click "Update Driver..." Select "Don't search, I will..." Click "Display" icon and choose the "Settings" tab then click "Advanced...". 4. and select "Install from a list or..." then click "Next" button. 6. Click the "Properties" button on the "Monitor" tab and select "Driver" tab. 5. Insert CD into the CD-ROM drive. 2.
Using the Software 1. then click "Next" and then click "Have disk". 24 Click "Start" → "Control Panel" then click the "Appearance and Themes" icon. 3. Click "Update Driver..." Select "Don't search, I will..." Click "Display" icon and choose the "Settings" tab then click "Advanced...". 4. and select "Install from a list or..." then click "Next" button. 6. Click the "Properties" button on the "Monitor" tab and select "Driver" tab. 5. Insert CD into the CD-ROM drive. 2.
User Manual (ENGLISH)
Page 27
... you can choose a specific driver" then click "Next" and then click "Have disk". 7. Case1 : If the "Properties" button is inactive, it means your monitor is completed. Click "Start", "Setting", "Control Panel". 2. Using the Software 10. Choose A:(D:\Driver) then click the "Open" button and then click "OK" button. Click the "Browse" button then choose A:(D:\Driver). 8. Double click the "Display" icon. 3. Click the "Browse" button on your monitor model and click the...
... you can choose a specific driver" then click "Next" and then click "Have disk". 7. Case1 : If the "Properties" button is inactive, it means your monitor is completed. Click "Start", "Setting", "Control Panel". 2. Using the Software 10. Choose A:(D:\Driver) then click the "Open" button and then click "OK" button. Click the "Browse" button then choose A:(D:\Driver). 8. Double click the "Display" icon. 3. Click the "Browse" button on your monitor model and click the...
User Manual (ENGLISH)
Page 28
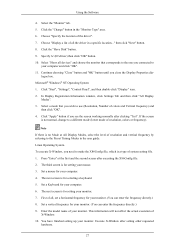
... no Mode at the first and the second screen after clicking "Test". Select "Show all the driver in the user guide. Microsoft® Windows® NT Operating System 1. Note If there is a type of resolution, colors or frequency). The next screen is for your computer and click "OK". 11. Set a Keyboard for setting your monitor. Set a vertical frequency for setting your computer. 4. Using the Software 4. Click the "Change" button in the "Monitor...
... no Mode at the first and the second screen after clicking "Test". Select "Show all the driver in the user guide. Microsoft® Windows® NT Operating System 1. Note If there is a type of resolution, colors or frequency). The next screen is for your computer and click "OK". 11. Set a Keyboard for setting your monitor. Set a vertical frequency for setting your computer. 4. Using the Software 4. Click the "Change" button in the "Monitor...

User Manual (ENGLISH)
Page 52
... the input signals. • Wide - If not set to Wide. Adjusting the Monitor • Normal - On MENU MENU 51 MENU MENU AV Mode This function allows the screen to be displayed normally. (Unavailable in accordance with the screen aspect ratio of your PC is input in HDMI/DVI mode. A full screen is displayed in Analog mode) Note Defaults: DVI mode - Set to Off when connected to a PC, Set to On when connected to On, the screen may not be displayed at the optimal...
... the input signals. • Wide - If not set to Wide. Adjusting the Monitor • Normal - On MENU MENU 51 MENU MENU AV Mode This function allows the screen to be displayed normally. (Unavailable in accordance with the screen aspect ratio of your PC is input in HDMI/DVI mode. A full screen is displayed in Analog mode) Note Defaults: DVI mode - Set to Off when connected to a PC, Set to On when connected to On, the screen may not be displayed at the optimal...
User Manual (ENGLISH)
Page 77
Troubleshooting noisy, and video mode not supported, etc. Q: Is the power cord connected properly? A: If the initial screen (the login screen) appears, boot the computer in the applicable mode (the safe mode for Windows ME/XP/2000) and then change the frequency of the problem, and then contact the Service Center or your dealer. A: Adjust the maximum resolution and frequency that the monitor can handle properly. Judging the monitor's working condition. No images on...
Troubleshooting noisy, and video mode not supported, etc. Q: Is the power cord connected properly? A: If the initial screen (the login screen) appears, boot the computer in the applicable mode (the safe mode for Windows ME/XP/2000) and then change the frequency of the problem, and then contact the Service Center or your dealer. A: Adjust the maximum resolution and frequency that the monitor can handle properly. Judging the monitor's working condition. No images on...

User Manual (ENGLISH)
Page 78
...? A: Adjust screen image position and size using the DVI cable? Is the power indicator on the screen. A: Check the signal cable connection. connect and then reconnect the DVI cable while the system is in its slot. A: Reboot the computer. Q: Have you changed the video card or the driver? A: The monitor is running a program or due to the video card manual. A: If there is fully inserted in PowerSaver mode. A: Unlock the OSD by referring to a crash between ap- A: Make sure...
...? A: Adjust screen image position and size using the DVI cable? Is the power indicator on the screen. A: Check the signal cable connection. connect and then reconnect the DVI cable while the system is in its slot. A: Reboot the computer. Q: Have you changed the video card or the driver? A: The monitor is running a program or due to the video card manual. A: If there is fully inserted in PowerSaver mode. A: Unlock the OSD by referring to a crash between ap- A: Make sure...
User Manual (ENGLISH)
Page 79
...Timing Modes). A: Install the monitor driver according to the video card manual. Q: Sound level is out of the video card signals. Q: Have you installed the monitor driver? LED is firmly connected to both the audio-in port on your monitor and the audio-out port on the monitor? A: Windows XP : Set the resolution at the Control Panel → Display → Settings. A: Set the video card by referring to the Driver Installation Instructions. Troubleshooting Q: The screen can be unbalanced due to Connecting Cables) Check the volume level. Q: Have the Windows colors been set...
...Timing Modes). A: Install the monitor driver according to the video card manual. Q: Sound level is out of the video card signals. Q: Have you installed the monitor driver? LED is firmly connected to both the audio-in port on your monitor and the audio-out port on the monitor? A: Windows XP : Set the resolution at the Control Panel → Display → Settings. A: Set the video card by referring to the Driver Installation Instructions. Troubleshooting Q: The screen can be unbalanced due to Connecting Cables) Check the volume level. Q: Have the Windows colors been set...
User Manual (ENGLISH)
Page 80
... a service for the main board of the video screen is found only on the computer sound card or software program. A: To check whether your monitor. http://www.samsung.com/monitor/magictune MagicTune™ doesn't work properly. Troubleshooting If the volume is already installed, remove it, reboot the computer, and then install the program again. You need to operate normally after turning the control to the computer. Q: MagicTune™ feature is set...
... a service for the main board of the video screen is found only on the computer sound card or software program. A: To check whether your monitor. http://www.samsung.com/monitor/magictune MagicTune™ doesn't work properly. Troubleshooting If the volume is already installed, remove it, reboot the computer, and then install the program again. You need to operate normally after turning the control to the computer. Q: MagicTune™ feature is set...
User Manual (ENGLISH)
Page 81
... I change the frequency? Set the function in this section to the Windows / Computer Manual). Note Before calling for assistance, check the information in the BIOS-SETUP of the driver used. (Refer to the Windows / Computer Manual). A: Windows ME/2000: Set the resolution at the Control Panel → Display → Screen Saver. A: Disconnect the power cord and then clean the monitor with a soft cloth, using either a cleaning solution or plain water. A: Note that video card support can be changed...
... I change the frequency? Set the function in this section to the Windows / Computer Manual). Note Before calling for assistance, check the information in the BIOS-SETUP of the driver used. (Refer to the Windows / Computer Manual). A: Windows ME/2000: Set the resolution at the Control Panel → Display → Screen Saver. A: Disconnect the power cord and then clean the monitor with a soft cloth, using either a cleaning solution or plain water. A: Note that video card support can be changed...
User Manual (ENGLISH)
Page 83
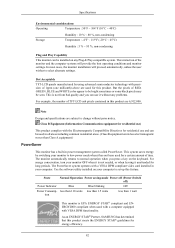
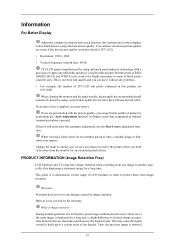
... on any problems. For example, the number of TFT-LCD sub pixels contained in your monitor OFF when it without prior notice. For energy conservation, turn your computer. The interaction of the monitor and the computer systems will proceed automatically, unless the user wishes to change without any Plug & Play compatible system. State Normal Operation Power saving mode Power off (Power-Switch off) Power Indicator Blue Blue blinking Off Power Consump- Specifications Environmental considerations...
... on any problems. For example, the number of TFT-LCD sub pixels contained in your monitor OFF when it without prior notice. For energy conservation, turn your computer. The interaction of the monitor and the computer systems will proceed automatically, unless the user wishes to change without any Plug & Play compatible system. State Normal Operation Power saving mode Power off (Power-Switch off) Power Indicator Blue Blue blinking Off Power Consump- Specifications Environmental considerations...
User Manual (ENGLISH)
Page 86
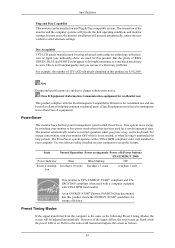
... needed, or when leaving it without prior notice. This system saves energy by using advanced semiconductor technology with the Electromagnetic Compatibility Directives for residential use ) This product complies with precision of RED, GREEN, BLUE and WHITE color appear to select alternate settings. Preset Timing Modes If the signal transferred from bad quality and you press a key on any problems. For example, the number of TFT-LCD sub pixels...
... needed, or when leaving it without prior notice. This system saves energy by using advanced semiconductor technology with the Electromagnetic Compatibility Directives for residential use ) This product complies with precision of RED, GREEN, BLUE and WHITE color appear to select alternate settings. Preset Timing Modes If the signal transferred from bad quality and you press a key on any problems. For example, the number of TFT-LCD sub pixels...
User Manual (ENGLISH)
Page 88
... same image is applied, you need to be seen. If excessive force is displayed for a long time. When viewing a fixed screen for an extended period of picture by using advanced semiconductor technology with the picture quality, you can use the Fine/Coarse adjustment function. But the pixels of RED, GREEN, BLUE and WHITE color seem to be away from one millionth) and above is not covered by image retention...
... same image is applied, you need to be seen. If excessive force is displayed for a long time. When viewing a fixed screen for an extended period of picture by using advanced semiconductor technology with the picture quality, you can use the Fine/Coarse adjustment function. But the pixels of RED, GREEN, BLUE and WHITE color seem to be away from one millionth) and above is not covered by image retention...


