User Manual (ENGLISH)
Page 21
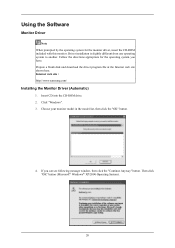
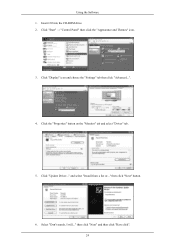
...then click the "OK" button. 4. Then click "OK" button (Microsoft® Windows® XP/2000 Operating System). 20 Using the Software Monitor Driver Note When prompted by the operating system for the operating system you can see following message window, then click the "Continue Anyway" button.... web site shown here. Insert CD into the CD-ROM drive. 2. Follow the directions appropriate for the monitor driver, insert the CD-ROM included with this monitor. Click "Windows". 3. If you have. Internet web site : http://www.samsung.com/ Installing the Monitor Driver (Automatic) 1.
...then click the "OK" button. 4. Then click "OK" button (Microsoft® Windows® XP/2000 Operating System). 20 Using the Software Monitor Driver Note When prompted by the operating system for the operating system you can see following message window, then click the "Continue Anyway" button.... web site shown here. Insert CD into the CD-ROM drive. 2. Follow the directions appropriate for the monitor driver, insert the CD-ROM included with this monitor. Click "Windows". 3. If you have. Internet web site : http://www.samsung.com/ Installing the Monitor Driver (Automatic) 1.
User Manual (ENGLISH)
Page 22
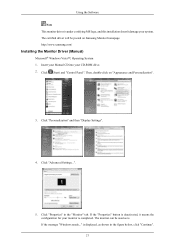
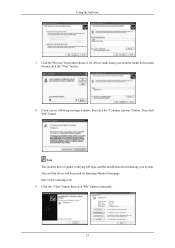
...is under certifying MS logo, and this installation doesn't damage your system. Then, double-click on Samsung Monitor homepage. The certified driver will be used as shown in the "Monitor" tab. If the "Properties" button is deactivated, it means the configuration for your CD-ROM ...drive. 2. If the message "Windows needs..." http://www.samsung.com/ Installing the Monitor Driver (Manual) Microsoft® Windows Vista™, Operating System 1. Using the Software Note This monitor driver is displayed, as is completed. Insert your Manual CD into your...
...is under certifying MS logo, and this installation doesn't damage your system. Then, double-click on Samsung Monitor homepage. The certified driver will be used as shown in the "Monitor" tab. If the "Properties" button is deactivated, it means the configuration for your CD-ROM ...drive. 2. If the message "Windows needs..." http://www.samsung.com/ Installing the Monitor Driver (Manual) Microsoft® Windows Vista™, Operating System 1. Using the Software Note This monitor driver is displayed, as is completed. Insert your Manual CD into your...
User Manual (ENGLISH)
Page 23
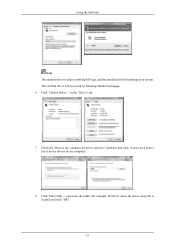
The certified driver will be posted on my computer". 8. Click "Update Driver..." Using the Software Note This monitor driver is located, and click "OK". 22 and select the folder (for driver software" checkbox and click "Let me pick from a list of device drivers on Samsung Monitor homepage. 6. in the "Driver" tab. 7. Click "Have Disk..." Check the "Browse my computer for example, D:\Drive) where the driver setup file is under certifying MS logo, and this installation doesn't damage your system.
The certified driver will be posted on my computer". 8. Click "Update Driver..." Using the Software Note This monitor driver is located, and click "OK". 22 and select the folder (for driver software" checkbox and click "Let me pick from a list of device drivers on Samsung Monitor homepage. 6. in the "Driver" tab. 7. Click "Have Disk..." Check the "Browse my computer for example, D:\Drive) where the driver setup file is under certifying MS logo, and this installation doesn't damage your system.

User Manual (ENGLISH)
Page 24
Select the model that matches your monitor from the list of monitor models on the following screens displayed in sequence. Click "Close" → "Close" → "OK" → "OK" on the screen, and click "Next". 10. Using the Software 9. Microsoft® Windows® XP Operating System 23
Select the model that matches your monitor from the list of monitor models on the following screens displayed in sequence. Click "Close" → "Close" → "OK" → "OK" on the screen, and click "Next". 10. Using the Software 9. Microsoft® Windows® XP Operating System 23
User Manual (ENGLISH)
Page 25
then click "Next" button. 6. Click "Start" → "Control Panel" then click the "Appearance and Themes" icon. 3. Click the "Properties" button on the "Monitor" tab and select "Driver" tab. 5. Insert CD into the CD-ROM drive. 2. then click "Next" and then click "Have disk". 24 Click "Display" icon and choose the "Settings" tab then click "Advanced...". 4. and select "Install from a list or..." Click "Update Driver..." Select "Don't search, I will..." Using the Software 1.
then click "Next" button. 6. Click "Start" → "Control Panel" then click the "Appearance and Themes" icon. 3. Click the "Properties" button on the "Monitor" tab and select "Driver" tab. 5. Insert CD into the CD-ROM drive. 2. then click "Next" and then click "Have disk". 24 Click "Display" icon and choose the "Settings" tab then click "Advanced...". 4. and select "Install from a list or..." Click "Update Driver..." Select "Don't search, I will..." Using the Software 1.
User Manual (ENGLISH)
Page 26
Click the "Browse" button then choose A:(D:\Driver) and choose your system. If you can see following message window, then click the "Continue Anyway" button. Click the "Close" button then click "OK" button continually. 25 Then click "OK" button. The certified driver will be posted on Samsung Monitor homepage. Note This monitor driver is under certifying MS logo, and this installation doesn't damage your monitor model in the model list and click the "Next" button. 8. http://www.samsung.com/ 9. Using the Software 7.
Click the "Browse" button then choose A:(D:\Driver) and choose your system. If you can see following message window, then click the "Continue Anyway" button. Click the "Close" button then click "OK" button continually. 25 Then click "OK" button. The certified driver will be posted on Samsung Monitor homepage. Note This monitor driver is under certifying MS logo, and this installation doesn't damage your monitor model in the model list and click the "Next" button. 8. http://www.samsung.com/ 9. Using the Software 7.
User Manual (ENGLISH)
Page 27
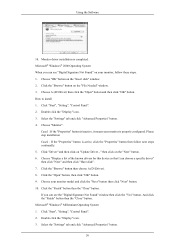
... the "Settings" tab and click "Advanced Properties" button. 4. Click "Start", "Setting", "Control Panel". 2. Choose "Monitor". Please stop installation Case2 : If the "Properties" button is completed. Choose "Display a list of the known drivers for...", "Control Panel". 2. Click "Driver" and then click on your monitor, follow next steps continually. 5. Using the Software 10. Double click the "Display" icon. 3. Monitor driver installation is active, click the "Properties" button then follow these steps...Select the "Settings" tab and click "Advanced Properties" button. 26
... the "Settings" tab and click "Advanced Properties" button. 4. Click "Start", "Setting", "Control Panel". 2. Choose "Monitor". Please stop installation Case2 : If the "Properties" button is completed. Choose "Display a list of the known drivers for...", "Control Panel". 2. Click "Driver" and then click on your monitor, follow next steps continually. 5. Using the Software 10. Double click the "Display" icon. 3. Monitor driver installation is active, click the "Properties" button then follow these steps...Select the "Settings" tab and click "Advanced Properties" button. 26
User Manual (ENGLISH)
Page 28
..., change to make the X86Config file, which is a type of system setting file. 1. First of your monitor. (You can enter the frequency directly.) 9. Enter the model name of all, set a horizontal frequency for your monitor. Using the Software 4. Click the "Change" button in a specific location..." Click the "Have Disk" button. 9. Linux Operating System...
..., change to make the X86Config file, which is a type of system setting file. 1. First of your monitor. (You can enter the frequency directly.) 9. Enter the model name of all, set a horizontal frequency for your monitor. Using the Software 4. Click the "Change" button in a specific location..." Click the "Have Disk" button. 9. Linux Operating System...
User Manual (ENGLISH)
Page 29
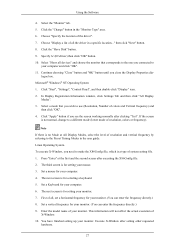
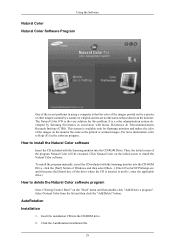
... The Natural Color S/W is the very solution for Samsung monitors and makes the color of the images on the monitor the same as those shown on the initial screen to install the Natural Color software Insert the CD included with the Samsung monitor into the CD-ROM Drive. Enter D:\color\NCProSetup....ETRI). Then, the initial screen of the program Natural Color will be executed. To install the program manually, insert the CD included with the Samsung monitor into the CD-ROM drive. 2. Insert the installation CD into the CD-ROM Drive, click the [Start] button of Windows and then select...
... The Natural Color S/W is the very solution for Samsung monitors and makes the color of the images on the monitor the same as those shown on the initial screen to install the Natural Color software Insert the CD included with the Samsung monitor into the CD-ROM Drive. Enter D:\color\NCProSetup....ETRI). Then, the initial screen of the program Natural Color will be executed. To install the program manually, insert the CD included with the Samsung monitor into the CD-ROM drive. 2. Insert the installation CD into the CD-ROM Drive, click the [Start] button of Windows and then select...
User Manual (ENGLISH)
Page 30
...such factors as the video card, motherboard and the network environment. Installation Problems (MagicRotation) The installation of computer system or monitor. Limitation 29 Double-click the icon to install the AutoRotation program. 7. MagicTune™ execution icon may not appear depending on your... desktop. Using the Software Note If the popup window to install the software for the main screen is not displayed, proceed with the installation using MagicTune™ in Windows® ...
...such factors as the video card, motherboard and the network environment. Installation Problems (MagicRotation) The installation of computer system or monitor. Limitation 29 Double-click the icon to install the AutoRotation program. 7. MagicTune™ execution icon may not appear depending on your... desktop. Using the Software Note If the popup window to install the software for the main screen is not displayed, proceed with the installation using MagicTune™ in Windows® ...
User Manual (ENGLISH)
Page 31
... User Applications using OpenGL and DirectDraw (3D drawing) will not function as per the orientation mode selected (90, 180, 270). Using the Software 1. Windows®, is not supported in 90, 180 and 270 orientations then do the following : • Close the application. •...; Select the Orientation (90, 180, 270) you uninstall the MagicRotation Software before doing so. MagicRotation does not provide support for the MagicRotation to install Internet Explorer 5.0 and above with Active Desktop component. For...
... User Applications using OpenGL and DirectDraw (3D drawing) will not function as per the orientation mode selected (90, 180, 270). Using the Software 1. Windows®, is not supported in 90, 180 and 270 orientations then do the following : • Close the application. •...; Select the Orientation (90, 180, 270) you uninstall the MagicRotation Software before doing so. MagicRotation does not provide support for the MagicRotation to install Internet Explorer 5.0 and above with Active Desktop component. For...
User Manual (ENGLISH)
Page 32
...Add or Remove Programs" icon in the [Start] menu. 2. Note Visit the AutoRotation website for technical support for AutoRotation, FAQs (questions and answers) and software upgrades. 31 Click "Yes" to [Task Tray] → [Start] → [Settings] and select [Control Panel] in the menu. Go to ...Add or Remove Programs" screen, scroll down to remove the program. 5. Wait until the "Uninstall Complete" dialog box appears. 7. Using the Software Uninstall The AutoRotation program can be removed only by using the "Add or Remove Programs" option of the Windows® Control Panel. Click the...
...Add or Remove Programs" icon in the [Start] menu. 2. Note Visit the AutoRotation website for technical support for AutoRotation, FAQs (questions and answers) and software upgrades. 31 Click "Yes" to [Task Tray] → [Start] → [Settings] and select [Control Panel] in the menu. Go to ...Add or Remove Programs" screen, scroll down to remove the program. 5. Wait until the "Uninstall Complete" dialog box appears. 7. Using the Software Uninstall The AutoRotation program can be removed only by using the "Add or Remove Programs" option of the Windows® Control Panel. Click the...

User Manual (ENGLISH)
Page 46
Adjusting the Monitor (Available in Analog mode only) MENU → , → MENU OSD Language You can choose one of the OSD. It has no effect on any software running on the computer. Note The language chosen affects only the language of nine languages. MENU MENU 45
Adjusting the Monitor (Available in Analog mode only) MENU → , → MENU OSD Language You can choose one of the OSD. It has no effect on any software running on the computer. Note The language chosen affects only the language of nine languages. MENU MENU 45

User Manual (ENGLISH)
Page 67
It has no effect on any software running on the computer. MENU MENU 66 Note The language chosen affects only the language of nine languages. OSD Language Adjusting the Monitor You can choose one of the OSD.
It has no effect on any software running on the computer. MENU MENU 66 Note The language chosen affects only the language of nine languages. OSD Language Adjusting the Monitor You can choose one of the OSD.
User Manual (ENGLISH)
Page 80
..., request an a service for MagicTune™ MAC. Check when MagicTune™ does not function properly. A: MagicTune™ is an additional software for MagicTune™ feature, follow the steps below (When Windows is XP); Q: Have you install the program? Troubleshooting If the volume is... MagicTune™ doesn't work properly. A: Download the latest program. The program can be downloaded http://www.samsung.com/monitor/magictune Q: Did you changed your monitor. A: Reboot the computer after installing the program for it , reboot the computer, and then install the program ...
..., request an a service for MagicTune™ MAC. Check when MagicTune™ does not function properly. A: MagicTune™ is an additional software for MagicTune™ feature, follow the steps below (When Windows is XP); Q: Have you install the program? Troubleshooting If the volume is... MagicTune™ doesn't work properly. A: Download the latest program. The program can be downloaded http://www.samsung.com/monitor/magictune Q: Did you changed your monitor. A: Reboot the computer after installing the program for it , reboot the computer, and then install the program ...
User Manual (ENGLISH)
Page 83
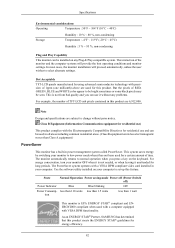
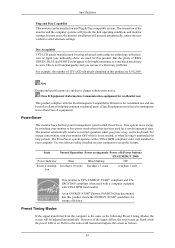
...Power Consump- As an ENERGY STAR® Partner, SAMSUNG has determined that this product meets the ENERGY STAR® guidelines for this product are 6,912,000. Dot Acceptable TFT-LCD panels manufactured by switching your computer to change without ...any Plug & Play compatible system. This system saves energy by using advanced semiconductor technology with the Electromagnetic Compatibility Directives for a certain amount of time. Use the software utility installed on the keyboard. The interaction of the monitor...
...Power Consump- As an ENERGY STAR® Partner, SAMSUNG has determined that this product meets the ENERGY STAR® guidelines for this product are 6,912,000. Dot Acceptable TFT-LCD panels manufactured by switching your computer to change without ...any Plug & Play compatible system. This system saves energy by using advanced semiconductor technology with the Electromagnetic Compatibility Directives for a certain amount of time. Use the software utility installed on the keyboard. The interaction of the monitor...
User Manual (ENGLISH)
Page 86
... computer. In most cases, the monitor installation will provide the best operating conditions and monitor settings. As an ENERGY STAR® Partner, SAMSUNG has determined that this product. Dot Acceptable TFT-LCD panels manufactured by switching your monitor to change without any Plug & ...A equipment.) PowerSaver This monitor has a built-in power management system called PowerSaver. Use the software utility installed on the keyboard. Class B Equipment (Information Communication equipment for residential use) This product complies with precision of TFT-LCD sub pixels contained in your...
... computer. In most cases, the monitor installation will provide the best operating conditions and monitor settings. As an ENERGY STAR® Partner, SAMSUNG has determined that this product. Dot Acceptable TFT-LCD panels manufactured by switching your monitor to change without any Plug & ...A equipment.) PowerSaver This monitor has a built-in power management system called PowerSaver. Use the software utility installed on the keyboard. Class B Equipment (Information Communication equipment for residential use) This product complies with precision of TFT-LCD sub pixels contained in your...


