User Manual (ENGLISH)
Page 2
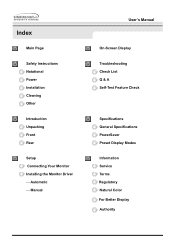
Automatic - Manual User's Manual On-Screen Display Troubleshooting Check List Q & A Self-Test Feature Check Specifications General Specifications PowerSaver Preset Display Modes Information Service Terms Regulatory Natural Color For Better Display Authority Index Main Page Safety Instructions Notational Power Installation Cleaning Other Introduction Unpacking Front Rear Setup Connecting Your Monitor Installing the Monitor Driver -
Automatic - Manual User's Manual On-Screen Display Troubleshooting Check List Q & A Self-Test Feature Check Specifications General Specifications PowerSaver Preset Display Modes Information Service Terms Regulatory Natural Color For Better Display Authority Index Main Page Safety Instructions Notational Power Installation Cleaning Other Introduction Unpacking Front Rear Setup Connecting Your Monitor Installing the Monitor Driver -
User Manual (ENGLISH)
Page 11
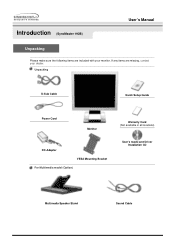
Unpacking D-Sub Cable Quick Setup Guide Power Cord Monitor DC-Adapter VESA Mounting Bracket For Multimedia model (Option) Warranty Card (Not available in all locations) User's Guide and Driver Installation CD Multimedia Speaker Stand Sound Cable If any items are included with your dealer. Introduction (SyncMaster 192B) User's Manual Unpacking Please make sure the following items are missing, contact your monitor.
Unpacking D-Sub Cable Quick Setup Guide Power Cord Monitor DC-Adapter VESA Mounting Bracket For Multimedia model (Option) Warranty Card (Not available in all locations) User's Guide and Driver Installation CD Multimedia Speaker Stand Sound Cable If any items are included with your dealer. Introduction (SyncMaster 192B) User's Manual Unpacking Please make sure the following items are missing, contact your monitor.
User Manual (ENGLISH)
Page 13
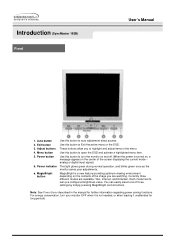
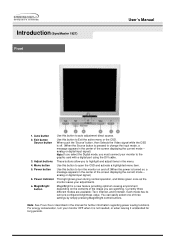
... the manual for long periods. Menu button 5. Note: See PowerSaver described in the center of three settings by simply pressing MagicBright control buttons. Exit button 3. Power button 6. You can easily select one of the screen displaying the current mode -analog or digital input signal.) This light glows green during normal operation, and blinks green once as the monitor saves your adjustments. MagicBright button Use this button to turn your monitor OFF when it unattended for further information regarding power saving...
... the manual for long periods. Menu button 5. Note: See PowerSaver described in the center of three settings by simply pressing MagicBright control buttons. Exit button 3. Power button 6. You can easily select one of the screen displaying the current mode -analog or digital input signal.) This light glows green during normal operation, and blinks green once as the monitor saves your adjustments. MagicBright button Use this button to turn your monitor OFF when it unattended for further information regarding power saving...
User Manual (ENGLISH)
Page 14
... current mode -analog or digital input signal.) Note:If you select the Digital mode, you are available: Text, Internet, and Entertain. You can easily select one of the screen displaying the current mode -analog or digital input signal.) This light glows green during normal operation, and blinks green once as the monitor saves your adjustments. Introduction (SyncMaster 192T) Front User's Manual 1. Exit button Source button 3. When push the 'Source' button, then Selects the Video signal while the OSD is off .(When the power is turned...
... current mode -analog or digital input signal.) Note:If you select the Digital mode, you are available: Text, Internet, and Entertain. You can easily select one of the screen displaying the current mode -analog or digital input signal.) This light glows green during normal operation, and blinks green once as the monitor saves your adjustments. Introduction (SyncMaster 192T) Front User's Manual 1. Exit button Source button 3. When push the 'Source' button, then Selects the Video signal while the OSD is off .(When the power is turned...
User Manual (ENGLISH)
Page 17
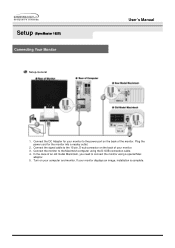
Plug the power cord for your monitor. 3. Connect the monitor to the power port on the back of the monitor. If your computer and monitor. Turn on the back of an old model Macintosh, you need to the 15-pin, D-sub connector on your monitor displays an image, installation is complete. Setup (SyncMaster 192BT)) Connecting Your Monitor Setup-General User's Manual 1. Connect the DC Adapter for the monitor into a nearby outlet. 2. Connect the signal cable to connect the monitor using the D-SUB connection cable. 4. In the case...
Plug the power cord for your monitor. 3. Connect the monitor to the power port on the back of the monitor. If your computer and monitor. Turn on the back of an old model Macintosh, you need to the 15-pin, D-sub connector on your monitor displays an image, installation is complete. Setup (SyncMaster 192BT)) Connecting Your Monitor Setup-General User's Manual 1. Connect the DC Adapter for the monitor into a nearby outlet. 2. Connect the signal cable to connect the monitor using the D-SUB connection cable. 4. In the case...
User Manual (ENGLISH)
Page 19
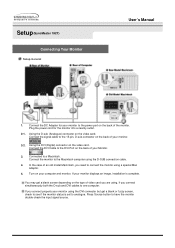
...your monitor using , if you connect properly your monitor. 2-2. If your Monitor. 3. Turn on the video card. You may get a blank or fuzzy screen, check to connect the monitor using the D-SUB connection cable. 4. Setup (SyncMaster 192T) Connecting Your Monitor Setup-General User's Manual 1. Connect the DC Adapter for the monitor into a nearby outlet. 2-1. Connected to have the monitor double-check the input signal source. Press Source button to a Macintosh. Connect the DVI Cable to analogue. Using the D-sub (Analogue) connector on the back of video card you need to...
...your monitor using , if you connect properly your monitor. 2-2. If your Monitor. 3. Turn on the video card. You may get a blank or fuzzy screen, check to connect the monitor using the D-SUB connection cable. 4. Setup (SyncMaster 192T) Connecting Your Monitor Setup-General User's Manual 1. Connect the DC Adapter for the monitor into a nearby outlet. 2-1. Connected to have the monitor double-check the input signal source. Press Source button to a Macintosh. Connect the DVI Cable to analogue. Using the D-sub (Analogue) connector on the back of video card you need to...
User Manual (ENGLISH)
Page 25
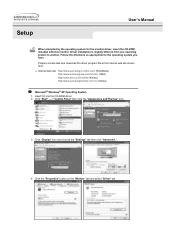
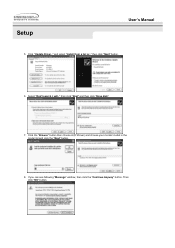
... CD into the CD-ROM driver. 2. Click "Start" -> "Control Panel" then click the "Appearance and Themes" Icon. 3. Driver installation is slightly different from one operating system to another. Follow the directions as appropriate for the monitor driver, insert the CD-ROM included with this monitor. Click "Display" icon and choose the "Settings" tab then click "Advanced..". 4. Setup User's Manual When prompted by the operating...
... CD into the CD-ROM driver. 2. Click "Start" -> "Control Panel" then click the "Appearance and Themes" Icon. 3. Driver installation is slightly different from one operating system to another. Follow the directions as appropriate for the monitor driver, insert the CD-ROM included with this monitor. Click "Display" icon and choose the "Settings" tab then click "Advanced..". 4. Setup User's Manual When prompted by the operating...
User Manual (ENGLISH)
Page 26
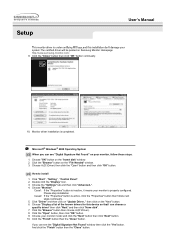
Click the "Browse" button then choose A:(D:\Driver) and choose your monitor model in the model list and click the "Next" button. 8. then click "Next" button. 6. Select "Don't search ,I will.." If you can see following "Message" window, then click the "Continue Anyway" button. Then click "OK" button. then click "Next" and then click "Have disk". 7. Click "Update Driver.." Setup User's Manual 5. and select "Install from a list or.."
Click the "Browse" button then choose A:(D:\Driver) and choose your monitor model in the model list and click the "Next" button. 8. then click "Next" button. 6. Select "Don't search ,I will.." If you can see following "Message" window, then click the "Continue Anyway" button. Then click "OK" button. then click "Next" and then click "Have disk". 7. Click "Update Driver.." Setup User's Manual 5. and select "Install from a list or.."
User Manual (ENGLISH)
Page 27
... "Digital Signature Not Found" window then click the "Yes"button. Choose the "Settings" tab and then click "Advanced..". 4. Choose "Monitor". Click "Driver" and then click on Samsung Monitor Homepage http://www.samsung-monitor.com/. 9. Double click the "Display" Icon. 3. Please stop installation Case2: If the "Properties" button is completed. Choose "Display a list of the known drivers for this installation don't damage your monitor, follow next steps continually. 5. Setup User's Manual...
... "Digital Signature Not Found" window then click the "Yes"button. Choose the "Settings" tab and then click "Advanced..". 4. Choose "Monitor". Click "Driver" and then click on Samsung Monitor Homepage http://www.samsung-monitor.com/. 9. Double click the "Display" Icon. 3. Please stop installation Case2: If the "Properties" button is completed. Choose "Display a list of the known drivers for this installation don't damage your monitor, follow next steps continually. 5. Setup User's Manual...

User Manual (ENGLISH)
Page 28
... of the driver". 7. You have finished setting up your monitor. (You can enter the frequency directly.) 8. Click "Start" , "Setting" , "Control Panel". 2. Select a mode that corresponds to the one you wish to use (Resolution, Number of resolution and vertical frequency by referring to make the X86Config file, which is no Mode at the first and the second screen after clicking Test. The next screen is not normal, change to your monitor. (You...
... of the driver". 7. You have finished setting up your monitor. (You can enter the frequency directly.) 8. Click "Start" , "Setting" , "Control Panel". 2. Select a mode that corresponds to the one you wish to use (Resolution, Number of resolution and vertical frequency by referring to make the X86Config file, which is no Mode at the first and the second screen after clicking Test. The next screen is not normal, change to your monitor. (You...
User Manual (ENGLISH)
Page 32
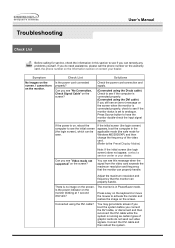
... monitor double-check the input signal source. There is on, reboot the computer to see "No Connection, Check Signal Cable" on the screen? (Connected using the DVI cable? Troubleshooting User's Manual Check List Before calling for Windows ME/2000/XP) and then change the frequency of graphic cards do need assistance, please call the phone number on the warranty card, the phone number on the Information section or contact your dealer. Symptom No images on the screen? Press Source button...
... monitor double-check the input signal source. There is on, reboot the computer to see "No Connection, Check Signal Cable" on the screen? (Connected using the DVI cable? Troubleshooting User's Manual Check List Before calling for Windows ME/2000/XP) and then change the frequency of graphic cards do need assistance, please call the phone number on the warranty card, the phone number on the Information section or contact your dealer. Symptom No images on the screen? Press Source button...
User Manual (ENGLISH)
Page 33
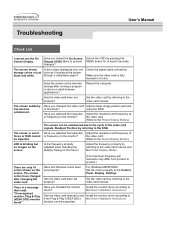
... the video card manual. Check the signal cable connection. Make sure the video card is a message that reads "Unrecognized monitor, Plug & Play (VESA DDC) monitor found". using the OSD. be adjusted. (Refer to the video card manual and the Preset Display Modes. Adjust the frequency properly by referring to the monitor? Has the video card been set properly? Reboot the computer. Have you adjusted the resolution Adjust the resolution and frequency at the Control Panel, Display, Settings. Readjust Position by referring to the Preset Display Modes). the video card...
... the video card manual. Check the signal cable connection. Make sure the video card is a message that reads "Unrecognized monitor, Plug & Play (VESA DDC) monitor found". using the OSD. be adjusted. (Refer to the video card manual and the Preset Display Modes. Adjust the frequency properly by referring to the monitor? Has the video card been set properly? Reboot the computer. Have you adjusted the resolution Adjust the resolution and frequency at the Control Panel, Display, Settings. Readjust Position by referring to the Preset Display Modes). the video card...

User Manual (ENGLISH)
Page 34
... PC, check if the installed the adapter(video) driver and the monitor driver. 4. Note: If problems repeatedly occur, contact an authorized service center. Check if the scanning ratio of the computer.) 3. Troubleshooting User's Manual Check List Check the following items if there is set at the "Control Panel, System, Device Administrator" and then reboot the computer to the computer. 2. Check if the power cord and the cable are properly connected to reinstall the adapter (video) driver.
... PC, check if the installed the adapter(video) driver and the monitor driver. 4. Note: If problems repeatedly occur, contact an authorized service center. Check if the scanning ratio of the computer.) 3. Troubleshooting User's Manual Check List Check the following items if there is set at the "Control Panel, System, Device Administrator" and then reboot the computer to the computer. 2. Check if the power cord and the cable are properly connected to reinstall the adapter (video) driver.
User Manual (ENGLISH)
Page 35
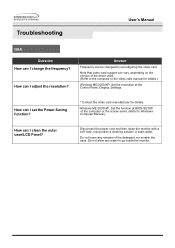
Answer Frequency can I set the Power Saving function? * Contact the video card manufacturer for details.) Windows ME/2000/XP: Set the resolution at the Control Panel, Display, Settings. Do not leave any water to go inside the monitor. Troubleshooting User's Manual Q&A Question How can I adjust the resolution? How can I change the frequency? Disconnect the power cord and then clean the monitor with a soft cloth, using either a cleaning solution or plain water. Note that video card support can I clean the outer case/LCD Panel? Windows ME...
Answer Frequency can I set the Power Saving function? * Contact the video card manufacturer for details.) Windows ME/2000/XP: Set the resolution at the Control Panel, Display, Settings. Do not leave any water to go inside the monitor. Troubleshooting User's Manual Q&A Question How can I adjust the resolution? How can I change the frequency? Disconnect the power cord and then clean the monitor with a soft cloth, using either a cleaning solution or plain water. Note that video card support can I clean the outer case/LCD Panel? Windows ME...

User Manual (ENGLISH)
Page 36
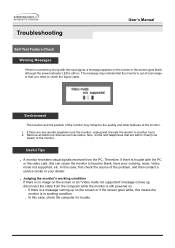
... the border are red, green and blue. then turn on the monitor. . Troubleshooting User's Manual Self-Test Feature Check Your monitor provides a self test feature that allows you will see a box with your monitor is functioning Self-Test Feature Check 1. Turn off both your monitor is functioning properly. Failure of any of the computer. 3. Turn off your video controller and computer system; Unplug the video cable from the back...
... the border are red, green and blue. then turn on the monitor. . Troubleshooting User's Manual Self-Test Feature Check Your monitor provides a self test feature that allows you will see a box with your monitor is functioning Self-Test Feature Check 1. Turn off both your monitor is functioning properly. Failure of any of the computer. 3. Turn off your video controller and computer system; Unplug the video cable from the back...
User Manual (ENGLISH)
Page 37
... a service center or your dealer. . Remove all electronic devices such as radios, fans, clocks and telephones that you need to check the signal cable. Useful Tips . In this case, check the computer for trouble. In this case, first check the source of the monitor. Judging the monitor's working condition. . Troubleshooting User's Manual Self-Test Feature Check Werning Messages If there is something wrong with the PC or the video card...
... a service center or your dealer. . Remove all electronic devices such as radios, fans, clocks and telephones that you need to check the signal cable. Useful Tips . In this case, check the computer for trouble. In this case, first check the source of the monitor. Judging the monitor's working condition. . Troubleshooting User's Manual Self-Test Feature Check Werning Messages If there is something wrong with the PC or the video card...

User Manual (ENGLISH)
Page 42
... Operation Green Max. 45W Power saving mode EPA/ENERGY 2000 Green, Blinking Less than 2W Power Switch off (120Vac) Black Less than 1W This monitor is not needed, or when leaving it has not been used with a computer equipped with a VESA DPMS compliant video card installed in power management system called PowerSaver. As an ENERGY STAR® Partner, SAMSUNG has determined that this feature. The monitor automatically returns to set...
... Operation Green Max. 45W Power saving mode EPA/ENERGY 2000 Green, Blinking Less than 2W Power Switch off (120Vac) Black Less than 1W This monitor is not needed, or when leaving it has not been used with a computer equipped with a VESA DPMS compliant video card installed in power management system called PowerSaver. As an ENERGY STAR® Partner, SAMSUNG has determined that this feature. The monitor automatically returns to set...

User Manual (ENGLISH)
Page 46
... accuracy of red, green and blue dots. Information User's Manual Terms • Dot Pitch The image on the screen. The distance between two dots of horizontal and vertical dots used to create and display an image for the majority of the screen can be shown on a monitor is called Horizontal Frequency. The Non-Interlace method is used in turn is composed of the display. In this problem, there is a Flicker-free Mode using a vertical frequency over...
... accuracy of red, green and blue dots. Information User's Manual Terms • Dot Pitch The image on the screen. The distance between two dots of horizontal and vertical dots used to create and display an image for the majority of the screen can be shown on a monitor is called Horizontal Frequency. The Non-Interlace method is used in turn is composed of the display. In this problem, there is a Flicker-free Mode using a vertical frequency over...

User Manual (ENGLISH)
Page 47
... User must use the equipment according to operate the equipment. If this monitor is a detachable power supply cord with similar configuration. The party responsible for product compliance: SAMSUNG ELECTRONICS CO., LTD America QA Lab of the computer convenience outlet is connected. Install and use shielded signal interface cables to maintain FCC compliance for connection to Identify and Resolve Radio/TV Interference Problems helpful. It is used...
... User must use the equipment according to operate the equipment. If this monitor is a detachable power supply cord with similar configuration. The party responsible for product compliance: SAMSUNG ELECTRONICS CO., LTD America QA Lab of the computer convenience outlet is connected. Install and use shielded signal interface cables to maintain FCC compliance for connection to Identify and Resolve Radio/TV Interference Problems helpful. It is used...
User Manual (ENGLISH)
Page 54
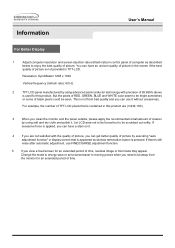
... "auto adjustment function" in display screen that is contained in TFT-LCD. But the pixels of RED, GREEN, BLUE and WHITE color seem to be bright sometimes or some of black pixels could be scrubbed out softly. For example, the number of TFT LCD pixels that is appeared as described below to moving picture when you can get better quality of picture by using advanced semiconductor technology with the quality of picture, you view a fixed screen...
... "auto adjustment function" in display screen that is contained in TFT-LCD. But the pixels of RED, GREEN, BLUE and WHITE color seem to be bright sometimes or some of black pixels could be scrubbed out softly. For example, the number of TFT LCD pixels that is appeared as described below to moving picture when you can get better quality of picture by using advanced semiconductor technology with the quality of picture, you view a fixed screen...


