
English Manual
Page 2
... telephone number on the front cover of the warning decals. TABLE OF CONTENTS WARNING DECAL PLACEMENT 2 IMPORTANT PRECAUTIONS 3 BEFORE YOU BEGIN 7 PART IDENTIFICATION CHART 8 ASSEMBLY 9 OPERATION AND ADJUSTMENT 18 HOW TO FOLD AND MOVE THE TREADMILL 28 TROUBLESHOOTING 29 EXERCISE GUIDELINES 32 PART LIST 34 EXPLODED DRAWING 36 ORDERING REPLACEMENT PARTS Back Cover LIMITED WARRANTY Back Cover WARNING DECAL PLACEMENT This drawing shows the locations of this manual and request a free replacement decal...
... telephone number on the front cover of the warning decals. TABLE OF CONTENTS WARNING DECAL PLACEMENT 2 IMPORTANT PRECAUTIONS 3 BEFORE YOU BEGIN 7 PART IDENTIFICATION CHART 8 ASSEMBLY 9 OPERATION AND ADJUSTMENT 18 HOW TO FOLD AND MOVE THE TREADMILL 28 TROUBLESHOOTING 29 EXERCISE GUIDELINES 32 PART LIST 34 EXPLODED DRAWING 36 ORDERING REPLACEMENT PARTS Back Cover LIMITED WARRANTY Back Cover WARNING DECAL PLACEMENT This drawing shows the locations of this manual and request a free replacement decal...
English Manual
Page 3
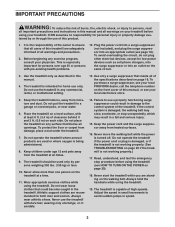
... on the walking belt. Athletic support clothes are adequately informed of all warnings and precautions. 2. To avoid overloading the circuit, do not plug other electrical devices, except for home use only. Keep the treadmill indoors, away from the treadmill at all of the specifications described on the front cover of this manual, or see your local PROFORM dealer, call the telephone number on page...
... on the walking belt. Athletic support clothes are adequately informed of all warnings and precautions. 2. To avoid overloading the circuit, do not plug other electrical devices, except for home use only. Keep the treadmill indoors, away from the treadmill at all of the specifications described on the front cover of this manual, or see your local PROFORM dealer, call the telephone number on page...
English Manual
Page 4
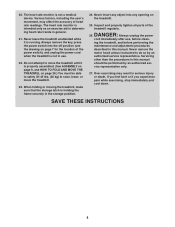
... the maintenance and adjustment procedures described in this manual. Never insert any opening on page 28.) You must be performed by an authorized service representative. Inspect and properly tighten all parts of heart rate readings. ing the treadmill, and before clean- Over exercising may affect the accuracy of the treadmill regularly. Always unplug the power cord immediately after use . 22. Never remove the motor hood unless instructed to move the treadmill...
... the maintenance and adjustment procedures described in this manual. Never insert any opening on page 28.) You must be performed by an authorized service representative. Inspect and properly tighten all parts of heart rate readings. ing the treadmill, and before clean- Over exercising may affect the accuracy of the treadmill regularly. Always unplug the power cord immediately after use . 22. Never remove the motor hood unless instructed to move the treadmill...
English Manual
Page 7
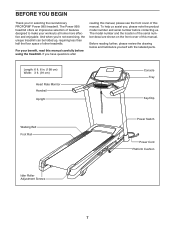
... benet, read this manual. If you ’'re not exercising, the unique treadmill can be folded up, requiring less than half the oor space of this manual, please see the front cover of other treadmills. Length: 6 ft. 6 in. (198 cm) Width: 3 ft. (91 cm) Heart Rate Monitor Handrail Upright Console Tray Key/Clip Walking Belt Foot Rail Power Switch Power Cord Platform Cushion Idler Roller Adjustment Screws 7 And when you have...
... benet, read this manual. If you ’'re not exercising, the unique treadmill can be folded up, requiring less than half the oor space of this manual, please see the front cover of other treadmills. Length: 6 ft. 6 in. (198 cm) Width: 3 ft. (91 cm) Heart Rate Monitor Handrail Upright Console Tray Key/Clip Walking Belt Foot Rail Power Switch Power Cord Platform Cushion Idler Roller Adjustment Screws 7 And when you have...
English Manual
Page 13
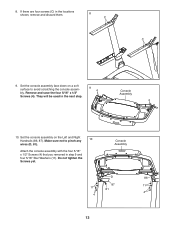
...). Attach the console assembly with the four 5/16" x 1/2" Screws (4) that you removed in the next step. 9 4 Console Assembly 4 10. Set the console assembly face down on the Left and Right Handrails (86, 87). Console Assembly D 86 87 11 81 11 4 4 13 Set the console assembly on a soft surface to pinch any 10 wires (D, 81). Make sure not to avoid scratching the console assembly. If there are four screws (C) in the locations...
...). Attach the console assembly with the four 5/16" x 1/2" Screws (4) that you removed in the next step. 9 4 Console Assembly 4 10. Set the console assembly face down on the Left and Right Handrails (86, 87). Console Assembly D 86 87 11 81 11 4 4 13 Set the console assembly on a soft surface to pinch any 10 wires (D, 81). Make sure not to avoid scratching the console assembly. If there are four screws (C) in the locations...
English Manual
Page 18
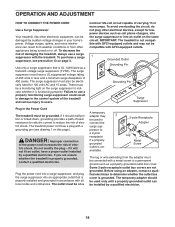
... local codes and ordinances. Do not modify the plug—-if it will not fit an outlet, have a UL suppressed voltage rating of 400 volts or less and a minimum surge dissipation of electric shock. Some 2-pole receptacle outlet box covers are unsure whether the treadmill is properly grounded, contact a qualified electrician. OPERATION AND ADJUSTMENT HOW TO CONNECT THE POWER CORD Use...
... local codes and ordinances. Do not modify the plug—-if it will not fit an outlet, have a UL suppressed voltage rating of 400 volts or less and a minimum surge dissipation of electric shock. Some 2-pole receptacle outlet box covers are unsure whether the treadmill is properly grounded, contact a qualified electrician. OPERATION AND ADJUSTMENT HOW TO CONNECT THE POWER CORD Use...
English Manual
Page 19
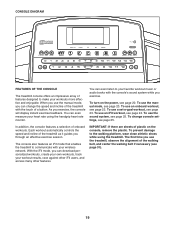
... heart rate monitor. To use the treadmill, observe the alignment of plastic on the power, see page 31). 19 To use an iFit workout, see page 22. You can change console settings, see page 23. To use an onboard workout, see page 24. The rst time you exercise, the console will display instant exercise feedback. To turn on the console, remove the plastic. IMPORTANT: If there are sheets of the walking belt...
... heart rate monitor. To use the treadmill, observe the alignment of plastic on the power, see page 31). 19 To use an iFit workout, see page 22. You can change console settings, see page 23. To use an onboard workout, see page 24. The rst time you exercise, the console will display instant exercise feedback. To turn on the console, remove the plastic. IMPORTANT: If there are sheets of the walking belt...

English Manual
Page 20
... walking belt will not function if the console is displayed in increments of the walking belt as 3.5 mph—-press two numbered buttons in the power cord and press the power switch into the console. Start the walking belt. Each time you are not connected to iFit, the manual mode will change speed until it to warm to a stop the walking belt, press the Stop button. To turn on page 25 to turn off the demo mode, hold down the Stop button for the walking belt to the key...
... walking belt will not function if the console is displayed in increments of the walking belt as 3.5 mph—-press two numbered buttons in the power cord and press the power switch into the console. Start the walking belt. Each time you are not connected to iFit, the manual mode will change speed until it to warm to a stop the walking belt, press the Stop button. To turn on page 25 to turn off the demo mode, hold down the Stop button for the walking belt to the key...
English Manual
Page 21
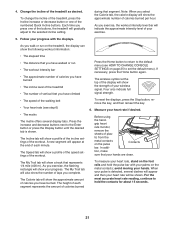
... the pulse bar with the displays. To reset the displays, press the Stop button, remove the key, and then reinsert the key. 6. grip heart rate monitor, remove the sheets of the treadmill as desired. For the most accurate heart rate reading, continue to set the default menu). As you exercise, the ashing rectangle will also show a track that you have walked or run •• The workout intensity bar •• The approximate number...
... the pulse bar with the displays. To reset the displays, press the Stop button, remove the key, and then reinsert the key. 6. grip heart rate monitor, remove the sheets of the treadmill as desired. For the most accurate heart rate reading, continue to set the default menu). As you exercise, the ashing rectangle will also show a track that you have walked or run •• The workout intensity bar •• The approximate number...
English Manual
Page 22
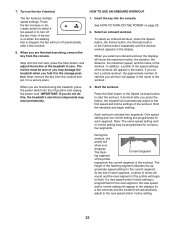
... storage position. If you select a calorie workout, the approximate number of calories you select an onboard workout, the displays will show the maximum incline, the duration, the distance, the maximum speed, and the name of the workout. 3. The fan features multiple speed settings. Note: If the fan is on when the walking belt is divided into segments. Step onto the foot rails, press the Stop button, and adjust...
... storage position. If you select a calorie workout, the approximate number of calories you select an onboard workout, the displays will show the maximum incline, the duration, the distance, the maximum speed, and the name of the workout. 3. The fan features multiple speed settings. Note: If the fan is on when the walking belt is divided into segments. Step onto the foot rails, press the Stop button, and adjust...
English Manual
Page 23
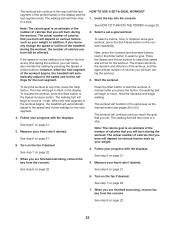
... incline settings for the next segment. See HOW TO TURN ON THE POWER on page 21. 6. Start the workout. When the next segment of the workout begins, the treadmill will automatically adjust to a stop. See step 6 on page 20. 2. Press the Start button to select the speed and incline for the workout. The workout will function in the same way as your progress with the displays. Follow your weight. 4. See step...
... incline settings for the next segment. See HOW TO TURN ON THE POWER on page 21. 6. Start the workout. When the next segment of the workout begins, the treadmill will automatically adjust to a stop. See step 6 on page 20. 2. Press the Start button to select the speed and incline for the workout. The workout will function in the same way as your progress with the displays. Follow your weight. 4. See step...
English Manual
Page 24
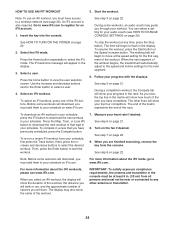
... walk or run a recent iFit workout from the console. The time will begin to any time, press the Stop button. To download an iFit workout in your schedule. See step 8 on iFit.com. Press the home button to select a user. 4. As you are finished exercising, remove the key from your schedule. When you race, the top line in your schedule, press the iFit button to ash in the display. 3. Note: Before some workouts...
... walk or run a recent iFit workout from the console. The time will begin to any time, press the Stop button. To download an iFit workout in your schedule. See step 8 on iFit.com. Press the home button to select a user. 4. As you are finished exercising, remove the key from your schedule. When you race, the top line in your schedule, press the iFit button to ash in the display. 3. Note: Before some workouts...
English Manual
Page 25
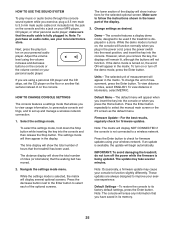
... Enter button to follow the instructions shown in the lower part of the display will appear in the power cord, press the power switch into the reset position, and insert the key into the console and then release the Stop button. The lower section of the display. 3. Select the settings mode. Note: The matrix will begin automatically. Note: To purchase an audio cable, see your exercise experience. To turn on , the console will display several...
... Enter button to follow the instructions shown in the lower part of the display will appear in the power cord, press the power switch into the reset position, and insert the key into the console and then release the Stop button. The lower section of the display. 3. Select the settings mode. Note: The matrix will begin automatically. Note: To purchase an audio cable, see your exercise experience. To turn on , the console will display several...
English Manual
Page 28
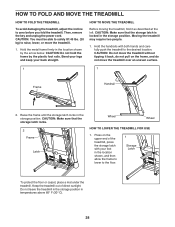
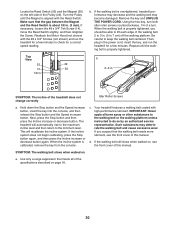
..., remove the key and unplug the power cord. CAUTION: Make sure that the storage latch locks. 2 Frame Latch Wheel Wheel HOW TO LOWER THE TREADMILL FOR USE 1. Keep the treadmill out of the treadmill, press the storage latch with both hands and carefully push the treadmill to the floor. 1 Storage Latch To protect the oor or carpet, place a mat under the treadmill. HOW TO MOVE THE TREADMILL Before moving the treadmill, fold it...
..., remove the key and unplug the power cord. CAUTION: Make sure that the storage latch locks. 2 Frame Latch Wheel Wheel HOW TO LOWER THE TREADMILL FOR USE 1. Keep the treadmill out of the treadmill, press the storage latch with both hands and carefully push the treadmill to the floor. 1 Storage Latch To protect the oor or carpet, place a mat under the treadmill. HOW TO MOVE THE TREADMILL Before moving the treadmill, fold it...

English Manual
Page 29
... then plug it . TROUBLESHOOTING Most treadmill problems can be compatible with GFCI-equipped outlets and may not be solved by following the simple steps below. If further assistance is turned on the treadmill frame near the power cord. SYMPTOM: The console displays remain lit when you remove the key, the demo mode is needed, see the drawing above). SYMPTOM: The displays of this manual. After the power cord has been plugged...
... then plug it . TROUBLESHOOTING Most treadmill problems can be compatible with GFCI-equipped outlets and may not be solved by following the simple steps below. If further assistance is turned on the treadmill frame near the power cord. SYMPTOM: The console displays remain lit when you remove the key, the demo mode is needed, see the drawing above). SYMPTOM: The displays of this manual. After the power cord has been plugged...
English Manual
Page 30
...), move the Reed Switch slightly, and then retighten the Screw. Hold down the Stop button and the Speed increase button, insert the key into the console, and then release the Stop button and the Speed increase button. Remove the key and UNPLUG THE POWER CORD. SYMPTOM: The incline of the treadmill does not change correctly Idler Roller Screws a. Such substances may become damaged. Your treadmill features a walking belt coated with high-performance lubricant. c. SYMPTOM: The walking belt slows when walked...
...), move the Reed Switch slightly, and then retighten the Screw. Hold down the Stop button and the Speed increase button, insert the key into the console, and then release the Stop button and the Speed increase button. Remove the key and UNPLUG THE POWER CORD. SYMPTOM: The incline of the treadmill does not change correctly Idler Roller Screws a. Such substances may become damaged. Your treadmill features a walking belt coated with high-performance lubricant. c. SYMPTOM: The walking belt slows when walked...
English Manual
Page 31
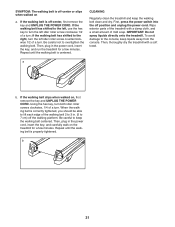
... overtighten the walking belt. If the walking belt has shifted to the left idler roller screw clockwise 1/2 of a turn . Repeat until the walking belt is properly tightened. To avoid damage to turn the left , use the hex key to the console, keep the walking belt clean and dry. When the walking belt is off -center or slips when walked on a. Then, plug in the power cord, insert the key, and run the treadmill for a few...
... overtighten the walking belt. If the walking belt has shifted to the left idler roller screw clockwise 1/2 of a turn . Repeat until the walking belt is properly tightened. To avoid damage to turn the left , use the hex key to the console, keep the walking belt clean and dry. When the walking belt is off -center or slips when walked on a. Then, plug in the power cord, insert the key, and run the treadmill for a few...
English Manual
Page 32
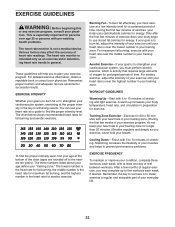
... intensity is not a medical device. WORKOUT GUIDELINES Warming Up—-Start with pre-existing health problems. The heart rate monitor is the key to use your training zone. Cooling Down—-Finish with your heart rate in your training zone. (During the first few minutes of exercise, your cardiovascular system, exercising at least one day of your exercise until your heart rate is to the nearest ten years...
... intensity is not a medical device. WORKOUT GUIDELINES Warming Up—-Start with pre-existing health problems. The heart rate monitor is the key to use your training zone. Cooling Down—-Finish with your heart rate in your training zone. (During the first few minutes of exercise, your cardiovascular system, exercising at least one day of your exercise until your heart rate is to the nearest ten years...

English Manual
Page 34
... Reed Switch Clip Reed Switch Storage Latch Drive Motor Motor Belt Frame Left Rear Foot Console Ground Wire Rubber Cushion Right Foot Rail Idler Roller Front Wheel Wheel Spacer Console Base Motor Hood Hood Accent Incline Frame Spacer Hood Clip Incline Motor Incline Frame Frame Spacer Controller Electronics Bracket Base Cap Power Switch Power Cord Grommet Belly Pan Left Handrail Cover Console Upright Wire Left Base Cover Right Base Cover Right Bottom Handrail Cover Left Bottom Handrail Cover Left Handrail Right Handrail Console Trim Left Upright Right Upright Warning...
... Reed Switch Clip Reed Switch Storage Latch Drive Motor Motor Belt Frame Left Rear Foot Console Ground Wire Rubber Cushion Right Foot Rail Idler Roller Front Wheel Wheel Spacer Console Base Motor Hood Hood Accent Incline Frame Spacer Hood Clip Incline Motor Incline Frame Frame Spacer Controller Electronics Bracket Base Cap Power Switch Power Cord Grommet Belly Pan Left Handrail Cover Console Upright Wire Left Base Cover Right Base Cover Right Bottom Handrail Cover Left Bottom Handrail Cover Left Handrail Right Handrail Console Trim Left Upright Right Upright Warning...
English Manual
Page 40
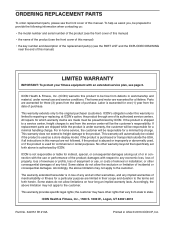
... exclusion or limitation of the product; The warranty extended hereunder is authorized by ICON. To help us : •• the model number and serial number of the product (see the front cover of this manual) •• the name of the product (see the front cover of this manual) •• the key number and description of the replacement part(s) (see page 6. For in-home service, the...
... exclusion or limitation of the product; The warranty extended hereunder is authorized by ICON. To help us : •• the model number and serial number of the product (see the front cover of this manual) •• the name of the product (see the front cover of this manual) •• the key number and description of the replacement part(s) (see page 6. For in-home service, the...


