
English Manual
Page 2
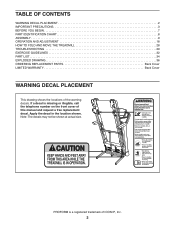
...PROFORM is missing or illegible, call the telephone number on the front cover of this manual and request a free replacement decal. TABLE OF CONTENTS WARNING DECAL PLACEMENT 2 IMPORTANT PRECAUTIONS 3 BEFORE YOU BEGIN 7 PART IDENTIFICATION CHART 8 ASSEMBLY 9 OPERATION AND ADJUSTMENT 18 HOW TO FOLD AND MOVE THE TREADMILL... 28 TROUBLESHOOTING 29 EXERCISE GUIDELINES 32 PART LIST 34 EXPLODED DRAWING 36 ORDERING REPLACEMENT PARTS Back Cover LIMITED WARRANTY Back ...
...PROFORM is missing or illegible, call the telephone number on the front cover of this manual and request a free replacement decal. TABLE OF CONTENTS WARNING DECAL PLACEMENT 2 IMPORTANT PRECAUTIONS 3 BEFORE YOU BEGIN 7 PART IDENTIFICATION CHART 8 ASSEMBLY 9 OPERATION AND ADJUSTMENT 18 HOW TO FOLD AND MOVE THE TREADMILL... 28 TROUBLESHOOTING 29 EXERCISE GUIDELINES 32 PART LIST 34 EXPLODED DRAWING 36 ORDERING REPLACEMENT PARTS Back Cover LIMITED WARRANTY Back ...

English Manual
Page 4
... described in this manual should be able to safely lift 45 lbs. (20 kg) to move the treadmill. 23. Always remove the key, press the power switch into any opening on page 28.) You must be performed by an authorized service representative. Inspect and... properly tighten all parts of heart rate readings. ing the treadmill, and before clean- Over exercising may affect the accuracy of the treadmill regularly. Never remove...
... described in this manual should be able to safely lift 45 lbs. (20 kg) to move the treadmill. 23. Always remove the key, press the power switch into any opening on page 28.) You must be performed by an authorized service representative. Inspect and... properly tighten all parts of heart rate readings. ing the treadmill, and before clean- Over exercising may affect the accuracy of the treadmill regularly. Never remove...
English Manual
Page 7
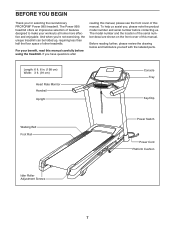
... enjoyable. If you for selecting the revolutionary PROFORM® Power 995i treadmill. Length: 6 ft. 6 in. (198 cm) Width: 3 ft. (91 cm) Heart Rate Monitor Handrail Upright Console Tray Key/Clip Walking Belt Foot Rail Power Switch Power Cord Platform Cushion Idler Roller Adjustment Screws 7...the drawing below and familiarize yourself with the labeled parts. BEFORE YOU BEGIN Thank you have questions after reading this manual, please see the front cover of this manual carefully before contacting us. The Power 995i treadmill offers an impressive selection of this manual.
... enjoyable. If you for selecting the revolutionary PROFORM® Power 995i treadmill. Length: 6 ft. 6 in. (198 cm) Width: 3 ft. (91 cm) Heart Rate Monitor Handrail Upright Console Tray Key/Clip Walking Belt Foot Rail Power Switch Power Cord Platform Cushion Idler Roller Adjustment Screws 7...the drawing below and familiarize yourself with the labeled parts. BEFORE YOU BEGIN Thank you have questions after reading this manual, please see the front cover of this manual carefully before contacting us. The Power 995i treadmill offers an impressive selection of this manual.
English Manual
Page 8
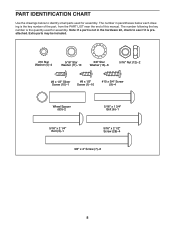
...in the hardware kit, check to identify small parts used for assembly. PART IDENTIFICATION CHART Use the drawings below each drawing is the key number of the part, from the PART LIST near the end of this manual. Extra parts may be included. #10 Star Washer (5)–... (9)–-4 Wheel Spacer (63)–-2 5/16" x 1 3/4" Bolt (6)–-1 5/16" x 2 1/4" Bolt (3)–-1 5/16" x 2 1/2" Screw (28)–-4 3/8" x 4" Screw (7)–-6 8 Note: If a part is the quantity used for assembly. The number following the key number is not in parentheses below to see if it is preattached.
...in the hardware kit, check to identify small parts used for assembly. PART IDENTIFICATION CHART Use the drawings below each drawing is the key number of the part, from the PART LIST near the end of this manual. Extra parts may be included. #10 Star Washer (5)–... (9)–-4 Wheel Spacer (63)–-2 5/16" x 1 3/4" Bolt (6)–-1 5/16" x 2 1/4" Bolt (3)–-1 5/16" x 2 1/2" Screw (28)–-4 3/8" x 4" Screw (7)–-6 8 Note: If a part is the quantity used for assembly. The number following the key number is not in parentheses below to see if it is preattached.
English Manual
Page 9
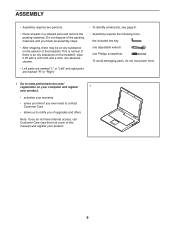
...149;• After shipping, there may be an oily substance on the treadmill, wipe it off with a soft cloth and a mild, non-abrasive cleaner. •• Left parts are marked “"L”" or “"Left”" and right parts are marked “"R”" or “"Right.”" ••... the following tools: the included hex key one adjustable wrench one Phillips screwdriver To avoid damaging parts, do not use power tools. 1. This is an oily substance on the exterior of the treadmill. Do not dispose of this manual) and register your warranty •• saves you time...
...149;• After shipping, there may be an oily substance on the treadmill, wipe it off with a soft cloth and a mild, non-abrasive cleaner. •• Left parts are marked “"L”" or “"Left”" and right parts are marked “"R”" or “"Right.”" ••... the following tools: the included hex key one adjustable wrench one Phillips screwdriver To avoid damaging parts, do not use power tools. 1. This is an oily substance on the exterior of the treadmill. Do not dispose of this manual) and register your warranty •• saves you time...
English Manual
Page 17
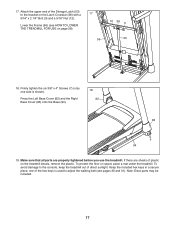
... sheets of the hex keys is shown). If there are properly tightened before you use the treadmill. Lower the Frame (56) (see pages 30 and 31). Note: Extra parts may be included. 17 one side is used to the bracket on the Latch Crossbar (38) with a 17 5/16" x 2 1/4" Bolt (3) and a 5/16"...included hex keys in a secure place; 17. To avoid damage to the console, keep the treadmill out of the Storage Latch (53) to adjust the walking belt (see HOW TO LOWER THE TREADMILL FOR USE on the treadmill decals, remove the plastic. To protect the oor or carpet, place a mat under...
... sheets of the hex keys is shown). If there are properly tightened before you use the treadmill. Lower the Frame (56) (see pages 30 and 31). Note: Extra parts may be included. 17 one side is used to the bracket on the Latch Crossbar (38) with a 17 5/16" x 2 1/4" Bolt (3) and a 5/16"...included hex keys in a secure place; 17. To avoid damage to the console, keep the treadmill out of the Storage Latch (53) to adjust the walking belt (see HOW TO LOWER THE TREADMILL FOR USE on the treadmill decals, remove the plastic. To protect the oor or carpet, place a mat under...
English Manual
Page 25
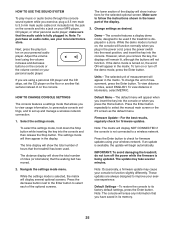
...audio player; Change settings as the default menu. To view distance in kilometers, select METRIC. IMPORTANT: To avoid damaging the treadmill, do not turn off the power while the firmware is available, the update will erase any information that the walking belt has moved. Navigate the settings mode...you insert the key into the console. Note: Occasionally, a firmware update may take several optional screens. If you have saved in the lower part of the optional screens. If the demo mode is selected, the matrix will appear in . Note: To purchase an audio cable, see ...
...audio player; Change settings as the default menu. To view distance in kilometers, select METRIC. IMPORTANT: To avoid damaging the treadmill, do not turn off the power while the firmware is available, the update will erase any information that the walking belt has moved. Navigate the settings mode...you insert the key into the console. Note: Occasionally, a firmware update may take several optional screens. If you have saved in the lower part of the optional screens. If the demo mode is selected, the matrix will appear in . Note: To purchase an audio cable, see ...
English Manual
Page 26
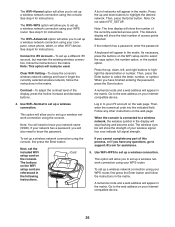
... distance display will stop flashing and become solid. This option will allow you to set up a wireless network connection using your internetcompatible device. 4. Follow any part of the display, press the Incline increase and decrease buttons. When the console is connected to set up a wireless network connection using the console. To...
... distance display will stop flashing and become solid. This option will allow you to set up a wireless network connection using your internetcompatible device. 4. Follow any part of the display, press the Incline increase and decrease buttons. When the console is connected to set up a wireless network connection using the console. To...

English Manual
Page 27
... this process, or if you have any previous wireless network settings on the web page. Follow the instructions on the web page to connect the treadmill to your computer, smart phone, tablet, or other Wi-Fi device, open the list of the console, and then close and re-open your computer... this happens, make sure that your Wi-Fi device is connected to a wireless network, the wireless symbol in the display will allow you have any part of the options will display an IP address, such as 192.168.0.1:8080. If you cannot complete any questions, go to support.ifit.com for...
... this process, or if you have any previous wireless network settings on the web page. Follow the instructions on the web page to connect the treadmill to your computer, smart phone, tablet, or other Wi-Fi device, open the list of the console, and then close and re-open your computer... this happens, make sure that your Wi-Fi device is connected to a wireless network, the wireless symbol in the display will allow you have any part of the options will display an IP address, such as 192.168.0.1:8080. If you cannot complete any questions, go to support.ifit.com for...
English Manual
Page 31
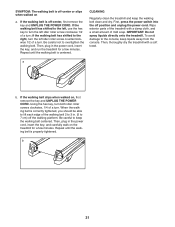
...: The walking belt is centered. Then, plug in . (5 to 7 cm) off -center, rst remove the key and UNPLUG THE POWER CORD. If the walking belt slips when walked on the treadmill for a few minutes. Using the hex key, turn both idler roller screws clockwise, 1/4 of the... the walking belt is correctly tightened, you should be able to 3 in the power cord, insert the key, and run the treadmill for a few minutes. Wipe exterior parts of a turn ; IMPORTANT: Do not spray liquids directly onto the treadmill. a b. Repeat until the walking belt is off position and unplug the...
...: The walking belt is centered. Then, plug in . (5 to 7 cm) off -center, rst remove the key and UNPLUG THE POWER CORD. If the walking belt slips when walked on the treadmill for a few minutes. Using the hex key, turn both idler roller screws clockwise, 1/4 of the... the walking belt is correctly tightened, you should be able to 3 in the power cord, insert the key, and run the treadmill for a few minutes. Wipe exterior parts of a turn ; IMPORTANT: Do not spray liquids directly onto the treadmill. a b. Repeat until the walking belt is off position and unplug the...
English Manual
Page 32
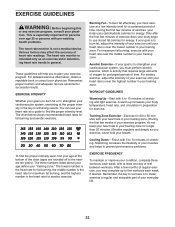
... your everyday life. 32 For maximum fat burning, exercise with pre-existing health problems. The heart rate monitor is to make exercise a regular and enjoyable part of your “"training zone.”" The lowest number is the heart rate for fat burning, the middle number is the heart rate for maximum...
... your everyday life. 32 For maximum fat burning, exercise with pre-existing health problems. The heart rate monitor is to make exercise a regular and enjoyable part of your “"training zone.”" The lowest number is the heart rate for fat burning, the middle number is the heart rate for maximum...

English Manual
Page 34
PART LIST Key No. Qty. 51 1 52 1 53 1 54 1 55 1 56 1 57 1 58 2 59 4 60 1 61 1 62 2 63 2 64 1 65 1 66 1 67 2 68 5 69 1 70 1 71 2 ... Wheel Wheel Spacer Console Base Motor Hood Hood Accent Incline Frame Spacer Hood Clip Incline Motor Incline Frame Frame Spacer Controller Electronics Bracket Base Cap Power Switch Power Cord Grommet Belly Pan Left Handrail Cover Console Upright Wire Left Base Cover Right Base Cover Right Bottom Handrail Cover Left Bottom Handrail Cover...
PART LIST Key No. Qty. 51 1 52 1 53 1 54 1 55 1 56 1 57 1 58 2 59 4 60 1 61 1 62 2 63 2 64 1 65 1 66 1 67 2 68 5 69 1 70 1 71 2 ... Wheel Wheel Spacer Console Base Motor Hood Hood Accent Incline Frame Spacer Hood Clip Incline Motor Incline Frame Frame Spacer Controller Electronics Bracket Base Cap Power Switch Power Cord Grommet Belly Pan Left Handrail Cover Console Upright Wire Left Base Cover Right Base Cover Right Bottom Handrail Cover Left Bottom Handrail Cover...

English Manual
Page 35
Qty. Description 101 1 102 5 103 1 104 1 105 1 106 1 107 2 Fan #8 x 3/4" Truss Head Screw Left Rear Cap Right Rear Cap 1/4" x 1 3/4" Screw 1/4" Star Washer #8 x 1 3/4" Screw 108 6 109 2 110 1 111 1 112 1 113 1 * –- #8 x 3/4" Washer Head Screw Base Pad Left Foot Pad Right Foot Pad Left Front Cushion Top Right Front Cushion Top User’'s Manual Note: Specications are not illustrated. 35 Qty. Key No. Description Key No. For information about ordering replacement parts, see the back cover of this manual. *These parts are subject to change without notice.
Qty. Description 101 1 102 5 103 1 104 1 105 1 106 1 107 2 Fan #8 x 3/4" Truss Head Screw Left Rear Cap Right Rear Cap 1/4" x 1 3/4" Screw 1/4" Star Washer #8 x 1 3/4" Screw 108 6 109 2 110 1 111 1 112 1 113 1 * –- #8 x 3/4" Washer Head Screw Base Pad Left Foot Pad Right Foot Pad Left Front Cushion Top Right Front Cushion Top User’'s Manual Note: Specications are not illustrated. 35 Qty. Key No. Description Key No. For information about ordering replacement parts, see the back cover of this manual. *These parts are subject to change without notice.

English Manual
Page 40
... manual) LIMITED WARRANTY IMPORTANT: To protect your fitness equipment with an extended service plan, see the front cover of this manual. If replacement parts are not followed, if the product is abused or improperly or abnormally used, or if the product is used as a store display model,... outside the USA, if all other consequential damages of removal or installation; ICON Health & Fitness, Inc., 1500 S. 1000 W., Logan, UT 84321-9813 Part No. 349151 R1213A Printed in this product to the original purchaser (customer). To help us : •• the model number and serial number of...
... manual) LIMITED WARRANTY IMPORTANT: To protect your fitness equipment with an extended service plan, see the front cover of this manual. If replacement parts are not followed, if the product is abused or improperly or abnormally used, or if the product is used as a store display model,... outside the USA, if all other consequential damages of removal or installation; ICON Health & Fitness, Inc., 1500 S. 1000 W., Logan, UT 84321-9813 Part No. 349151 R1213A Printed in this product to the original purchaser (customer). To help us : •• the model number and serial number of...


