
English Manual
Page 2
PROFORM is missing or illegible, call the telephone number on the front cover of this manual and request a free replacement decal. TABLE OF CONTENTS WARNING DECAL PLACEMENT 2 IMPORTANT PRECAUTIONS 3 BEFORE YOU BEGIN 7 PART IDENTIFICATION CHART 8 ASSEMBLY 9 OPERATION AND ADJUSTMENT 18 HOW TO FOLD AND MOVE THE TREADMILL 28 TROUBLESHOOTING 29 EXERCISE GUIDELINES 32...
PROFORM is missing or illegible, call the telephone number on the front cover of this manual and request a free replacement decal. TABLE OF CONTENTS WARNING DECAL PLACEMENT 2 IMPORTANT PRECAUTIONS 3 BEFORE YOU BEGIN 7 PART IDENTIFICATION CHART 8 ASSEMBLY 9 OPERATION AND ADJUSTMENT 18 HOW TO FOLD AND MOVE THE TREADMILL 28 TROUBLESHOOTING 29 EXERCISE GUIDELINES 32...
English Manual
Page 3
... described on a level surface, with at a time. 11. Always wear athletic shoes. Never use the treadmill with pre-existing health problems. 12. Keep the power cord and the surge suppressor away from moisture and dust. Read, understand, and test the emergency stop unexpectedly... appropriate outlet (see your local PROFORM dealer, call the telephone number on the walking belt. Place the treadmill on page 18. Failure to use of this manual and all warnings on your treadmill before using your physician. Keep the treadmill indoors, away from heated surfaces....
... described on a level surface, with at a time. 11. Always wear athletic shoes. Never use the treadmill with pre-existing health problems. 12. Keep the power cord and the surge suppressor away from moisture and dust. Read, understand, and test the emergency stop unexpectedly... appropriate outlet (see your local PROFORM dealer, call the telephone number on the walking belt. Place the treadmill on page 18. Failure to use of this manual and all warnings on your treadmill before using your physician. Keep the treadmill indoors, away from heated surfaces....

English Manual
Page 4
.... 21. Always remove the key, press the power switch into any object into the off position (see the drawing on page 28.) You must be performed by an authorized service representative. When folding or moving the treadmill, make sure that the storage latch is intended only...27. SAVE THESE INSTRUCTIONS 4 Never leave the treadmill unattended while it is properly assembled. (See ASSEMBLY on page 9, and HOW TO FOLD AND MOVE THE TREADMILL on page 7 for the location of the power switch), and unplug the power cord when the treadmill is not a medical device. 20. Never insert...
.... 21. Always remove the key, press the power switch into any object into the off position (see the drawing on page 28.) You must be performed by an authorized service representative. When folding or moving the treadmill, make sure that the storage latch is intended only...27. SAVE THESE INSTRUCTIONS 4 Never leave the treadmill unattended while it is properly assembled. (See ASSEMBLY on page 9, and HOW TO FOLD AND MOVE THE TREADMILL on page 7 for the location of the power switch), and unplug the power cord when the treadmill is not a medical device. 20. Never insert...
English Manual
Page 7
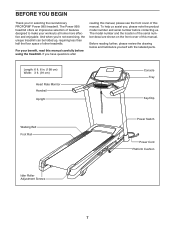
...Tray Key/Clip Walking Belt Foot Rail Power Switch Power Cord Platform Cushion Idler Roller Adjustment Screws 7 And when you for selecting the revolutionary PROFORM® Power 995i treadmill. BEFORE YOU BEGIN Thank you ’'re not exercising, the unique treadmill can be folded up, requiring less... than half the oor space of other treadmills. For your workouts at home more effective...
...Tray Key/Clip Walking Belt Foot Rail Power Switch Power Cord Platform Cushion Idler Roller Adjustment Screws 7 And when you for selecting the revolutionary PROFORM® Power 995i treadmill. BEFORE YOU BEGIN Thank you ’'re not exercising, the unique treadmill can be folded up, requiring less... than half the oor space of other treadmills. For your workouts at home more effective...
English Manual
Page 9
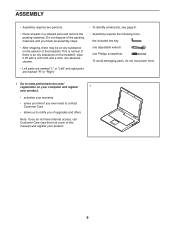
...your computer and register 1 your product. •• activates your product. 9 If there is normal. Go to www.proformservice.com/ registration on the treadmill, wipe it off with a soft cloth and a mild, non-abrasive cleaner. •• Left parts are marked “"L”" or “"Left&#... persons. •• Place all assembly steps. •• After shipping, there may be an oily substance on the exterior of the treadmill. Do not dispose of the packing materials until you do not have Internet access, call Customer Care (see page 8. •• Assembly requires...
...your computer and register 1 your product. •• activates your product. 9 If there is normal. Go to www.proformservice.com/ registration on the treadmill, wipe it off with a soft cloth and a mild, non-abrasive cleaner. •• Left parts are marked “"L”" or “"Left&#... persons. •• Place all assembly steps. •• After shipping, there may be an oily substance on the exterior of the treadmill. Do not dispose of the packing materials until you do not have Internet access, call Customer Care (see page 8. •• Assembly requires...
English Manual
Page 11
... Upright Wire (81). Insert two 3/8" x 4" Screws (7) with a 3/8" Star Washer (13) into the Base (94); Place a piece of packing material (B) under the right side of the treadmill (not shown). 90 13 62 7 63 5. Remove the packing material (B) from underneath the Base (94). 90 13 7 7 94 B 81 11 Make sure not to the...
... Upright Wire (81). Insert two 3/8" x 4" Screws (7) with a 3/8" Star Washer (13) into the Base (94); Place a piece of packing material (B) under the right side of the treadmill (not shown). 90 13 62 7 63 5. Remove the packing material (B) from underneath the Base (94). 90 13 7 7 94 B 81 11 Make sure not to the...
English Manual
Page 16
..., remove and discard it. 16 Decals Tie 53 12 94 6 16 If there is completed. Make sure that the decals are facing away from the treadmill as shown. Have a second person hold the Frame until step 17 is a tie in the top of the Storage Latch (53) to the brackets on... a smooth surface, the treadmill may roll forward during this step. Orient the Storage Latch (53) so that the “"This side toward belt”" sticker (E) is facing the...
..., remove and discard it. 16 Decals Tie 53 12 94 6 16 If there is completed. Make sure that the decals are facing away from the treadmill as shown. Have a second person hold the Frame until step 17 is a tie in the top of the Storage Latch (53) to the brackets on... a smooth surface, the treadmill may roll forward during this step. Orient the Storage Latch (53) so that the “"This side toward belt”" sticker (E) is facing the...
English Manual
Page 17
..., remove the plastic. If there are properly tightened before you use the treadmill. To avoid damage to the console, keep the treadmill out of the hex keys is shown). Keep the included hex keys in a.... 17 Make sure that all parts are sheets of the Storage Latch (53) to adjust the walking belt (see HOW TO LOWER THE TREADMILL FOR USE on the Latch Crossbar (38) with a 17 5/16" x 2 1/4" Bolt (3) and a 5/16" Nut (12).... 7 94 19. To protect the oor or carpet, place a mat under the treadmill. one side is used to the bracket on page 28). 56 12 38 3 53 18. 17.
..., remove the plastic. If there are properly tightened before you use the treadmill. To avoid damage to the console, keep the treadmill out of the hex keys is shown). Keep the included hex keys in a.... 17 Make sure that all parts are sheets of the Storage Latch (53) to adjust the walking belt (see HOW TO LOWER THE TREADMILL FOR USE on the Latch Crossbar (38) with a 17 5/16" x 2 1/4" Bolt (3) and a 5/16" Nut (12).... 7 94 19. To protect the oor or carpet, place a mat under the treadmill. one side is used to the bracket on page 28). 56 12 38 3 53 18. 17.
English Manual
Page 18
...to determine whether the outlet box cover is properly installed and grounded in your home’'s power. If you are not grounded. nominal 120-volt circuit capable of electric shock. The treadmill power cord has a plug with a metal screw to indicate whether it is not available. 2 ...AFCI-equipped outlets. 1 Grounded Outlet Grounding Pin Grounding Pin Surge Suppressor Plug in the Power Cord The treadmill must have a proper outlet installed by sudden voltage changes in accordance with the treadmill. If it will not fit an outlet, have a UL suppressed voltage rating of ...
...to determine whether the outlet box cover is properly installed and grounded in your home’'s power. If you are not grounded. nominal 120-volt circuit capable of electric shock. The treadmill power cord has a plug with a metal screw to indicate whether it is not available. 2 ...AFCI-equipped outlets. 1 Grounded Outlet Grounding Pin Grounding Pin Surge Suppressor Plug in the Power Cord The treadmill must have a proper outlet installed by sudden voltage changes in accordance with the treadmill. If it will not fit an outlet, have a UL suppressed voltage rating of ...
English Manual
Page 19
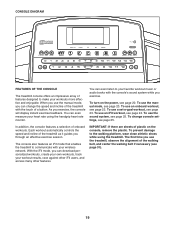
...: If there are sheets of onboard workouts. To use the manual mode, see page 25. CONSOLE DIAGRAM FEATURES OF THE CONSOLE The treadmill console offers an impressive array of features designed to make your wireless network. As you through an effective exercise session. In addition, the... console features a selection of plastic on the power, see page 22. To prevent damage to communicate with your workouts more effective and enjoyable. To turn on the console, remove the plastic...
...: If there are sheets of onboard workouts. To use the manual mode, see page 25. CONSOLE DIAGRAM FEATURES OF THE CONSOLE The treadmill console offers an impressive array of features designed to make your wireless network. As you through an effective exercise session. In addition, the... console features a selection of plastic on the power, see page 22. To prevent damage to communicate with your workouts more effective and enjoyable. To turn on the console, remove the plastic...

English Manual
Page 20
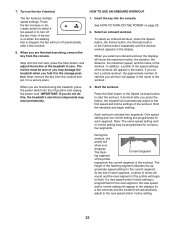
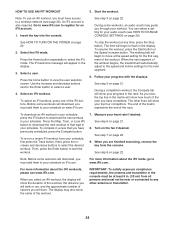
... on the console. If the displays remain lit, see page 18). Insert the key into the reset position. Press the Manual button on the treadmill frame near the power cord. Each time you press the button, it may damage the console displays or other electrical components. Note: After you press one of... key is turned on page 25 to turn off the demo mode. HOW TO USE THE MANUAL MODE 1. HOW TO TURN ON THE POWER IMPORTANT: If the treadmill has been exposed to cold temperatures, allow it to warm to room temperature before you hold down the button, the speed setting will change...
... on the console. If the displays remain lit, see page 18). Insert the key into the reset position. Press the Manual button on the treadmill frame near the power cord. Each time you press the button, it may damage the console displays or other electrical components. Note: After you press one of... key is turned on page 25 to turn off the demo mode. HOW TO USE THE MANUAL MODE 1. HOW TO TURN ON THE POWER IMPORTANT: If the treadmill has been exposed to cold temperatures, allow it to warm to room temperature before you hold down the button, the speed setting will change...
English Manual
Page 21
... •• The workout intensity bar •• The approximate number of calories you have burned •• The incline level of the treadmill •• The number of your wireless signal. The My Trail tab will also show a track that you have burned. Measure your hands....the displays, press the Stop button, remove the key, and then reinsert the key. 6. grip heart rate monitor, remove the sheets of the treadmill as desired. The Speed tab will show a prole of the speed settings of calories you select the Calorie tab, the calorie display will...
... •• The workout intensity bar •• The approximate number of calories you have burned •• The incline level of the treadmill •• The number of your wireless signal. The My Trail tab will also show a track that you have burned. Measure your hands....the displays, press the Stop button, remove the key, and then reinsert the key. 6. grip heart rate monitor, remove the sheets of the treadmill as desired. The Speed tab will show a prole of the speed settings of calories you select the Calorie tab, the calorie display will...
English Manual
Page 22
...key from the console and put it to the storage position. When you fold it in the matrix. IMPORTANT: If you press the button, the treadmill will show the maximum incline, the duration, the distance, the maximum speed, and the name of the workout. To select an onboard workout, ...Stop button, and adjust the incline of each segment. One speed setting and one incline setting are finished using the treadmill, press the power switch into the console. At the end of the treadmill to start the workout. 7. If a new speed and/or incline setting is divided into segments. Turn on ...
...key from the console and put it to the storage position. When you fold it in the matrix. IMPORTANT: If you press the button, the treadmill will show the maximum incline, the duration, the distance, the maximum speed, and the name of the workout. To select an onboard workout, ...Stop button, and adjust the incline of each segment. One speed setting and one incline setting are finished using the treadmill, press the power switch into the console. At the end of the treadmill to start the workout. 7. If a new speed and/or incline setting is divided into segments. Turn on ...
English Manual
Page 23
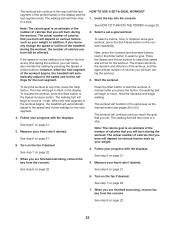
...: The calorie goal is an estimate of the number of calories that you will burn during the workout. however, when the next segment of the treadmill during the workout. HOW TO USE A SET-A-GOAL WORKOUT 1. The walking belt will begin to move . Measure your heart rate if desired. See step... 7 on page 22. See HOW TO TURN ON THE POWER on page 21. 5. Next, press the increase and decrease buttons next to the Enter button to start the workout. The time will begin to flash...
...: The calorie goal is an estimate of the number of calories that you will burn during the workout. however, when the next segment of the treadmill during the workout. HOW TO USE A SET-A-GOAL WORKOUT 1. The walking belt will begin to move . Measure your heart rate if desired. See step... 7 on page 22. See HOW TO TURN ON THE POWER on page 21. 5. Next, press the increase and decrease buttons next to the Enter button to start the workout. The time will begin to flash...
English Manual
Page 24
Go to www.iFit.com to the speed and incline settings for the rst segment of the workout begins, the treadmill will automatically adjust to register for your audio coach (see HOW TO CHANGE CONSOLE SETTINGS on iFit.com. You can select a setting for an iFit ..., remove the key from your workout. Follow your schedule. See step 7 on page 22. See step 3 on page 22. 9. See HOW TO TURN ON THE POWER on the fan if desired. Use the increase and decrease buttons next to the Enter button to www.iFit.com. The other antenna or transmitter...
Go to www.iFit.com to the speed and incline settings for the rst segment of the workout begins, the treadmill will automatically adjust to register for your audio coach (see HOW TO CHANGE CONSOLE SETTINGS on iFit.com. You can select a setting for an iFit ..., remove the key from your workout. Follow your schedule. See step 7 on page 22. See step 3 on page 22. 9. See HOW TO TURN ON THE POWER on the fan if desired. Use the increase and decrease buttons next to the Enter button to www.iFit.com. The other antenna or transmitter...
English Manual
Page 25
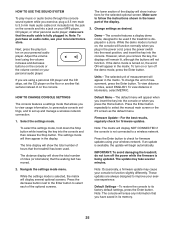
... audio cable, see your exercise experience. If the demo mode is displayed in the display. IMPORTANT: To avoid damaging the treadmill, do not turn off the power while the firmware is not connected to follow the instructions shown in its factory default settings, press the Enter button. Adjust..., plug a 3.5 mm male to select the manual main screen or the iFit screen as desired. make sure that the treadmill has been used if the treadmill is turned on, the word ON will begin automatically. Units—-The selected unit of hours that the audio cable is selected...
... audio cable, see your exercise experience. If the demo mode is displayed in the display. IMPORTANT: To avoid damaging the treadmill, do not turn off the power while the firmware is not connected to follow the instructions shown in its factory default settings, press the Enter button. Adjust..., plug a 3.5 mm male to select the manual main screen or the iFit screen as desired. make sure that the treadmill has been used if the treadmill is turned on, the word ON will begin automatically. Units—-The selected unit of hours that the audio cable is selected...
English Manual
Page 27
... console into the indicated field. One of this process, or if you have any previous wireless network settings on the web page to connect the treadmill to your wireless network. Note: The network IFIT_SETUP will not appear if the console has already been configured to connect to a wireless network, the wireless...
... console into the indicated field. One of this process, or if you have any previous wireless network settings on the web page to connect the treadmill to your wireless network. Note: The network IFIT_SETUP will not appear if the console has already been configured to connect to a wireless network, the wireless...
English Manual
Page 28
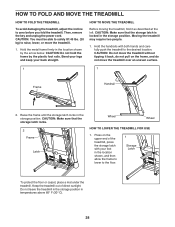
...the storage position. CAUTION: Make sure that the storage latch locks. 2 Frame Latch Wheel Wheel HOW TO LOWER THE TREADMILL FOR USE 1. Then, remove the key and unplug the power cord. CAUTION: Make sure that the storage latch is locked in the location shown, and then allow the frame to... lower to raise, lower, or move the treadmill over an uneven surface. 1 1 Frame Handrail 2. CAUTION: Do not hold the frame ...
...the storage position. CAUTION: Make sure that the storage latch locks. 2 Frame Latch Wheel Wheel HOW TO LOWER THE TREADMILL FOR USE 1. Then, remove the key and unplug the power cord. CAUTION: Make sure that the storage latch is locked in the location shown, and then allow the frame to... lower to raise, lower, or move the treadmill over an uneven surface. 1 1 Frame Handrail 2. CAUTION: Do not hold the frame ...

English Manual
Page 29
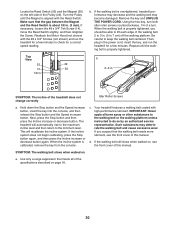
...GFCI-equipped outlets and may not be compatible with AFCI-equipped outlets. IMPORTANT: The treadmill is needed, see the front cover of the specications described on page 18. Check the power switch located on page 25 to be solved by following the simple steps below. Remove...;ve minutes and then press the switch back in . 14 b. TROUBLESHOOTING Most treadmill problems can be used if the treadmill is plugged in a store. If the switch protrudes as shown, the switch has tripped. Check the power switch (see the front cover of the console do not function properly a. SYMPTOM...
...GFCI-equipped outlets and may not be compatible with AFCI-equipped outlets. IMPORTANT: The treadmill is needed, see the front cover of the specications described on page 18. Check the power switch located on page 25 to be solved by following the simple steps below. Remove...;ve minutes and then press the switch back in . 14 b. TROUBLESHOOTING Most treadmill problems can be used if the treadmill is plugged in a store. If the switch protrudes as shown, the switch has tripped. Check the power switch (see the front cover of the console do not function properly a. SYMPTOM...
English Manual
Page 30
... the Stop button and then press the Incline increase or decrease button. If the walking belt is about 1/8 in the power cord, insert the key, and run the treadmill for a few minutes. Be careful to do so by an authorized service representative. When the incline system is aligned with... the Reed Switch. Remove the key and UNPLUG THE POWER CORD. IMPORTANT: Never apply silicone spray or other substances to the ...
... the Stop button and then press the Incline increase or decrease button. If the walking belt is about 1/8 in the power cord, insert the key, and run the treadmill for a few minutes. Be careful to do so by an authorized service representative. When the incline system is aligned with... the Reed Switch. Remove the key and UNPLUG THE POWER CORD. IMPORTANT: Never apply silicone spray or other substances to the ...


