

English Manual
Page 2
® TABLE OF CONTENTS IMPORTANT PRECAUTIONS 3 BEFORE YOU BEGIN 5 ASSEMBLY 6 OPERATION AND ADJUSTMENT 8 HOW TO FOLD AND MOVE THE TREADMILL 19 TROUBLE-SHOOTING 20 CONDITIONING GUIDELINES 22 PART LIST 23 ORDERING REPLACEMENT PARTS Back Cover FULL 90-DAY WARRANTY Back Cover Note: An EXPLODED DRAWING is attached in the center of this manual. 2
® TABLE OF CONTENTS IMPORTANT PRECAUTIONS 3 BEFORE YOU BEGIN 5 ASSEMBLY 6 OPERATION AND ADJUSTMENT 8 HOW TO FOLD AND MOVE THE TREADMILL 19 TROUBLE-SHOOTING 20 CONDITIONING GUIDELINES 22 PART LIST 23 ORDERING REPLACEMENT PARTS Back Cover FULL 90-DAY WARRANTY Back Cover Note: An EXPLODED DRAWING is attached in the center of this manual. 2

English Manual
Page 3
... responsibility of clearance behind it. The surge suppressor must be electrically rated for the location of the on the walking belt. Keep the treadmill indoors, away from the treadmill at all warnings and precautions. 2. Adjust the speed in a garage or covered patio, or near water. 5. Always remove the key, unplug the power cord and move the on page 5 if the treadmill is not a medical device.
... responsibility of clearance behind it. The surge suppressor must be electrically rated for the location of the on the walking belt. Keep the treadmill indoors, away from the treadmill at all warnings and precautions. 2. Adjust the speed in a garage or covered patio, or near water. 5. Always remove the key, unplug the power cord and move the on page 5 if the treadmill is not a medical device.

English Manual
Page 4
... the speed and/or incline of the treadmill is shown at any commercial, rental, or institutional setting. Note: This decal is about to order a free replacement decal (see the front cover of the CD or video program. 24. Always unplug the power cord immediately after use of 35 or persons with pre-existing health problems. Read all parts of actual size. 4 scribed in this manual. 21. When using...
... the speed and/or incline of the treadmill is shown at any commercial, rental, or institutional setting. Note: This decal is about to order a free replacement decal (see the front cover of the CD or video program. 24. Always unplug the power cord immediately after use of 35 or persons with pre-existing health problems. Read all parts of actual size. 4 scribed in this manual. 21. When using...
English Manual
Page 5
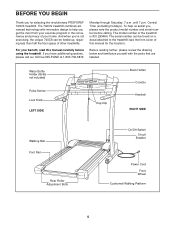
... product model number and serial number before using the treadmill. Before reading further, please review the drawing below and familiarize yourself with innovative design to the treadmill (see the front cover of your home. until 7 p.m. Water Bottle Holder (Bottle not included) Pulse Sensor Lock Knob LEFT SIDE Key/Clip Book Holder Console Handrail RIGHT SIDE Walking Belt Foot Rail Rear Roller Adjustment Bolts On/Off Switch Circuit Breaker Power Cord Front Wheel Cushioned Walking Platform...
... product model number and serial number before using the treadmill. Before reading further, please review the drawing below and familiarize yourself with innovative design to the treadmill (see the front cover of your home. until 7 p.m. Water Bottle Holder (Bottle not included) Pulse Sensor Lock Knob LEFT SIDE Key/Clip Book Holder Console Handrail RIGHT SIDE Walking Belt Foot Rail Rear Roller Adjustment Bolts On/Off Switch Circuit Breaker Power Cord Front Wheel Cushioned Walking Platform...
English Manual
Page 6
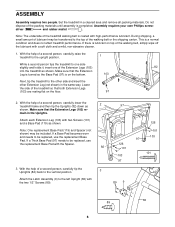
...3 Attach the Latch Assembly (9) to the other side and insert the other Extension Leg (not shown) in the same way. Make sure that the Extension Leg is turned so the Base Pad (97) is completed. With the help of the walking belt, simply wipe off the lubricant with two Screws (101... the help of the walking belt or the shipping carton. Attach each Extension Leg (103) with a soft cloth and a mild, non-abrasive cleaner. 1. main in a cleared area and remove all packing materials. This is lubricant on the floor. 97 2. Set the treadmill in the Uprights. If there is a...
...3 Attach the Latch Assembly (9) to the other side and insert the other Extension Leg (not shown) in the same way. Make sure that the Extension Leg is turned so the Base Pad (97) is completed. With the help of the walking belt, simply wipe off the lubricant with two Screws (101... the help of the walking belt or the shipping carton. Attach each Extension Leg (103) with a soft cloth and a mild, non-abrasive cleaner. 1. main in a cleared area and remove all packing materials. This is lubricant on the floor. 97 2. Set the treadmill in the Uprights. If there is a...

English Manual
Page 7
... tightening three Small Screws (76) into the post on the treadmill. Refer to drawing 6b. If the left Rear Foot (59 [see page 21). Reattach the right Rear Foot without the Rear Foot Spacer. Hold the treadmill with the holes in the left Upright (82). Make sure that the front edge of the post is not used to adjust the walking belt...
... tightening three Small Screws (76) into the post on the treadmill. Refer to drawing 6b. If the left Rear Foot (59 [see page 21). Reattach the right Rear Foot without the Rear Foot Spacer. Hold the treadmill with the holes in the left Upright (82). Make sure that the front edge of the post is not used to adjust the walking belt...

English Manual
Page 8
... suppressed voltage rating of 400 volts or less and a minimum surge dissipation of your local SEARS or call toll-free 1-800-366-7278 and order part number 146148. Plug the power cord into a surge suppressor, and plug the surge suppressor into an appropriate outlet that is grounded before using an adapter. 8 OPERATION AND ADJUSTMENT THE PERFORMANT LUBETM WALKING BELT Your treadmill features a walking belt coated with a cord having...
... suppressed voltage rating of 400 volts or less and a minimum surge dissipation of your local SEARS or call toll-free 1-800-366-7278 and order part number 146148. Plug the power cord into a surge suppressor, and plug the surge suppressor into an appropriate outlet that is grounded before using an adapter. 8 OPERATION AND ADJUSTMENT THE PERFORMANT LUBETM WALKING BELT Your treadmill features a walking belt coated with a cord having...
English Manual
Page 9
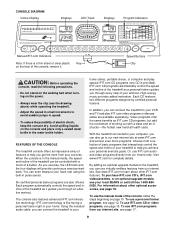
... even more programs. Choose from a selection of basic programs that interactively control the speed and incline of the treadmill as a personal trainer guides you get the most from our internet site. In addition, you can connect the treadmill to help you through an effective workout. To use iFIT.com programs from our internet site. To use the manual mode of your personal exercise goals. CONSOLE DIAGRAM Incline Display Displays LED Track Displays Program Indicators Manual/iFIT.com Indicators...
... even more programs. Choose from a selection of basic programs that interactively control the speed and incline of the treadmill as a personal trainer guides you get the most from our internet site. In addition, you can connect the treadmill to help you through an effective workout. To use iFIT.com programs from our internet site. To use the manual mode of your personal exercise goals. CONSOLE DIAGRAM Incline Display Displays LED Track Displays Program Indicators Manual/iFIT.com Indicators...
English Manual
Page 10
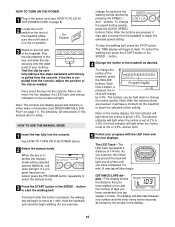
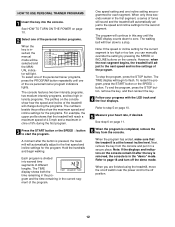
... POWER 1 Plug in the power cord (see SPEED/MIN-MILE DISPLAY on the front of laps you exercise, 5 Follow your clothing. Test the clip by pressing the SPEED v and w buttons. If the key is pulled from the console, adjust the position of the clip as desired by carefully taking a few steps backward until you have walked or run and the number of the treadmill. HOW TO USE THE MANUAL MODE change the incline...
... POWER 1 Plug in the power cord (see SPEED/MIN-MILE DISPLAY on the front of laps you exercise, 5 Follow your clothing. Test the clip by pressing the SPEED v and w buttons. If the key is pulled from the console, adjust the position of the clip as desired by carefully taking a few steps backward until you have walked or run and the number of the treadmill. HOW TO USE THE MANUAL MODE change the incline...
English Manual
Page 11
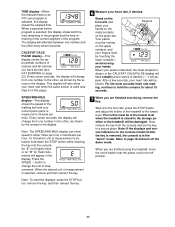
... CALS/PULSE display will flash steadily and a series of the program. ing, continue to hold down the STOP button while inserting the key into the console. Note: If the displays and various indicators on /off switch near the power cord to the off the demo mode. SPEED/MIN-MILE display-This display shows the speed of the walking belt and your fingers must be at the lowest level when the treadmill is...
... CALS/PULSE display will flash steadily and a series of the program. ing, continue to hold down the STOP button while inserting the key into the console. Note: If the displays and various indicators on /off switch near the power cord to the off the demo mode. SPEED/MIN-MILE display-This display shows the speed of the walking belt and your fingers must be at the lowest level when the treadmill is...
English Manual
Page 12
... one incline setting are finished using the treadmill, move the on the console. One speed setting and one of the personal trainer programs, press the PROGRAM button repeatedly until the TIME display counts down to a stop the program, press the STOP button. To stop . To end the program, press the STOP button, remove the key, and then reinsert the key. 4 Follow your heart rate, if desired. Refer to page 18 and turn off switch near the power cord to the first speed and incline settings for...
... one incline setting are finished using the treadmill, move the on the console. One speed setting and one of the personal trainer programs, press the PROGRAM button repeatedly until the TIME display counts down to a stop the program, press the STOP button. To stop . To end the program, press the STOP button, remove the key, and then reinsert the key. 4 Follow your heart rate, if desired. Refer to page 18 and turn off switch near the power cord to the first speed and incline settings for...
English Manual
Page 15
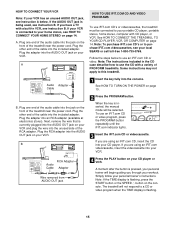
... of the audio cable into the AUDIO OUT jack on page 14. Follow the steps below . IN VIDEO AUDIO IN CH 34 OUT RF OUT 2 Press the PROGRAM button. Note: If the TIME display is flashing, press the START button or the SPEED v button on the front of PROFORM treadmills. IN VIDEO AUDIO IN CH 34 OUT RF OUT AUDIO OUT RIGHT LEFT Audio Adapter Cable HOW TO USE IFIT.COM CD AND VIDEO PROGRAMS To use the...
... of the audio cable into the AUDIO OUT jack on page 14. Follow the steps below . IN VIDEO AUDIO IN CH 34 OUT RF OUT 2 Press the PROGRAM button. Note: If the TIME display is flashing, press the START button or the SPEED v button on the front of PROFORM treadmills. IN VIDEO AUDIO IN CH 34 OUT RF OUT AUDIO OUT RIGHT LEFT Audio Adapter Cable HOW TO USE IFIT.COM CD AND VIDEO PROGRAMS To use the...

English Manual
Page 16
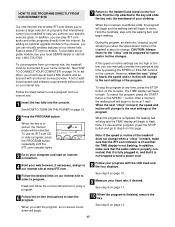
... incline of the treadmill is about to change when a "chirp" is heard: • make sure that the audio cable is properly connected, that it is not wrapped around a power cord • if you can also be prepared for the "chirp" and be stopped by pressing the SPEED or INCLINE buttons on the console. If the speed or incline settings are finished using your CD player or VCR. See step...
... incline of the treadmill is about to change when a "chirp" is heard: • make sure that the audio cable is properly connected, that it is not wrapped around a power cord • if you can also be prepared for the "chirp" and be stopped by pressing the SPEED or INCLINE buttons on the console. If the speed or incline settings are finished using your CD player or VCR. See step...
English Manual
Page 17
... the handrails, step onto the walking belt, and begin to the next settings of the treadmill does not change to move . However, when the next "chirp" is heard, the speed and/or incline will change when a "chirp" is heard, make sure that the audio cable is properly connected, that it is fully plugged in, and that the TIME display is inserted, the manual mode will be found...
... the handrails, step onto the walking belt, and begin to the next settings of the treadmill does not change to move . However, when the next "chirp" is heard, the speed and/or incline will change when a "chirp" is heard, make sure that the audio cable is properly connected, that it is fully plugged in, and that the TIME display is inserted, the manual mode will be found...
English Manual
Page 18
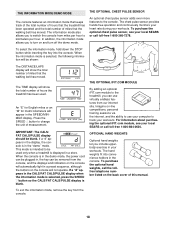
The information mode also allows you can be plugged in, the key can use your computer to switch the console from the console, and the displays and indicators on the console will show the total number of miles that the walking belt has moved. To purchase the optional chest pulse sensor, see your workouts. An "E" for English miles or an "M" for metric kilometers will appear in a preset sequence, although the buttons on...
The information mode also allows you can be plugged in, the key can use your computer to switch the console from the console, and the displays and indicators on the console will show the total number of miles that the walking belt has moved. To purchase the optional chest pulse sensor, see your workouts. An "E" for English miles or an "M" for metric kilometers will appear in a preset sequence, although the buttons on...
English Manual
Page 20
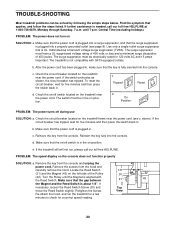
... console. Turn the Pulley until 7 p.m. If necessary, loosen the Reed Switch Screw (30) and Top move the Reed Switch slightly. Retighten the Screw. PROBLEM: The speed display on SOLUTION: a. Make sure that the key is aligned with GFCI-equipped outlets. c. Reinsert the key fully into the console. Remove the key from the console and unplug the power cord. above). Remove the screws from the hood and carefully remove the hood. Check the circuit breaker located on the treadmill...
... console. Turn the Pulley until 7 p.m. If necessary, loosen the Reed Switch Screw (30) and Top move the Reed Switch slightly. Retighten the Screw. PROBLEM: The speed display on SOLUTION: a. Make sure that the key is aligned with GFCI-equipped outlets. c. Reinsert the key fully into the console. Remove the key from the console and unplug the power cord. above). Remove the screws from the hood and carefully remove the hood. Check the circuit breaker located on the treadmill...
English Manual
Page 21
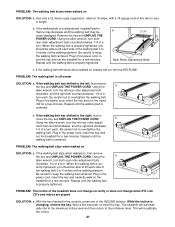
... lift each . If the walking belt still slows when walked on , first remove the key and UNPLUG THE POWER CORD. Plug in the console, press one of a turn . If the walking belt slips when walked on , please call our toll-free HELPLINE. The treadmill will recalibrate the incline. 21 PROBLEM: The walking belt slips when walked on SOLUTION: a. After a few minutes. If the walking belt is properly tightened. b. When the walking belt is properly tightened, you should be able...
... lift each . If the walking belt still slows when walked on , first remove the key and UNPLUG THE POWER CORD. Plug in the console, press one of a turn . If the walking belt slips when walked on , please call our toll-free HELPLINE. The treadmill will recalibrate the incline. 21 PROBLEM: The walking belt slips when walked on SOLUTION: a. After a few minutes. If the walking belt is properly tightened. b. When the walking belt is properly tightened, you should be able...
English Manual
Page 22
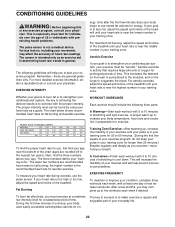
... use the pulse sensor. Next, find the proper heart rate for you exercise-never hold your body temperature, heart rate and circulation in your heart rate as a guide. The lower two numbers are rounded off to the nearest ten years). Fat Burning Training Zone Exercise-After warming up increases your breath. Various factors, including your training zone. For maximum fat burning, adjust the speed and incline of the treadmill until your heart rate...
... use the pulse sensor. Next, find the proper heart rate for you exercise-never hold your body temperature, heart rate and circulation in your heart rate as a guide. The lower two numbers are rounded off to the nearest ten years). Fat Burning Training Zone Exercise-After warming up increases your breath. Various factors, including your training zone. For maximum fat burning, adjust the speed and incline of the treadmill until your heart rate...
English Manual
Page 23
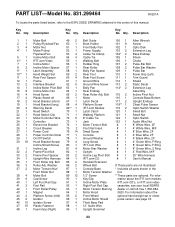
... Weight Set Rear Foot Spacer Frame Interface Bracket Incline Motor Pivot Bolt Incline Motor Nut Hood Screw Plastic Stand-off Hood Bracket (short) Hood Bracket (long) Warning Decal Reed Switch Reed Switch Clip Motor/Controller Wire Controller Electronics Bracket Circuit Breaker Power Cord Power Cord Grommet On/Off Switch Hood Bracket Screw/ Incline Shield Screw Incline Leg Frame Pivot Bolt Frame Pivot Spacer Upright Wire Harness Front Roller Adj. mation about the optional hand weight set or chest pulse sensor, see your local SEARS dealer or call toll-free 1-800-8840620. PART LIST-Model...
... Weight Set Rear Foot Spacer Frame Interface Bracket Incline Motor Pivot Bolt Incline Motor Nut Hood Screw Plastic Stand-off Hood Bracket (short) Hood Bracket (long) Warning Decal Reed Switch Reed Switch Clip Motor/Controller Wire Controller Electronics Bracket Circuit Breaker Power Cord Power Cord Grommet On/Off Switch Hood Bracket Screw/ Incline Shield Screw Incline Leg Frame Pivot Bolt Frame Pivot Spacer Upright Wire Harness Front Roller Adj. mation about the optional hand weight set or chest pulse sensor, see your local SEARS dealer or call toll-free 1-800-8840620. PART LIST-Model...

English Manual
Page 26
... Sears, Roebuck and Co. All replacement parts are listed on page 23). This warranty does not apply when the TREADMILL EXERCISER is missing • or you need to schedule repair service call our toll-free HELPLINE 1-800-736-6879 Monday-Saturday, 7 am-7 pm Central Time (excluding holidays) REPLACEMENT PARTS If parts become worn and need help or service, or ordering parts, please be replaced, call the toll-free numbers listed at...
... Sears, Roebuck and Co. All replacement parts are listed on page 23). This warranty does not apply when the TREADMILL EXERCISER is missing • or you need to schedule repair service call our toll-free HELPLINE 1-800-736-6879 Monday-Saturday, 7 am-7 pm Central Time (excluding holidays) REPLACEMENT PARTS If parts become worn and need help or service, or ordering parts, please be replaced, call the toll-free numbers listed at...


