

User Manual
Page 1
... and instructions in the space above for future reference. If you have questions, or if parts are damaged or missing, DO NOT CONTACT THE STORE; CALL TOLL-FREE: 1-888-533-1333 Mon.-Fri. 6 a.m.-6 p.m. Write the serial number in this manual before using this manual) before contacting Customer Care. IMPORTANT: Please register this product (see the limited warranty on the back cover of...
... and instructions in the space above for future reference. If you have questions, or if parts are damaged or missing, DO NOT CONTACT THE STORE; CALL TOLL-FREE: 1-888-533-1333 Mon.-Fri. 6 a.m.-6 p.m. Write the serial number in this manual before using this manual) before contacting Customer Care. IMPORTANT: Please register this product (see the limited warranty on the back cover of...
User Manual
Page 2
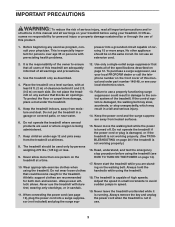
... cover of the warning decals. Apply the decal in the location shown. TABLE OF CONTENTS WARNING DECAL PLACEMENT 2 IMPORTANT PRECAUTIONS 3 BEFORE YOU BEGIN 5 ASSEMBLY 6 OPERATION AND ADJUSTMENT 12 HOW TO FOLD AND MOVE THE TREADMILL 18 TROUBLESHOOTING 20 EXERCISE GUIDELINES 22 PART LIST 23 EXPLODED DRAWING 24 ORDERING REPLACEMENT PARTS Back Cover LIMITED WARRANTY Back Cover WARNING DECAL PLACEMENT This drawing shows the locations of this manual and request a free replacement...
... cover of the warning decals. Apply the decal in the location shown. TABLE OF CONTENTS WARNING DECAL PLACEMENT 2 IMPORTANT PRECAUTIONS 3 BEFORE YOU BEGIN 5 ASSEMBLY 6 OPERATION AND ADJUSTMENT 12 HOW TO FOLD AND MOVE THE TREADMILL 18 TROUBLESHOOTING 20 EXERCISE GUIDELINES 22 PART LIST 23 EXPLODED DRAWING 24 ORDERING REPLACEMENT PARTS Back Cover LIMITED WARRANTY Back Cover WARNING DECAL PLACEMENT This drawing shows the locations of this manual and request a free replacement...
User Manual
Page 3
... operate the treadmill if the power cord or plug is damaged, or if the treadmill is not working properly.) 16. Always hold the handrails while using the treadmill. Never move the walking belt while the power is not working properly. (See TROUBLESHOOTING on page 20 if the treadmill is turned off. Never start the treadmill while you are used only by or through the use of this manual and order part number 146148...
... operate the treadmill if the power cord or plug is damaged, or if the treadmill is not working properly.) 16. Always hold the handrails while using the treadmill. Never move the walking belt while the power is not working properly. (See TROUBLESHOOTING on page 20 if the treadmill is turned off. Never start the treadmill while you are used only by or through the use of this manual and order part number 146148...
User Manual
Page 4
... service representative. SAVE THESE INSTRUCTIONS 4 scribed in -home use , before cleaning the treadmill, and before performing the maintenance and adjustment procedures de- The pulse sensor is intended only as an exercise aid in determining heart rate trends in the storage position. 24. vice representative only. 26. Always unplug the power cord immediately after use only. The pulse sensor is not a medical device. This treadmill is intended for in this manual...
... service representative. SAVE THESE INSTRUCTIONS 4 scribed in -home use , before cleaning the treadmill, and before performing the maintenance and adjustment procedures de- The pulse sensor is intended only as an exercise aid in determining heart rate trends in the storage position. 24. vice representative only. 26. Always unplug the power cord immediately after use only. The pulse sensor is not a medical device. This treadmill is intended for in this manual...
User Manual
Page 5
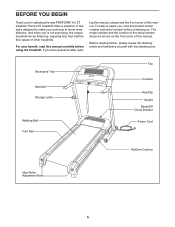
... PROFORM® 6.0 ZT treadmill. Accessory Tray Handrail Storage Latch Walking Belt Foot Rail Fan Console Key/Clip Upright Reset/Off Circuit Breaker Power Cord Platform Cushion Idler Roller Adjustment Bolts 5 Before reading further, please review the drawing below and familiarize yourself with the labeled parts. BEFORE YOU BEGIN Thank you have questions after read this manual. To help us . For your workouts at home more effective. The model number and the location of the serial number...
... PROFORM® 6.0 ZT treadmill. Accessory Tray Handrail Storage Latch Walking Belt Foot Rail Fan Console Key/Clip Upright Reset/Off Circuit Breaker Power Cord Platform Cushion Idler Roller Adjustment Bolts 5 Before reading further, please review the drawing below and familiarize yourself with the labeled parts. BEFORE YOU BEGIN Thank you have questions after read this manual. To help us . For your workouts at home more effective. The model number and the location of the serial number...

User Manual
Page 6
... the key number of the part, from the PART LIST near the lower end. do not use power tools for assembly. During shipping, some lubricant may be assembled. If there is coated with a soft cloth and a mild, non-abrasive cleaner. Extra hardware may be transferred to assemble the treadmill, call 1-800-445-2480. Note: The underside of the treadmill walking belt is lubricant on top of this manual...
... the key number of the part, from the PART LIST near the lower end. do not use power tools for assembly. During shipping, some lubricant may be assembled. If there is coated with a soft cloth and a mild, non-abrasive cleaner. Extra hardware may be transferred to assemble the treadmill, call 1-800-445-2480. Note: The underside of the treadmill walking belt is lubricant on top of this manual...

User Manual
Page 10
... Uprights. Firmly tighten the 3/8" x 2 1/2" Bolts (32) and then the 3/8" x 2 1/4" Bolts (5) on the Handrails (18). 10 Be careful not to the Handrails (18) with 1/4" Star Washers (21) into the Console Base (26) as shown. Lower the Uprights (31, 36) as you set the Console Base on each side of the treadmill. See the inset drawing. Attach the Console Base (26) to pinch the wires...
... Uprights. Firmly tighten the 3/8" x 2 1/2" Bolts (32) and then the 3/8" x 2 1/4" Bolts (5) on the Handrails (18). 10 Be careful not to the Handrails (18) with 1/4" Star Washers (21) into the Console Base (26) as shown. Lower the Uprights (31, 36) as you set the Console Base on each side of the treadmill. See the inset drawing. Attach the Console Base (26) to pinch the wires...

User Manual
Page 11
... Left Upright (not shown). 12 48 Hole Ground Wire 36 86 28 27 13. Locate the Latch Pin Assembly (29). Remove the knob from the pin. If there are sheets of the hex keys is on the pin as shown. Note: Extra hardware may be included. Do not overtighten the Screws. Press the indicated Grommet (86) into the Latch Housing (30), and tighten the knob back...
... Left Upright (not shown). 12 48 Hole Ground Wire 36 86 28 27 13. Locate the Latch Pin Assembly (29). Remove the knob from the pin. If there are sheets of the hex keys is on the pin as shown. Note: Extra hardware may be included. Do not overtighten the Screws. Press the indicated Grommet (86) into the Latch Housing (30), and tighten the knob back...
User Manual
Page 12
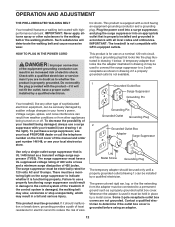
... a monitoring light on the front cover of this manual and order part number 146148, or see your treadmill (see your local PROFORM dealer or call the telephone number on the surge suppressor to whether the product is damaged, the walking belt may slow, accelerate or stop unexpectedly, which may be used only until a properly grounded outlet (drawing 1) can be installed by a metal screw. To...
... a monitoring light on the front cover of this manual and order part number 146148, or see your treadmill (see your local PROFORM dealer or call the telephone number on the surge suppressor to whether the product is damaged, the walking belt may slow, accelerate or stop unexpectedly, which may be used only until a properly grounded outlet (drawing 1) can be installed by a metal screw. To...
User Manual
Page 13
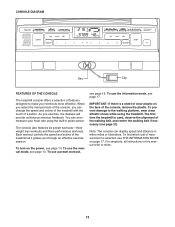
... workouts more effective. Each workout controls the speed and incline of a button. You can change the speed and incline of the treadmill with the touch of the treadmill as it guides you exercise, the displays will provide continuous exercise feedback. Note: The console can display speed and distance in this manual refer to the walking platform, wear clean athletic shoes while using the built-in pulse sensor. The console also features six preset workouts-three weight loss workouts...
... workouts more effective. Each workout controls the speed and incline of a button. You can change the speed and incline of the treadmill with the touch of the treadmill as it guides you exercise, the displays will provide continuous exercise feedback. Note: The console can display speed and distance in this manual refer to the walking platform, wear clean athletic shoes while using the built-in pulse sensor. The console also features six preset workouts-three weight loss workouts...
User Manual
Page 14
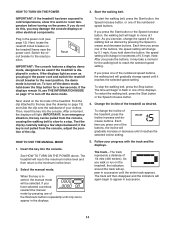
... restart the walking belt, press the Start button or the Speed increase button. 4. The track-The track represents a distance of the displays. Reset IMPORTANT: The console features a display demo mode, designed to the reset position. if the key is inserted, the manual mode will light. if you plug in succession until it reaches the selected incline setting. If you press one of the treadmill, press the Incline increase and decrease buttons. To turn off circuit breaker on the power. Switch the...
... restart the walking belt, press the Start button or the Speed increase button. 4. The track-The track represents a distance of the displays. Reset IMPORTANT: The console features a display demo mode, designed to the reset position. if the key is inserted, the manual mode will light. if you plug in succession until it reaches the selected incline setting. If you press one of the treadmill, press the Incline increase and decrease buttons. To turn off circuit breaker on the power. Switch the...
User Manual
Page 15
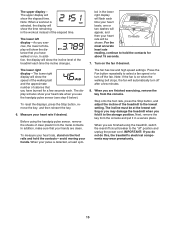
... the incline changes. Before using the treadmill, switch the reset/off circuit breaker to the "off the fan. The lower left display-As you exercise, the lower left display will show the speed of the walking belt and the approximate number of calories that your pulse is on when the walking belt stops, the fan will show the distance that you have burned for about 15 seconds. 7. Measure your heart rate when...
... the incline changes. Before using the treadmill, switch the reset/off circuit breaker to the "off the fan. The lower left display-As you exercise, the lower left display will show the speed of the walking belt and the approximate number of calories that your pulse is on when the walking belt stops, the fan will show the distance that you have burned for about 15 seconds. 7. Measure your heart rate when...
User Manual
Page 16
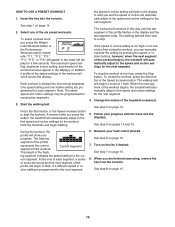
... USE A PRESET WORKOUT 1. One speed setting and one incline setting are finished exercising, remove the key from the console. Press the Start button or the Speed increase button to flash. the speed or incline setting will flash in the displays. When the next segment of the profile will automatically adjust to the speed and incline settings for each segment, a series of tones will sound and the next segment of the workout begins, the treadmill will begin walking...
... USE A PRESET WORKOUT 1. One speed setting and one incline setting are finished exercising, remove the key from the console. Press the Start button or the Speed increase button to flash. the speed or incline setting will flash in the displays. When the next segment of the profile will automatically adjust to the speed and incline settings for each segment, a series of tones will sound and the next segment of the workout begins, the treadmill will begin walking...
User Manual
Page 17
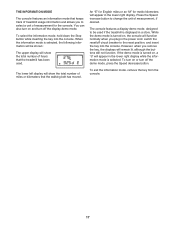
... demo mode is turned on, a "d" will appear in the power cord, switch the reset/off circuit breaker to the reset position, and insert the key into the console. THE INFORMATION MODE The console features an information mode that keeps track of treadmill usage information and allows you plug in the lower right display. While the demo mode is selected. To turn off the demo mode, press the Speed decrease button. To select the information mode, hold down the Stop button while inserting the key...
... demo mode is turned on, a "d" will appear in the power cord, switch the reset/off circuit breaker to the reset position, and insert the key into the console. THE INFORMATION MODE The console features an information mode that keeps track of treadmill usage information and allows you plug in the lower right display. While the demo mode is selected. To turn off the demo mode, press the Speed decrease button. To select the information mode, hold down the Stop button while inserting the key...
User Manual
Page 18
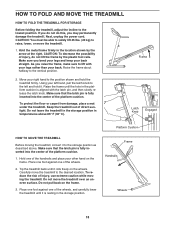
... desired location. Make sure that the latch pin is aligned with your legs rather than your back straight. Carefully move the treadmill to the vertical position. 2. Do not leave the treadmill in the storage position in the platform cushion is fully inserted into the center of direct sunlight. HOW TO FOLD AND MOVE THE TREADMILL HOW TO FOLD THE TREADMILL FOR STORAGE Before folding the treadmill, adjust the incline...
... desired location. Make sure that the latch pin is aligned with your legs rather than your back straight. Carefully move the treadmill to the vertical position. 2. Do not leave the treadmill in the storage position in the platform cushion is fully inserted into the center of direct sunlight. HOW TO FOLD AND MOVE THE TREADMILL HOW TO FOLD THE TREADMILL FOR STORAGE Before folding the treadmill, adjust the incline...

User Manual
Page 20
... Reset PROBLEM: The power turns off the demo mode, hold down the Stop button for five minutes and then press the switch back in . d. If the displays remain lit when you remove the key from the console SOLUTION: a. With the key in . After a few seconds. Check the reset/off circuit breaker located on the treadmill frame near the power cord. Make sure that the key is plugged in . Remove the key from the console. c. This...
... Reset PROBLEM: The power turns off the demo mode, hold down the Stop button for five minutes and then press the switch back in . d. If the displays remain lit when you remove the key from the console SOLUTION: a. With the key in . After a few seconds. Check the reset/off circuit breaker located on the treadmill frame near the power cord. Make sure that the key is plugged in . Remove the key from the console. c. This...
User Manual
Page 21
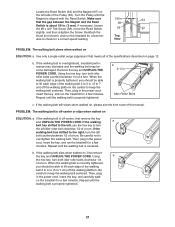
... tightened, you should be able to lift each edge of a turn both idler roller bolts counterclockwise 1/4 of the walking belt 2 to 7 cm) off the walking platform. Be careful not to keep the walking belt centered. Make sure 1/8 in . (5 to 3 in the power cord, insert the key, and run the treadmill for a correct speed reading. When the walking belt is aligned with the Reed Switch. Then, plug in . (3 mm). Locate the Reed Switch...
... tightened, you should be able to lift each edge of a turn both idler roller bolts counterclockwise 1/4 of the walking belt 2 to 7 cm) off the walking platform. Be careful not to keep the walking belt centered. Make sure 1/8 in . (5 to 3 in the power cord, insert the key, and run the treadmill for a correct speed reading. When the walking belt is aligned with the Reed Switch. Then, plug in . (3 mm). Locate the Reed Switch...
User Manual
Page 22
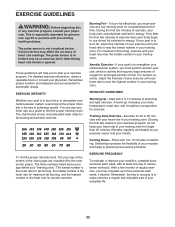
... minutes of exercise does your physician. For aerobic exercise, adjust the intensity of stretching. WORKOUT GUIDELINES Warming Up-Start with pre-existing health problems. The pulse sensor is especially important for aerobic exercise. Various factors may complete up increases your body temperature, heart rate, and circulation in your cardiovascular system, exercising at least one day of time. The pulse sensor is near the lowest number in your...
... minutes of exercise does your physician. For aerobic exercise, adjust the intensity of stretching. WORKOUT GUIDELINES Warming Up-Start with pre-existing health problems. The pulse sensor is especially important for aerobic exercise. Various factors may complete up increases your body temperature, heart rate, and circulation in your cardiovascular system, exercising at least one day of time. The pulse sensor is near the lowest number in your...
User Manual
Page 23
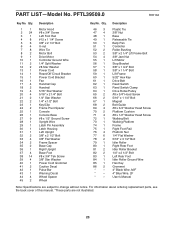
... Ground Screw Upright Wire Latch Pin Assembly Latch Housing Left Upright 3/8" x 2 1/2" Bolt 3/8" Flat Washer Frame Spacer Base Cap Right Upright Base Foot #8 x 3/4" Tek Screw 3/8" Star Washer Power Cord Grommet Caution Decal Pulse Bar Warning Decal Wheel Spacer Wheel Key No. PART LIST-Model No. Description Plastic Tie 3/8" Nut Base Releasable Tie Belly Pan Controller Roller Bushing 3/8" x 2 1/4" Lift Frame Bolt 3/8" Jam Nut Lift Motor Stop Bracket 3/8" x 1 3/4" Bolt 3/8" x 1 1/4" Bolt Lift Frame 5/32" Hex Key Drive Belt Reed Switch Reed Switch Clamp Drive Roller/Pulley #8 x 3/4" Hood Screw...
... Ground Screw Upright Wire Latch Pin Assembly Latch Housing Left Upright 3/8" x 2 1/2" Bolt 3/8" Flat Washer Frame Spacer Base Cap Right Upright Base Foot #8 x 3/4" Tek Screw 3/8" Star Washer Power Cord Grommet Caution Decal Pulse Bar Warning Decal Wheel Spacer Wheel Key No. PART LIST-Model No. Description Plastic Tie 3/8" Nut Base Releasable Tie Belly Pan Controller Roller Bushing 3/8" x 2 1/4" Lift Frame Bolt 3/8" Jam Nut Lift Motor Stop Bracket 3/8" x 1 3/4" Bolt 3/8" x 1 1/4" Bolt Lift Frame 5/32" Hex Key Drive Belt Reed Switch Reed Switch Clamp Drive Roller/Pulley #8 x 3/4" Hood Screw...
User Manual
Page 28
... of removal or installation; damages with the use and service conditions. Accordingly, the above limitation may not apply to be free from defects in -home service, the customer will be the customerʼs responsibility. ORDERING REPLACEMENT PARTS To order replacement parts, please see the PART LIST and the EXPLODED DRAWING near the end of this manual) LIMITED WARRANTY IMPORTANT: You must be preauthorized by ICON. ICON Health & Fitness, Inc. (ICON) warrants this warranty...
... of removal or installation; damages with the use and service conditions. Accordingly, the above limitation may not apply to be free from defects in -home service, the customer will be the customerʼs responsibility. ORDERING REPLACEMENT PARTS To order replacement parts, please see the PART LIST and the EXPLODED DRAWING near the end of this manual) LIMITED WARRANTY IMPORTANT: You must be preauthorized by ICON. ICON Health & Fitness, Inc. (ICON) warrants this warranty...


