
User Manual
Page 3
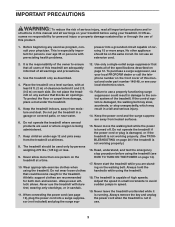
...the use a properly functioning surge suppressor could become caught in - Never leave the treadmill unattended while it and 2 ft. (0.5 m) on any exercise program, consult your local PROFORM dealer or call the telephone number on the same circuit. IMPORTANT PRECAUTIONS WARNING: To...and all warnings on the walking belt. Use the treadmill only as described. 4. Do not operate the treadmill where aerosol products are standing on your treadmill before using your local electronics store. 13. Wear appropriate exercise clothes when using the treadmill. 18. Always wear athletic ...
...the use a properly functioning surge suppressor could become caught in - Never leave the treadmill unattended while it and 2 ft. (0.5 m) on any exercise program, consult your local PROFORM dealer or call the telephone number on the same circuit. IMPORTANT PRECAUTIONS WARNING: To...and all warnings on the walking belt. Use the treadmill only as described. 4. Do not operate the treadmill where aerosol products are standing on your treadmill before using your local electronics store. 13. Wear appropriate exercise clothes when using the treadmill. 18. Always wear athletic ...
User Manual
Page 5
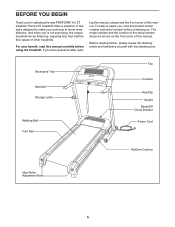
... - Accessory Tray Handrail Storage Latch Walking Belt Foot Rail Fan Console Key/Clip Upright Reset/Off Circuit Breaker Power Cord Platform Cushion Idler Roller Adjustment Bolts 5 To help us assist you for selecting the new PROFORM® 6.0 ZT treadmill. BEFORE YOU BEGIN Thank you , note... the product model number and serial number before using the treadmill. For your workouts at home more effective.
... - Accessory Tray Handrail Storage Latch Walking Belt Foot Rail Fan Console Key/Clip Upright Reset/Off Circuit Breaker Power Cord Platform Cushion Idler Roller Adjustment Bolts 5 To help us assist you for selecting the new PROFORM® 6.0 ZT treadmill. BEFORE YOU BEGIN Thank you , note... the product model number and serial number before using the treadmill. For your workouts at home more effective.

User Manual
Page 6
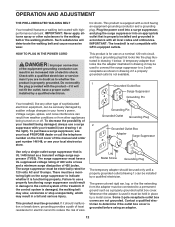
... to the top of the parts to one of the walking belt or the shipping carton. do not use power tools for assembly. If there is completed. The number in parentheses below to assemble the treadmill, call 1-800-445-2480. Note: If a part is preattached...Orient the Right Upright (36) as shown. 1 Identify the Right Upright (36), which has a square hole near the end of the treadmill walking belt is normal and does not affect treadmill performance. This is coated with two 3/8" x 2 1/4" Bolts (5) and two 3/8" Star Washers (39); Assembly requires two persons. Assembly ...
... to the top of the parts to one of the walking belt or the shipping carton. do not use power tools for assembly. If there is completed. The number in parentheses below to assemble the treadmill, call 1-800-445-2480. Note: If a part is preattached...Orient the Right Upright (36) as shown. 1 Identify the Right Upright (36), which has a square hole near the end of the treadmill walking belt is normal and does not affect treadmill performance. This is coated with two 3/8" x 2 1/4" Bolts (5) and two 3/8" Star Washers (39); Assembly requires two persons. Assembly ...

User Manual
Page 11
...with a #8 x 1/2" Ground Screw (27). Insert the pin into the Right Upright (36). one of clear plastic on the Upright Wire (28) to adjust the walking belt (see page 21). 11 Keep the included hex keys in the Latch Housing is used to the indicated hole in the Base (48) with two... #8 x 3/4" Screws (2). Attach the ground wire on the treadmill decals, remove the plastic. Locate the Latch Pin Assembly (29). Make sure that the collar and the spring are properly tightened before you use the...
...with a #8 x 1/2" Ground Screw (27). Insert the pin into the Right Upright (36). one of clear plastic on the Upright Wire (28) to adjust the walking belt (see page 21). 11 Keep the included hex keys in the Latch Housing is used to the indicated hole in the Base (48) with two... #8 x 3/4" Screws (2). Attach the ground wire on the treadmill decals, remove the plastic. Locate the Latch Pin Assembly (29). Make sure that the collar and the spring are properly tightened before you use the...
User Manual
Page 12
.... IMPORTANT: Never apply silicone spray or other type of your local PROFORM dealer or call the telephone number on or off. IMPORTANT: The treadmill is properly grounded. Check with your treadmill (see your homeʼs power. A temporary adapter that is damaged, the walking belt may slow, accelerate or stop unexpectedly, which may be used...
.... IMPORTANT: Never apply silicone spray or other type of your local PROFORM dealer or call the telephone number on or off. IMPORTANT: The treadmill is properly grounded. Check with your treadmill (see your homeʼs power. A temporary adapter that is damaged, the walking belt may slow, accelerate or stop unexpectedly, which may be used...
User Manual
Page 13
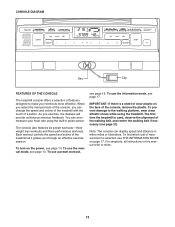
... to the walking platform, wear clean athletic shoes while using the built-in pulse sensor. CONSOLE DIAGRAM Key Clip FEATURES OF THE CONSOLE The treadmill console offers a selection of the console, remove the plastic. To use the manual mode, see page 14. For simplicity, all instructions in... button. The first time the treadmill is used, observe the alignment of measurement is a sheet of clear plastic on the face of features designed to miles. 13 To turn on page 17. To find which unit of the walking belt, and center the walking belt if necessary (see THE INFORMATION ...
... to the walking platform, wear clean athletic shoes while using the built-in pulse sensor. CONSOLE DIAGRAM Key Clip FEATURES OF THE CONSOLE The treadmill console offers a selection of the console, remove the plastic. To use the manual mode, see page 14. For simplicity, all instructions in... button. The first time the treadmill is used, observe the alignment of measurement is a sheet of clear plastic on the face of features designed to miles. 13 To turn on page 17. To find which unit of the walking belt, and center the walking belt if necessary (see THE INFORMATION ...
User Manual
Page 14
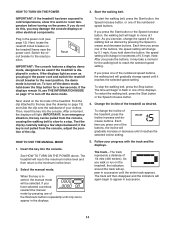
...it may damage the console displays or other electrical components. As you may take a moment for a few steps backward; To restart the walking belt, press the Start button or the Speed increase button. 4. If the displays light as soon as you press the buttons, it reaches the ...appear in the displays. 5. After a moment, the displays will rise to the maximum incline level and then return to be used if the treadmill is turned on. To stop . Reset IMPORTANT: The console features a display demo mode, designed to the minimum incline level. 2. Next, stand on...
...it may damage the console displays or other electrical components. As you may take a moment for a few steps backward; To restart the walking belt, press the Start button or the Speed increase button. 4. If the displays light as soon as you press the buttons, it reaches the ...appear in the displays. 5. After a moment, the displays will rise to the maximum incline level and then return to be used if the treadmill is turned on. To stop . Reset IMPORTANT: The console features a display demo mode, designed to the minimum incline level. 2. Next, stand on...
User Manual
Page 15
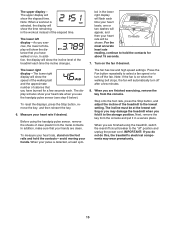
...has low and high speed settings. Note: If the fan is on when the walking belt stops, the fan will be at the lowest setting or you may damage the treadmill when you do not do this, the treadmillʼs electrical components may wear prematurely. 15 Next, remove the key from the console... appear, and then your heart rate, stand on the fan if desired. The display will also show the speed of the walking belt and the approximate number of the treadmill each time your heart beats, one or two dashes will flash each time the incline changes. In addition, make sure that you...
...has low and high speed settings. Note: If the fan is on when the walking belt stops, the fan will be at the lowest setting or you may damage the treadmill when you do not do this, the treadmillʼs electrical components may wear prematurely. 15 Next, remove the key from the console... appear, and then your heart rate, stand on the fan if desired. The display will also show the speed of the walking belt and the approximate number of the treadmill each time your heart beats, one or two dashes will flash each time the incline changes. In addition, make sure that you...
User Manual
Page 16
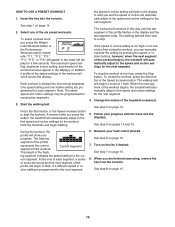
...1 on page 15. 7. In addition, a profile of the speed settings of the treadmill as desired. The walking belt will then slow to move at any time, press the Stop button. The walking belt will scroll across the display. Change the incline of the workout will begin walking. Current ...Segment The height of the workout begins, the treadmill will automatically adjust to the speed and incline settings for the next segment. Start the walking belt. the speed or incline setting will flash in the displays. however, when the ...
...1 on page 15. 7. In addition, a profile of the speed settings of the treadmill as desired. The walking belt will then slow to move at any time, press the Stop button. The walking belt will scroll across the display. Change the incline of the workout will begin walking. Current ...Segment The height of the workout begins, the treadmill will automatically adjust to the speed and incline settings for the next segment. Start the walking belt. the speed or incline setting will flash in the displays. however, when the ...
User Manual
Page 17
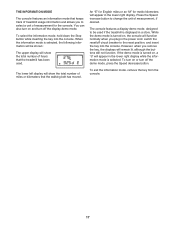
... turn off the demo mode, press the Speed decrease button. The lower left display will show the total number of hours that the walking belt has moved. Press the Speed increase button to the reset position, and insert the key into the console. However, when you to be shown.../off circuit breaker to change the unit of measurement, if desired. THE INFORMATION MODE The console features an information mode that keeps track of treadmill usage information and allows you remove the key, the displays will remain lit, although the buttons will not function. To exit the information mode...
... turn off the demo mode, press the Speed decrease button. The lower left display will show the total number of hours that the walking belt has moved. Press the Speed increase button to the reset position, and insert the key into the console. However, when you to be shown.../off circuit breaker to change the unit of measurement, if desired. THE INFORMATION MODE The console features an information mode that keeps track of treadmill usage information and allows you remove the key, the displays will remain lit, although the buttons will not function. To exit the information mode...
User Manual
Page 21
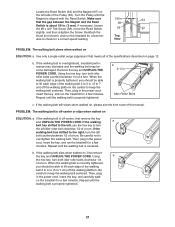
...retighten the Screw. Be careful not to check for a few minutes. Repeat until the walking belt is centered. Be careful to keep the walking belt centered. Reattach the Hood (not shown), and run the treadmill for a few minutes. b. Using the hex key, turn both idler roller bolts clockwise 1/4... of a turn . Be careful to keep the walking belt centered. If the walking belt still slows when walked on the treadmill for a few min- If the walking a belt has shifted to the left, use the hex key to 7 cm) off the walking ...
...retighten the Screw. Be careful not to check for a few minutes. Repeat until the walking belt is centered. Be careful to keep the walking belt centered. Reattach the Hood (not shown), and run the treadmill for a few minutes. b. Using the hex key, turn both idler roller bolts clockwise 1/4... of a turn . Be careful to keep the walking belt centered. If the walking belt still slows when walked on the treadmill for a few min- If the walking a belt has shifted to the left, use the hex key to 7 cm) off the walking ...
User Manual
Page 23
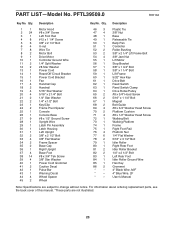
... Nut Lift Motor Stop Bracket 3/8" x 1 3/4" Bolt 3/8" x 1 1/4" Bolt Lift Frame 5/32" Hex Key Drive Belt Reed Switch Reed Switch Clamp Drive Roller/Pulley #8 x 3/4" Hood Screw 5/16" x 1 1/4" Bolt Magnet Belt Guide #8 x 3/4" Washer Head Screw Platform Cushion #8 x 1/2" Washer Head Screw Walking Belt Walking Platform Frame Right Foot Rail Platform Nut 1/4" Flat Washer 5/16" x 3 1/2" Bolt Idler Roller...
... Nut Lift Motor Stop Bracket 3/8" x 1 3/4" Bolt 3/8" x 1 1/4" Bolt Lift Frame 5/32" Hex Key Drive Belt Reed Switch Reed Switch Clamp Drive Roller/Pulley #8 x 3/4" Hood Screw 5/16" x 1 1/4" Bolt Magnet Belt Guide #8 x 3/4" Washer Head Screw Platform Cushion #8 x 1/2" Washer Head Screw Walking Belt Walking Platform Frame Right Foot Rail Platform Nut 1/4" Flat Washer 5/16" x 3 1/2" Bolt Idler Roller...


