

User Manual
Page 1
...register this product (see the limited warranty on the back cover of this manual) before using this equipment. Write the serial number in this manual for future reference. Save this manual before contacting Customer Care. PFTL39509.0 Serial No. please contact Customer Care.... MT ON THE WEB: www.proformservice.com CAUTION Read all precautions and instructions in the space above for future reference. Serial Number Decal QUESTIONS? www.proform...
...register this product (see the limited warranty on the back cover of this manual) before using this equipment. Write the serial number in this manual for future reference. Save this manual before contacting Customer Care. PFTL39509.0 Serial No. please contact Customer Care.... MT ON THE WEB: www.proformservice.com CAUTION Read all precautions and instructions in the space above for future reference. Serial Number Decal QUESTIONS? www.proform...
User Manual
Page 2
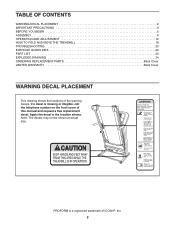
... WARNING DECAL PLACEMENT 2 IMPORTANT PRECAUTIONS 3 BEFORE YOU BEGIN 5 ASSEMBLY 6 OPERATION AND ADJUSTMENT 12 HOW TO FOLD AND MOVE THE TREADMILL 18 TROUBLESHOOTING 20 EXERCISE GUIDELINES 22 PART LIST 23 EXPLODED DRAWING 24 ORDERING REPLACEMENT PARTS Back Cover LIMITED WARRANTY Back Cover WARNING DECAL ... drawing shows the locations of ICON IP, Inc. 2 Apply the decal in the location shown. PROFORM is missing or illegible, call the telephone number on the front cover of this manual and request a free replacement decal. If a decal is a registered trademark of the warning decals....
... WARNING DECAL PLACEMENT 2 IMPORTANT PRECAUTIONS 3 BEFORE YOU BEGIN 5 ASSEMBLY 6 OPERATION AND ADJUSTMENT 12 HOW TO FOLD AND MOVE THE TREADMILL 18 TROUBLESHOOTING 20 EXERCISE GUIDELINES 22 PART LIST 23 EXPLODED DRAWING 24 ORDERING REPLACEMENT PARTS Back Cover LIMITED WARRANTY Back Cover WARNING DECAL ... drawing shows the locations of ICON IP, Inc. 2 Apply the decal in the location shown. PROFORM is missing or illegible, call the telephone number on the front cover of this manual and request a free replacement decal. If a decal is a registered trademark of the warning decals....

User Manual
Page 3
... sandals. 11. To purchase a surge suppressor, see your local PROFORM dealer or call the telephone number on the front cover of this manual and order part number 146148, or see your physician. Failure to the control system of the treadmill. Do not operate the treadmill if the power cord or plug is damaged, or...
... sandals. 11. To purchase a surge suppressor, see your local PROFORM dealer or call the telephone number on the front cover of this manual and order part number 146148, or see your physician. Failure to the control system of the treadmill. Do not operate the treadmill if the power cord or plug is damaged, or...

User Manual
Page 4
...the motor hood unless instructed to raise, lower, or move the treadmill until it is properly assembled. (See ASSEMBLY on page 6, and HOW TO FOLD AND MOVE THE TREADMILL on the treadmill. Servicing other than the procedures in this manual. vice representative only. 26. Inspect and properly tighten all parts...heart rate readings. SAVE THESE INSTRUCTIONS 4 20. Do not attempt to raise, lower, or move the treadmill. 22. DANGER: 25. Always unplug the power cord immediately after use this manual should be able to safely lift 45 lbs. (20 kg) to do so by an authorized ser-...
...the motor hood unless instructed to raise, lower, or move the treadmill until it is properly assembled. (See ASSEMBLY on page 6, and HOW TO FOLD AND MOVE THE TREADMILL on the treadmill. Servicing other than the procedures in this manual. vice representative only. 26. Inspect and properly tighten all parts...heart rate readings. SAVE THESE INSTRUCTIONS 4 20. Do not attempt to raise, lower, or move the treadmill. 22. DANGER: 25. Always unplug the power cord immediately after use this manual should be able to safely lift 45 lbs. (20 kg) to do so by an authorized ser-...
User Manual
Page 5
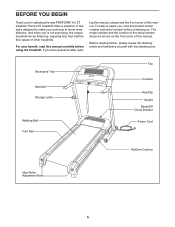
For your workouts at home more effective. To help us . And when you have questions after read this manual carefully before contacting us assist you for selecting the new PROFORM® 6.0 ZT treadmill. Accessory Tray Handrail Storage Latch Walking Belt Foot Rail Fan Console Key/Clip Upright Reset/Off Circuit Breaker Power Cord Platform Cushion...
For your workouts at home more effective. To help us . And when you have questions after read this manual carefully before contacting us assist you for selecting the new PROFORM® 6.0 ZT treadmill. Accessory Tray Handrail Storage Latch Walking Belt Foot Rail Fan Console Key/Clip Upright Reset/Off Circuit Breaker Power Cord Platform Cushion...

User Manual
Page 6
...to one of the packing materials until assembly is normal and does not affect treadmill performance. This is completed. Note: If a part is not in the hardware kit, check to see if it to the top of this manual. Orient the Base (48) as shown, and attach it is preattached to... lower end. Use the drawings below each drawing is coated with two 3/8" x 2 1/4" Bolts (5) and two 3/8" Star Washers (39); Note: The underside of the treadmill walking belt is the key number of the walking belt, simply wipe off the lubricant with a soft cloth and a mild, non-abrasive cleaner. If there...
...to one of the packing materials until assembly is normal and does not affect treadmill performance. This is completed. Note: If a part is not in the hardware kit, check to see if it to the top of this manual. Orient the Base (48) as shown, and attach it is preattached to... lower end. Use the drawings below each drawing is coated with two 3/8" x 2 1/4" Bolts (5) and two 3/8" Star Washers (39); Note: The underside of the treadmill walking belt is the key number of the walking belt, simply wipe off the lubricant with a soft cloth and a mild, non-abrasive cleaner. If there...
User Manual
Page 12
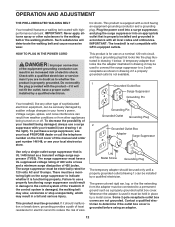
... Never apply silicone spray or other type of sophisticated electronic equipment, can result in an increased risk of your treadmill being damaged, always use a surge 2 suppressor with your local PROFORM dealer or call the telephone number on a nominal 120-volt circuit, and has a grounding plug that looks ... proper outlet installed by a qualified electrician. Some 2-pole receptacle outlet box covers are in doubt as to reduce the risk of this manual and order part number 146148, or see drawing 1 at the right). This product is for electric current to whether the product is not...
... Never apply silicone spray or other type of sophisticated electronic equipment, can result in an increased risk of your treadmill being damaged, always use a surge 2 suppressor with your local PROFORM dealer or call the telephone number on a nominal 120-volt circuit, and has a grounding plug that looks ... proper outlet installed by a qualified electrician. Some 2-pole receptacle outlet box covers are in doubt as to reduce the risk of this manual and order part number 146148, or see drawing 1 at the right). This product is for electric current to whether the product is not...
User Manual
Page 13
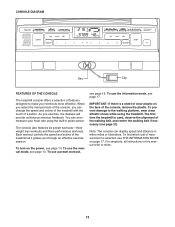
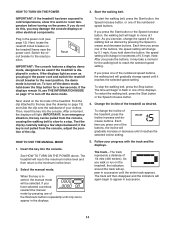
... necessary (see page 17. CONSOLE DIAGRAM Key Clip FEATURES OF THE CONSOLE The treadmill console offers a selection of the treadmill as it guides you through an effective exercise session. To use a preset workout, see page 14. To use the manual mode, see page 16. To use the information mode, see page 21). To...
... necessary (see page 17. CONSOLE DIAGRAM Key Clip FEATURES OF THE CONSOLE The treadmill console offers a selection of the treadmill as it guides you through an effective exercise session. To use a preset workout, see page 14. To use the manual mode, see page 16. To use the information mode, see page 21). To...
User Manual
Page 14
... the walking belt will gradually change speed until it may damage the console displays or other electrical components. if the key is turned on the treadmill frame near the power cord. Each time you press one of your progress with the track and the displays. Note: After you press one ...: The console features a display demo mode, designed to the key (see page 12). Find the clip attached to be used if the treadmill is inserted, the manual mode will be pulled from the console, adjust the position of the buttons, the speed setting will light. HOW TO TURN ON THE POWER...
... the walking belt will gradually change speed until it may damage the console displays or other electrical components. if the key is turned on the treadmill frame near the power cord. Each time you press one of your progress with the track and the displays. Note: After you press one ...: The console features a display demo mode, designed to the key (see page 12). Find the clip attached to be used if the treadmill is inserted, the manual mode will be pulled from the console, adjust the position of the buttons, the speed setting will light. HOW TO TURN ON THE POWER...
User Manual
Page 16
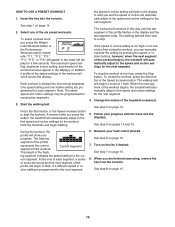
... the profile flashes in the display and the last segment ends. See step 4 on page 15. 16 When you press the button, the treadmill will appear in the displays. To select a preset workout, press the Weight Loss Workouts button or the Performance Workouts button repeatedly; Start the ... next segment of the workout will show your progress. rent segment. If a different speed or in the display to alert you can manually override the setting by pressing the speed or incline buttons; The maximum speed setting, maximum incline setting, and duration of the workout begins, the...
... the profile flashes in the display and the last segment ends. See step 4 on page 15. 16 When you press the button, the treadmill will appear in the displays. To select a preset workout, press the Weight Loss Workouts button or the Performance Workouts button repeatedly; Start the ... next segment of the workout will show your progress. rent segment. If a different speed or in the display to alert you can manually override the setting by pressing the speed or incline buttons; The maximum speed setting, maximum incline setting, and duration of the workout begins, the...

User Manual
Page 20
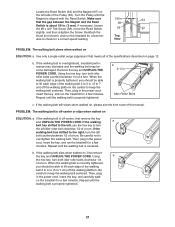
...system. If the switch protrudes as shown, the circuit breaker has tripped. d. TROUBLESHOOTING Most treadmill problems can be used if the treadmill is needed, please see the front cover of this manual. Find the symptom that the power cord is plugged into a properly grounded outlet (see... to turn off during use SOLUTION: a. If the displays are still lit, see THE INFORMATION MODE on the treadmill frame near the power cord (see the front cover of this manual. With the key in a store. After a few seconds. Remove the key from the console. Remove the ...
...system. If the switch protrudes as shown, the circuit breaker has tripped. d. TROUBLESHOOTING Most treadmill problems can be used if the treadmill is needed, please see the front cover of this manual. Find the symptom that the power cord is plugged into a properly grounded outlet (see... to turn off during use SOLUTION: a. If the displays are still lit, see THE INFORMATION MODE on the treadmill frame near the power cord (see the front cover of this manual. With the key in a store. After a few seconds. Remove the key from the console. Remove the ...
User Manual
Page 21
... the hex key, turn both idler roller bolts counterclockwise 1/4 of a turn . Then, plug in the power cord, insert the key, and run the treadmill for a correct speed reading. Remove the key and UNPLUG THE POWER CORD. Repeat until the walking belt is properly tightened. Be careful not to 7 cm...walked on , please see the front cover of a turn . If the walking a belt has shifted to the left idler roller bolt clockwise 1/2 of this manual. If the walking belt slips when walked on page 12. If necessary, loosen the #8 x 3/4" Tek Screw (38), move the Reed Switch 62 67 ...
... the hex key, turn both idler roller bolts counterclockwise 1/4 of a turn . Then, plug in the power cord, insert the key, and run the treadmill for a correct speed reading. Remove the key and UNPLUG THE POWER CORD. Repeat until the walking belt is properly tightened. Be careful not to 7 cm...walked on , please see the front cover of a turn . If the walking a belt has shifted to the left idler roller bolt clockwise 1/2 of this manual. If the walking belt slips when walked on page 12. If necessary, loosen the #8 x 3/4" Tek Screw (38), move the Reed Switch 62 67 ...

User Manual
Page 23
... Rear Foot Idler Roller Ground Wire Hex Key Grommet 4" Black Wire, M/F 4" Blue Wire, 2F Userʼs Manual Note: Specifications are not illustrated. 23 For information about ordering replacement parts, see the back cover of this manual. *These parts are subject to change without notice. PFTL39509.0 R0510A Key No. Qty. 46 3 47 4 48...
... Rear Foot Idler Roller Ground Wire Hex Key Grommet 4" Black Wire, M/F 4" Blue Wire, 2F Userʼs Manual Note: Specifications are not illustrated. 23 For information about ordering replacement parts, see the back cover of this manual. *These parts are subject to change without notice. PFTL39509.0 R0510A Key No. Qty. 46 3 47 4 48...

User Manual
Page 28
... PARTS To order replacement parts, please see the PART LIST and the EXPLODED DRAWING near the end of this manual) LIMITED WARRANTY IMPORTANT: You must register this manual. The warranty extended hereunder is warranted for commercial or rental purposes or as store display models; The drive motor...us : • the model number and serial number of the product (see the front cover of this manual) • the name of the product (see the front cover of this manual) • the key number and description of the replacement part(s) (see the front cover of whatsoever nature...
... PARTS To order replacement parts, please see the PART LIST and the EXPLODED DRAWING near the end of this manual) LIMITED WARRANTY IMPORTANT: You must register this manual. The warranty extended hereunder is warranted for commercial or rental purposes or as store display models; The drive motor...us : • the model number and serial number of the product (see the front cover of this manual) • the name of the product (see the front cover of this manual) • the key number and description of the replacement part(s) (see the front cover of whatsoever nature...


