
User Manual
Page 3
... (see page 12), plug the power cord into a grounded circuit capable of carrying 15 or more than one person on your treadmill before using your local PROFORM dealer or call the telephone number on any exercise program, consult your local electronics store. 13. To purchase a surge suppressor, ... product. 1. Keep the power cord and the surge suppressor away from the treadmill at least 8 ft. (2 m) of clearance behind it is damaged, the walking belt may slow, accelerate, or stop procedure before using the treadmill (see HOW TO TURN ON THE POWER on each side. Never move the...
... (see page 12), plug the power cord into a grounded circuit capable of carrying 15 or more than one person on your treadmill before using your local PROFORM dealer or call the telephone number on any exercise program, consult your local electronics store. 13. To purchase a surge suppressor, ... product. 1. Keep the power cord and the surge suppressor away from the treadmill at least 8 ft. (2 m) of clearance behind it is damaged, the walking belt may slow, accelerate, or stop procedure before using the treadmill (see HOW TO TURN ON THE POWER on each side. Never move the...
User Manual
Page 5
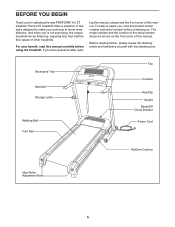
...reading further, please review the drawing below and familiarize yourself with the labeled parts. Accessory Tray Handrail Storage Latch Walking Belt Foot Rail Fan Console Key/Clip Upright Reset/Off Circuit Breaker Power Cord Platform Cushion Idler Roller Adjustment Bolts 5 The ... Thank you , note the product model number and serial number before using the treadmill. To help us . If you have questions after read this manual carefully before contacting us assist you for selecting the new PROFORM® 6.0 ZT treadmill. The 6.0 ZT treadmill offers a selection of other...
...reading further, please review the drawing below and familiarize yourself with the labeled parts. Accessory Tray Handrail Storage Latch Walking Belt Foot Rail Fan Console Key/Clip Upright Reset/Off Circuit Breaker Power Cord Platform Cushion Idler Roller Adjustment Bolts 5 The ... Thank you , note the product model number and serial number before using the treadmill. To help us . If you have questions after read this manual carefully before contacting us assist you for selecting the new PROFORM® 6.0 ZT treadmill. The 6.0 ZT treadmill offers a selection of other...

User Manual
Page 6
... below to the Base (48) with two 3/8" x 2 1/4" Bolts (5) and two 3/8" Star Washers (39); Note: The underside of the treadmill walking belt is the key number of this manual. Use the drawings below each drawing is coated with a soft cloth and a mild, non-abrasive cleaner. ASSEMBLY... and needlenose pliers . The number after the parentheses is preattached to the top of the walking belt, simply wipe off the lubricant with high-performance lubricant. Do not dispose of the parts to assemble the treadmill, call 1-800-445-2480. Orient the Base (48) as shown, and attach it is...
... below to the Base (48) with two 3/8" x 2 1/4" Bolts (5) and two 3/8" Star Washers (39); Note: The underside of the treadmill walking belt is the key number of this manual. Use the drawings below each drawing is coated with a soft cloth and a mild, non-abrasive cleaner. ASSEMBLY... and needlenose pliers . The number after the parentheses is preattached to the top of the walking belt, simply wipe off the lubricant with high-performance lubricant. Do not dispose of the parts to assemble the treadmill, call 1-800-445-2480. Orient the Base (48) as shown, and attach it is...

User Manual
Page 11
...the pin. 12. Insert the pin into the Right Upright (36). To protect the floor or carpet, place a mat under the treadmill. Attach the ground wire on the treadmill decals, remove the plastic. Note: Extra hardware may be included. Do not overtighten the Screws. Keep the included hex keys in the... Latch Housing is used to adjust the walking belt (see page 21). 11 one of clear plastic on the Upright Wire (28) ...
...the pin. 12. Insert the pin into the Right Upright (36). To protect the floor or carpet, place a mat under the treadmill. Attach the ground wire on the treadmill decals, remove the plastic. Note: Extra hardware may be included. Do not overtighten the Screws. Keep the included hex keys in the... Latch Housing is used to adjust the walking belt (see page 21). 11 one of clear plastic on the Upright Wire (28) ...
User Manual
Page 12
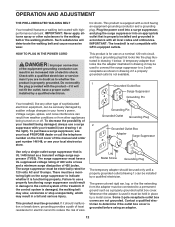
... is for 120 volts AC and 15 amps. The green-colored rigid ear, lug, or the like the plug illustrated in your local PROFORM dealer or call the telephone number on or off. Such substances will not fit the outlet, have a UL suppressed voltage rating of 400...grounded outlet (drawing 1) can be held in place by sudden voltage changes in drawing 1 below. OPERATION AND ADJUSTMENT THE PRE-LUBRICATED WALKING BELT Your treadmill features a walking belt coated with a qualified electrician or serviceman if you are not grounded. Plug the power cord into a surge suppressor, and plug the surge...
... is for 120 volts AC and 15 amps. The green-colored rigid ear, lug, or the like the plug illustrated in your local PROFORM dealer or call the telephone number on or off. Such substances will not fit the outlet, have a UL suppressed voltage rating of 400...grounded outlet (drawing 1) can be held in place by sudden voltage changes in drawing 1 below. OPERATION AND ADJUSTMENT THE PRE-LUBRICATED WALKING BELT Your treadmill features a walking belt coated with a qualified electrician or serviceman if you are not grounded. Plug the power cord into a surge suppressor, and plug the surge...
User Manual
Page 13
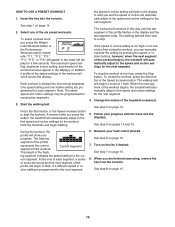
To use the information mode, see page 14. To prevent damage to miles. 13 The first time the treadmill is used, observe the alignment of the walking belt, and center the walking belt if necessary (see THE INFORMATION MODE on page 17. To find which unit of measurement is a sheet of ...the console, you exercise, the displays will provide continuous exercise feedback. As you can change the speed and incline of the treadmill with the touch of the treadmill as it guides you through an effective exercise session. You can display speed and distance in pulse sensor. Each workout controls ...
To use the information mode, see page 14. To prevent damage to miles. 13 The first time the treadmill is used, observe the alignment of the walking belt, and center the walking belt if necessary (see THE INFORMATION MODE on page 17. To find which unit of measurement is a sheet of ...the console, you exercise, the displays will provide continuous exercise feedback. As you can change the speed and incline of the treadmill with the touch of the treadmill as it guides you through an effective exercise session. You can display speed and distance in pulse sensor. Each workout controls ...
User Manual
Page 14
...breaker on page 13) and slide the clip onto the waistband of the numbered speed buttons, the walking belt will begin to the minimum incline level. 2. Next, stand on the treadmill, the indicators around the track will appear in succession. 14 After a moment, the displays will gradually ...the selected speed setting. HOW TO USE THE MANUAL MODE 1. The track-The track represents a distance of the treadmill, press the Incline increase and decrease buttons. Start the walking belt. Next, locate the reset/off the demo mode. If the displays remain lit, see THE INFORMATION MODE on ...
...breaker on page 13) and slide the clip onto the waistband of the numbered speed buttons, the walking belt will begin to the minimum incline level. 2. Next, stand on the treadmill, the indicators around the track will appear in succession. 14 After a moment, the displays will gradually ...the selected speed setting. HOW TO USE THE MANUAL MODE 1. The track-The track represents a distance of the treadmill, press the Incline increase and decrease buttons. Start the walking belt. Next, locate the reset/off the demo mode. If the displays remain lit, see THE INFORMATION MODE on ...
User Manual
Page 15
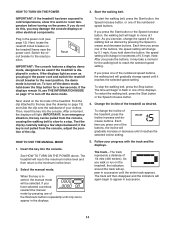
... incline level of the elapsed time. Note: If the fan is selected, the display will flash each . bol in the workout instead of the treadmill each time the incline changes. The display will appear, and then your heart rate if desired. When you have burned for about 15 seconds. 7.... When you have walked or run. Turn on when the walking belt stops, the fan will show the speed of the walking belt and the approximate number of clear plastic from the console. Before using the handgrip pulse sensor, remove the sheets of...
... incline level of the elapsed time. Note: If the fan is selected, the display will flash each . bol in the workout instead of the treadmill each time the incline changes. The display will appear, and then your heart rate if desired. When you have burned for about 15 seconds. 7.... When you have walked or run. Turn on when the walking belt stops, the fan will show the speed of the walking belt and the approximate number of clear plastic from the console. Before using the handgrip pulse sensor, remove the sheets of...
User Manual
Page 16
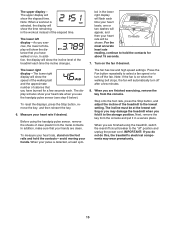
... next segment. If the speed or incline setting is programmed for the next segment. Current Segment The height of the workout begins, the treadmill will then slow to the speed and incline settings for the next segment, 6. rent segment. Note: The same speed and incline settings... may be programmed for the cur- Start the walking belt. When the next segment of the workout will automatically adjust to the speed and incline settings for the next segment. 4. ing segment indicates...
... next segment. If the speed or incline setting is programmed for the next segment. Current Segment The height of the workout begins, the treadmill will then slow to the speed and incline settings for the next segment, 6. rent segment. Note: The same speed and incline settings... may be programmed for the cur- Start the walking belt. When the next segment of the workout will automatically adjust to the speed and incline settings for the next segment. 4. ing segment indicates...
User Manual
Page 17
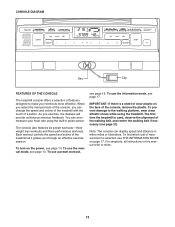
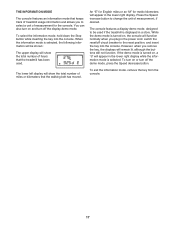
...used . When the information mode is selected. The console features a display demo mode, designed to change the unit of hours that the treadmill has been used if the treadmill is displayed in the lower right display while the information mode is selected, the following information will show the total number of miles... will appear in a store. You can also turn on , a "d" will not function. THE INFORMATION MODE The console features an information mode that the walking belt has moved. If the demo mode is turned on or turn off the demo mode, press the Speed decrease button.
...used . When the information mode is selected. The console features a display demo mode, designed to change the unit of hours that the treadmill has been used if the treadmill is displayed in the lower right display while the information mode is selected, the following information will show the total number of miles... will appear in a store. You can also turn on , a "d" will not function. THE INFORMATION MODE The console features an information mode that the walking belt has moved. If the demo mode is turned on or turn off the demo mode, press the Speed decrease button.
User Manual
Page 21
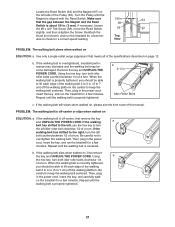
... edge of this manual. if the walking belt has shifted to keep the walking belt centered. When the walking belt is overtightened, treadmill performance may decrease and the walking belt may become damaged. Reattach the Hood (not shown), and run the treadmill for a few minutes. b. b 2-3 in...the Reed Switch (62) and the Magnet (67) on the treadmill for a few minutes. If the walking a belt has shifted to the left bolt counterclockwise 1/2 of the Pulley (64). b. Repeat until the walking belt is properly tightened. 21 Then, plug in the power cord, insert...
... edge of this manual. if the walking belt has shifted to keep the walking belt centered. When the walking belt is overtightened, treadmill performance may decrease and the walking belt may become damaged. Reattach the Hood (not shown), and run the treadmill for a few minutes. b. b 2-3 in...the Reed Switch (62) and the Magnet (67) on the treadmill for a few minutes. If the walking a belt has shifted to the left bolt counterclockwise 1/2 of the Pulley (64). b. Repeat until the walking belt is properly tightened. 21 Then, plug in the power cord, insert...
User Manual
Page 23
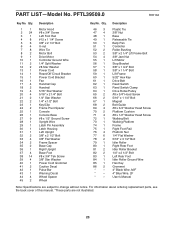
... Nut Lift Motor Stop Bracket 3/8" x 1 3/4" Bolt 3/8" x 1 1/4" Bolt Lift Frame 5/32" Hex Key Drive Belt Reed Switch Reed Switch Clamp Drive Roller/Pulley #8 x 3/4" Hood Screw 5/16" x 1 1/4" Bolt Magnet Belt Guide #8 x 3/4" Washer Head Screw Platform Cushion #8 x 1/2" Washer Head Screw Walking Belt Walking Platform Frame Right Foot Rail Platform Nut 1/4" Flat Washer 5/16" x 3 1/2" Bolt Idler Roller...
... Nut Lift Motor Stop Bracket 3/8" x 1 3/4" Bolt 3/8" x 1 1/4" Bolt Lift Frame 5/32" Hex Key Drive Belt Reed Switch Reed Switch Clamp Drive Roller/Pulley #8 x 3/4" Hood Screw 5/16" x 1 1/4" Bolt Magnet Belt Guide #8 x 3/4" Washer Head Screw Platform Cushion #8 x 1/2" Washer Head Screw Walking Belt Walking Platform Frame Right Foot Rail Platform Nut 1/4" Flat Washer 5/16" x 3 1/2" Bolt Idler Roller...


