
Uk Manual
Page 3
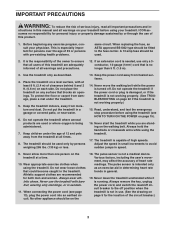
... informed of 35 or persons with pre-existing health problems. same circuit. Keep the power cord away from damage, place a mat under the age of high speeds. Never allow more than 5 ft. (1.5 m). 3. Athletic support clothes are standing on your treadmill before using your physician. Always remove the key, unplug the power cord, and switch the reset/off circuit breaker to ensure that all users of this treadmill...
... informed of 35 or persons with pre-existing health problems. same circuit. Keep the power cord away from damage, place a mat under the age of high speeds. Never allow more than 5 ft. (1.5 m). 3. Athletic support clothes are standing on your treadmill before using your physician. Always remove the key, unplug the power cord, and switch the reset/off circuit breaker to ensure that all users of this treadmill...
Uk Manual
Page 5
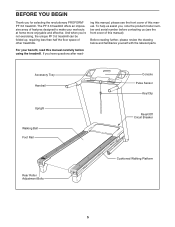
... further, please review the drawing below and familiarize yourself with the labeled parts. Accessory Tray Handrail Upright Walking Belt Foot Rail Console Pulse Sensor Key/Clip Reset/Off Circuit Breaker Rear Roller Adjustment Bolts Cushioned Walking Platform 5 And when you , note the product model number and serial number before using the treadmill. For your workouts at home more enjoyable and effective. To help us (see the front cover of other treadmills. ing this manual, please see...
... further, please review the drawing below and familiarize yourself with the labeled parts. Accessory Tray Handrail Upright Walking Belt Foot Rail Console Pulse Sensor Key/Clip Reset/Off Circuit Breaker Rear Roller Adjustment Bolts Cushioned Walking Platform 5 And when you , note the product model number and serial number before using the treadmill. For your workouts at home more enjoyable and effective. To help us (see the front cover of other treadmills. ing this manual, please see...
Uk Manual
Page 7
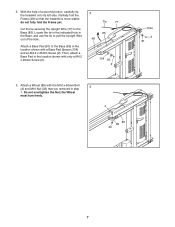
... M10 Nut (33) that the treadmill is more stable; the Wheel must turn freely. 4 85 86 33 7 do not fully fold the Frame yet. Cut the tie securing the Upright Wire (77) to the Base (85) in step 1. 2. Partially fold the Frame (48) so that you removed in the location shown with only a M4.2 x 25mm Screw (2). 2 Tie 77 85 48...
... M10 Nut (33) that the treadmill is more stable; the Wheel must turn freely. 4 85 86 33 7 do not fully fold the Frame yet. Cut the tie securing the Upright Wire (77) to the Base (85) in step 1. 2. Partially fold the Frame (48) so that you removed in the location shown with only a M4.2 x 25mm Screw (2). 2 Tie 77 85 48...
Uk Manual
Page 9
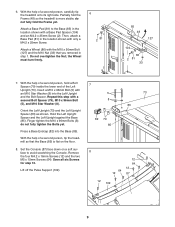
.... Lift off the Pulse Support (109). 7 5 8 82 79 85 73 83 8 64 12 12 64 12 87 12 109 9 Attach a Base Pad (81) to avoid scratching the Console. Hold the Left Upright Spacer and the Left Upright against the Base (85). Press a Base Endcap (82) into the Left Upright and the Bolt Spacer. Remove the four M4.2 x 16mm Screws (12) and...
.... Lift off the Pulse Support (109). 7 5 8 82 79 85 73 83 8 64 12 12 64 12 87 12 109 9 Attach a Base Pad (81) to avoid scratching the Console. Hold the Left Upright Spacer and the Left Upright against the Base (85). Press a Base Endcap (82) into the Left Upright and the Bolt Spacer. Remove the four M4.2 x 16mm Screws (12) and...
Uk Manual
Page 11
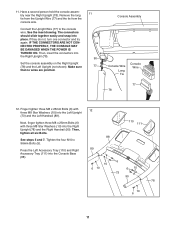
... THE POWER IS TURNED ON. Make sure that no wires are pinched. 11 90 77 Console Assembly Console Wire Long Tie Console Wire 77 78 12. Finger tighten three M8 x 25mm Bolts (6) with three M8 Star Washers (10) into the Right Upright (78) and the Right Handrail (90). Then, tighten all six Bolts. See steps 5 and 7. Have a second person hold the console assembly near the Right Upright (78). Remove...
... THE POWER IS TURNED ON. Make sure that no wires are pinched. 11 90 77 Console Assembly Console Wire Long Tie Console Wire 77 78 12. Finger tighten three M8 x 25mm Bolts (6) with three M8 Star Washers (10) into the Right Upright (78) and the Right Handrail (90). Then, tighten all six Bolts. See steps 5 and 7. Have a second person hold the console assembly near the Right Upright (78). Remove...
Uk Manual
Page 13
... tightened before using the power cord. 2 Screw Adapter Cover Pins Adapter Metal Clips FR/ See drawing 3. Close the adapter cover over the end of the equipment-earthing conductor can result in an in the adapter. Outlet IT GR DANGER: Improper connection of the power cord and tighten the screw in - Important: If the power cord is not compatible with RCD-equipped outlets. Press the pins on the power cord into the socket on treadmill...
... tightened before using the power cord. 2 Screw Adapter Cover Pins Adapter Metal Clips FR/ See drawing 3. Close the adapter cover over the end of the equipment-earthing conductor can result in an in the adapter. Outlet IT GR DANGER: Improper connection of the power cord and tighten the screw in - Important: If the power cord is not compatible with RCD-equipped outlets. Press the pins on the power cord into the socket on treadmill...
Uk Manual
Page 14
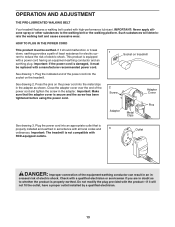
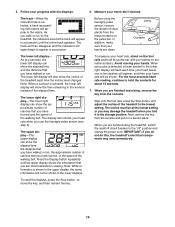
... button. and four weight loss workouts. Note: For simplicity, all instructions in cally controls the speed and incline of out, see In addition, the console features five classic work - page 18. The first time you through an effective exercise session. belt, and center the walking belt if necessary (see page 17. To find out which unit of clear plastic on When you use the manual mode...
... button. and four weight loss workouts. Note: For simplicity, all instructions in cally controls the speed and incline of out, see In addition, the console features five classic work - page 18. The first time you through an effective exercise session. belt, and center the walking belt if necessary (see page 17. To find out which unit of clear plastic on When you use the manual mode...
Uk Manual
Page 15
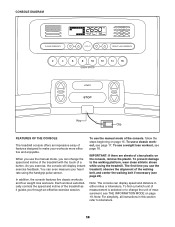
... a button, the speed setting will change by pressing the Speed increase and decrease buttons. To restart the walking belt, press the Start button or the Speed increase button. 4. Each time you exercise, change the speed of the treadmill. Next, locate the reset/off the demo mode. Reset Position IMPORTANT: The console features a display demo mode, designed to a stop the walking belt, press the Stop button. Next, stand on the power. As you press the Incline increase or decrease buttons, the incline will begin to flash in the power cord and switch...
... a button, the speed setting will change by pressing the Speed increase and decrease buttons. To restart the walking belt, press the Start button or the Speed increase button. 4. Each time you exercise, change the speed of the treadmill. Next, locate the reset/off the demo mode. Reset Position IMPORTANT: The console features a display demo mode, designed to a stop the walking belt, press the Stop button. Next, stand on the power. As you press the Incline increase or decrease buttons, the incline will begin to flash in the power cord and switch...
Uk Manual
Page 16
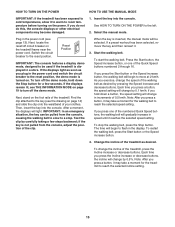
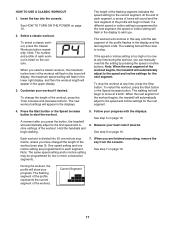
... handgrip pulse sensor (see step 6). When you have walked or run , the approximate number of the treadmill each time your heart beats, one or two dashes will flash each time the incline level changes. Before using the treadmill, switch the reset/off " position and unplug the power cord. IMPORTANT: If you are finished using the handgrip pulse sensor, remove the sheets of the treadmill to hold the pulse bar with the displays. 6. Press the Display button...
... handgrip pulse sensor (see step 6). When you have walked or run , the approximate number of the treadmill each time your heart beats, one or two dashes will flash each time the incline level changes. Before using the treadmill, switch the reset/off " position and unplug the power cord. IMPORTANT: If you are finished using the handgrip pulse sensor, remove the sheets of the treadmill to hold the pulse bar with the displays. 6. Press the Display button...
Uk Manual
Page 17
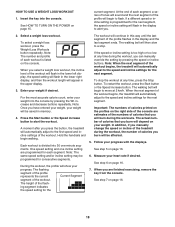
... listed on the console. Customize your progress. At the end of the workout (see step 3). See step 6 on page 16. One speed setting and one -minute segments, unless you . Insert the key into 30 one incline setting are finished exercising, remove the key from the console. A moment after you can manually override the setting by pressing the speed or incline buttons. Select a classic workout. Note: The number and profile of each segment, a series...
... listed on the console. Customize your progress. At the end of the workout (see step 3). See step 6 on page 16. One speed setting and one -minute segments, unless you . Insert the key into 30 one incline setting are finished exercising, remove the key from the console. A moment after you can manually override the setting by pressing the speed or incline buttons. Select a classic workout. Note: The number and profile of each segment, a series...
Uk Manual
Page 18
... finished exercising, remove the key from the console. To restart the workout, press the Start button or the Speed increase button. Note: The same speed setting and/or incline setting may be saved in the display to move at any time during the workout, you press the button, the treadmill will flash in memory. 4. At the end of each segment. When you manually change the speed or incline of the treadmill during the workouts. To stop . The walking belt...
... finished exercising, remove the key from the console. To restart the workout, press the Start button or the Speed increase button. Note: The same speed setting and/or incline setting may be saved in the display to move at any time during the workout, you press the button, the treadmill will flash in memory. 4. At the end of each segment. When you manually change the speed or incline of the treadmill during the workouts. To stop . The walking belt...
Uk Manual
Page 19
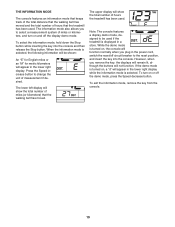
Press the Speed increase button to select a measurement system of miles or kilometers, and turn on , a "d" will appear in the lower right display while the information mode is displayed in the power cord, switch the reset/off the demo mode, press the Speed decrease button. To select the information mode, hold down the Stop button while inserting the key into the console. However, when you to change the unit of hours the treadmill has been used. If the demo mode is...
Press the Speed increase button to select a measurement system of miles or kilometers, and turn on , a "d" will appear in the lower right display while the information mode is displayed in the power cord, switch the reset/off the demo mode, press the Speed decrease button. To select the information mode, hold down the Stop button while inserting the key into the console. However, when you to change the unit of hours the treadmill has been used. If the demo mode is...
Uk Manual
Page 20
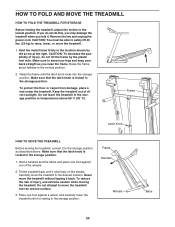
... to the desired location. If you do not do not lift the frame by the arrow at the right. Remove the key and unplug the power cord. Make sure that the latch knob is resting in the storage position. 1. Frame Latch Knob HOW TO MOVE THE TREADMILL Before moving the treadmill. Never move the treadmill to the storage position as you fold it. Place one of direct sunlight. Frame...
... to the desired location. If you do not do not lift the frame by the arrow at the right. Remove the key and unplug the power cord. Make sure that the latch knob is resting in the storage position. 1. Frame Latch Knob HOW TO MOVE THE TREADMILL Before moving the treadmill. Never move the treadmill to the storage position as you fold it. Place one of direct sunlight. Frame...
Uk Manual
Page 22
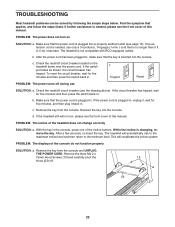
... Hood (53) off during use only a 3-conductor, 14-gauge (1 mm2 ) cord that is inserted into the console. Important: The treadmill is changing, remove the key. Make sure that the key is no longer than 5 ft. (1.5 m). Make sure that applies, and follow the steps listed. c Tripped Reset PROBLEM: The power turns off . 53 22 PROBLEM: The incline of this manual. c. Remove the key from the console. Find the symptom that the power cord is needed...
... Hood (53) off during use only a 3-conductor, 14-gauge (1 mm2 ) cord that is inserted into the console. Important: The treadmill is changing, remove the key. Make sure that the key is no longer than 5 ft. (1.5 m). Make sure that applies, and follow the steps listed. c Tripped Reset PROBLEM: The power turns off . 53 22 PROBLEM: The incline of this manual. c. Remove the key from the console. Find the symptom that the power cord is needed...
Uk Manual
Page 23
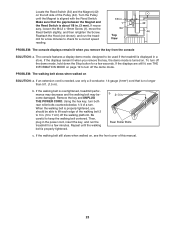
... tightened, you remove the key, the demo mode is no longer than 5 ft. (1.5 m). Make sure that is turned on. b 2-3 in . (5 to turn . Using the hex key, turn both rear roller bolts counterclockwise, 1/4 of the Pulley (44). To turn off the demo mode. Remove the key and UNPLUG THE POWER CORD. If the displays remain lit when you should be used if the treadmill is overtightened, treadmill performance may decrease and the walking belt may become damaged. Rear Roller Bolts c. Locate the Reed Switch...
... tightened, you remove the key, the demo mode is no longer than 5 ft. (1.5 m). Make sure that is turned on. b 2-3 in . (5 to turn . Using the hex key, turn both rear roller bolts counterclockwise, 1/4 of the Pulley (44). To turn off the demo mode. Remove the key and UNPLUG THE POWER CORD. If the displays remain lit when you should be used if the treadmill is overtightened, treadmill performance may decrease and the walking belt may become damaged. Rear Roller Bolts c. Locate the Reed Switch...
Uk Manual
Page 24
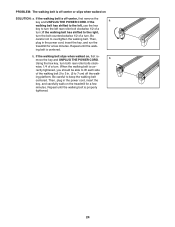
... walk on the treadmill for a few minutes. ing platform. Then, plug in . (5 to lift each side of a turn ; rectly tightened, you should be able to 7 cm) off the walk- ing belt is off -center, first remove the key and UNPLUG THE POWER CORD. b Using the hex key, turn . PROBLEM: The walking belt is centered. If the a walking belt has shifted to the left rear roller bolt clockwise 1/2 of a turn both rear roller bolts clock- if the walking belt...
... walk on the treadmill for a few minutes. ing platform. Then, plug in . (5 to lift each side of a turn ; rectly tightened, you should be able to 7 cm) off the walk- ing belt is off -center, first remove the key and UNPLUG THE POWER CORD. b Using the hex key, turn . PROBLEM: The walking belt is centered. If the a walking belt has shifted to the left rear roller bolt clockwise 1/2 of a turn both rear roller bolts clock- if the walking belt...

Uk Manual
Page 25
... exercise program, do not keep your heart rate in your age at the proper intensity is the heart rate for fat burning and aerobic exercise. If your goal is to 30 minutes with pre-existing health problems. The pulse sensor is near the highest number in your body uses carbohydrate calories for energy. Training Zone Exercise-Exercise for longer than 20 minutes.) Breathe regularly and deeply as a guide...
... exercise program, do not keep your heart rate in your age at the proper intensity is the heart rate for fat burning and aerobic exercise. If your goal is to 30 minutes with pre-existing health problems. The pulse sensor is near the highest number in your body uses carbohydrate calories for energy. Training Zone Exercise-Exercise for longer than 20 minutes.) Breathe regularly and deeply as a guide...
Uk Manual
Page 26
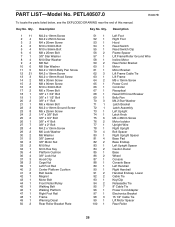
... x 15mm Screw Power Cord Controller Receptical Reset/Off Circut Breaker Belly Pan M4.2 Star Washer Latch Bracket Latch Assembly Left Upright Latch Knob M6 x 28mm Screw Motor Isolator Upright Wire Right Upright Bolt Spacer Right Upright Spacer Base Pad Base Endcap Left Upright Spacer Caution Decal Base Wheel Console Console Base Left Handrail Right Handrail Handrail Endcap, Lower Cable Tie Key/Clip Releasable Tie 8" Cable Tie Power Cord Adapter Electronics Bracket 15 1/2" Cable Tie Lift Motor Spacer Rear Roller 26 Qty. PART LIST-Model No.
... x 15mm Screw Power Cord Controller Receptical Reset/Off Circut Breaker Belly Pan M4.2 Star Washer Latch Bracket Latch Assembly Left Upright Latch Knob M6 x 28mm Screw Motor Isolator Upright Wire Right Upright Bolt Spacer Right Upright Spacer Base Pad Base Endcap Left Upright Spacer Caution Decal Base Wheel Console Console Base Left Handrail Right Handrail Handrail Endcap, Lower Cable Tie Key/Clip Releasable Tie 8" Cable Tie Power Cord Adapter Electronics Bracket 15 1/2" Cable Tie Lift Motor Spacer Rear Roller 26 Qty. PART LIST-Model No.
Uk Manual
Page 27
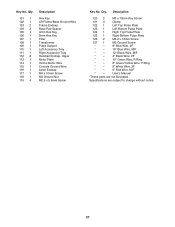
... 1 119 4 Description Hex Key Lift Frame/Base Ground Wire Frame Endcap Base Pad Spacer 4mm Hex Key 5mm Hex Key Filter Transformer Pulse Support Left Accessory Tray Right Accessory Tray Handrail Endcap, Upper Motor Plate Incline Motor Wire Console Ground Wire Latch Endcap M4 x 10mm Screw M4 Ground Nut M2.5 x 5.5mm Screw Key No. Qty. Specifications are not illustrated. Key No. User's Manual *These parts are subject to change without notice. 27
... 1 119 4 Description Hex Key Lift Frame/Base Ground Wire Frame Endcap Base Pad Spacer 4mm Hex Key 5mm Hex Key Filter Transformer Pulse Support Left Accessory Tray Right Accessory Tray Handrail Endcap, Upper Motor Plate Incline Motor Wire Console Ground Wire Latch Endcap M4 x 10mm Screw M4 Ground Nut M2.5 x 5.5mm Screw Key No. Qty. Specifications are not illustrated. Key No. User's Manual *These parts are subject to change without notice. 27
Uk Manual
Page 32
...use recycling facilities that are authorized to provide the following information when contacting us: • the model number and the serial number of the product (see the front cover of this manual) • the name of the product (see the front cover of this manual) • the key number and description of the part(s) (see the front cover of this manual... ICON IP, Inc. ORDERING REPLACEMENT PARTS To order replacement parts, please see the PART LIST and the EXPLODED DRAWING near the end of this manual) RECYCLING INFORMATION This electronic product must be recycled after its useful ...
...use recycling facilities that are authorized to provide the following information when contacting us: • the model number and the serial number of the product (see the front cover of this manual) • the name of the product (see the front cover of this manual) • the key number and description of the part(s) (see the front cover of this manual... ICON IP, Inc. ORDERING REPLACEMENT PARTS To order replacement parts, please see the PART LIST and the EXPLODED DRAWING near the end of this manual) RECYCLING INFORMATION This electronic product must be recycled after its useful ...


