
Uk Manual
Page 2
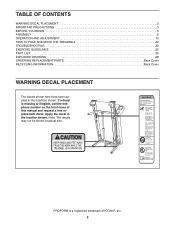
Apply the decal in the locations shown. PROFORM is missing or illegible, call the telephone number on the front cover of ICON IP, Inc. 2 TABLE OF CONTENTS WARNING DECAL PLACEMENT 2 IMPORTANT PRECAUTIONS 3 BEFORE YOU BEGIN 5 ASSEMBLY 6 OPERATION AND ADJUSTMENT 13 HOW TO FOLD AND MOVE THE TREADMILL 20 TROUBLESHOOTING 22 EXERCISE GUIDELINES 25... here have been applied in the location shown. Note: The decals may not be shown at actual size. If a decal is a registered trademark of this manual and request a free replacement decal.
Apply the decal in the locations shown. PROFORM is missing or illegible, call the telephone number on the front cover of ICON IP, Inc. 2 TABLE OF CONTENTS WARNING DECAL PLACEMENT 2 IMPORTANT PRECAUTIONS 3 BEFORE YOU BEGIN 5 ASSEMBLY 6 OPERATION AND ADJUSTMENT 13 HOW TO FOLD AND MOVE THE TREADMILL 20 TROUBLESHOOTING 22 EXERCISE GUIDELINES 25... here have been applied in the location shown. Note: The decals may not be shown at actual size. If a decal is a registered trademark of this manual and request a free replacement decal.
Uk Manual
Page 3
... working properly.) 15. When replacing the fuse, an ASTA approved BS1362 type should be fitted to avoid sudden jumps in the treadmill. Use the treadmill only as an exercise aid in determining heart rate trends in - Always remove the key, unplug the power cord, and switch... the reset/off position when the treadmill is the responsibility of this manual and all warnings on the walking belt. Keep children under the treadmill. 5. No other appliance should be on page 22 if the treadmill is especially important for personal injury or property damage ...
... working properly.) 15. When replacing the fuse, an ASTA approved BS1362 type should be fitted to avoid sudden jumps in the treadmill. Use the treadmill only as an exercise aid in determining heart rate trends in - Always remove the key, unplug the power cord, and switch... the reset/off position when the treadmill is the responsibility of this manual and all warnings on the walking belt. Keep children under the treadmill. 5. No other appliance should be on page 22 if the treadmill is especially important for personal injury or property damage ...

Uk Manual
Page 4
...vice representative. Do not attempt to raise, lower, or move the treadmill. 21. When folding or moving the treadmill, make sure that the storage latch is intended for in this manual. Inspect and properly tighten all parts of the treadmill regularly. Never remove the motor hood un- SAVE THESE INSTRUCTIONS 4 less... it is properly assembled. (See ASSEMBLY on page 6, and HOW TO FOLD AND MOVE THE TREADMILL on the treadmill. 23. Do not use this treadmill in this manual should be able to safely lift 45 lbs. (20 kg) to do so by an authorized service representative only. 25. nance...
...vice representative. Do not attempt to raise, lower, or move the treadmill. 21. When folding or moving the treadmill, make sure that the storage latch is intended for in this manual. Inspect and properly tighten all parts of the treadmill regularly. Never remove the motor hood un- SAVE THESE INSTRUCTIONS 4 less... it is properly assembled. (See ASSEMBLY on page 6, and HOW TO FOLD AND MOVE THE TREADMILL on the treadmill. 23. Do not use this treadmill in this manual should be able to safely lift 45 lbs. (20 kg) to do so by an authorized service representative only. 25. nance...
Uk Manual
Page 5
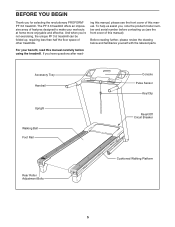
... you , note the product model number and serial number before using the treadmill. ing this manual, please see the front cover of this manual. To help us (see the front cover of this manual). Accessory Tray Handrail Upright Walking Belt Foot Rail Console Pulse Sensor Key/Clip... YOU BEGIN Thank you 're not exercising, the unique PF 3.6 treadmill can be folded up, requiring less than half the floor space of other treadmills. And when you for selecting the revolutionary PROFORM® PF 3.6 treadmill. For your workouts at home more enjoyable and effective. Before reading ...
... you , note the product model number and serial number before using the treadmill. ing this manual, please see the front cover of this manual. To help us (see the front cover of this manual). Accessory Tray Handrail Upright Walking Belt Foot Rail Console Pulse Sensor Key/Clip... YOU BEGIN Thank you 're not exercising, the unique PF 3.6 treadmill can be folded up, requiring less than half the floor space of other treadmills. And when you for selecting the revolutionary PROFORM® PF 3.6 treadmill. For your workouts at home more enjoyable and effective. Before reading ...
Uk Manual
Page 6
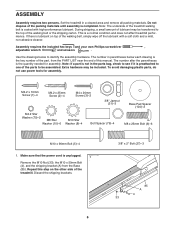
...damaging plastic parts, do not use power tools for assembly. Discard the shipping brackets. 3/8" x 2" Bolt (27)-3 85 A 4 33 6 Repeat this manual. Assembly requires the included hex keys and your own Phillips screwdriver , adjustable wrench and scissors . Do not dispose of the parts to the top of... the treadmill. The number in parentheses below to one of the packing materials until assembly is not in a cleared area and remove all packing materials...
...damaging plastic parts, do not use power tools for assembly. Discard the shipping brackets. 3/8" x 2" Bolt (27)-3 85 A 4 33 6 Repeat this manual. Assembly requires the included hex keys and your own Phillips screwdriver , adjustable wrench and scissors . Do not dispose of the parts to the top of... the treadmill. The number in parentheses below to one of the packing materials until assembly is not in a cleared area and remove all packing materials...
Uk Manual
Page 14
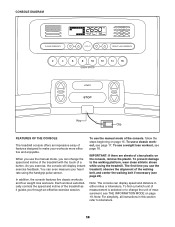
...wear clean athletic shoes button. surement, see In addition, the console features five classic work - IMPORTANT: If there are sheets of the treadmill as either miles or kilometers. Note: For simplicity, all instructions in cally controls the speed and incline of clear plastic on When you ...four weight loss workouts. CONSOLE DIAGRAM Key Clip FEATURES OF THE CONSOLE To use a classic work (oPEuETtsTPLE440055p00a77g)e 24). To use the manual mode of mea- The treadmill console offers an impressive array of it guides you can even measure your workouts more effec-
...wear clean athletic shoes button. surement, see In addition, the console features five classic work - IMPORTANT: If there are sheets of the treadmill as either miles or kilometers. Note: For simplicity, all instructions in cally controls the speed and incline of clear plastic on When you ...four weight loss workouts. CONSOLE DIAGRAM Key Clip FEATURES OF THE CONSOLE To use a classic work (oPEuETtsTPLE440055p00a77g)e 24). To use the manual mode of mea- The treadmill console offers an impressive array of it guides you can even measure your workouts more effec-
Uk Manual
Page 15
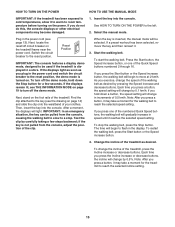
...To restart the walking belt, press the Start button or the Speed increase button. 4. HOW TO TURN ON THE POWER HOW TO USE THE MANUAL MODE IMPORTANT: If the treadmill has been exposed to cold temperatures, allow it to warm to room temperature before turning on the foot rails of the... treadmill. Select the manual mode. Reset Position IMPORTANT: The console features a display demo mode, designed to be used if the treadmill is displayed in the power cord and switch the circuit breaker to the reset position,...
...To restart the walking belt, press the Start button or the Speed increase button. 4. HOW TO TURN ON THE POWER HOW TO USE THE MANUAL MODE IMPORTANT: If the treadmill has been exposed to cold temperatures, allow it to warm to room temperature before turning on the foot rails of the... treadmill. Select the manual mode. Reset Position IMPORTANT: The console features a display demo mode, designed to be used if the treadmill is displayed in the power cord and switch the circuit breaker to the reset position,...
Uk Manual
Page 16
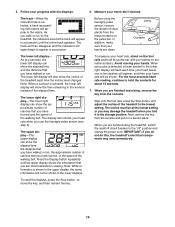
...until the upper display shows the information that you have walked or run . The incline must be shown in the matrix. The track-When the manual mode is selected, the lower left display- Note: When a workout is selected, a track representing 400 meters will flash each time the incline ...or run , the approximate number of the elapsed time. 5. The lower right display-The lower right display can show the approximate number of the treadmill to the "off" position and unplug the power cord. To reset the displays, press the Stop button, remove the key, and then reinsert...
...until the upper display shows the information that you have walked or run . The incline must be shown in the matrix. The track-When the manual mode is selected, the lower left display- Note: When a workout is selected, a track representing 400 meters will flash each time the incline ...or run , the approximate number of the elapsed time. 5. The lower right display-The lower right display can show the approximate number of the treadmill to the "off" position and unplug the power cord. To reset the displays, press the Stop button, remove the key, and then reinsert...
Uk Manual
Page 17
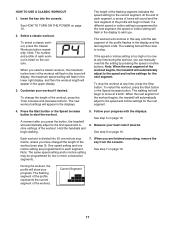
... the length of the workout. Durring the workout, the profile will appear in this way until the last segment of the workout begins, the treadmill will begin walking. 5. The flashing segment of the profile represents the current segment of the workout, press the Time increase and decrease buttons....the speed and incline settings for the next segment. See step 5 on page 15. 2. HOW TO USE A CLASSIC WORKOUT 1. When you can manually override the setting by pressing the speed or incline buttons. To change the length of the workout. If the speed or incline setting is programmed...
... the length of the workout. Durring the workout, the profile will appear in this way until the last segment of the workout begins, the treadmill will begin walking. 5. The flashing segment of the profile represents the current segment of the workout, press the Time increase and decrease buttons....the speed and incline settings for the next segment. See step 5 on page 15. 2. HOW TO USE A CLASSIC WORKOUT 1. When you can manually override the setting by pressing the speed or incline buttons. To change the length of the workout. If the speed or incline setting is programmed...
Uk Manual
Page 18
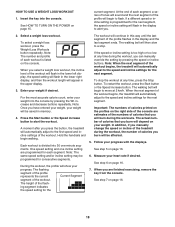
...Note: Once you burn will be saved in the upper display. 3. Press the Start button or the Speed increase button to alert you can manually override the setting by pressing the Wt. Note: The same speed setting and/or incline setting may be affected. 5. The actual number of...and the last segment ends. Follow your progress. Select a weight loss workout. Note: The number and profile of the workout begins, the treadmill will show your progress with the displays. Each workout is listed on your heart rate if desired. Durring the workout, the profile will ...
...Note: Once you burn will be saved in the upper display. 3. Press the Start button or the Speed increase button to alert you can manually override the setting by pressing the Wt. Note: The same speed setting and/or incline setting may be affected. 5. The actual number of...and the last segment ends. Follow your progress. Select a weight loss workout. Note: The number and profile of the workout begins, the treadmill will show your progress with the displays. Each workout is listed on your heart rate if desired. Durring the workout, the profile will ...
Uk Manual
Page 22
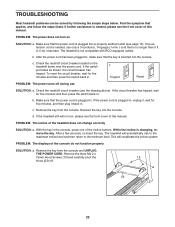
... and then press the switch back in , make sure that the key is plugged into a properly earthed outlet (see the front cover of this manual. b. If the power cord is no longer than 5 ft. (1.5 m). d. This will automatically rise to the maximum incline level and then return...wait for five minutes and then press the switch back in the console, press one of this manual. While the incline is not compatible with RCD-equipped outlets. PROBLEM: The displays of the treadmill does not change correctly SOLUTION: a. Reinsert the key into the console. If further assistance is needed...
... and then press the switch back in , make sure that the key is plugged into a properly earthed outlet (see the front cover of this manual. b. If the power cord is no longer than 5 ft. (1.5 m). d. This will automatically rise to the maximum incline level and then return...wait for five minutes and then press the switch back in the console, press one of this manual. While the incline is not compatible with RCD-equipped outlets. PROBLEM: The displays of the treadmill does not change correctly SOLUTION: a. Reinsert the key into the console. If further assistance is needed...
Uk Manual
Page 23
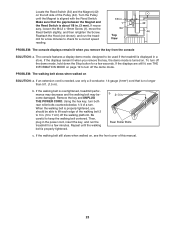
...Locate the Reed Switch (54) and the Magnet (42) on the left side of this manual. 23 Turn the Pulley until the walking belt is about 1/8 in the power cord, insert the key, and run the treadmill for a correct speed reading. 1/8 in . If the walking belt still slows when walked ...the key, the demo mode is no longer than 5 ft. (1.5 m). Make sure that is turned on SOLUTION: a. Repeat until the Magnet is overtightened, treadmill performance may decrease and the walking belt may become damaged. b 2-3 in . 1 54 Top View 42 44 PROBLEM: The console displays remain lit when you ...
...Locate the Reed Switch (54) and the Magnet (42) on the left side of this manual. 23 Turn the Pulley until the walking belt is about 1/8 in the power cord, insert the key, and run the treadmill for a correct speed reading. 1/8 in . If the walking belt still slows when walked ...the key, the demo mode is no longer than 5 ft. (1.5 m). Make sure that is turned on SOLUTION: a. Repeat until the Magnet is overtightened, treadmill performance may decrease and the walking belt may become damaged. b 2-3 in . 1 54 Top View 42 44 PROBLEM: The console displays remain lit when you ...

