Installation Manual
Page 3
... the antenna or cable system is grounded so as an improper adjustment of other controls may corrode the cabinet. When replacement parts are unable to insert the plug fully into a grounding type power outlet. WALL OR CEILING MOUNTING - The product should be situated away from the wall outlet and refer servicing to qualified service personnel under the following the operating instructions. A ANTENNA DISCHARGE...
... the antenna or cable system is grounded so as an improper adjustment of other controls may corrode the cabinet. When replacement parts are unable to insert the plug fully into a grounding type power outlet. WALL OR CEILING MOUNTING - The product should be situated away from the wall outlet and refer servicing to qualified service personnel under the following the operating instructions. A ANTENNA DISCHARGE...
Installation Manual
Page 4
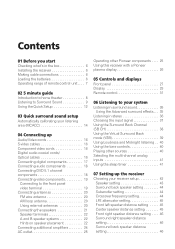
...box 6 Installing the receiver 6 Making cable connections 6 Loading the batteries 6 Operating range of remote control unit. . . . 7 02 5 minute guide Introduction to home theater 8 Listening to Surround Sound 9 Using the Quick Setup 12 03 Quick surround sound setup Automatically calibrating your listening area (MCACC 14 04 Connecting up Audio/Video cords 16 S-video cables 16 Component video cords 16 Digital audio coaxial cords/ Optical cables 16 Connecting digital components 17 Connecting audio components 18 Connecting DVD 5.1 channel components 18 Connecting video components 19...
...box 6 Installing the receiver 6 Making cable connections 6 Loading the batteries 6 Operating range of remote control unit. . . . 7 02 5 minute guide Introduction to home theater 8 Listening to Surround Sound 9 Using the Quick Setup 12 03 Quick surround sound setup Automatically calibrating your listening area (MCACC 14 04 Connecting up Audio/Video cords 16 S-video cables 16 Component video cords 16 Digital audio coaxial cords/ Optical cables 16 Connecting digital components 17 Connecting audio components 18 Connecting DVD 5.1 channel components 18 Connecting video components 19...

Installation Manual
Page 5
... channel levels for listening modes 50 Using the SR+ mode with a Pioneer plasma display 51 08 Using the tuner Listening to the radio 53 Improving FM stereo sound 53 Tuning directly to a station 53 Saving station presets 54 Naming station presets 54 Listening to station presets 55 10 Controlling the rest of your system Setting the remote to control other components 57 Selecting preset codes directly 57 Programming signals from other remote controls 58 Erasing one of the remote control button settings 59 Erasing all of the remote control presets 60 Direct function...
... channel levels for listening modes 50 Using the SR+ mode with a Pioneer plasma display 51 08 Using the tuner Listening to the radio 53 Improving FM stereo sound 53 Tuning directly to a station 53 Saving station presets 54 Naming station presets 54 Listening to station presets 55 10 Controlling the rest of your system Setting the remote to control other components 57 Selecting preset codes directly 57 Programming signals from other remote controls 58 Erasing one of the remote control button settings 59 Erasing all of the remote control presets 60 Direct function...
Installation Manual
Page 9
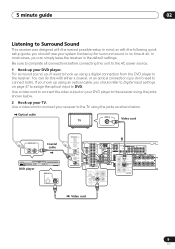
... INPUT CD-R IN /TAPE / MD SUB WOOFER PREOUT Video cord 9 En For surround sound, you should have your DVD player to the receiver using the jacks as shown below . 2 Hook up your TV. You can simply leave the receiver in the default settings. If you hook up using an optical cable, you 'll want to hook up for surround sound in no time at all connections before connecting this with the following quick setup guide, you should refer to Digital input settings...
... INPUT CD-R IN /TAPE / MD SUB WOOFER PREOUT Video cord 9 En For surround sound, you should have your DVD player to the receiver using the jacks as shown below . 2 Hook up your TV. You can simply leave the receiver in the default settings. If you hook up using an optical cable, you 'll want to hook up for surround sound in no time at all connections before connecting this with the following quick setup guide, you should refer to Digital input settings...
Installation Manual
Page 10
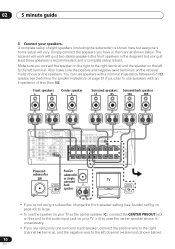
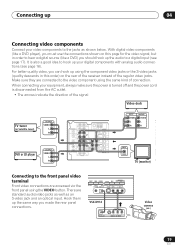
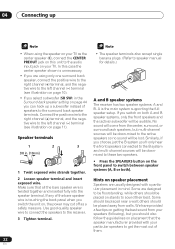
... IN / TAPE / MD VIDEO CONTROL DVD 5.1CH INPUT IN OUT DVR/ VCR OUT IN MONITOR TV/ OUT SAT IN SUB WOOFER DVD PREOUT /LD IN S-VIDEO Y PB PR Y PB PR R R CENTER (T V / SAT)IN ø FRONT SURROUND PREOUT S R FRONT L P E A K A E R CENTER R SURROUND BACK L R SURROUND L SINGLE SEE INSTRUCTION MANUAL R FRONT L B IN PLAY S R AUDIO L AC OUTLET Powered Passive subwoofer subwoofer SW or single surround INPUT back speaker TV AUDIO IN • If you're not using a subwoofer, change the front speaker setting (see Switching the speaker impedance on...
... IN / TAPE / MD VIDEO CONTROL DVD 5.1CH INPUT IN OUT DVR/ VCR OUT IN MONITOR TV/ OUT SAT IN SUB WOOFER DVD PREOUT /LD IN S-VIDEO Y PB PR Y PB PR R R CENTER (T V / SAT)IN ø FRONT SURROUND PREOUT S R FRONT L P E A K A E R CENTER R SURROUND BACK L R SURROUND L SINGLE SEE INSTRUCTION MANUAL R FRONT L B IN PLAY S R AUDIO L AC OUTLET Powered Passive subwoofer subwoofer SW or single surround INPUT back speaker TV AUDIO IN • If you're not using a subwoofer, change the front speaker setting (see Switching the speaker impedance on...

Installation Manual
Page 11
... to your DVD player or source discs, you can hook up a subwoofer instead of speakers to STANDARD (it isn't, press DVD on the remote control to set to the surround back speaker terminals. Make sure you've set -see Listening in the Quick surround sound setup on page 12 if you want multi-channel surround sound. 11 En Check the manual that the DVD input is selected. VSX-D914 model only - See also Choosing your receiver setup on page...
... to your DVD player or source discs, you can hook up a subwoofer instead of speakers to STANDARD (it isn't, press DVD on the remote control to set to the surround back speaker terminals. Make sure you've set -see Listening in the Quick surround sound setup on page 12 if you want multi-channel surround sound. 11 En Check the manual that the DVD input is selected. VSX-D914 model only - See also Choosing your receiver setup on page...
Installation Manual
Page 14
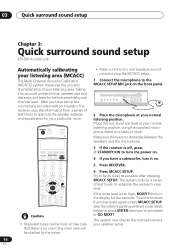
... level is no obstacles between the speakers and the microphone. The system now checks the microphone and your normal listening position. After you have a subwoofer, turn the power on. 4 If you 're prompted to the MCACC SETUP MIC jack on the front panel. STATION TUNING ADVANCED STEREO/ STANDARD SURROUND DIRECT SIGNAL MIDNIGHT/ SELECT LOUDNESS SPEAKERS SB CH MODE MULTI JOG TONE QUICK SETUP TUNER EDIT CLASS BAND LISTENING MODE MPX INPUT ATT FL DIMMER MCACC SETUP MIC DIGITAL IN VIDEO INPUT S-VIDEO VIDEO L AUDIO R MULTI...
... level is no obstacles between the speakers and the microphone. The system now checks the microphone and your normal listening position. After you have a subwoofer, turn the power on. 4 If you 're prompted to the MCACC SETUP MIC jack on the front panel. STATION TUNING ADVANCED STEREO/ STANDARD SURROUND DIRECT SIGNAL MIDNIGHT/ SELECT LOUDNESS SPEAKERS SB CH MODE MULTI JOG TONE QUICK SETUP TUNER EDIT CLASS BAND LISTENING MODE MPX INPUT ATT FL DIMMER MCACC SETUP MIC DIGITAL IN VIDEO INPUT S-VIDEO VIDEO L AUDIO R MULTI...
Installation Manual
Page 15
... auto surround setup. • Using the MCACC system to set up your speaker system overwrites any previous settings you had for the STANDARD or ADVANCED SURROUND modes. • When the STANDARD or ADVANCED SURROUND mode is selected, you can correct the setting manually using CH SELECT (to check channel levels) or by the ERR message (see below ) or simply press ENTER when you have connected a subwoofer, it will end up . 7 Use...
... auto surround setup. • Using the MCACC system to set up your speaker system overwrites any previous settings you had for the STANDARD or ADVANCED SURROUND modes. • When the STANDARD or ADVANCED SURROUND mode is selected, you can correct the setting manually using CH SELECT (to check channel levels) or by the ERR message (see below ) or simply press ENTER when you have connected a subwoofer, it will end up . 7 Use...
Installation Manual
Page 17
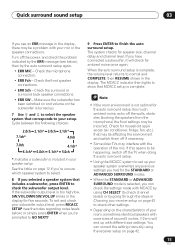
... TV / SA T IN DVD /LD FRONT D V D 5.1CH REC INPUT CD-R IN / TAPE / MD IN PLAY R AUDIO L VIDEO CENTER SUB WOOFER AM LOOP ANTENNA MONITOR OUT OUT CONTROL R L SURROUND DVD 5.1CH INPUT MONITO IN OUT DVR/ VCR OUT IN MONITOR TV/ OUT SAT IN SUB WOOFER DVD PREOUT /LD IN S-VIDEO S P E A K A E R S Y P R FRONT L DVD player DIGITAL OUT COAX • If you have one digital output jack which is a matter of the signal. We also recommend hooking up your digital components as well.
... TV / SA T IN DVD /LD FRONT D V D 5.1CH REC INPUT CD-R IN / TAPE / MD IN PLAY R AUDIO L VIDEO CENTER SUB WOOFER AM LOOP ANTENNA MONITOR OUT OUT CONTROL R L SURROUND DVD 5.1CH INPUT MONITO IN OUT DVR/ VCR OUT IN MONITOR TV/ OUT SAT IN SUB WOOFER DVD PREOUT /LD IN S-VIDEO S P E A K A E R S Y P R FRONT L DVD player DIGITAL OUT COAX • If you have one digital output jack which is a matter of the signal. We also recommend hooking up your digital components as well.
Installation Manual
Page 19
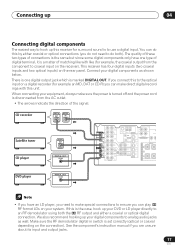
... quality video, you can hook up using the VIDEO button. STEREO/ DIRECT SIGNAL MIDNIGHT/ SELECT LOUDNESS SPEAKERS SB CH MODE MULTI JOG TONE QUICK SETUP ODE MCACC VIDEO INPUT SETUP MIC DIGITAL IN S-VIDEO VIDEO L AUDIO R VSX-D914 DIGITAL OUT V L R VIDEO OUTPUT Video camera (etc.) 19 En Make sure they are standard audio/video jacks as well as shown below. There are connected to the jacks as an S-video jack and an optical input. When connecting your equipment, always make sure the power is turned off and the power cord is...
... quality video, you can hook up using the VIDEO button. STEREO/ DIRECT SIGNAL MIDNIGHT/ SELECT LOUDNESS SPEAKERS SB CH MODE MULTI JOG TONE QUICK SETUP ODE MCACC VIDEO INPUT SETUP MIC DIGITAL IN S-VIDEO VIDEO L AUDIO R VSX-D914 DIGITAL OUT V L R VIDEO OUTPUT Video camera (etc.) 19 En Make sure they are standard audio/video jacks as well as shown below. There are connected to the jacks as an S-video jack and an optical input. When connecting your equipment, always make sure the power is turned off and the power cord is...
Installation Manual
Page 22
... the Surround back speaker setting on page 44 you can hook up • When using the speaker on your TV as a safety measure. We have provided a few tips on getting the best sound from your speakers (following), but multi-channel sources will be down-mixed to speaker manual for details.) A and B speaker systems The receiver has two speaker systems: A and B. Use good quality speaker wire to connect the speakers to the receiver. 3 Tighten...
... the Surround back speaker setting on page 44 you can hook up • When using the speaker on your TV as a safety measure. We have provided a few tips on getting the best sound from your speakers (following), but multi-channel sources will be down-mixed to speaker manual for details.) A and B speaker systems The receiver has two speaker systems: A and B. Use good quality speaker wire to connect the speakers to the receiver. 3 Tighten...
Installation Manual
Page 28
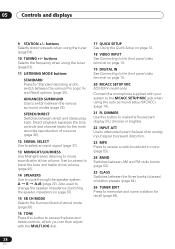
... change the speaker impedence (Switching the speaker impedance on page 67). 15 SB CH MODE Selects the Surround back channel mode (page 38). 16 TONE Press this button to access the bass and treble controls, which you can then adjust with the MULTI JOG dial. 17 QUICK SETUP See Using the Quick Setup on page 12. 18 VIDEO INPUT See Connecting to the front panel video terminal on page 19. 19 DIGITAL IN See Connecting to the front panel video...
... change the speaker impedence (Switching the speaker impedance on page 67). 15 SB CH MODE Selects the Surround back channel mode (page 38). 16 TONE Press this button to access the bass and treble controls, which you can then adjust with the MULTI JOG dial. 17 QUICK SETUP See Using the Quick Setup on page 12. 18 VIDEO INPUT See Connecting to the front panel video terminal on page 19. 19 DIGITAL IN See Connecting to the front panel video...
Installation Manual
Page 32
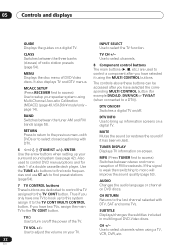
... menus. Use the TUNE +/- Thus if you have one TV to hook up to a DTV)). TV Use to access) Switches between the tuner AM and FM bands (page 53). TV VOL +/- TUNER DISPLAY Displays TV information on a digital TV. MPX (Press TUNER first to turn on/off . MENU Displays the disc menu of radio station presets (page 54). Use to select channels. 8 Component control buttons The main buttons ( , , etc.) are dedicated to control the TV assigned to control DVD menus...
... menus. Use the TUNE +/- Thus if you have one TV to hook up to a DTV)). TV Use to access) Switches between the tuner AM and FM bands (page 53). TV VOL +/- TUNER DISPLAY Displays TV information on a digital TV. MPX (Press TUNER first to turn on/off . MENU Displays the disc menu of radio station presets (page 54). Use to select channels. 8 Component control buttons The main buttons ( , , etc.) are dedicated to control the TV assigned to control DVD menus...
Installation Manual
Page 36
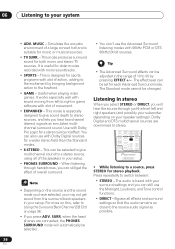
... CHSELECT LEVEL EFFECT RECEIVER • While listening to a source, press STEREO for a stereo surround effect. 06 Listening to your speaker settings). MUSIC - The Standard mode cannot be selected to give sound depth to stereo sources, and lets you press ADV. Listening in your setup. • PHONES SURROUND - Use with Dolby Digital sources for each Advanced Surround mode. Useful when playing video games. It works especially well with sound moving from the surround back speakers in stereo When you select STEREO or DIRECT, you...
... CHSELECT LEVEL EFFECT RECEIVER • While listening to a source, press STEREO for a stereo surround effect. 06 Listening to your speaker settings). MUSIC - The Standard mode cannot be selected to give sound depth to stereo sources, and lets you press ADV. Listening in your setup. • PHONES SURROUND - Use with Dolby Digital sources for each Advanced Surround mode. Useful when playing video games. It works especially well with sound moving from the surround back speakers in stereo When you select STEREO or DIRECT, you...
Installation Manual
Page 40
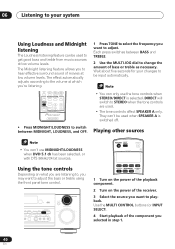
... can be used when SPEAKER A is selected. Playing other sources • You can't use the tone controls when STEREO/DIRECT is switched off. GNAL MIDNIGHT/ ELECT LOUDNESS SPEAKERS SB CH MODE MULTI JOG TONE QUICK SETUP CACC UP MIC DIGITAL IN VIDEO INPUT S-VIDEO VIDEO L AUDIO R ENTER MULTI JOG MASTER VOLUME DOWN UP RECEIVER INPUT SELECT SOURCE DVD/LD TV/SAT DVR/VCR TVCONT MULTI CONTROL CD CD-R/TAPE TUNER RECEIVER 1 Turn on the power of the playback component. 2 Turn on what you are used to get good bass and treble from music sources at...
... can be used when SPEAKER A is selected. Playing other sources • You can't use the tone controls when STEREO/DIRECT is switched off. GNAL MIDNIGHT/ ELECT LOUDNESS SPEAKERS SB CH MODE MULTI JOG TONE QUICK SETUP CACC UP MIC DIGITAL IN VIDEO INPUT S-VIDEO VIDEO L AUDIO R ENTER MULTI JOG MASTER VOLUME DOWN UP RECEIVER INPUT SELECT SOURCE DVD/LD TV/SAT DVR/VCR TVCONT MULTI CONTROL CD CD-R/TAPE TUNER RECEIVER 1 Turn on the power of the playback component. 2 Turn on what you are used to get good bass and treble from music sources at...

Installation Manual
Page 45
... Sends bass frequencies below 100 Hz to the subwoofer (or L speakers). 150 Hz Sends bass frequencies below 150 Hz to the subwoofer (or L speakers). 200 Hz Sends bass frequencies below 200 Hz to prevent the ultra-low bass tones from distorting the sound from the speakers. The center speaker is selected ( appears in the LFE attenuator setting • Default setting: 0 dB Dolby Digital and DTS audio sources include ultra-low bass tones. This means that the sound from the front and center speakers...
... Sends bass frequencies below 100 Hz to the subwoofer (or L speakers). 150 Hz Sends bass frequencies below 150 Hz to the subwoofer (or L speakers). 200 Hz Sends bass frequencies below 200 Hz to prevent the ultra-low bass tones from distorting the sound from the speakers. The center speaker is selected ( appears in the LFE attenuator setting • Default setting: 0 dB Dolby Digital and DTS audio sources include ultra-low bass tones. This means that the sound from the front and center speakers...

Installation Manual
Page 53
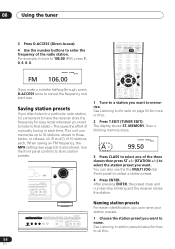
... frequency directly using the automatic (search) and manual (step) tuning functions. Each press switches the band between FM and AM. 3 Tune to a station. INPUT ATT FL DIMMER +10 D.ACCESS TOP MENU SETUP TUNE SR DISC ENTER CLASS MENU DTVMENU ST T.EDIT ENTER ST MCACC SETUP BAND GUIDE TUNE TV CONTROL RETURN TV VOL INPUT SELECT TV CH VOL DTVON/OFF REC DTVINFO MUTE TUNER DISPLAY REC STOP MPX CHRETURN AUDIO SUBTITLE HDD DVD CH CH RECEIVER CONTROL...
... frequency directly using the automatic (search) and manual (step) tuning functions. Each press switches the band between FM and AM. 3 Tune to a station. INPUT ATT FL DIMMER +10 D.ACCESS TOP MENU SETUP TUNE SR DISC ENTER CLASS MENU DTVMENU ST T.EDIT ENTER ST MCACC SETUP BAND GUIDE TUNE TV CONTROL RETURN TV VOL INPUT SELECT TV CH VOL DTVON/OFF REC DTVINFO MUTE TUNER DISPLAY REC STOP MPX CHRETURN AUDIO SUBTITLE HDD DVD CH CH RECEIVER CONTROL...
Installation Manual
Page 54
... FM frequency, the MPX setting (see page 53) is also stored. Use the front panel controls to 106.00 (FM), press 1, 0, 6, 0, 0. STEREO TUNED SP A 99.50 3 Press CLASS to select one of the three classes then press ST +/- (STATION +/-) to select the station preset you want to listen to do this . 2 Press T.EDIT (TUNER EDIT). SPEAKERS SB CH MODE MULTI JOG TONE QUICK SETUP VIDEO INPUT S-VIDEO VIDEO L AUDIO R ENTER MULTI JOG MASTER VOLUME DOWN UP DVD...
... FM frequency, the MPX setting (see page 53) is also stored. Use the front panel controls to 106.00 (FM), press 1, 0, 6, 0, 0. STEREO TUNED SP A 99.50 3 Press CLASS to select one of the three classes then press ST +/- (STATION +/-) to select the station preset you want to listen to do this . 2 Press T.EDIT (TUNER EDIT). SPEAKERS SB CH MODE MULTI JOG TONE QUICK SETUP VIDEO INPUT S-VIDEO VIDEO L AUDIO R ENTER MULTI JOG MASTER VOLUME DOWN UP DVD...
Installation Manual
Page 56
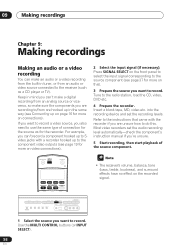
... signal. 56 En STATION TUNING ADVANCED STEREO/ STANDARD SURROUND DIRECT SIGNAL MIDNIGHT/ SELECT LOUDNESS SPEAKERS SB CH MODE MULTI JOG TONE QUICK SETUP TUNER EDIT CLASS BAND LISTENING MODE MPX INPUT ATT FL DIMMER MCACC SETUP MIC DIGITAL IN VIDEO INPUT S-VIDEO VIDEO L AUDIO R MULTI JOG 1 Select the source you can 't record a component hooked up to use the same type of the source component. into the recording device and set the audio recording level automatically-check the component's instruction manual if you can 't make a digital recording from an analog source...
... signal. 56 En STATION TUNING ADVANCED STEREO/ STANDARD SURROUND DIRECT SIGNAL MIDNIGHT/ SELECT LOUDNESS SPEAKERS SB CH MODE MULTI JOG TONE QUICK SETUP TUNER EDIT CLASS BAND LISTENING MODE MPX INPUT ATT FL DIMMER MCACC SETUP MIC DIGITAL IN VIDEO INPUT S-VIDEO VIDEO L AUDIO R MULTI JOG 1 Select the source you can 't record a component hooked up to use the same type of the source component. into the recording device and set the audio recording level automatically-check the component's instruction manual if you can 't make a digital recording from an analog source...
Installation Manual
Page 59
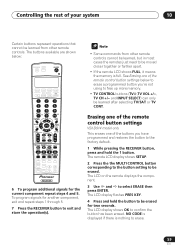
... from other remote controls. The LCD display flashes PRES KEY. 4 Press and hold the 1 button. Erasing one of the remote control button settings VSX-D914 model only This erases one of the remote control button settings below : RECEIVER INPUT SELECT SOURCE DVD/LD TV/SAT DVR/VCR TVCONT MULTI CONTROL CD CD-R/TAPE TUNER RECEIVER INPUT ATT FL DIMMER +10 D.ACCESS TOP MENU SETUP TUNE SR DISC ENTER CLASS MENU DTVMENU ST T.EDIT ENTER ST MCACC SETUP BAND GUIDE TUNE TV CONTROL RETURN TV VOL INPUT SELECT TV...
... from other remote controls. The LCD display flashes PRES KEY. 4 Press and hold the 1 button. Erasing one of the remote control button settings VSX-D914 model only This erases one of the remote control button settings below : RECEIVER INPUT SELECT SOURCE DVD/LD TV/SAT DVR/VCR TVCONT MULTI CONTROL CD CD-R/TAPE TUNER RECEIVER INPUT ATT FL DIMMER +10 D.ACCESS TOP MENU SETUP TUNE SR DISC ENTER CLASS MENU DTVMENU ST T.EDIT ENTER ST MCACC SETUP BAND GUIDE TUNE TV CONTROL RETURN TV VOL INPUT SELECT TV...


