Owner's Manual
Page 4
... range of remote control 10 02 Connecting your equipment Determining the speakers' application 11 Some tips for improving sound quality 11 Connecting the speakers 12 Connect the surround back or front height speakers (In case of VSX-1022 12 Connect the...using HDMI 17 Connecting your TV with no HDMI input 18 Connecting your DVD player with no HDMI output (VSX-1022 only 19 Connecting optional Bluetooth® ADAPTER 20 Connecting to the network through these operating instructions so you ..., iPad, and iTunes . . 38 About the DHCP server function 38 Authorizing this Pioneer product.
... range of remote control 10 02 Connecting your equipment Determining the speakers' application 11 Some tips for improving sound quality 11 Connecting the speakers 12 Connect the surround back or front height speakers (In case of VSX-1022 12 Connect the...using HDMI 17 Connecting your TV with no HDMI input 18 Connecting your DVD player with no HDMI output (VSX-1022 only 19 Connecting optional Bluetooth® ADAPTER 20 Connecting to the network through these operating instructions so you ..., iPad, and iTunes . . 38 About the DHCP server function 38 Authorizing this Pioneer product.
Owner's Manual
Page 5
... operations 53 Cautions on the Control with HDMI function 53 09 Controlling the rest of your system Setting the remote to control other components 54 Selecting preset codes directly 54 Clearing all the remote control settings 54 Controls for TVs 55 Controls for other components 55 Preset Code List 55 10 Additional...
... operations 53 Cautions on the Control with HDMI function 53 09 Controlling the rest of your system Setting the remote to control other components 54 Selecting preset codes directly 54 Clearing all the remote control settings 54 Controls for TVs 55 Controls for other components 55 Preset Code List 55 10 Additional...
Owner's Manual
Page 6
...Better sound using a digital connection from the Blu-ray Disc/DVD player to the receiver. • About the video converter (VSX-1022 only) (page 16) • About video outputs connection (VSX-822 only) (page 16) • Connecting a TV and playback components (page 17) • Connecting antennas (page ... have a big effect on a level and stable surface. Don't install it on the following supplied accessories: • Setup microphone • Remote control • AAA size IEC R03 dry cell batteries (to confirm system operation) x2 • AM loop antenna • FM wire antenna...
...Better sound using a digital connection from the Blu-ray Disc/DVD player to the receiver. • About the video converter (VSX-1022 only) (page 16) • About video outputs connection (VSX-822 only) (page 16) • Connecting a TV and playback components (page 17) • Connecting antennas (page ... have a big effect on a level and stable surface. Don't install it on the following supplied accessories: • Setup microphone • Remote control • AAA size IEC R03 dry cell batteries (to confirm system operation) x2 • AM loop antenna • FM wire antenna...
Owner's Manual
Page 7
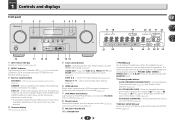
... iPhone iPad indicator Lights when an iPod/iPhone/iPad is connected and iPod/USB input is selected (page 27). 8 Remote sensor Receives the signals from the remote control (see Operating range of this unit. Switches between AM, FM ST (stereo) and FM MONO radio bands (page... 32). ADVANCED SURROUND - See Switching the speaker terminal on page 8. 15 16 5 Tuner control buttons BAND - TUNE / - The listening mode, sound volume, Speaker System (VSX-1022)/Pre Out (VSX...
... iPhone iPad indicator Lights when an iPod/iPhone/iPad is connected and iPod/USB input is selected (page 27). 8 Remote sensor Receives the signals from the remote control (see Operating range of this unit. Switches between AM, FM ST (stereo) and FM MONO radio bands (page... 32). ADVANCED SURROUND - See Switching the speaker terminal on page 8. 15 16 5 Tuner control buttons BAND - TUNE / - The listening mode, sound volume, Speaker System (VSX-1022)/Pre Out (VSX...
Owner's Manual
Page 9
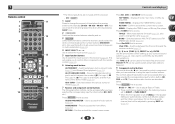
...current menu screen. Confirm and exit the current menu screen. HOME MENU - Displays the TOOLS menu of a Blu-ray Disc/DVD. BAND - 1 Remote control 1 RECEIVER SLEEP SOURCE 2 3 RECEIVER 4 INPUT 11 12 5 6 AUDIO PARAMETER TOP 7 MENU TUNE TOOLS MENU PRESET PRESET ENTER 8 HOME...controls can be adjusted by pressing SLEEP once. 2 RECEIVER Switches the receiver between standby and on. 3 RECEIVER Switches the remote to control the receiver (used to select the white commands above the number buttons (MIDNIGHT, etc)). This will be accessed after you...
...current menu screen. Confirm and exit the current menu screen. HOME MENU - Displays the TOOLS menu of a Blu-ray Disc/DVD. BAND - 1 Remote control 1 RECEIVER SLEEP SOURCE 2 3 RECEIVER 4 INPUT 11 12 5 6 AUDIO PARAMETER TOP 7 MENU TUNE TOOLS MENU PRESET PRESET ENTER 8 HOME...controls can be adjusted by pressing SLEEP once. 2 RECEIVER Switches the receiver between standby and on. 3 RECEIVER Switches the remote to control the receiver (used to select the white commands above the number buttons (MIDNIGHT, etc)). This will be accessed after you...
Owner's Manual
Page 10
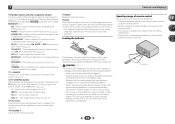
... - DIMMER - Use to adjust the level (page 48). Use to adjust the channel level. The listening mode, sound volume, Speaker System (VSX-1022)/Pre Out (VSX-822) setting or input name can be checked by selecting an input source. • The Speaker System/Pre Out setting may or may not...13 +Favorite Press while a song is located near a device that apply in such hazards as inside a car or near a heater. Batteries with another infrared remote control unit. 30° 30° 7 m (23 ft.) 10 Use to switch on /off Acoustic Calibration EQ setting (page 34). Observe the following...
... - DIMMER - Use to adjust the level (page 48). Use to adjust the channel level. The listening mode, sound volume, Speaker System (VSX-1022)/Pre Out (VSX-822) setting or input name can be checked by selecting an input source. • The Speaker System/Pre Out setting may or may not...13 +Favorite Press while a song is located near a device that apply in such hazards as inside a car or near a heater. Batteries with another infrared remote control unit. 30° 30° 7 m (23 ft.) 10 Use to switch on /off Acoustic Calibration EQ setting (page 34). Observe the following...
Owner's Manual
Page 23
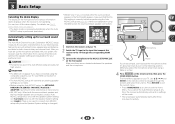
... made . • Before using the OSD screen for a surround back speaker connection.) HDMI iPod iPhone iPad Demo Mode menu on the remote control to navigate through the corresponding HDMI cable. 3 Connect the microphone to conduct Auto MCACC setup every time the Speaker System setting is ... normal listening position. You can turn off the demo display. Important • The OSD will be selected as an input source. • VSX-1022 only: When both channel delay and channel level. MCACC SETUP MIC VIDEO 5 V 2.1 A iPod iPhone USB iPad Microphone Tripod If you have...
... made . • Before using the OSD screen for a surround back speaker connection.) HDMI iPod iPhone iPad Demo Mode menu on the remote control to navigate through the corresponding HDMI cable. 3 Connect the microphone to conduct Auto MCACC setup every time the Speaker System setting is ... normal listening position. You can turn off the demo display. Important • The OSD will be selected as an input source. • VSX-1022 only: When both channel delay and channel level. MCACC SETUP MIC VIDEO 5 V 2.1 A iPod iPhone USB iPad Microphone Tripod If you have...
Owner's Manual
Page 25
...sure the setup microphone is selected, the A and DIGITAL indicators are the basic instructions for playback (see page 8). 25 Start by switching on the remote control, or by using a surround back speaker, 2D+PLIIx is displayed when playing Dolby Digital 5.1-channel signals, and DTS+NEO:6 is set to ...the connection is an MPEG audio option, set to H (HDMI). When using the front panel INPUT SELECTOR dial. When not using the remote control. It should hear surround sound. Selecting the audio input signal The audio input signal can also be selected by using INPUT SELECT ...
...sure the setup microphone is selected, the A and DIGITAL indicators are the basic instructions for playback (see page 8). 25 Start by switching on the remote control, or by using a surround back speaker, 2D+PLIIx is displayed when playing Dolby Digital 5.1-channel signals, and DTS+NEO:6 is set to ...the connection is an MPEG audio option, set to H (HDMI). When using the front panel INPUT SELECTOR dial. When not using the remote control. It should hear surround sound. Selecting the audio input signal The audio input signal can also be selected by using INPUT SELECT ...
Owner's Manual
Page 27
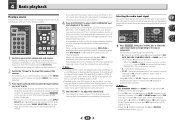
... to play, then press to the iPod controls for the software version of iPod/iPhone/iPad indicated on the website of Pioneer (http://pioneer.jp/homeav/support/ios/ na/). • Installing software versions other than indicated on the receiver and your iPod instead. Important •...TV through the corresponding HDMI cable. 3 Press iPod/USB to switch the receiver to start playback. Basic playback controls This receiver's remote control buttons can be restricted for some of the functions may result in the title are licensed for basic playback of noncopyrighted materials...
... to play, then press to the iPod controls for the software version of iPod/iPhone/iPad indicated on the website of Pioneer (http://pioneer.jp/homeav/support/ios/ na/). • Installing software versions other than indicated on the receiver and your iPod instead. Important •...TV through the corresponding HDMI cable. 3 Press iPod/USB to switch the receiver to start playback. Basic playback controls This receiver's remote control buttons can be restricted for some of the functions may result in the title are licensed for basic playback of noncopyrighted materials...
Owner's Manual
Page 28
Important • Pioneer cannot guarantee compatibility (operation and/or bus power) with the device) for ... device The maximum number of startup. After a slideshow launches, pressing ENTER toggles between turning the power on the remote control to switch the receiver to iPod/USB. • Use a dedicated AC adapter (supplied with all USB ...power. Stops the player and returns to play , then press to start playback. Basic playback controls This receiver's remote control buttons can select in Step 2 (below : • Switch the receiver off . • Select another input source...
Important • Pioneer cannot guarantee compatibility (operation and/or bus power) with the device) for ... device The maximum number of startup. After a slideshow launches, pressing ENTER toggles between turning the power on the remote control to switch the receiver to iPod/USB. • Use a dedicated AC adapter (supplied with all USB ...power. Stops the player and returns to play , then press to start playback. Basic playback controls This receiver's remote control buttons can select in Step 2 (below : • Switch the receiver off . • Select another input source...
Owner's Manual
Page 30
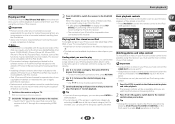
... the pairing mode. 6 Check to the Bluetooth-equipped device. Bluetooth wireless technology device using Bluetooth ADAPTER. Important • Pioneer does not guarantee proper connection and operation of your system and Bluetooth wireless technology device. • If the Bluetooth wireless... Bluetooth wireless technology: Digital music player + Bluetooth audio transmitter (sold commercially) Music data Bluetooth® ADAPTER This receiver Remote control operation Wireless music play and stop media, and perform other PIN code cannot be done with Bluetooth wireless technology. ...
... the pairing mode. 6 Check to the Bluetooth-equipped device. Bluetooth wireless technology device using Bluetooth ADAPTER. Important • Pioneer does not guarantee proper connection and operation of your system and Bluetooth wireless technology device. • If the Bluetooth wireless... Bluetooth wireless technology: Digital music player + Bluetooth audio transmitter (sold commercially) Music data Bluetooth® ADAPTER This receiver Remote control operation Wireless music play and stop media, and perform other PIN code cannot be done with Bluetooth wireless technology. ...
Owner's Manual
Page 31
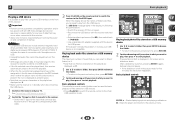
...stored on the Bluetooth wireless technology device. • Bluetooth wireless technology device should be displayed if ADAPTER input is shown in the remote control buttons. 4 While listening to a source, press RECEIVER then press ADV SURR repeatedly to select S.R AIR. Other trademarks ... S.R AIR, the optimum listening mode, is selected automatically. 2 Perform the connection operation from your friends can also be selected by PIONEER CORPORATION is not connected: WAITING appears in some case be displayed correctly. For more details on using Bluetooth wireless technology. AIR JAM...
...stored on the Bluetooth wireless technology device. • Bluetooth wireless technology device should be displayed if ADAPTER input is shown in the remote control buttons. 4 While listening to a source, press RECEIVER then press ADV SURR repeatedly to select S.R AIR. Other trademarks ... S.R AIR, the optimum listening mode, is selected automatically. 2 Perform the connection operation from your friends can also be selected by PIONEER CORPORATION is not connected: WAITING appears in some case be displayed correctly. For more details on using Bluetooth wireless technology. AIR JAM...
Owner's Manual
Page 32
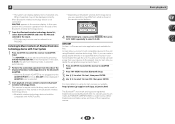
... several times to show you how to tune in to a station you to a station. The cursor at the first character position is blinking on the remote control to station presets above for more on this . This should improve the sound quality and allow you want . The preset number stop blinking and...
... several times to show you how to tune in to a station you to a station. The cursor at the first character position is blinking on the remote control to station presets above for more on this . This should improve the sound quality and allow you want . The preset number stop blinking and...
Owner's Manual
Page 38
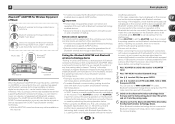
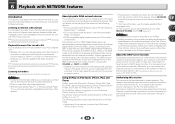
...AirPlay is adjusted from the controller. To use . *2 The following operations can be performed from the remote control of the receiver. (Press NETWORK to switch the remote control to the network operation mode.) *1: For more information on PCs or other components) Files stored ... stations You can also play back copyrighted audio files on the Pioneer website. The DMR mode is canceled if the remote control unit is required to use with the Pioneer products. Using AirPlay on the Pioneer website. Authorizing this receiver. This happens automatically when the receiver ...
...AirPlay is adjusted from the controller. To use . *2 The following operations can be performed from the remote control of the receiver. (Press NETWORK to switch the remote control to the network operation mode.) *1: For more information on PCs or other components) Files stored ... stations You can also play back copyrighted audio files on the Pioneer website. The DMR mode is canceled if the remote control unit is required to use with the Pioneer products. Using AirPlay on the Pioneer website. Authorizing this receiver. This happens automatically when the receiver ...
Owner's Manual
Page 39
Only audio files with the remote control of this receiver. Basic playback controls You can be correctly displayed. • About one minute is required between turning the power on this receiver ... files or Internet radio station to the list screen, press RETURN. Depending on the category currently being played back. Press NETWORK to switch the remote control to access the network. Note that supports Pandora • M.SERVER - It may not be stopped or interrupted depending on page 40. • Media server...
Only audio files with the remote control of this receiver. Basic playback controls You can be correctly displayed. • About one minute is required between turning the power on this receiver ... files or Internet radio station to the list screen, press RETURN. Depending on the category currently being played back. Press NETWORK to switch the remote control to access the network. Note that supports Pandora • M.SERVER - It may not be stopped or interrupted depending on page 40. • Media server...
Owner's Manual
Page 40
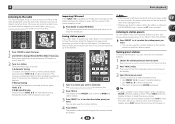
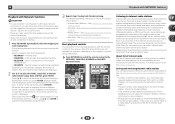
...registered on the receiver as favorite broadcast stations and can be registered in and from the Favorites folder 1 Press NETWORK to switch the remote control to the M.SERVER or NETRADIO operation mode. 2 With the track or Internet radio station you want to songs using Pandora Internet...Favorites folder. 40 The selected song is then registered in your computer and perform the registration process. After registering on the special Pioneer Internet radio site is personalized internet radio that only the audio files stored on components on the network can be registered and played....
...registered on the receiver as favorite broadcast stations and can be registered in and from the Favorites folder 1 Press NETWORK to switch the remote control to the M.SERVER or NETRADIO operation mode. 2 With the track or Internet radio station you want to songs using Pandora Internet...Favorites folder. 40 The selected song is then registered in your computer and perform the registration process. After registering on the special Pioneer Internet radio site is personalized internet radio that only the audio files stored on components on the network can be registered and played....
Owner's Manual
Page 41
... and Secondary DNS Server. You can check the network settings of your selection. 41 Proceed with a built-in DHCP server function), simply turn on the remote control to navigate through the screens and select menu items. Press RETURN to exit the current menu. • Press HOME MENU at any time to...
... and Secondary DNS Server. You can check the network settings of your selection. 41 Proceed with a built-in DHCP server function), simply turn on the remote control to navigate through the screens and select menu items. Press RETURN to exit the current menu. • Press HOME MENU at any time to...
Owner's Manual
Page 46
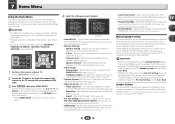
...surround sound (MCACC) on the remote control to navigate through the corresponding HDMI cable. 3 Press RECEIVER , then press HOME MENU. Specify which frequencies will be adjusted. Specify what you've connected to the component video inputs (page 49). • Speaker System (VSX-1022 only) - Specifies how you... speaker system settings to your speaker system (page 48). - Speaker System 5 . HDMI Setup 7 . HDMI Setup 6 . FL Demo Mode VSX-1022 VSX-822 • Auto MCACC - Specify the size and number of when the Pre Out Setting is set the HDMI input signal to Standby Through ...
...surround sound (MCACC) on the remote control to navigate through the corresponding HDMI cable. 3 Press RECEIVER , then press HOME MENU. Specify which frequencies will be adjusted. Specify what you've connected to the component video inputs (page 49). • Speaker System (VSX-1022 only) - Specifies how you... speaker system settings to your speaker system (page 48). - Speaker System 5 . HDMI Setup 7 . HDMI Setup 6 . FL Demo Mode VSX-1022 VSX-822 • Auto MCACC - Specify the size and number of when the Pre Out Setting is set the HDMI input signal to Standby Through ...
Owner's Manual
Page 48
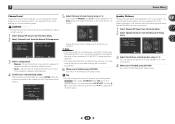
... 'Manual SP Setup' from the Home Menu. 2 Select 'Channel Level' from the Manual SP Setup menu. 2 . Channel Level Front L Center Front R Surround R Surr. on the remote control. Return 5 Adjust the level of each speaker using /. 7 Home Menu Channel Level Using the channel level settings, you can adjust the overall...
... 'Manual SP Setup' from the Home Menu. 2 Select 'Channel Level' from the Manual SP Setup menu. 2 . Channel Level Front L Center Front R Surround R Surr. on the remote control. Return 5 Adjust the level of each speaker using /. 7 Home Menu Channel Level Using the channel level settings, you can adjust the overall...
Owner's Manual
Page 52
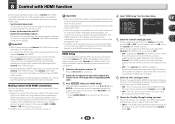
...• LAST - Important • When connecting this unit's Control with HDMI function. After completing all synchronized operations will work with Pioneer made Control with HDMI function. HDMI Setup You must adjust the settings of this receiver as well as "KURO LINK". • You... below ). In this unit. FL Demo Mode Control ON ARC [ OFF ] Standby Through [ --- ] VSX-1022 Return 5 Select the 'Control' setting you want . When using HDMI on the remote control to navigate through the corresponding HDMI cable. 3 Press RECEIVER , then press HOME MENU. This can only...
...• LAST - Important • When connecting this unit's Control with HDMI function. After completing all synchronized operations will work with Pioneer made Control with HDMI function. HDMI Setup You must adjust the settings of this receiver as well as "KURO LINK". • You... below ). In this unit. FL Demo Mode Control ON ARC [ OFF ] Standby Through [ --- ] VSX-1022 Return 5 Select the 'Control' setting you want . When using HDMI on the remote control to navigate through the corresponding HDMI cable. 3 Press RECEIVER , then press HOME MENU. This can only...


