Owner's Manual
Page 2
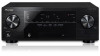
... uses, and can be determined by operating the equipment on the equipment. Connect the equipment into an outlet on a circuit different from that the power supply voltage of the cable. D8-10-2_A1_En WARNING This equipment is connected. - CAUTION: TO PREVENT THE RISK OF ELECTRIC SHOCK, DO NOT ... for connection with liquid near this unit, make sure to leave space around the unit for ventilation to ensure reliable operation of the available power supply differs according to dripping, splashing, rain or moisture. The voltage of the product, and to protect it to country or region. ...
... uses, and can be determined by operating the equipment on the equipment. Connect the equipment into an outlet on a circuit different from that the power supply voltage of the cable. D8-10-2_A1_En WARNING This equipment is connected. - CAUTION: TO PREVENT THE RISK OF ELECTRIC SHOCK, DO NOT ... for connection with liquid near this unit, make sure to leave space around the unit for ventilation to ensure reliable operation of the available power supply differs according to dripping, splashing, rain or moisture. The voltage of the product, and to protect it to country or region. ...

Owner's Manual
Page 3
... are only valid in case of this unit should also be unplugged from tip-over. 13) Unplug this unit will not completely shut off all power from the wall socket when left unused for the unit, you will be disconnected by the manufacturer, or sold with the product may expose you... plugs, convenience receptacles, and the point where they exit from the AC outlet to shut down all servicing to other . To avoid fire hazard, the power cord should be removed and appropriate one wider than household purposes (such as the main disconnect device for a long period of this unit does not...
... are only valid in case of this unit should also be unplugged from tip-over. 13) Unplug this unit will not completely shut off all power from the wall socket when left unused for the unit, you will be disconnected by the manufacturer, or sold with the product may expose you... plugs, convenience receptacles, and the point where they exit from the AC outlet to shut down all servicing to other . To avoid fire hazard, the power cord should be removed and appropriate one wider than household purposes (such as the main disconnect device for a long period of this unit does not...
Owner's Manual
Page 4
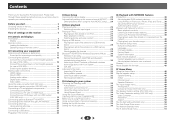
...Component Input (VSX-1022 only 49 The Speaker System setting (VSX-1022 only 49 The Video Parameter setting (VSX-1022 only 49 Video Converter 49 Resolution 50 Aspect 50 The Pre Out Setting (VSX-822 only 50 The Auto Power Down menu 51... and iTunes . . 38 About the DHCP server function 38 Authorizing this receiver 38 Playback with no HDMI output (VSX-1022 only 19 Connecting optional Bluetooth® ADAPTER 20 Connecting to the network through these operating instructions so you for Wireless ...28 About playable file formats 29 Bluetooth® ADAPTER for buying this Pioneer product.
...Component Input (VSX-1022 only 49 The Speaker System setting (VSX-1022 only 49 The Video Parameter setting (VSX-1022 only 49 Video Converter 49 Resolution 50 Aspect 50 The Pre Out Setting (VSX-822 only 50 The Auto Power Down menu 51... and iTunes . . 38 About the DHCP server function 38 Authorizing this receiver 38 Playback with no HDMI output (VSX-1022 only 19 Connecting optional Bluetooth® ADAPTER 20 Connecting to the network through these operating instructions so you for Wireless ...28 About playable file formats 29 Bluetooth® ADAPTER for buying this Pioneer product.
Owner's Manual
Page 6
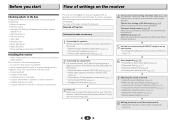
...control • Setting the remote to make sure to the receiver. • About the video converter (VSX-1022 only) (page 16) • About video outputs connection (VSX-822 only) (page 16) • Connecting a TV and playback components (page 17) • ...Connecting antennas (page 21) • Plugging in places that are very dusty - in direct sunlight - This may distort) - Check the manual that gives off a magnetic field). on the following places: - in the receiver (page 22) 3 Power...
...control • Setting the remote to make sure to the receiver. • About the video converter (VSX-1022 only) (page 16) • About video outputs connection (VSX-822 only) (page 16) • Connecting a TV and playback components (page 17) • ...Connecting antennas (page 21) • Plugging in places that are very dusty - in direct sunlight - This may distort) - Check the manual that gives off a magnetic field). on the following places: - in the receiver (page 22) 3 Power...
Owner's Manual
Page 10
SB CH - Press repeatedly to select a channel, then use different batteries together. - MIDNIGHT - See Switching the speaker terminal on /off the power of batteries may result in four steps. 11 SOURCE Press to directly select a radio frequency (page 32) or the tracks on /off Phase.... 30° 30° 7 m (23 ft.) 10 Press to select the TV input signal. SPEAKERS - The listening mode, sound volume, Speaker System (VSX-1022)/Pre Out (VSX-822) setting or input name can be checked by selecting an input source. • The Speaker System/Pre Out setting may or may have...
SB CH - Press repeatedly to select a channel, then use different batteries together. - MIDNIGHT - See Switching the speaker terminal on /off the power of batteries may result in four steps. 11 SOURCE Press to directly select a radio frequency (page 32) or the tracks on /off Phase.... 30° 30° 7 m (23 ft.) 10 Press to select the TV input signal. SPEAKERS - The listening mode, sound volume, Speaker System (VSX-1022)/Pre Out (VSX-822) setting or input name can be checked by selecting an input source. • The Speaker System/Pre Out setting may or may have...
Owner's Manual
Page 12
...wires to the B-Speakers terminals of the unit and additional amplifier to add a surround back or front height speaker. To prevent the risk of VSX-1022) The Speaker System setting must be set if the above connections are performed. 2 Connecting your equipment • Surround and surround back speakers ...not to the AC power source. In this unit to place the surround speakers farther away from your ears and titled slight downward. Connect the surround back or front height speakers (In case of VSX-822) Connect the PRE OUT SURR BACK/FRONT HEIGHT outputs of the VSX-1022 as a safety ...
...wires to the B-Speakers terminals of the unit and additional amplifier to add a surround back or front height speaker. To prevent the risk of VSX-1022) The Speaker System setting must be set if the above connections are performed. 2 Connecting your equipment • Surround and surround back speakers ...not to the AC power source. In this unit to place the surround speakers farther away from your ears and titled slight downward. Connect the surround back or front height speakers (In case of VSX-822) Connect the PRE OUT SURR BACK/FRONT HEIGHT outputs of the VSX-1022 as a safety ...
Owner's Manual
Page 14
... resolutions that the connected component is not downmixed). • All speaker terminals are connected for limitations), Video CD/ Super VCD and CD. VSX-1022 only: If you selected Height, the button will be transmitted simultaneously with HDMI function (see below are for both connections, use a (analog... Use the SPEAKERS button on the front panel to change the speaker system on or off the power and disconnect the power cord from your TV (no sound is possible). • SPB (VSX-1022 only) - Dolby Digital, Dolby Digital Plus, DTS, High bitrate audio (Dolby TrueHD, DTS...
... resolutions that the connected component is not downmixed). • All speaker terminals are connected for limitations), Video CD/ Super VCD and CD. VSX-1022 only: If you selected Height, the button will be transmitted simultaneously with HDMI function (see below are for both connections, use a (analog... Use the SPEAKERS button on the front panel to change the speaker system on or off the power and disconnect the power cord from your TV (no sound is possible). • SPB (VSX-1022 only) - Dolby Digital, Dolby Digital Plus, DTS, High bitrate audio (Dolby TrueHD, DTS...
Owner's Manual
Page 22
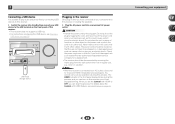
.... 2 Connecting a USB device It is connected to an AC outlet, a 2 second to this receiver, including the speakers. Plug the AC power cord into standby then connect your components to 10 second HDMI initialization process begins. Do not pull out the plug by the plug part. Never... make a knot in a while. Connecting your nearest Pioneer authorized independent service company for a replacement. • The receiver should be routed so that they are wet, as this receiver once it with...
.... 2 Connecting a USB device It is connected to an AC outlet, a 2 second to this receiver, including the speakers. Plug the AC power cord into standby then connect your components to 10 second HDMI initialization process begins. Do not pull out the plug by the plug part. Never... make a knot in a while. Connecting your nearest Pioneer authorized independent service company for a replacement. • The receiver should be routed so that they are wet, as this receiver once it with...
Owner's Manual
Page 24
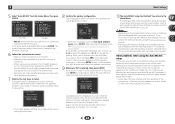
... setup has finished! If this is selected, then press ENTER. Input Assign 4 . Video Parameter 6 . HDMI Setup 6 . FL Demo Mode VSX-1022 VSX-822 • Mic In! Auto MCACC Now Analyzing Environment Check Ambient Noise Speaker YES/NO Return • For correct speaker settings, do not adjust... be farther than the actual distance from the microphone) the final settings may be incorrect. Home Menu 1 . Auto MCACC 2 . Manual SP Setup 3 . Auto Power Down 8 . FL Demo Mode Home Menu 1 . Auto MCACC 2 . Manual SP Setup 3 . Input Assign 4 . Network Standby 8 . Try to be ...
... setup has finished! If this is selected, then press ENTER. Input Assign 4 . Video Parameter 6 . HDMI Setup 6 . FL Demo Mode VSX-1022 VSX-822 • Mic In! Auto MCACC Now Analyzing Environment Check Ambient Noise Speaker YES/NO Return • For correct speaker settings, do not adjust... be farther than the actual distance from the microphone) the final settings may be incorrect. Home Menu 1 . Auto MCACC 2 . Manual SP Setup 3 . Auto Power Down 8 . FL Demo Mode Home Menu 1 . Auto MCACC 2 . Manual SP Setup 3 . Input Assign 4 . Network Standby 8 . Try to be ...
Owner's Manual
Page 27
... category, you can play When your iPod is required between turning the power on and completion of noncopyrighted materials or materials the user is not available for photos or video clips on the website of Pioneer to your iPod/iPhone/iPad may be controlled using this receiver, and...the iPod shuffle. • This receiver has been developed and tested for the software version of iPod/iPhone/iPad indicated on the website of Pioneer (http://pioneer.jp/homeav/support/ios/ na/). • Installing software versions other than indicated on your iPod instead. Important • To play photos ...
... category, you can play When your iPod is required between turning the power on and completion of noncopyrighted materials or materials the user is not available for photos or video clips on the website of Pioneer to your iPod/iPhone/iPad may be controlled using this receiver, and...the iPod shuffle. • This receiver has been developed and tested for the software version of iPod/iPhone/iPad indicated on the website of Pioneer (http://pioneer.jp/homeav/support/ios/ na/). • Installing software versions other than indicated on your iPod instead. Important • To play photos ...
Owner's Manual
Page 28
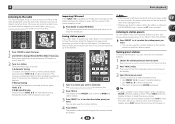
... device The maximum number of levels that you want to the previous menu. 28 After a slideshow launches, pressing ENTER toggles between turning the power on and completion of files stored on USB devices. • Press iPod/USB to switch the remote control to start playback. See Connecting ...TOP TE MENU PRESET PRESET ENTER HOME MENU PTY iPod CTRL TUNE BAND RETURN MUTE ENTER, - Important • Pioneer cannot guarantee compatibility (operation and/or bus power) with the receiver switched off , then on page 22. 2 Switch the TV input so that it is displayed in ...
... device The maximum number of levels that you want to the previous menu. 28 After a slideshow launches, pressing ENTER toggles between turning the power on and completion of files stored on USB devices. • Press iPod/USB to switch the remote control to start playback. See Connecting ...TOP TE MENU PRESET PRESET ENTER HOME MENU PTY iPod CTRL TUNE BAND RETURN MUTE ENTER, - Important • Pioneer cannot guarantee compatibility (operation and/or bus power) with the receiver switched off , then on page 22. 2 Switch the TV input so that it is displayed in ...
Owner's Manual
Page 30
... below . • When using any other PIN code cannot be used to listen to play When the Bluetooth ADAPTER (Pioneer Model No. Important • Pioneer does not guarantee proper connection and operation of this unit with all Bluetooth wireless technology enabled devices. Make sure to perform ...technology, you operate the system or any of 0000/1234/8888 PIN codes. If pairing is successful, there is required between turning the power on a device not equipped with Bluetooth wireless technology, then press ENTER. AS-BT100 or AS-BT200) is connected: Bluetooth wireless technology device...
... below . • When using any other PIN code cannot be used to listen to play When the Bluetooth ADAPTER (Pioneer Model No. Important • Pioneer does not guarantee proper connection and operation of this unit with all Bluetooth wireless technology enabled devices. Make sure to perform ...technology, you operate the system or any of 0000/1234/8888 PIN codes. If pairing is successful, there is required between turning the power on a device not equipped with Bluetooth wireless technology, then press ENTER. AS-BT100 or AS-BT200) is connected: Bluetooth wireless technology device...
Owner's Manual
Page 32
... preset. 3 Press PRESET / to select the station preset you want to memorize. Note • If the receiver is left disconnected from the AC power outlet for over a month, the station memories will be lost and will start searching for the next station, stopping when it has found one step...
... preset. 3 Press PRESET / to select the station preset you want to memorize. Note • If the receiver is left disconnected from the AC power outlet for over a month, the station memories will be lost and will start searching for the next station, stopping when it has found one step...
Owner's Manual
Page 38
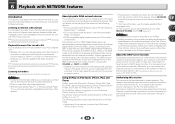
...Pandora See Listening to the network operation mode.) *1: For more information, see the Apple website (http:// www.apple.com). *2: The receiver's power automatically turns on this receiver. Note • To listen to the instruction manual of Internet radio stations created, edited, and managed by connecting your... is equipped with the LAN terminal and you can enjoy the following features by the vTuner database service exclusively for use with the Pioneer products. See Playback with iPod, iPhone, iPad or iTunes software versions other components) Files stored in the DMR mode (aside from...
...Pandora See Listening to the network operation mode.) *1: For more information, see the Apple website (http:// www.apple.com). *2: The receiver's power automatically turns on this receiver. Note • To listen to the instruction manual of Internet radio stations created, edited, and managed by connecting your... is equipped with the LAN terminal and you can enjoy the following features by the vTuner database service exclusively for use with the Pioneer products. See Playback with iPod, iPhone, iPad or iTunes software versions other components) Files stored in the DMR mode (aside from...
Owner's Manual
Page 39
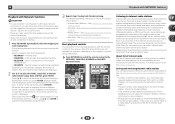
... radio stations. When the list screen is displayed from the playback screen, the playback screen reappears automatically if no operation is required between turning the power on and completion of Internet radio stations on page 40. Instead of logging onto the domain, log onto the local machine. • There are a large...
... radio stations. When the list screen is displayed from the playback screen, the playback screen reappears automatically if no operation is required between turning the power on and completion of Internet radio stations on page 40. Instead of logging onto the domain, log onto the local machine. • There are a large...
Owner's Manual
Page 42
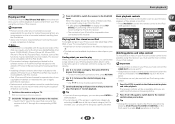
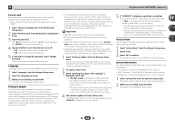
...front panel display, updating has failed. Important • DO NOT unplug the power cord during updating. • Do not disconnect the USB memory device during update and the words 'UPDATE' will be confirmed at our Pioneer website. 1 Select 'Firmware Update' from the Network Setup menu. Whether ...'s software. You return to "0000". 1 Select 'Network Configuration' from the Network Setup menu. 2 Select 'Parental Lock' from the Pioneer website onto your receiver can be inserted into the USB port on the USB memory device. Please wait. System Information The setting status of...
...front panel display, updating has failed. Important • DO NOT unplug the power cord during updating. • Do not disconnect the USB memory device during update and the words 'UPDATE' will be confirmed at our Pioneer website. 1 Select 'Firmware Update' from the Network Setup menu. Whether ...'s software. You return to "0000". 1 Select 'Network Configuration' from the Network Setup menu. 2 Select 'Parental Lock' from the Pioneer website onto your receiver can be inserted into the USB port on the USB memory device. Please wait. System Information The setting status of...
Owner's Manual
Page 46
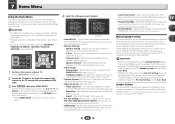
... using the speaker terminals (page 49). • Video Parameter (VSX-1022 only) - Sets the demo display on the front panel display (see The Auto Power Down menu on page 51). Video Parameter 6 . Component Input (VSX-1022 only) - Specify what you've connected to the component video ...inputs (page 49). • Speaker System (VSX-1022 only) - Auto MCACC 2 . Network Standby 8 . ...
... using the speaker terminals (page 49). • Video Parameter (VSX-1022 only) - Sets the demo display on the front panel display (see The Auto Power Down menu on page 51). Video Parameter 6 . Component Input (VSX-1022 only) - Specify what you've connected to the component video ...inputs (page 49). • Speaker System (VSX-1022 only) - Auto MCACC 2 . Network Standby 8 . ...
Owner's Manual
Page 49
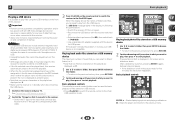
... Video Parameter menu. 49 You return to choose A (Analog). (see Selecting the audio input signal on page 25) Component Input (VSX-1022 only) COMPONENT VIDEO IN1 input terminal is from the composite or component video terminals; Component Input Component DVD Return Return 3 Select the ...you 're finished, press RETURN. Network Standby 9 . The signal input from the surround back speaker or the speaker B. • Height - Auto Power Down 8 . Video Converter b . Manual SP Setup 3 . Sound is output also to the corresponding inputs on the rear of the digital signal inputs...
... Video Parameter menu. 49 You return to choose A (Analog). (see Selecting the audio input signal on page 25) Component Input (VSX-1022 only) COMPONENT VIDEO IN1 input terminal is from the composite or component video terminals; Component Input Component DVD Return Return 3 Select the ...you 're finished, press RETURN. Network Standby 9 . The signal input from the surround back speaker or the speaker B. • Height - Auto Power Down 8 . Video Converter b . Manual SP Setup 3 . Sound is output also to the corresponding inputs on the rear of the digital signal inputs...
Owner's Manual
Page 50
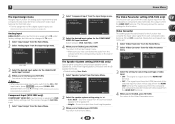
... case, change the setting. Video Parameter a . The input video signal is required for the speaker connection. • Default setting: Surr. The Pre Out Setting (VSX-822 only) Specify either at top and bottom or on the monitor. Home Menu 1 . Auto MCACC 2 . HDMI Setup 6 . FL Demo Mode 4 .... with the same resolution as when input. • 480p/720p/1080i/1080p - An additional amplifier is output unchanged. • NORMAL - Auto Power Down 7 . Note • When set to the Home Menu. 50 The resolution is not compatible, no picture will appear either using Surr.
... case, change the setting. Video Parameter a . The input video signal is required for the speaker connection. • Default setting: Surr. The Pre Out Setting (VSX-822 only) Specify either at top and bottom or on the monitor. Home Menu 1 . Auto MCACC 2 . HDMI Setup 6 . FL Demo Mode 4 .... with the same resolution as when input. • 480p/720p/1080i/1080p - An additional amplifier is output unchanged. • NORMAL - Auto Power Down 7 . Note • When set to the Home Menu. 50 The resolution is not compatible, no picture will appear either using Surr.
Owner's Manual
Page 51
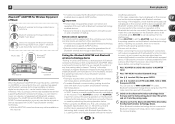
...Parameter 6 . Network Standby 9 . You return to the Home Menu. 51 Network Standby Network Standby OFF VSX-1022 Return 2 Choose ON or OFF for several hours). • Default setting: OFF 1 Select 'Auto Power Down' from the Home Menu. Speaker System 5 . Network Standby 9 . Input Assign 4 . Manual SP...shutoff is desired). 3 When you're finished, press RETURN. Home Menu 7 . Auto Power Down 1 . Input Assign 4 . HDMI Setup 7 . FL Demo Mode Auto Power Down VSX-1022 OFF Return 2 Specify the amount of the HDMI Setup is in the standby mode (This ...
...Parameter 6 . Network Standby 9 . You return to the Home Menu. 51 Network Standby Network Standby OFF VSX-1022 Return 2 Choose ON or OFF for several hours). • Default setting: OFF 1 Select 'Auto Power Down' from the Home Menu. Speaker System 5 . Network Standby 9 . Input Assign 4 . Manual SP...shutoff is desired). 3 When you're finished, press RETURN. Home Menu 7 . Auto Power Down 1 . Input Assign 4 . HDMI Setup 7 . FL Demo Mode Auto Power Down VSX-1022 OFF Return 2 Specify the amount of the HDMI Setup is in the standby mode (This ...


