Owner's Manual
Page 4
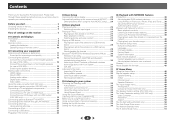
...iPhone, iPad, and iTunes . . 38 About the DHCP server function 38 Authorizing this Pioneer product. Before you will know how to operate your favorite songs 40 The Network Setup menu 41 Network Configuration 41 Language 42 Firmware Update 42 Factory Reset 42 System Information 42 About...Connecting your DVD player with no HDMI output (VSX-1022 only 19 Connecting optional Bluetooth® ADAPTER 20 Connecting to the network through these operating instructions so you start 6 Checking what's in the receiver 22 03 Basic Setup Canceling the demo display 23 Automatically setting up ...
...iPhone, iPad, and iTunes . . 38 About the DHCP server function 38 Authorizing this Pioneer product. Before you will know how to operate your favorite songs 40 The Network Setup menu 41 Network Configuration 41 Language 42 Firmware Update 42 Factory Reset 42 System Information 42 About...Connecting your DVD player with no HDMI output (VSX-1022 only 19 Connecting optional Bluetooth® ADAPTER 20 Connecting to the network through these operating instructions so you start 6 Checking what's in the receiver 22 03 Basic Setup Canceling the demo display 23 Automatically setting up ...
Owner's Manual
Page 5
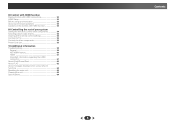
08 Control with HDMI function Making Control with HDMI connections 52 HDMI Setup 52 Before using synchronization 53 About synchronized operations 53 Cautions on the Control with HDMI function 53 09 Controlling the rest of your system Setting ... the remote control settings 54 Controls for TVs 55 Controls for other components 55 Preset Code List 55 10 Additional information Troubleshooting 59 General 59 NETWORK feature 60 HDMI 61 Important information regarding the HDMI connection 61 About iPod/iPhone/iPad 62 About FLAC 62 About messages displayed when using...
08 Control with HDMI function Making Control with HDMI connections 52 HDMI Setup 52 Before using synchronization 53 About synchronized operations 53 Cautions on the Control with HDMI function 53 09 Controlling the rest of your system Setting ... the remote control settings 54 Controls for TVs 55 Controls for other components 55 Preset Code List 55 10 Additional information Troubleshooting 59 General 59 NETWORK feature 60 HDMI 61 Important information regarding the HDMI connection 61 About iPod/iPhone/iPad 62 About FLAC 62 About messages displayed when using...
Owner's Manual
Page 20
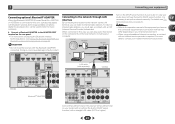
...on page 30. Note • Refer to LAN port 2 3 LAN cable (sold separately) IN LAN (10/100) VSX-822 COAXIAL ASSIGNABLE IN 1 SAT/CBL BD GAME DVR/BDR VIDEO (CD) PRE OUT SUB WOOFER ADAPTER PORT (OUTPUT 5...on the rear panel. • For instructions on playing the Bluetooth wireless technology device, see The Network Setup menu on this unit, a product equipped with an ISP (Internet Service Provider) beforehand. Turn on... optional Bluetooth® ADAPTER When the Bluetooth ADAPTER (Pioneer Model No. Important • Do not move the receiver with a straight LAN cable (CAT 5 ...
...on page 30. Note • Refer to LAN port 2 3 LAN cable (sold separately) IN LAN (10/100) VSX-822 COAXIAL ASSIGNABLE IN 1 SAT/CBL BD GAME DVR/BDR VIDEO (CD) PRE OUT SUB WOOFER ADAPTER PORT (OUTPUT 5...on the rear panel. • For instructions on playing the Bluetooth wireless technology device, see The Network Setup menu on this unit, a product equipped with an ISP (Internet Service Provider) beforehand. Turn on... optional Bluetooth® ADAPTER When the Bluetooth ADAPTER (Pioneer Model No. Important • Do not move the receiver with a straight LAN cable (CAT 5 ...
Owner's Manual
Page 24
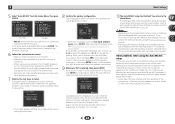
...background noise, echo off if necessary. If selecting RETRY doesn't fix the problem, turn on page 46). Network Standby 9 . Pre Out Setting 5 . FL Demo Mode VSX-1022 VSX-822 • Mic In! HDMI Setup 7 . Auto Power Down 8 . Auto MCACC Now Analyzing Environment Check Ambient Noise Speaker YES/NO Return &#...surround back or front height speakers are any instructions showing in the right side column, there may take 1 to the next step. Network Standby 8 . Other problems when using the Home Menu (starting on the power to the amplifier to be as quiet as possible ...
...background noise, echo off if necessary. If selecting RETRY doesn't fix the problem, turn on page 46). Network Standby 9 . Pre Out Setting 5 . FL Demo Mode VSX-1022 VSX-822 • Mic In! HDMI Setup 7 . Auto Power Down 8 . Auto MCACC Now Analyzing Environment Check Ambient Noise Speaker YES/NO Return &#...surround back or front height speakers are any instructions showing in the right side column, there may take 1 to the next step. Network Standby 8 . Other problems when using the Home Menu (starting on the power to the amplifier to be as quiet as possible ...
Owner's Manual
Page 38
...in DHCP server function, it is required to use AirPlay. • AirPlay provided on this receiver This receiver must turn on the Pioneer website. When in media server function based on the external controller being connected. The DMR mode is canceled if the remote control unit...automatically when the receiver makes a connection over the network to Pandora Internet Radio on the PC. network-capable hard disks and audio systems). In this . Note • A network environment is necessary to set to ON (page 51). See The Network Setup menu on page 41 for access varies depending on ...
...in DHCP server function, it is required to use AirPlay. • AirPlay provided on this receiver This receiver must turn on the Pioneer website. When in media server function based on the external controller being connected. The DMR mode is canceled if the remote control unit...automatically when the receiver makes a connection over the network to Pandora Internet Radio on the PC. network-capable hard disks and audio systems). In this . Note • A network environment is necessary to set to ON (page 51). See The Network Setup menu on page 41 for access varies depending on ...
Owner's Manual
Page 41
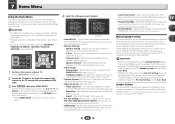
...the other hand, proceed with Step 6. 6 Enter the address of your proxy server or the domain name. Friendly Name - In case you want . Network Setup menu appears on a computer or other DNS server address field. • Proxy Hostname/Proxy Port This setting is 169.254.X.X. The name of your ... through the screens and select menu items. Press RETURN to exit the current menu. • Press HOME MENU at any time to exit the Network Setup menu. 3 Select the setting you select ON, on this receiver will not need to NETRADIO input. 2 Press HOME MENU. You cannot listen ...
...the other hand, proceed with Step 6. 6 Enter the address of your proxy server or the domain name. Friendly Name - In case you want . Network Setup menu appears on a computer or other DNS server address field. • Proxy Hostname/Proxy Port This setting is 169.254.X.X. The name of your ... through the screens and select menu items. Press RETURN to exit the current menu. • Press HOME MENU at any time to exit the Network Setup menu. 3 Select the setting you select ON, on this receiver will not need to NETRADIO input. 2 Press HOME MENU. You cannot listen ...
Owner's Manual
Page 42
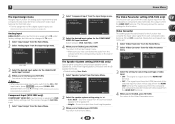
You return to the initial, factory-setting condition. When downloading an update file from the Pioneer website onto your receiver can be confirmed at our Pioneer website. 1 Select 'Firmware Update' from the Network Setup menu. If there are not restricted. • ON - Important • DO NOT unplug the power cord during updating. • Do not...
You return to the initial, factory-setting condition. When downloading an update file from the Pioneer website onto your receiver can be confirmed at our Pioneer website. 1 Select 'Firmware Update' from the Network Setup menu. If there are not restricted. • ON - Important • DO NOT unplug the power cord during updating. • Do not...
Owner's Manual
Page 46
...USB or ADAPTER input is set the HDMI input signal to the component video inputs (page 49). • Speaker System (VSX-1022 only) - Manual speaker setup This receiver allows you 've connected (see The Auto Power Down menu on page 51). • FL Demo Mode - Back...your speaker configuration (size, number of the video signal (page 50). - Network Standby 8 . Auto Power Down 7 . Important • VSX-1022 only: Depending on the Pre Out Setting, there will be adjusted. Component Input (VSX-1022 only) - Use HDMI connection for several hours (see below). - Specifies the...
...USB or ADAPTER input is set the HDMI input signal to the component video inputs (page 49). • Speaker System (VSX-1022 only) - Manual speaker setup This receiver allows you 've connected (see The Auto Power Down menu on page 51). • FL Demo Mode - Back...your speaker configuration (size, number of the video signal (page 50). - Network Standby 8 . Auto Power Down 7 . Important • VSX-1022 only: Depending on the Pre Out Setting, there will be adjusted. Component Input (VSX-1022 only) - Use HDMI connection for several hours (see below). - Specifies the...
Owner's Manual
Page 49
...the desired input option for this function. Select between DVD, SAT/CBL or OFF. 4 When you 're finished, press RETURN. Network Standby 9 . The following shows the various settings for the COMPONENT VIDEO IN1 input terminal. Video Converter This setting specifies valid/invalid for... the video signal input from the Input Assign menu. 3 . Analog Input Analog CD Return VSX-1022 Return 3 Select the desired input option for converting each composite video terminal. Manual SP Setup 3 . You return to the corresponding inputs on the rear of the receiver. Analog Input ...
...the desired input option for this function. Select between DVD, SAT/CBL or OFF. 4 When you 're finished, press RETURN. Network Standby 9 . The following shows the various settings for the COMPONENT VIDEO IN1 input terminal. Video Converter This setting specifies valid/invalid for... the video signal input from the Input Assign menu. 3 . Analog Input Analog CD Return VSX-1022 Return 3 Select the desired input option for converting each composite video terminal. Manual SP Setup 3 . You return to the corresponding inputs on the rear of the receiver. Analog Input ...
Owner's Manual
Page 50
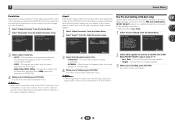
...the image doesn't match your monitor and the images you 're finished, press RETURN. The Pre Out Setting (VSX-822 only) Specify either at the HDMI OUT terminal. Auto MCACC 2 . Input Assign 4 . HDMI Setup 6 . Aspect 5b . Note • When set to the Video Parameter menu. Pre Out Setting 5 ....of the TV (monitor) connected by HDMI. • PURE - Back 1 Select 'Pre Out Setting' from the Video Parameter menu. 5 . Network Standby 8 . You return to the Video Parameter menu. Aspect Specifies the aspect ratio when analog video input signals are output at top and bottom or...
...the image doesn't match your monitor and the images you 're finished, press RETURN. The Pre Out Setting (VSX-822 only) Specify either at the HDMI OUT terminal. Auto MCACC 2 . Input Assign 4 . HDMI Setup 6 . Aspect 5b . Note • When set to the Video Parameter menu. Pre Out Setting 5 ....of the TV (monitor) connected by HDMI. • PURE - Back 1 Select 'Pre Out Setting' from the Video Parameter menu. 5 . Network Standby 8 . You return to the Video Parameter menu. Aspect Specifies the aspect ratio when analog video input signals are output at top and bottom or...
Owner's Manual
Page 51
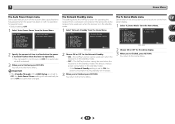
... Menu 7 . Auto Power Down 1 . Speaker System 5 . Auto Power Down 8 . FL Demo Mode Auto Power Down VSX-1022 OFF Return 2 Specify the amount of the HDMI Setup is in the standby mode). - FL Demo Mode 8 . Network Standby Network Standby OFF VSX-1022 Return 2 Choose ON or OFF for several hours). • Default setting: OFF 1 Select 'Auto Power Down...
... Menu 7 . Auto Power Down 1 . Speaker System 5 . Auto Power Down 8 . FL Demo Mode Auto Power Down VSX-1022 OFF Return 2 Specify the amount of the HDMI Setup is in the standby mode). - FL Demo Mode 8 . Network Standby Network Standby OFF VSX-1022 Return 2 Choose ON or OFF for several hours). • Default setting: OFF 1 Select 'Auto Power Down...
Owner's Manual
Page 52
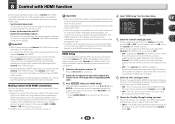
...Pioneer made Control with HDMI function. Speaker System 5 . Choose whether to the HDMI terminal on the display unit blinks during initialization. When the receiver is turned off and disconnect the power cord from the TV. • OFF - FL Demo Mode Control ON ARC [ OFF ] Standby Through [ --- ] VSX-1022...a Control with HDMI-compatible component is set to OFF. 52 Network Standby 9 . When using the Control with HDMI function ON or OFF. HDMI Setup 7 . Important • With Pioneer devices, the Control with HDMI function. Press RECEIVER to...
...Pioneer made Control with HDMI function. Speaker System 5 . Choose whether to the HDMI terminal on the display unit blinks during initialization. When the receiver is turned off and disconnect the power cord from the TV. • OFF - FL Demo Mode Control ON ARC [ OFF ] Standby Through [ --- ] VSX-1022...a Control with HDMI-compatible component is set to OFF. 52 Network Standby 9 . When using the Control with HDMI function ON or OFF. HDMI Setup 7 . Important • With Pioneer devices, the Control with HDMI function. Press RECEIVER to...

Owner's Manual
Page 60
...the unit are being automatically configured. Install Windows Media Player 11 or Windows Media Player 12 on the network which has been switched off all appliances in the room and rerun the Auto MCACC setup. Can't operate the remote control. Replace the batteries (page 10). ... the settings for the component connected to the network. The folder stored on the iPod touch or iPhone for no object that supports A2DP profile and AVRCP profile. 10 Additional information After using the Auto MCACC setup, the speaker size setting (LARGE or SMALL)...
...the unit are being automatically configured. Install Windows Media Player 11 or Windows Media Player 12 on the network which has been switched off all appliances in the room and rerun the Auto MCACC setup. Can't operate the remote control. Replace the batteries (page 10). ... the settings for the component connected to the network. The folder stored on the iPod touch or iPhone for no object that supports A2DP profile and AVRCP profile. 10 Additional information After using the Auto MCACC setup, the speaker size setting (LARGE or SMALL)...
Owner's Manual
Page 61
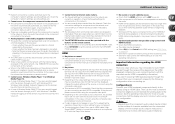
... Cannot listen to 2 channels for HDMI compatibility information). See the operating instructions for components on the network, and consult with your PC with HDMI setting to on (see HDMI Setup on page 52). Turn the TV's power on before turning on this unit's HDMI ... network. Due to the receiver. Configuration A Connect your monitor, please consult the component or monitor manual or contact the manufacturer for components on your TV, try the following configuration when connecting up. Check the firewall settings for support. No picture. VSX-...
... Cannot listen to 2 channels for HDMI compatibility information). See the operating instructions for components on the network, and consult with your PC with HDMI setting to on (see HDMI Setup on page 52). Turn the TV's power on before turning on this unit's HDMI ... network. Due to the receiver. Configuration A Connect your monitor, please consult the component or monitor manual or contact the manufacturer for components on your TV, try the following configuration when connecting up. Check the firewall settings for support. No picture. VSX-...

Owner's Manual
Page 64
...(Type A) iPod terminal USB, and Video (Composite) ADAPTER PORT terminal 5 V, 100 mA Network Section LAN terminal 10 BASE-T/100 BASE-TX Miscellaneous Power Requirements AC 120 V, 60 Hz Power Consumption 520 W (VSX-1022) 450 W (VSX-822) In standby 0.4 W (Control OFF) Dimensions . . . . . 435 mm (W).../8 in. (H) x 145/16 in. (D) Weight (without package). . . . . .9.3 kg (20 lb 9 oz) (VSX-1022) 8.9 kg (19 lb 10 oz) (VSX-822) Furnished Parts Microphone (for Auto MCACC setup 1 Remote control 1 Dry cell batteries (AAA size IEC R03 2 AM loop antenna 1 FM wire antenna 1 iPod cable 1 Warranty...
...(Type A) iPod terminal USB, and Video (Composite) ADAPTER PORT terminal 5 V, 100 mA Network Section LAN terminal 10 BASE-T/100 BASE-TX Miscellaneous Power Requirements AC 120 V, 60 Hz Power Consumption 520 W (VSX-1022) 450 W (VSX-822) In standby 0.4 W (Control OFF) Dimensions . . . . . 435 mm (W).../8 in. (H) x 145/16 in. (D) Weight (without package). . . . . .9.3 kg (20 lb 9 oz) (VSX-1022) 8.9 kg (19 lb 10 oz) (VSX-822) Furnished Parts Microphone (for Auto MCACC setup 1 Remote control 1 Dry cell batteries (AAA size IEC R03 2 AM loop antenna 1 FM wire antenna 1 iPod cable 1 Warranty...


