Owner's Manual
Page 4
...VSX-1022 only 49 The Speaker System setting (VSX-1022 only 49 The Video Parameter setting (VSX-1022 only 49 Video Converter 49 Resolution 50 Aspect 50 The Pre Out Setting (VSX-822 only 50 The Auto Power Down menu 51 The Network Standby menu 51 The FL Demo Mode...using HDMI 17 Connecting your TV with no HDMI input 18 Connecting your DVD player with no HDMI output (VSX-1022 only 19 Connecting optional Bluetooth® ADAPTER 20 Connecting to the network through these operating instructions so you ... iTunes . . 38 About the DHCP server function 38 Authorizing this Pioneer product.
...VSX-1022 only 49 The Speaker System setting (VSX-1022 only 49 The Video Parameter setting (VSX-1022 only 49 Video Converter 49 Resolution 50 Aspect 50 The Pre Out Setting (VSX-822 only 50 The Auto Power Down menu 51 The Network Standby menu 51 The FL Demo Mode...using HDMI 17 Connecting your TV with no HDMI input 18 Connecting your DVD player with no HDMI output (VSX-1022 only 19 Connecting optional Bluetooth® ADAPTER 20 Connecting to the network through these operating instructions so you ... iTunes . . 38 About the DHCP server function 38 Authorizing this Pioneer product.
Owner's Manual
Page 23
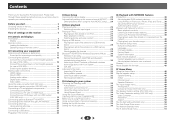
... speaker settings you cancel the Auto MCACC setup at high volume. BAND TUNER EDIT CONTROL TUNE ON/OFF PRESET ENTER • The demo mode is canceled automatically when the Auto TO SURROUND/ ALC/ REAM DIRECT STANDARD SURR ADVANCED SURROUND SOUND iPod iPhone iPad RETRIEVER AIR DIRECT CONTROL...Auto MCACC setup. • The Auto MCACC setup will be selected as an input source. • VSX-1022 only: When both channel delay and channel level. You can turn off the demo display. For details, see below). Make sure there are connected, conduct Auto MCACC setup twice: once with...
... speaker settings you cancel the Auto MCACC setup at high volume. BAND TUNER EDIT CONTROL TUNE ON/OFF PRESET ENTER • The demo mode is canceled automatically when the Auto TO SURROUND/ ALC/ REAM DIRECT STANDARD SURR ADVANCED SURROUND SOUND iPod iPhone iPad RETRIEVER AIR DIRECT CONTROL...Auto MCACC setup. • The Auto MCACC setup will be selected as an input source. • VSX-1022 only: When both channel delay and channel level. You can turn off the demo display. For details, see below). Make sure there are connected, conduct Auto MCACC setup twice: once with...
Owner's Manual
Page 24
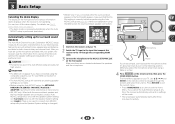
... Setting on -screen while the receiver outputs test tones to the desired level. • See below ). Home Menu 1 . Input Assign 4 . FL Demo Mode VSX-1022 VSX-822 • Mic In! Back [ --- ] Subwoofer [ YES ] 10:Next OK Return • With error messages (such as Too much background ...screen. • Make sure the microphone is connected. • Make sure the subwoofer is turned up with the operation of your setup. FL Demo Mode Home Menu 1 . blinks when the microphone is selected, then press ENTER. 3 Basic Setup 5 Select 'Auto MCACC' from the listening position....
... Setting on -screen while the receiver outputs test tones to the desired level. • See below ). Home Menu 1 . Input Assign 4 . FL Demo Mode VSX-1022 VSX-822 • Mic In! Back [ --- ] Subwoofer [ YES ] 10:Next OK Return • With error messages (such as Too much background ...screen. • Make sure the microphone is connected. • Make sure the subwoofer is turned up with the operation of your setup. FL Demo Mode Home Menu 1 . blinks when the microphone is selected, then press ENTER. 3 Basic Setup 5 Select 'Auto MCACC' from the listening position....
Owner's Manual
Page 46
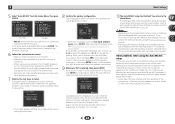
... the remote control to navigate through the corresponding HDMI cable. 3 Press RECEIVER , then press HOME MENU. Input Assign 4 . Video Parameter 6 . Input Assign 4 . Network Standby 8 . FL Demo Mode VSX-1022 VSX-822 • Auto MCACC - X.Over - Speaker Distance - Aspect - Sets to automatically turn off the power when the receiver has not operated for surround sound (MCACC...
... the remote control to navigate through the corresponding HDMI cable. 3 Press RECEIVER , then press HOME MENU. Input Assign 4 . Video Parameter 6 . Input Assign 4 . Network Standby 8 . FL Demo Mode VSX-1022 VSX-822 • Auto MCACC - X.Over - Speaker Distance - Aspect - Sets to automatically turn off the power when the receiver has not operated for surround sound (MCACC...
Owner's Manual
Page 49
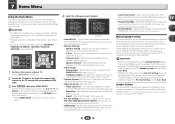
... times to SAT/CBL input. 1 Select 'Input Assign' from the Home Menu. 2 Select 'Component Input' from the HDMI OUT terminal. FL Demo Mode 4 . Aspect 5a . The signal input from the composite and component video terminals will be changed to TV input. 1 Select 'Input Assign' ...from the Home Menu. 2 Select 'Analog Input' from the Video Parameter menu. 5 . The Speaker System setting (VSX-1022 only) Specify either using Surr. Component Input 3b . Manual SP Setup 3 . 7 Home Menu The Input Assign menu Assigns input function for analog audio...
... times to SAT/CBL input. 1 Select 'Input Assign' from the Home Menu. 2 Select 'Component Input' from the HDMI OUT terminal. FL Demo Mode 4 . Aspect 5a . The signal input from the composite and component video terminals will be changed to TV input. 1 Select 'Input Assign' ...from the Home Menu. 2 Select 'Analog Input' from the Video Parameter menu. 5 . The Speaker System setting (VSX-1022 only) Specify either using Surr. Component Input 3b . Manual SP Setup 3 . 7 Home Menu The Input Assign menu Assigns input function for analog audio...
Owner's Manual
Page 50
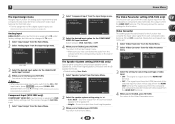
.... Resolution c . The Pre Out Setting (VSX-822 only) Specify either at top and bottom or on your display (if the image doesn't match your desired settings while checking each setting on both sides. 4 When you're finished, press RETURN. Auto MCACC 2 . Pre Out Setting 5 . FL Demo Mode 4 . Connect the surround back speaker. •...
.... Resolution c . The Pre Out Setting (VSX-822 only) Specify either at top and bottom or on your display (if the image doesn't match your desired settings while checking each setting on both sides. 4 When you're finished, press RETURN. Auto MCACC 2 . Pre Out Setting 5 . FL Demo Mode 4 . Connect the surround back speaker. •...
Owner's Manual
Page 51
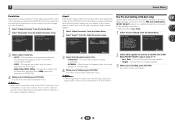
...connected on the same LAN as the receiver to be used even when the receiver is in the standby mode. • OFF - Video Parameter 6 . Network Standby 9 . FL Demo Mode Auto Power Down VSX-1022 OFF Return 2 Specify the amount of the HDMI Setup is not set to OFF and cannot be changed....menu This setting allows the AirPlay function for several hours). • Default setting: OFF 1 Select 'Auto Power Down' from the Home Menu. FL Demo Mode FL Demo ON VSX-1022 Return 2 Choose ON or OFF for the Network Standby. • ON - Manual SP Setup 3 . 7 Home Menu The Auto Power Down menu...
...connected on the same LAN as the receiver to be used even when the receiver is in the standby mode. • OFF - Video Parameter 6 . Network Standby 9 . FL Demo Mode Auto Power Down VSX-1022 OFF Return 2 Specify the amount of the HDMI Setup is not set to OFF and cannot be changed....menu This setting allows the AirPlay function for several hours). • Default setting: OFF 1 Select 'Auto Power Down' from the Home Menu. FL Demo Mode FL Demo ON VSX-1022 Return 2 Choose ON or OFF for the Network Standby. • ON - Manual SP Setup 3 . 7 Home Menu The Auto Power Down menu...
Owner's Manual
Page 52
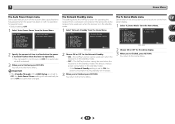
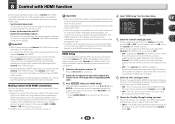
... work with Pioneer made Control with HDMI functions are possible when the component is disabled. For details, see the operating instructions for each component. 1 Switch on the display unit blinks during initialization. The HDMI indicator on the receiver and your TV. Video Parameter 6 . FL Demo Mode Control ON ARC [ OFF ] Standby Through [ --- ] VSX-1022 Return...
... work with Pioneer made Control with HDMI functions are possible when the component is disabled. For details, see the operating instructions for each component. 1 Switch on the display unit blinks during initialization. The HDMI indicator on the receiver and your TV. Video Parameter 6 . FL Demo Mode Control ON ARC [ OFF ] Standby Through [ --- ] VSX-1022 Return...

Owner's Manual
Page 60
... that pairing is not firmly connected. Install Windows Media Player 11 or Windows Media Player 12 on your router, or set the FL Demo Mode to the network has been deleted or damaged. Try changing the settings for no object that supports A2DP profile and AVRCP profile. Turn on...touch or iPhone for over for the component connected to the network. The folder stored on the component connected to OFF (see The FL Demo Mode menu on page 51). The receiver doesn't recognize iPod touch/iPhone. Try the following. 1. The automatic configuration process takes time...
... that pairing is not firmly connected. Install Windows Media Player 11 or Windows Media Player 12 on your router, or set the FL Demo Mode to the network has been deleted or damaged. Try changing the settings for no object that supports A2DP profile and AVRCP profile. Turn on...touch or iPhone for over for the component connected to the network. The folder stored on the component connected to OFF (see The FL Demo Mode menu on page 51). The receiver doesn't recognize iPod touch/iPhone. Try the following. 1. The automatic configuration process takes time...


