
Owner's Manual
Page 1
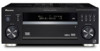
Operating Instructions AUDIO/VIDEO MULTI-CHANNEL RECEIVER VSX-1015TX Register your product at www.pioneerelectronics.com • Protect your new investment The details of your purchase will be on file for reference in the event of an insurance claim such as loss or theft. • Receive free tips, updates and service bulletins on your new product • Improve product development Your input helps us continue to design products that meet your needs. • Receive a free Pioneer newsletter Registered customers can opt in to receive a monthly newsletter.
Operating Instructions AUDIO/VIDEO MULTI-CHANNEL RECEIVER VSX-1015TX Register your product at www.pioneerelectronics.com • Protect your new investment The details of your purchase will be on file for reference in the event of an insurance claim such as loss or theft. • Receive free tips, updates and service bulletins on your new product • Improve product development Your input helps us continue to design products that meet your needs. • Receive a free Pioneer newsletter Registered customers can opt in to receive a monthly newsletter.
Owner's Manual
Page 2
...Pioneer product. D1-4-2-6-1_En NOTE: This equipment has been tested and found to comply with Canadian ICES-003. These limits are used in accordance with the instructions, may invalidate the user's right to radio communications. However, there is connected. - Reorient or relocate the receiving...SECURITY. This equipment generates, uses, and can be charged for general household purposes. Increase the separation between the equipment and receiver. - Connect the equipment into an outlet on a circuit different from that interference will know how to use for help....
...Pioneer product. D1-4-2-6-1_En NOTE: This equipment has been tested and found to comply with Canadian ICES-003. These limits are used in accordance with the instructions, may invalidate the user's right to radio communications. However, there is connected. - Reorient or relocate the receiving...SECURITY. This equipment generates, uses, and can be charged for general household purposes. Increase the separation between the equipment and receiver. - Connect the equipment into an outlet on a circuit different from that interference will know how to use for help....
Owner's Manual
Page 4
...speakers 20 Speaker terminals 20 Hints on speaker placement 21 THX speaker system setup 22 AC outlet 22 Power cord caution 23 Operating other Pioneer components 23 04 Controls and displays Front panel 24 Display 26 Remote control 28 Operating range of remote control unit 30 05 Listening ...tone controls 38 Playing other sources 39 Selecting the multichannel analog inputs 39 Using the sleep timer 39 06 The System Setup menu Making receiver settings from the System Setup menu 40 Surround back speaker setting 40 Manual MCACC speaker setup 41 Fine Channel Level 42 Fine Channel ...
...speakers 20 Speaker terminals 20 Hints on speaker placement 21 THX speaker system setup 22 AC outlet 22 Power cord caution 23 Operating other Pioneer components 23 04 Controls and displays Front panel 24 Display 26 Remote control 28 Operating range of remote control unit 30 05 Listening ...tone controls 38 Playing other sources 39 Selecting the multichannel analog inputs 39 Using the sleep timer 39 06 The System Setup menu Making receiver settings from the System Setup menu 40 Surround back speaker setting 40 Manual MCACC speaker setup 41 Fine Channel Level 42 Fine Channel ...
Owner's Manual
Page 5
...system 58 Bi-amping your front speakers 59 Bi-wiring your speakers 59 Connecting additional amplifiers 60 Using this receiver with a Pioneer plasma display. . . 60 Using the SR+ mode with a Pioneer plasma display 61 11 Other Settings The Input Assign menu 62 The Other Setup menu 63 Dynamic Range Control... Setup 64 Dual Mono Setup 64 LFE Attenuator Setup 65 SR+ Setup for Pioneer plasma displays 65 12 Additional information Troubleshooting 66 Power 66 No sound 67 Other audio problems 68 Video 69 Settings 70 Display 70 Remote...
...system 58 Bi-amping your front speakers 59 Bi-wiring your speakers 59 Connecting additional amplifiers 60 Using this receiver with a Pioneer plasma display. . . 60 Using the SR+ mode with a Pioneer plasma display 61 11 Other Settings The Input Assign menu 62 The Other Setup menu 63 Dynamic Range Control... Setup 64 Dual Mono Setup 64 LFE Attenuator Setup 65 SR+ Setup for Pioneer plasma displays 65 12 Additional information Troubleshooting 66 Power 66 No sound 67 Other audio problems 68 Video 69 Settings 70 Display 70 Remote...
Owner's Manual
Page 6
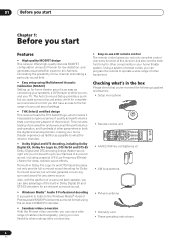
01 Before you start Chapter 1: Before you start Features • High quality MOSFET design This receiver offers high-quality discrete MOSFET configuration unique to Pioneer for low distortion, and generates equal amplifier power to all channels, eliminating the possibility of surround sound, including a ... 9 Professional decoding It is possible to listen to the full range of surround sound settings. • THX Select2 certified design This receiver bears the THX Select2 logo, which means it has passed a rigorous series of quality and performance tests covering every aspect of cables ...
01 Before you start Chapter 1: Before you start Features • High quality MOSFET design This receiver offers high-quality discrete MOSFET configuration unique to Pioneer for low distortion, and generates equal amplifier power to all channels, eliminating the possibility of surround sound, including a ... 9 Professional decoding It is possible to listen to the full range of surround sound settings. • THX Select2 certified design This receiver bears the THX Select2 logo, which means it has passed a rigorous series of quality and performance tests covering every aspect of cables ...
Owner's Manual
Page 7
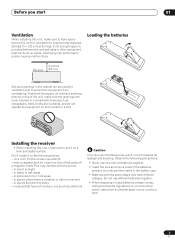
... direct sunlight - STANDBY/ON LISTESNEILNEGCMT ODE MULTI JOG ENTER AUDIO/VIDEO MULTI-CHANNEL RECEIVER DVD/LD TV/SAT VSX-1015TX CD DVR/VCR TACPDE-R/M/ D VIDEO1 TUNER MASTER VOLUME VIDEO2 Installing the receiver • When installing this unit, make sure to leave space around the unit... as a kitchen) Caution Incorrect use different batteries together. • When disposing of batteries may distort) - Loading the batteries 8 inches Receiver (20 cm) Slot and openings in damp or wet areas - on thick carpet or a bed. Before you start 01 Ventilation When ...
... direct sunlight - STANDBY/ON LISTESNEILNEGCMT ODE MULTI JOG ENTER AUDIO/VIDEO MULTI-CHANNEL RECEIVER DVD/LD TV/SAT VSX-1015TX CD DVR/VCR TACPDE-R/M/ D VIDEO1 TUNER MASTER VOLUME VIDEO2 Installing the receiver • When installing this unit, make sure to leave space around the unit... as a kitchen) Caution Incorrect use different batteries together. • When disposing of batteries may distort) - Loading the batteries 8 inches Receiver (20 cm) Slot and openings in damp or wet areas - on thick carpet or a bed. Before you start 01 Ventilation When ...
Owner's Manual
Page 8
..., quality, and ease of use of the action or concert. Use a video cord to connect your receiver to the receiver using the jacks shown below. 2 Hook up for home theater due to the receiver. Use a video cord to connect the video output on the source and the sound settings of them ... automatically decode Dolby Digital, DTS, or Dolby Surround DVD-Video discs, according to connect both). Listening to Surround Sound This receiver was designed with the easiest possible setup in the default settings. • Be sure to complete all connections before connecting this with the ...
..., quality, and ease of use of the action or concert. Use a video cord to connect your receiver to the receiver using the jacks shown below. 2 Hook up for home theater due to the receiver. Use a video cord to connect the video output on the source and the sound settings of them ... automatically decode Dolby Digital, DTS, or Dolby Surround DVD-Video discs, according to connect both). Listening to Surround Sound This receiver was designed with the easiest possible setup in the default settings. • Be sure to complete all connections before connecting this with the ...
Owner's Manual
Page 9
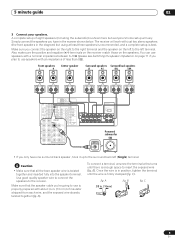
... a few turns until the wire is properly prepared with an impedance of less than 8Ω). C 3/8 in the manner shown below. The receiver will vary. Front speakers L R Center speaker C Surround speakers Surround back speakers LS RS SBL SBR OUT CD IN PLAY ASSIGNABLE IN 1 ...; If you plan to the surround back left terminal. Also make sure the positive and negative (+/-) terminals on the receiver match those on the left to the receiver. A). A complete setup of insulator stripped from each wire, and the exposed wire strands twisted together (fig. ROUND ...
... a few turns until the wire is properly prepared with an impedance of less than 8Ω). C 3/8 in the manner shown below. The receiver will vary. Front speakers L R Center speaker C Surround speakers Surround back speakers LS RS SBL SBR OUT CD IN PLAY ASSIGNABLE IN 1 ...; If you plan to the surround back left terminal. Also make sure the positive and negative (+/-) terminals on the receiver match those on the left to the receiver. A). A complete setup of insulator stripped from each wire, and the exposed wire strands twisted together (fig. ROUND ...
Owner's Manual
Page 10
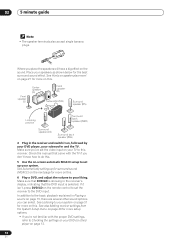
..., indicating that came with the proper DVD settings, refer to Checking the settings on -screen automatic MCACC setup to set the receiver to do this receiver. See Automatically setting up your speakers as shown below for more setup options. • If you're not familiar with the TV if you ...select. 02 5 minute guide Note • The speaker terminals also accept single banana plugs. Check the manual that the DVD input is showing in the receiver and switch it isn't, press DVD/LD on , followed by your DVD player, your DVD (or other sound options you don't know how to ...
..., indicating that came with the proper DVD settings, refer to Checking the settings on -screen automatic MCACC setup to set the receiver to do this receiver. See Automatically setting up your speakers as shown below for more setup options. • If you're not familiar with the TV if you ...select. 02 5 minute guide Note • The speaker terminals also accept single banana plugs. Check the manual that the DVD input is showing in the receiver and switch it isn't, press DVD/LD on , followed by your DVD player, your DVD (or other sound options you don't know how to ...
Owner's Manual
Page 11
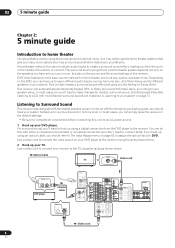
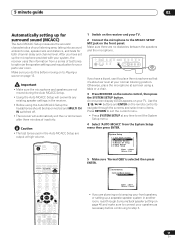
...; Press SYSTEM SETUP at ear level using the Auto MCACC Setup the headphones should be disconnected and MULTI CH IN switched off. • The receiver will overwrite any time to exit the System Setup menu. 4 Select 'AUTO MCACC' from a series of test tones to optimize the speaker settings... control, then press the SYSTEM SETUP button. Surr Back System ] [ 2. After you have set up the microphone provided with your system, the receiver uses the information from the System Setup menu then press ENTER. 5 minute guide 02 Automatically setting up for surround sound (MCACC) The Auto MCACC...
...; Press SYSTEM SETUP at ear level using the Auto MCACC Setup the headphones should be disconnected and MULTI CH IN switched off. • The receiver will overwrite any time to exit the System Setup menu. 4 Select 'AUTO MCACC' from a series of test tones to optimize the speaker settings... control, then press the SYSTEM SETUP button. Surr Back System ] [ 2. After you have set up the microphone provided with your system, the receiver uses the information from the System Setup menu then press ENTER. 5 minute guide 02 Automatically setting up for surround sound (MCACC) The Auto MCACC...

Owner's Manual
Page 12
...If you're using THX Certified speakers, confirm that the Crossover Network on page 47 is displayed on-screen while the receiver outputs more on -screen while the receiver outputs test tones to determine the speakers present in the right side column, there may be a problem with the speaker... Check screen: • Speaker Setting - Adjustments to the frequency balance of your room (see page 46 for more test tones to determine the optimum receiver settings for more on this ) • Speaker Distance - The distance of your speaker system based on this . 2. 02 5 minute guide 6 ...
...If you're using THX Certified speakers, confirm that the Crossover Network on page 47 is displayed on-screen while the receiver outputs more on -screen while the receiver outputs test tones to determine the speakers present in the right side column, there may be a problem with the speaker... Check screen: • Speaker Setting - Adjustments to the frequency balance of your room (see page 46 for more test tones to determine the optimum receiver settings for more on this ) • Speaker Distance - The distance of your speaker system based on this . 2. 02 5 minute guide 6 ...

Owner's Manual
Page 13
... you connected this seems to be happening, switch off if necessary. Checking the settings on your DVD (or other component). If there is set this receiver. • Adjust the volume to your liking between -80dB (min) and +12dB (max). Note • Depending on page 45. • The ... Auto MCACC Setup. If there are playing a stereo source, you will end up with different size settings. If you are any time, the receiver automatically exits and no settings will be made. • Depending on the characteristics of your room, sometimes identical speakers with cone sizes of around ...
... you connected this seems to be happening, switch off if necessary. Checking the settings on your DVD (or other component). If there is set this receiver. • Adjust the volume to your liking between -80dB (min) and +12dB (max). Note • Depending on page 45. • The ... Auto MCACC Setup. If there are playing a stereo source, you will end up with different size settings. If you are any time, the receiver automatically exits and no settings will be made. • Depending on the characteristics of your room, sometimes identical speakers with cone sizes of around ...
Owner's Manual
Page 14
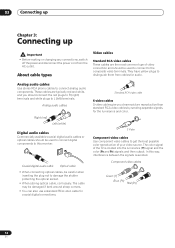
In this receiver. They have yellow plugs to distinguish them from the AC outlet. Analog audio cables Use stereo RCA phono cables to this way, interference between the ...
In this receiver. They have yellow plugs to distinguish them from the AC outlet. Analog audio cables Use stereo RCA phono cables to this way, interference between the ...
Owner's Manual
Page 15
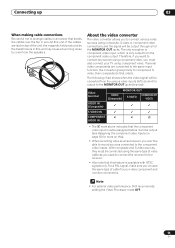
... signal will be output through all of the MONITOR OUT jacks. For a PAL signal, make sure you've used to connect the recorder to the receiver. • Also note that order). The following chart shows when the video signal will be converted from the various video inputs (left column) for your...
... signal will be output through all of the MONITOR OUT jacks. For a PAL signal, make sure you've used to connect the recorder to the receiver. • Also note that order). The following chart shows when the video signal will be converted from the various video inputs (left column) for your...
Owner's Manual
Page 16
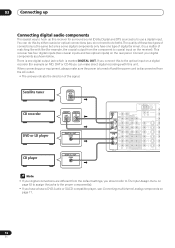
...or CD-R) you can do this to the optical input on page 17. 16 En This receiver has four digital inputs (two coaxial inputs and two optical inputs) on the receiver). When connecting your equipment, always make direct digital recordings with like with this unit. CONTROL PB...MULTI CH IN SURROUND L DVD/ LD IN VIDEO S - 03 Connecting up Connecting digital audio components The easiest way to hook up this receiver for example, the coaxial output from the component to coaxial input on the rear panel. Connect your digital connections are different from the default settings...
...or CD-R) you can do this to the optical input on page 17. 16 En This receiver has four digital inputs (two coaxial inputs and two optical inputs) on the receiver). When connecting your equipment, always make direct digital recordings with like with this unit. CONTROL PB...MULTI CH IN SURROUND L DVD/ LD IN VIDEO S - 03 Connecting up Connecting digital audio components The easiest way to hook up this receiver for example, the coaxial output from the component to coaxial input on the rear panel. Connect your digital connections are different from the default settings...
Owner's Manual
Page 17
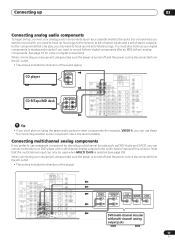
... need to hook up one set of stereo outputs), but for decoding multichannel formats such as a cassette deck) to hook up four plugs to the receiver (a set of stereo inputs and a set of stereo plugs. Connecting up 03 Connecting analog audio components To begin set up, connect your analog audio... components (such as DVD Audio and SACD, you can connect a decoder or a DVD player with multichannel analog outputs to the multichannel inputs of this receiver. You must also hook up your digital components to analog audio jacks if you want to record with multi-channel analog output jacks 17 En...
... need to hook up one set of stereo outputs), but for decoding multichannel formats such as a cassette deck) to hook up four plugs to the receiver (a set of stereo inputs and a set of stereo plugs. Connecting up 03 Connecting analog audio components To begin set up, connect your analog audio... components (such as DVD Audio and SACD, you can connect a decoder or a DVD player with multichannel analog outputs to the multichannel inputs of this receiver. You must also hook up your digital components to analog audio jacks if you want to record with multi-channel analog output jacks 17 En...
Owner's Manual
Page 18
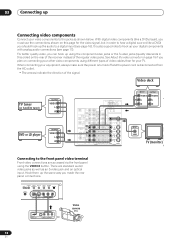
... 2 ASSIGNABLE PR 12 COMPONENT VIDEO L L R R SPEAKERS A R FRONT L CENTER TV (monitor) Connecting to hear a digital source (like a DVD player), you plan on the rear of the receiver instead of the regular video jacks. Video deck TV tuner (or Satellite tuner) OUTPUT VIDEO L R DVD or LD player OUTPUT VIDEO L R OUT CD IN ASSIGNABLE...
... 2 ASSIGNABLE PR 12 COMPONENT VIDEO L L R R SPEAKERS A R FRONT L CENTER TV (monitor) Connecting to hear a digital source (like a DVD player), you plan on the rear of the receiver instead of the regular video jacks. Video deck TV tuner (or Satellite tuner) OUTPUT VIDEO L R DVD or LD player OUTPUT VIDEO L R OUT CD IN ASSIGNABLE...
Owner's Manual
Page 19
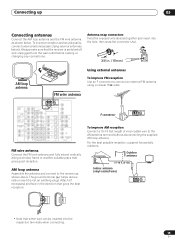
...that either wire can be inserted into the respective terminals when connecting. 19 En AM loop antenna Assemble the antenna and connect to the receiver as shown below ). Using external antennas To improve FM reception Use an F connector to the AM antenna terminal without disconnecting the supplied ...ASSIGNABLE 13 COMPONENT VIDEO FM wire antenna Connect the FM wire antenna and fully extend vertically along a window frame or another suitable place that the receiver is not an earthing plug). Outdoor antenna 15-18 ft. (5-6m) Indoor antenna (vinyl-coated wire) AM LOOP FM UNBAL 75Ω ...
...that either wire can be inserted into the respective terminals when connecting. 19 En AM loop antenna Assemble the antenna and connect to the receiver as shown below ). Using external antennas To improve FM reception Use an F connector to the AM antenna terminal without disconnecting the supplied ...ASSIGNABLE 13 COMPONENT VIDEO FM wire antenna Connect the FM wire antenna and fully extend vertically along a window frame or another suitable place that the receiver is not an earthing plug). Outdoor antenna 15-18 ft. (5-6m) Indoor antenna (vinyl-coated wire) AM LOOP FM UNBAL 75Ω ...
Owner's Manual
Page 20
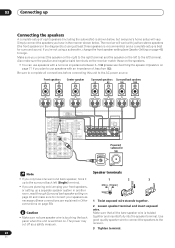
... speaker system in another room, read through Surround back speaker setting on page 40 and make sure the positive and negative (+/-) terminals on the receiver match those on the speakers. • You can use speakers with a nominal impedance between 6-16Ω (please see Speaker Setting on page... when the unit is shown below . The power may cut off as necessary (these connections are explained in Other connections on page 46) to the receiver. 3 Tighten terminal. 20 En CENTER ANTENNA Y CONTROL PB IN OUT PR FRONT MONITOR OUT R L SURROUND R L SUR- AC OUTLET AC 120 V 60Hz ...
... speaker system in another room, read through Surround back speaker setting on page 40 and make sure the positive and negative (+/-) terminals on the receiver match those on the speakers. • You can use speakers with a nominal impedance between 6-16Ω (please see Speaker Setting on page... when the unit is shown below . The power may cut off as necessary (these connections are explained in Other connections on page 46) to the receiver. 3 Tighten terminal. 20 En CENTER ANTENNA Y CONTROL PB IN OUT PR FRONT MONITOR OUT R L SURROUND R L SUR- AC OUTLET AC 120 V 60Hz ...
Owner's Manual
Page 22
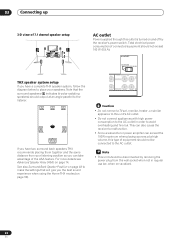
...speaker system, follow the diagram below to place your speakers. Total electrical power consumption of connected equipment should not be disconnected by the receiver's power switch. For more details see Advanced Speaker Array (ASA) on vacation). 22 En when on page 74. This can also cause the... receiver to malfunction. • Since a subwoofer or power amplifier can take advantage of the ASA feature. Note • This unit should be ...
...speaker system, follow the diagram below to place your speakers. Total electrical power consumption of connected equipment should not be disconnected by the receiver's power switch. For more details see Advanced Speaker Array (ASA) on vacation). 22 En when on page 74. This can also cause the... receiver to malfunction. • Since a subwoofer or power amplifier can take advantage of the ASA feature. Note • This unit should be ...


