Owner's Manual
Page 4
... 20 Speaker terminals 20 Hints on speaker placement 21 THX speaker system setup 22 AC outlet 22 Power cord caution 23 Operating other Pioneer components 23 04 Controls and displays Front panel 24 Display 26 Remote control 28 Operating range of remote control unit 30 05 Listening... menu Making receiver settings from the System Setup menu 40 Surround back speaker setting 40 Manual MCACC speaker setup 41 Fine Channel Level 42 Fine Channel Distance 42 Acoustic Calibration EQ 43 Manual speaker setup 45 Speaker Setting 46 Crossover Network 47 Channel Level 47 Speaker Distance 48...
... 20 Speaker terminals 20 Hints on speaker placement 21 THX speaker system setup 22 AC outlet 22 Power cord caution 23 Operating other Pioneer components 23 04 Controls and displays Front panel 24 Display 26 Remote control 28 Operating range of remote control unit 30 05 Listening... menu Making receiver settings from the System Setup menu 40 Surround back speaker setting 40 Manual MCACC speaker setup 41 Fine Channel Level 42 Fine Channel Distance 42 Acoustic Calibration EQ 43 Manual speaker setup 45 Speaker Setting 46 Crossover Network 47 Channel Level 47 Speaker Distance 48...
Owner's Manual
Page 10
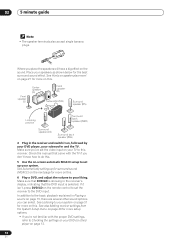
... guide Note • The speaker terminals also accept single banana plugs. See Hints on speaker placement on page 21 for more on this . Check the manual that came with the proper DVD settings, refer to this . Place your system on page 31 for more on the remote control to set the...
... guide Note • The speaker terminals also accept single banana plugs. See Hints on speaker placement on page 21 for more on this . Check the manual that came with the proper DVD settings, refer to this . Place your system on page 31 for more on the remote control to set the...
Owner's Manual
Page 11
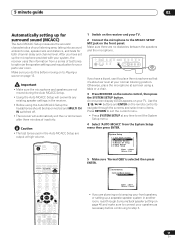
... at any existing speaker settings in the receiver. • Before using a table or a chair. 3 Press RECEIVER on your TV. Surr Back System ] [ 2. Manual SP Setup ] [ 5. Input Assign ] [ 6. AUTO MCACC Surround Back Output [ Normal (SB) ] INPUT ATT FL DIMMER +10 D.ACCESS TOP MENU TUNE SR...DVR/VCR TVCONT MULTI CONTROL CD CD-R/TAPE TUNER RECEIVER 5 Make sure 'Normal (SB)' is selected then press ENTER. 2. System Setup [ 1. MANUAL MCACC ] [ 4. Make sure you are no obstacles between the speakers and the microphone. An on-screen display (OSD) appears on the remote...
... at any existing speaker settings in the receiver. • Before using a table or a chair. 3 Press RECEIVER on your TV. Surr Back System ] [ 2. Manual SP Setup ] [ 5. Input Assign ] [ 6. AUTO MCACC Surround Back Output [ Normal (SB) ] INPUT ATT FL DIMMER +10 D.ACCESS TOP MENU TUNE SR...DVR/VCR TVCONT MULTI CONTROL CD CD-R/TAPE TUNER RECEIVER 5 Make sure 'Normal (SB)' is selected then press ENTER. 2. System Setup [ 1. MANUAL MCACC ] [ 4. Make sure you are no obstacles between the speakers and the microphone. An on-screen display (OSD) appears on the remote...

Owner's Manual
Page 12
... have finished checking each screen. The MCACC indicator on the front panel will light to show the surround settings are set to adjust these settings manually using the System Setup menu (starting on page 40). • If you are using THX Certified speakers, confirm that all speakers are complete. 2. You can...
... have finished checking each screen. The MCACC indicator on the front panel will light to show the surround settings are set to adjust these settings manually using the System Setup menu (starting on page 40). • If you are using THX Certified speakers, confirm that all speakers are complete. 2. You can...

Owner's Manual
Page 13
...affecting the environment and switch them . • Some older TVs may interfere with the operation of the microphone. You can correct the setting manually using the Auto MCACC Setup If the room environment is not optimal for the Auto MCACC Setup (too much background noise, echo off the ...or multichannel), press SIGNAL SELECT (page 35). • For more information on . 3 Change the receiver input to the source you may want to manually switch the input signal type from the microphone) the final settings may only get digital 2 channel stereo and analog sound. If you're playing a Dolby...
...affecting the environment and switch them . • Some older TVs may interfere with the operation of the microphone. You can correct the setting manually using the Auto MCACC Setup If the room environment is not optimal for the Auto MCACC Setup (too much background noise, echo off the ...or multichannel), press SIGNAL SELECT (page 35). • For more information on . 3 Change the receiver input to the source you may want to manually switch the input signal type from the microphone) the final settings may only get digital 2 channel stereo and analog sound. If you're playing a Dolby...
Owner's Manual
Page 21
... LS RS LS RS LS SB fig. B 21 En Connecting up 03 Note • The speaker terminals also accept single banana plugs. (Refer to speaker manual for details.) • To achieve the best possible surround sound, install your subwoofer. Use less of the center channel is localized at equal distances from...
... LS RS LS RS LS SB fig. B 21 En Connecting up 03 Note • The speaker terminals also accept single banana plugs. (Refer to speaker manual for details.) • To achieve the best possible surround sound, install your subwoofer. Use less of the center channel is localized at equal distances from...
Owner's Manual
Page 35
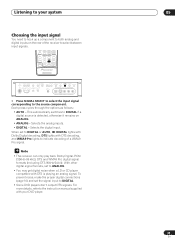
... Dolby Digital, PCM (32kHz-96 kHz), DTS and WMA9 Pro digital signal formats (including DTS 96kHz/24 bit). For more details, refer to the instruction manual supplied with your system 05 Choosing the input signal You need to hook up a component to both analog and digital inputs on ANALOG. • ANALOG...
... Dolby Digital, PCM (32kHz-96 kHz), DTS and WMA9 Pro digital signal formats (including DTS 96kHz/24 bit). For more details, refer to the instruction manual supplied with your system 05 Choosing the input signal You need to hook up a component to both analog and digital inputs on ANALOG. • ANALOG...

Owner's Manual
Page 40
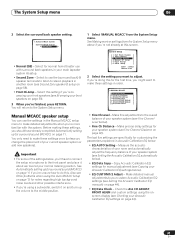
... page 63). An on-screen display (OSD) appears on the remote control, then press the SYSTEM SETUP button. Surr Back System ] [ 2. Manual SP Setup ] [ 5. In addition to a normal home theater setup where they can use the surround back speaker channels with this screen. Other...The System Setup menu Making receiver settings from the System Setup menu. System Setup [ 1. Surr Back System ] [ 2. AUTO MCACC ] [ 3. MANUAL MCACC ] [ 4. Manual SP Setup ] [ 5. Other Setup ] Enter : Select Return : Exit RECEIVER INPUT SELECT SOURCE DVD/LD TV/SAT DVR/VCR TVCONT MULTI CONTROL ...
... page 63). An on-screen display (OSD) appears on the remote control, then press the SYSTEM SETUP button. Surr Back System ] [ 2. Manual SP Setup ] [ 5. In addition to a normal home theater setup where they can use the surround back speaker channels with this screen. Other...The System Setup menu Making receiver settings from the System Setup menu. System Setup [ 1. Surr Back System ] [ 2. AUTO MCACC ] [ 3. MANUAL MCACC ] [ 4. Manual SP Setup ] [ 5. Other Setup ] Enter : Select Return : Exit RECEIVER INPUT SELECT SOURCE DVD/LD TV/SAT DVR/VCR TVCONT MULTI CONTROL ...
Owner's Manual
Page 41
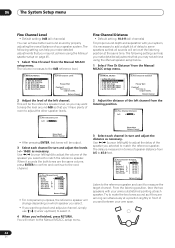
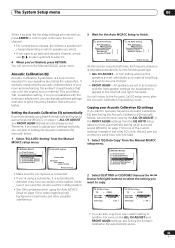
...have already completed Automatically setting up for your Acoustic Calibration EQ settings below ). • EQ Data Copy - Surr Back System ] [ 2. Manual SP Setup ] [ 5. Before making these settings, you 're biamping your front speakers (see Fine Channel Distance on page 11. Make fine...AUTO Setting - See Automatically setting up the volume to stereo playback in your front speakers on page 44). 41 En Make detailed manual adjustments to make detailed adjustments when you change the placement of your speaker system (see Setting the Acoustic Calibration EQ automatically below ...
...have already completed Automatically setting up for your Acoustic Calibration EQ settings below ). • EQ Data Copy - Surr Back System ] [ 2. Manual SP Setup ] [ 5. Before making these settings, you 're biamping your front speakers (see Fine Channel Distance on page 11. Make fine...AUTO Setting - See Automatically setting up the volume to stereo playback in your front speakers on page 44). 41 En Make detailed manual adjustments to make detailed adjustments when you change the placement of your speaker system (see Setting the Acoustic Calibration EQ automatically below ...
Owner's Manual
Page 42
... adjust the delay of you and between your speaker system. This will return to adjust the other speaker levels. 3a.Fine Channel Level Left [ + 0.5dB ] 3.MANUAL MCACC [ a .Fine Ch Level ] [ b .Fine Ch Distance ] [ c .EQ AUTO Setting ] [ d .EQ Data Copy ] [ e .EQ CUSTOM1 Adjust ] [ f .EQ CUSTOM2 Adjust ] [ g ....Test tone is output loudly. When it sounds like both tones are arriving simultaneously at each channel in terms of room to the Manual MCACC setup menu. You will be output. 3 Select each channel in front of the speaker you selected to match the reference speaker...
... adjust the delay of you and between your speaker system. This will return to adjust the other speaker levels. 3a.Fine Channel Level Left [ + 0.5dB ] 3.MANUAL MCACC [ a .Fine Ch Level ] [ b .Fine Ch Distance ] [ c .EQ AUTO Setting ] [ d .EQ Data Copy ] [ e .EQ CUSTOM1 Adjust ] [ f .EQ CUSTOM2 Adjust ] [ g ....Test tone is output loudly. When it sounds like both tones are arriving simultaneously at each channel in terms of room to the Manual MCACC setup menu. You will be output. 3 Select each channel in front of the speaker you selected to match the reference speaker...
Owner's Manual
Page 43
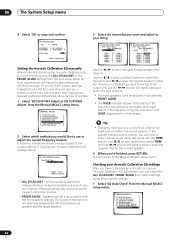
... Adjust ] [ g .EQ Data Check ] 3c.EQ AUTO Setting Please Wait Caution!! You will return to finish. 3c. If you can also copy from the Manual MCACC setup menu. 3.MANUAL MCACC [ a .Fine Ch Level ] [ b .Fine Ch Distance ] [ c .EQ AUTO Setting ] [ d .EQ Data Copy ] [ e .EQ CUSTOM1 Adjust ] [ ...you 're not satisfied with the front speaker settings (no special weighting is output loudly. Copying your settings manually, you want to manually adjust the Acoustic Calibration EQ (see Setting the Acoustic Calibration EQ automatically above (or from Automatically setting up...
... Adjust ] [ g .EQ Data Check ] 3c.EQ AUTO Setting Please Wait Caution!! You will return to finish. 3c. If you can also copy from the Manual MCACC setup menu. 3.MANUAL MCACC [ a .Fine Ch Level ] [ b .Fine Ch Distance ] [ c .EQ AUTO Setting ] [ d .EQ Data Copy ] [ e .EQ CUSTOM1 Adjust ] [ ...you 're not satisfied with the front speaker settings (no special weighting is output loudly. Copying your settings manually, you want to manually adjust the Acoustic Calibration EQ (see Setting the Acoustic Calibration EQ automatically above (or from Automatically setting up...
Owner's Manual
Page 44
...13kHz : TRIM : [+ 1.0dB ] [ 0.0dB ] [ 0.0dB ] [ 0.0dB ] [ 0.0dB ] [ 0.0dB ] 3f. Use the / (cursor left /right) to the Manual MCACC setup menu. If this will alternate between the left /right) buttons to adjust the overall frequency balance. 06 The System Setup menu 3 Select 'OK... : [ 0.0dB ] 250Hz : [ 0.0dB ] 4kHz : [ 0.0dB ] 13kHz : [ 0.0dB ] TRIM : [ 0.0dB ] Setting the Acoustic Calibration EQ manually Before manually adjusting the Acoustic Calibration EQ, we recommend copying the ALL CH ADJUST or the FRONT ALIGN settings from the display. Tip • Changing the frequency...
...13kHz : TRIM : [+ 1.0dB ] [ 0.0dB ] [ 0.0dB ] [ 0.0dB ] [ 0.0dB ] [ 0.0dB ] 3f. Use the / (cursor left /right) to the Manual MCACC setup menu. If this will alternate between the left /right) buttons to adjust the overall frequency balance. 06 The System Setup menu 3 Select 'OK... : [ 0.0dB ] 250Hz : [ 0.0dB ] 4kHz : [ 0.0dB ] 13kHz : [ 0.0dB ] TRIM : [ 0.0dB ] Setting the Acoustic Calibration EQ manually Before manually adjusting the Acoustic Calibration EQ, we recommend copying the ALL CH ADJUST or the FRONT ALIGN settings from the display. Tip • Changing the frequency...

Owner's Manual
Page 45
... in the System Setup are designed to the subwoofer (see Crossover Network below). • Channel Level - Speaker Setting ] [ b. AUTO MCACC ] [ 3 . Manual speaker setup This receiver allows you 're finished, press RETURN. Surr Back System ] [ 2 . Input Assign ] [ 6 . If you are using a THX... volume increases to check. 3g. Other Setup ] Enter : Select Return : Exit 2 Select the setting you want to the Manual MCACC setup menu. THX Audio Setting ] • Speaker Setting - Specify which frequencies will return to adjust these settings. Adjust ...
... in the System Setup are designed to the subwoofer (see Crossover Network below). • Channel Level - Speaker Setting ] [ b. AUTO MCACC ] [ 3 . Manual speaker setup This receiver allows you 're finished, press RETURN. Surr Back System ] [ 2 . Input Assign ] [ 6 . If you are using a THX... volume increases to check. 3g. Other Setup ] Enter : Select Return : Exit 2 Select the setting you want to the Manual MCACC setup menu. THX Audio Setting ] • Speaker Setting - Specify which frequencies will return to adjust these settings. Adjust ...
Owner's Manual
Page 46
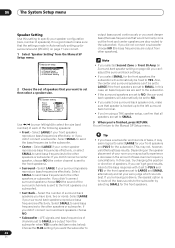
...speaker placement of channels set to the other speakers or subwoofer. Select SMALL to send bass frequencies to specify your ears judge which sounds best. Manual SP Setup [ a . 06 The System Setup menu Speaker Setting Use this setting to the other speakers or subwoofer. Speaker Setting ] [... ] Sub Woofer [ YES ] (THX Speaker:SMALL) output bass sound continuously or you 're having problems, the easiest option is sent to the Manual SP Setup menu. If you didn't connect surround back speakers choose NO. • Subwoofer - You will automatically be fixed to set to NO. ...
...speaker placement of channels set to the other speakers or subwoofer. Select SMALL to send bass frequencies to specify your ears judge which sounds best. Manual SP Setup [ a . 06 The System Setup menu Speaker Setting Use this setting to the other speakers or subwoofer. Speaker Setting ] [... ] Sub Woofer [ YES ] (THX Speaker:SMALL) output bass sound continuously or you 're having problems, the easiest option is sent to the Manual SP Setup menu. If you didn't connect surround back speakers choose NO. • Subwoofer - You will automatically be fixed to set to NO. ...

Owner's Manual
Page 47
... individual channel levels. • Auto - Return:Cancel 4 Adjust the level of each speaker as SMALL. Note • For more on -screen: 4c. Manual SP Setup [ a . Crossover Network ] [ c . Channel Level ] [ d . Speaker Distance ] [ e . THX Audio Setting ] Channel Level...crossover frequency is set to speaker automatically. 3 Confirm your speaker system, an important factor when setting up /down) to the Manual SP Setup menu. Channel Level Test Tone [ Manual ] Setting Start Please Wait Caution!! Channel Level Left [ + 0.5dB] Center [ 0.0dB] Right [ 0.0dB] Surround ...
... individual channel levels. • Auto - Return:Cancel 4 Adjust the level of each speaker as SMALL. Note • For more on -screen: 4c. Manual SP Setup [ a . Crossover Network ] [ c . Channel Level ] [ d . Speaker Distance ] [ e . THX Audio Setting ] Channel Level...crossover frequency is set to speaker automatically. 3 Confirm your speaker system, an important factor when setting up /down) to the Manual SP Setup menu. Channel Level Test Tone [ Manual ] Setting Start Please Wait Caution!! Channel Level Left [ + 0.5dB] Center [ 0.0dB] Right [ 0.0dB] Surround ...
Owner's Manual
Page 48
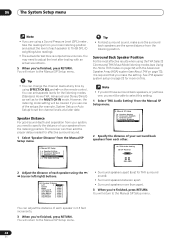
.... The receiver can change the channel levels at low volumes. 06 The System Setup menu Note • If you are the same distance from the Manual SP Setup menu. 4. Tip • You can then add the proper delay needed for effective surround sound. 1 Select 'Speaker Distance' from the ...you don't have surround back speakers, or just have one, you won't be cleared if you 're finished, press RETURN. You will return to the Manual SP Setup menu. Channel Level ] [ d. THX Audio Setting ] 2 Specify the distance of each speaker in 0.5 feet increments. 3 When you 're...
.... The receiver can change the channel levels at low volumes. 06 The System Setup menu Note • If you are the same distance from the Manual SP Setup menu. 4. Tip • You can then add the proper delay needed for effective surround sound. 1 Select 'Speaker Distance' from the ...you don't have surround back speakers, or just have one, you won't be cleared if you 're finished, press RETURN. You will return to the Manual SP Setup menu. Channel Level ] [ d. THX Audio Setting ] 2 Specify the distance of each speaker in 0.5 feet increments. 3 When you 're...
Owner's Manual
Page 49
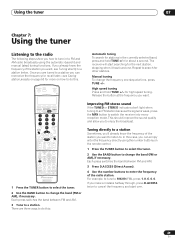
...on the remote control. 1 Press the TUNER button to select the tuner. 2 Use the BAND button to change the band (FM or AM), if necessary. Manual tuning To change the frequency one . This should improve the sound quality and allow you to 106.00 (FM), press 1, 0, 6, 0, 0. Each press .... The receiver will start over. 49 En There are tuned to a station you can simply enter the frequency directly using the automatic (search) and manual (step) tuning functions. Once you are three ways to do this : Improving FM stereo sound If the TUNED or STEREO indicators don't light when ...
...on the remote control. 1 Press the TUNER button to select the tuner. 2 Use the BAND button to change the band (FM or AM), if necessary. Manual tuning To change the frequency one . This should improve the sound quality and allow you to 106.00 (FM), press 1, 0, 6, 0, 0. Each press .... The receiver will start over. 49 En There are tuned to a station you can simply enter the frequency directly using the automatic (search) and manual (step) tuning functions. Once you are three ways to do this : Improving FM stereo sound If the TUNED or STEREO indicators don't light when ...
Owner's Manual
Page 50
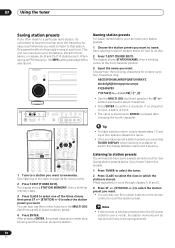
... memorize up to four characters long. ABCDEFGHIJKLMNOPQRSTUVWXYZ abcdefghijklmnopqrstuvwxyz 0123456789 • Use the MULTI JOG dial (front panel) or the ST +/- This saves the effort of manually tuning in each . You can also use the number buttons on this . buttons (remote) to select characters. • Press ENTER to the radio on page...
... memorize up to four characters long. ABCDEFGHIJKLMNOPQRSTUVWXYZ abcdefghijklmnopqrstuvwxyz 0123456789 • Use the MULTI JOG dial (front panel) or the ST +/- This saves the effort of manually tuning in each . You can also use the number buttons on this . buttons (remote) to select characters. • Press ENTER to the radio on page...
Owner's Manual
Page 51
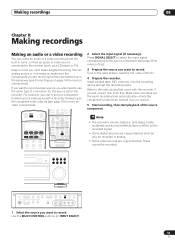
... to do this ). 3 Prepare the source you want to the receiver (such as for more on this . AUDIO/VIDEO MULTI-CHANNEL RECEIVER VSX-1015X DVD/LD TV/SAT DVR/VCR VIDEO1 CD-R/ CD TAPE/MD TUNER VIDEO2 MASTER VOLUME TUNER CONTROL TUNER EDIT TUNING/ STATION MULTI JOG SYSTEM...analog. • Some video sources are recording to record. into the recording device and set the audio recording level automatically-check the component's instruction manual if you are copy-protected. Keep in mind you can't make a digital recording from an analog source or vice-versa, so make an ...
... to do this ). 3 Prepare the source you want to the receiver (such as for more on this . AUDIO/VIDEO MULTI-CHANNEL RECEIVER VSX-1015X DVD/LD TV/SAT DVR/VCR VIDEO1 CD-R/ CD TAPE/MD TUNER VIDEO2 MASTER VOLUME TUNER CONTROL TUNER EDIT TUNING/ STATION MULTI JOG SYSTEM...analog. • Some video sources are recording to record. into the recording device and set the audio recording level automatically-check the component's instruction manual if you are copy-protected. Keep in mind you can't make a digital recording from an analog source or vice-versa, so make an ...
Owner's Manual
Page 58
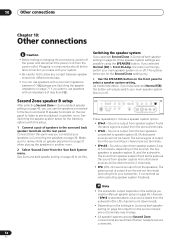
Plugging in Manual speaker setup on page 40 to do this setup. 1 Connect a pair of less than 8Ω). The options below for the Second Zone setting only. • ...
Plugging in Manual speaker setup on page 40 to do this setup. 1 Connect a pair of less than 8Ω). The options below for the Second Zone setting only. • ...


