Owner's Manual
Page 3
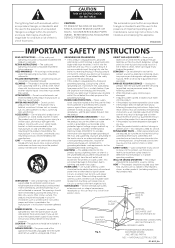
...RISK OF ELECTRIC SHOCK, DO NOT REMOVE COVER (OR BACK). D1-4-2-3_En IMPORTANT SAFETY INSTRUCTIONS READ INSTRUCTIONS - CLEANING - VENTILATION - POWER SOURCES - The appliance should be of sufficient magnitude to constitute a risk of any service or repairs to this product from the product...The product may cause the product and cart combination to . The openings should be located in a wet basement; The power cord of uninsulated "dangerous voltage" within an equilateral triangle is equipped with regard to qualified service personnel under the following the...
...RISK OF ELECTRIC SHOCK, DO NOT REMOVE COVER (OR BACK). D1-4-2-3_En IMPORTANT SAFETY INSTRUCTIONS READ INSTRUCTIONS - CLEANING - VENTILATION - POWER SOURCES - The appliance should be of sufficient magnitude to constitute a risk of any service or repairs to this product from the product...The product may cause the product and cart combination to . The openings should be located in a wet basement; The power cord of uninsulated "dangerous voltage" within an equilateral triangle is equipped with regard to qualified service personnel under the following the...
Owner's Manual
Page 4
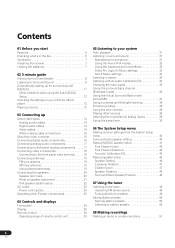
... external antennas 19 Connecting the speakers 20 Speaker terminals 20 Hints on speaker placement 21 THX speaker system setup 22 AC outlet 22 Power cord caution 23 Operating other Pioneer components 23 04 Controls and displays Front panel 24 Display 26 Remote control 28 Operating range of remote control unit 30 05...
... external antennas 19 Connecting the speakers 20 Speaker terminals 20 Hints on speaker placement 21 THX speaker system setup 22 AC outlet 22 Power cord caution 23 Operating other Pioneer components 23 04 Controls and displays Front panel 24 Display 26 Remote control 28 Operating range of remote control unit 30 05...
Owner's Manual
Page 5
...Bi-amping your front speakers 59 Bi-wiring your speakers 59 Connecting additional amplifiers 60 Using this receiver with a Pioneer plasma display. . . 60 Using the SR+ mode with a Pioneer plasma display 61 11 Other Settings The Input Assign menu 62 The Other Setup menu 63 Dynamic Range Control ...Setup 64 Dual Mono Setup 64 LFE Attenuator Setup 65 SR+ Setup for Pioneer plasma displays 65 12 Additional information Troubleshooting 66 Power 66 No sound 67 Other audio problems 68 Video 69 Settings 70 Display 70 Remote control 71 Resetting the ...
...Bi-amping your front speakers 59 Bi-wiring your speakers 59 Connecting additional amplifiers 60 Using this receiver with a Pioneer plasma display. . . 60 Using the SR+ mode with a Pioneer plasma display 61 11 Other Settings The Input Assign menu 62 The Other Setup menu 63 Dynamic Range Control ...Setup 64 Dual Mono Setup 64 LFE Attenuator Setup 65 SR+ Setup for Pioneer plasma displays 65 12 Additional information Troubleshooting 66 Power 66 No sound 67 Other audio problems 68 Video 69 Settings 70 Display 70 Remote control 71 Resetting the ...
Owner's Manual
Page 6
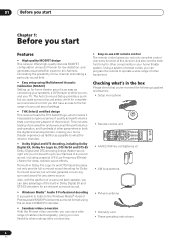
... you start Features • High quality MOSFET design This receiver offers high-quality discrete MOSFET configuration unique to Pioneer for low distortion, and generates equal amplifier power to all channels, eliminating the possibility of one channel dominating a particular sound field. • Easy setup using... WMA9 Pro decoder. • Seamless video conversion With the Pioneer video converter, you can program the remote to operate a wide range of other equipment. This includes testing of pre-amplifier and power amplifier performance and operation, and hundreds of other parameters in ...
... you start Features • High quality MOSFET design This receiver offers high-quality discrete MOSFET configuration unique to Pioneer for low distortion, and generates equal amplifier power to all channels, eliminating the possibility of one channel dominating a particular sound field. • Easy setup using... WMA9 Pro decoder. • Seamless video conversion With the Pioneer video converter, you can program the remote to operate a wide range of other equipment. This includes testing of pre-amplifier and power amplifier performance and operation, and hundreds of other parameters in ...
Owner's Manual
Page 8
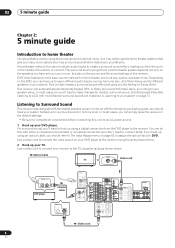
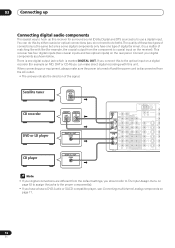
... in mind, so with either a coaxial (recommended), or an optical connection (you don't need to connect both). You can do this unit to an AC power source. 1 Hook up using a digital connection from a home theater system depends not only on the speakers you have set up using an optical cable, you...
... in mind, so with either a coaxial (recommended), or an optical connection (you don't need to connect both). You can do this unit to an AC power source. 1 Hook up using a digital connection from a home theater system depends not only on the speakers you have set up using an optical cable, you...
Owner's Manual
Page 9
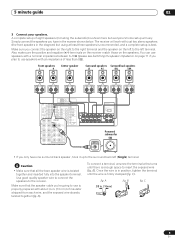
... UNBAL 75Ω PRE OUT SUBW. AC OUTLET AC 120 V 60Hz SWITCHED 100W (0 . 8A) MAX SPEAKERS A R FRONT L CENTER R SURROUND L SURROUND BACK / B R SELECTABLE L (Single) SELECTABLE INPUT Powered subwoofer SW • If you only have in . (10 mm) of less than 8Ω). A fig. Make sure you plan to use is best. ROUND BACK...
... UNBAL 75Ω PRE OUT SUBW. AC OUTLET AC 120 V 60Hz SWITCHED 100W (0 . 8A) MAX SPEAKERS A R FRONT L CENTER R SURROUND L SURROUND BACK / B R SELECTABLE L (Single) SELECTABLE INPUT Powered subwoofer SW • If you only have in . (10 mm) of less than 8Ω). A fig. Make sure you plan to use is best. ROUND BACK...

Owner's Manual
Page 12
... excellent surround sound from your system, but it is on the system. AUTO MCACC Check!!! If selecting RETRY doesn't fix the problem, turn off the power and check the speaker connections. 2. A progress report is displayed on-screen while the receiver outputs test tones to finish outputting test tones. Test tone is...
... excellent surround sound from your system, but it is on the system. AUTO MCACC Check!!! If selecting RETRY doesn't fix the problem, turn off the power and check the speaker connections. 2. A progress report is displayed on-screen while the receiver outputs test tones to finish outputting test tones. Test tone is...

Owner's Manual
Page 13
... output multichannel analog audio. If there are the basic instructions for playing a source (such as a DVD disc) with your home theater system. 1 Turn on the power of the microphone. If there is now selected.) 2 If the receiver isn't already on, press RECEIVER to switch it on. 3 Change the receiver input to...
... output multichannel analog audio. If there are the basic instructions for playing a source (such as a DVD disc) with your home theater system. 1 Turn on the power of the microphone. If there is now selected.) 2 If the receiver isn't already on, press RECEIVER to switch it on. 3 Change the receiver input to...
Owner's Manual
Page 14
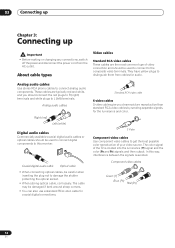
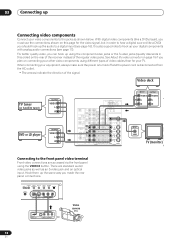
... a standard RCA video cable for audio. 03 Connecting up Chapter 3: Connecting up Important • Before making or changing any connections, switch off the power and disconnect the power cord from cables for coaxial digital connections. These cables are the most common type of video connection and should be careful when inserting the...
... a standard RCA video cable for audio. 03 Connecting up Chapter 3: Connecting up Important • Before making or changing any connections, switch off the power and disconnect the power cord from cables for coaxial digital connections. These cables are the most common type of video connection and should be careful when inserting the...
Owner's Manual
Page 16
... input on the receiver). There is one type of digital terminal, it is a matter of the signal. You can make sure the power is turned off and the power cord is marked DIGITAL OUT. The quality of these two types of connections is the same but since some digital components only have...
... input on the receiver). There is one type of digital terminal, it is a matter of the signal. You can make sure the power is turned off and the power cord is marked DIGITAL OUT. The quality of these two types of connections is the same but since some digital components only have...
Owner's Manual
Page 17
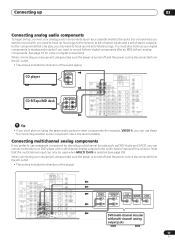
...use a separate component for components that only play, you only need to hook up one set up your equipment, always make sure the power is turned off and the power cord is disconnected from the AC outlet. • The arrows indicate the direction of the audio signal. ANTENNA Y CONTROL PB IN OUT... 03 Connecting analog audio components To begin set of stereo plugs. You must also hook up , connect your equipment, always make sure the power is turned off and the power cord is disconnected from analog components. OUT CD IN ASSIGNABLE 14 IN 1 (TV/ SAT ) PLAY IN CD-R/ TAPE/MD OUT REC ...
...use a separate component for components that only play, you only need to hook up one set up your equipment, always make sure the power is turned off and the power cord is disconnected from the AC outlet. • The arrows indicate the direction of the audio signal. ANTENNA Y CONTROL PB IN OUT... 03 Connecting analog audio components To begin set of stereo plugs. You must also hook up , connect your equipment, always make sure the power is turned off and the power cord is disconnected from analog components. OUT CD IN ASSIGNABLE 14 IN 1 (TV/ SAT ) PLAY IN CD-R/ TAPE/MD OUT REC ...
Owner's Manual
Page 18
When connecting your equipment, always make sure the power is turned off and the power cord is also a good idea to hook up the same way you must use the connections shown on the rear of the receiver instead of ...
When connecting your equipment, always make sure the power is turned off and the power cord is also a good idea to hook up the same way you must use the connections shown on the rear of the receiver instead of ...
Owner's Manual
Page 20
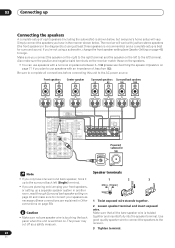
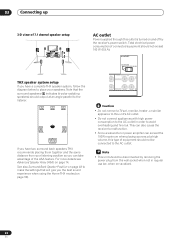
... Y IN 2 PB PR Y PB IN 3 PR ASSIGNABLE 13 COMPONENT VIDEO FRONT R L SURROUND R L SURROUND BACK L R (Single) CEN- The power may cut off as necessary (these connections are planning on bi-amping your speakers as a safety measure. 1 2 3 3/8 in the manner shown below ... 60Hz SWITCHED 100W (0 . 8A) MAX SPEAKERS A R FRONT L CENTER R SURROUND L SURROUND BACK / B R SELECTABLE L (Single) SELECTABLE INPUT Powered subwoofer SW Note Speaker terminals • If you only have in . (10mm) 1 Twist exposed wire strands together. 2 Loosen speaker terminal and insert ...
... Y IN 2 PB PR Y PB IN 3 PR ASSIGNABLE 13 COMPONENT VIDEO FRONT R L SURROUND R L SURROUND BACK L R (Single) CEN- The power may cut off as necessary (these connections are planning on bi-amping your speakers as a safety measure. 1 2 3 3/8 in the manner shown below ... 60Hz SWITCHED 100W (0 . 8A) MAX SPEAKERS A R FRONT L CENTER R SURROUND L SURROUND BACK / B R SELECTABLE L (Single) SELECTABLE INPUT Powered subwoofer SW Note Speaker terminals • If you only have in . (10mm) 1 Twist exposed wire strands together. 2 Loosen speaker terminal and insert ...
Owner's Manual
Page 22
... to make the settings that the surround speakers ( indicates bi-polar radiating speakers) should be connected to malfunction. • Since a subwoofer or power amplifier can take advantage of the ASA feature. This can also cause the receiver to the AC outlet. Note • This unit should output...exceed the 100W maximum when playing sources at an angle parallel to this type of connected equipment should not be disconnected by the receiver's power switch. FL C FR LS Surround RS Surround SBL SBR Surround back If you the best sound experience when using the Home THX modes...
... to make the settings that the surround speakers ( indicates bi-polar radiating speakers) should be connected to malfunction. • Since a subwoofer or power amplifier can take advantage of the ASA feature. This can also cause the receiver to the AC outlet. Note • This unit should output...exceed the 100W maximum when playing sources at an angle parallel to this type of connected equipment should not be disconnected by the receiver's power switch. FL C FR LS Surround RS Surround SBL SBR Surround back If you the best sound experience when using the Home THX modes...
Owner's Manual
Page 23
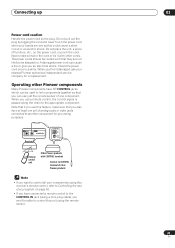
... electrical shock. Note that you also have at least one component. A damaged power cord can be stepped on. Check the power cord once in the cord or tie it damaged, ask your nearest Pioneer authorized independent service company for grounding purposes. Do not place the unit, a...control signal is passed along the chain to CONTROL terminal of furniture, etc., on the power cord, or pinch the cord. IN OUT CONTROL Receiver CONTROL IN OUT Remote control unit Other Pioneer products with other Pioneer products Note • If you use this feature, make a knot in a while...
... electrical shock. Note that you also have at least one component. A damaged power cord can be stepped on. Check the power cord once in the cord or tie it damaged, ask your nearest Pioneer authorized independent service company for grounding purposes. Do not place the unit, a...control signal is passed along the chain to CONTROL terminal of furniture, etc., on the power cord, or pinch the cord. IN OUT CONTROL Receiver CONTROL IN OUT Remote control unit Other Pioneer products with other Pioneer products Note • If you use this feature, make a knot in a while...
Owner's Manual
Page 24
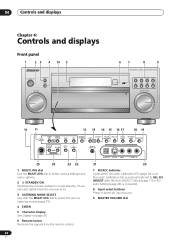
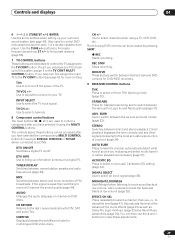
Power indicator lights when the receiver is on. 3 LISTENING MODE SELECT Use with the MULTI JOG dial to select the various listening modes (page 31). 4 ENTER 5 ... Controls and displays Chapter 4: Controls and displays Front panel 1 23 4 10 5 STANDBY/ON LISTENING MODE SELECT ENTER MULTI JOG 67 8 9 AUDIO/VIDEO MULTI-CHANNEL RECEIVER VSX-1015TX DVD/LD TV/SAT DVR/VCR VIDEO1 CD-R/ CD TAPE/MD TUNER VIDEO2 MASTER VOLUME 10 11 12 13 14 15 16 17 18 19...
Power indicator lights when the receiver is on. 3 LISTENING MODE SELECT Use with the MULTI JOG dial to select the various listening modes (page 31). 4 ENTER 5 ... Controls and displays Chapter 4: Controls and displays Front panel 1 23 4 10 5 STANDBY/ON LISTENING MODE SELECT ENTER MULTI JOG 67 8 9 AUDIO/VIDEO MULTI-CHANNEL RECEIVER VSX-1015TX DVD/LD TV/SAT DVR/VCR VIDEO1 CD-R/ CD TAPE/MD TUNER VIDEO2 MASTER VOLUME 10 11 12 13 14 15 16 17 18 19...
Owner's Manual
Page 29
...). TV Use to select a channel, then use ST +/- The controls above these adjustments. 29 En AUDIO Changes the audio language or channel on /off the power of a source (page 34). STEREO Switches between named station presets and radio frequencies (page 50). EFFECT/CH SEL Press repeatedly to turn on a digital TV...
...). TV Use to select a channel, then use ST +/- The controls above these adjustments. 29 En AUDIO Changes the audio language or channel on /off the power of a source (page 34). STEREO Switches between named station presets and radio frequencies (page 50). EFFECT/CH SEL Press repeatedly to turn on a digital TV...
Owner's Manual
Page 39
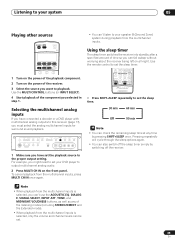
... 05 Playing other sources RECEIVER INPUT SELECT SOURCE DVD/LD TV/SAT DVR/VCR TVCONT MULTI CONTROL CD CD-R/TAPE TUNER RECEIVER 1 Turn on the power of the playback component. 2 Turn on the power of the component you selected in step 1.
... 05 Playing other sources RECEIVER INPUT SELECT SOURCE DVD/LD TV/SAT DVR/VCR TVCONT MULTI CONTROL CD CD-R/TAPE TUNER RECEIVER 1 Turn on the power of the playback component. 2 Turn on the power of the component you selected in step 1.
Owner's Manual
Page 50
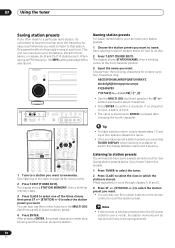
... between name and frequency. See Listening to station presets below for easy recall whenever you want to recall the station preset. Choose from the AC power outlet for over a month, the station memories will be reprogrammed. 50 En You can press TUNER DISPLAY when listening to a station to do this already...
... between name and frequency. See Listening to station presets below for easy recall whenever you want to recall the station preset. Choose from the AC power outlet for over a month, the station memories will be reprogrammed. 50 En You can press TUNER DISPLAY when listening to a station to do this already...
Owner's Manual
Page 58
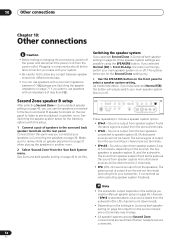
... Chapter 10: Other connections Caution • Before making or changing the connections, switch off the power and disconnect the power cord from the speakers. See Surround back speaker setting on or off ) - No sound is output from the power outlet. The options below for the Second Zone setting only. • Use the SPEAKERS...
... Chapter 10: Other connections Caution • Before making or changing the connections, switch off the power and disconnect the power cord from the speakers. See Surround back speaker setting on or off ) - No sound is output from the power outlet. The options below for the Second Zone setting only. • Use the SPEAKERS...


