

Basic Manual English/French
Page 1
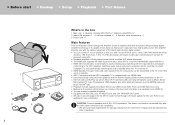
... playback features/ listening modes/settings details, specifications, and troubleshooting. The Advanced Manual is available on a PC or Smartphone. > Before start > Hookup > Setup > Playback > Part Names Basic Manual SC-LX501 AV RECEIVER RECEPTEUR AV En Fr Hookup Step1: Choose your Speaker Layout 3 Step2: Connect the Speakers 9 Step3: Connect the TV 12 Step4: Connect the AV Components 14 Step5: Multi-zone Connection 17 Step6: Connect Other Cables 19 Setup Step7: Power On & Initial Setup 20 HDMI Setup 21 Playback Basic Playback...
... playback features/ listening modes/settings details, specifications, and troubleshooting. The Advanced Manual is available on a PC or Smartphone. > Before start > Hookup > Setup > Playback > Part Names Basic Manual SC-LX501 AV RECEIVER RECEPTEUR AV En Fr Hookup Step1: Choose your Speaker Layout 3 Step2: Connect the Speakers 9 Step3: Connect the TV 12 Step4: Connect the AV Components 14 Step5: Multi-zone Connection 17 Step6: Connect Other Cables 19 Setup Step7: Power On & Initial Setup 20 HDMI Setup 21 Playback Basic Playback...
Basic Manual English/French
Page 2
... standard, switching audio output and volume using the remote controller of equipment manufactured by Music Server and USB include WAV, FLAC and DSD high-res source $ Multi-zone Connection which provides 360e sound placement $ The HDMI jack supports 4K video input and output. Power cord ×1 Main features This unit features a Direct Energy HD Amplifier (Class D amplifier) that was developed using onscreen guidance and On-Screen Display (OSD) showing operations on the TV $ Internet radio and AirPlay via wired LAN...
... standard, switching audio output and volume using the remote controller of equipment manufactured by Music Server and USB include WAV, FLAC and DSD high-res source $ Multi-zone Connection which provides 360e sound placement $ The HDMI jack supports 4K video input and output. Power cord ×1 Main features This unit features a Direct Energy HD Amplifier (Class D amplifier) that was developed using onscreen guidance and On-Screen Display (OSD) showing operations on the TV $ Internet radio and AirPlay via wired LAN...
Basic Manual English/French
Page 4
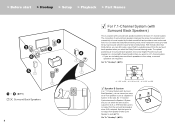
... including surround back speakers in the setup, surround speakers are required. The connection of surround back speakers improves the sense of envelopment and connectivity of front speakers to use as a Speaker B System. Note that sound is not output from A, B, or A+B. > Before start > Hookup > Setup > Playback > Part Names 1 6 (P3) 7 8 Surround Back Speakers 4 For 7.1-Channel System (with surround back speakers added to the basic 5.1-channel system. You can switch the same audio to output from Speaker B when Zone Speaker is selected...
... including surround back speakers in the setup, surround speakers are required. The connection of surround back speakers improves the sense of envelopment and connectivity of front speakers to use as a Speaker B System. Note that sound is not output from A, B, or A+B. > Before start > Hookup > Setup > Playback > Part Names 1 6 (P3) 7 8 Surround Back Speakers 4 For 7.1-Channel System (with surround back speakers added to the basic 5.1-channel system. You can switch the same audio to output from Speaker B when Zone Speaker is selected...

Basic Manual English/French
Page 8
... > Hookup > Setup > Playback > Part Names For Bi-Amping the Speakers It is possible to connect front speakers supporting Bi-Amping to 30e, ˎ 2: 120e 1 2 Front Speakers (Bi-Amping) 3 Center Speaker 4 5 Surround Speakers 6 Powered Subwoofer 8 The effects and placements for the woofer jacks. Go To "Hookup" (P11) ˎ1 ˎ2 ˎ 1: 22e to improve quality of channels available with this connection is 5.1 because Bi-Amping speakers require one amplifier for the tweeter jacks and one amplifier for speakers are...
... > Hookup > Setup > Playback > Part Names For Bi-Amping the Speakers It is possible to connect front speakers supporting Bi-Amping to 30e, ˎ 2: 120e 1 2 Front Speakers (Bi-Amping) 3 Center Speaker 4 5 Surround Speakers 6 Powered Subwoofer 8 The effects and placements for the woofer jacks. Go To "Hookup" (P11) ˎ1 ˎ2 ˎ 1: 22e to improve quality of channels available with this connection is 5.1 because Bi-Amping speakers require one amplifier for the tweeter jacks and one amplifier for speakers are...

Basic Manual English/French
Page 9
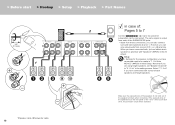
... speaker terminals when connecting. Note that sound is selected. Speaker B Make sure the exposed wires of the speakers do not stick out of front speakers to use as a Speaker B System. Switch Speakers A/B with Surround Back Speakers), also connect 7 and 8. Setup 0 Settings for a 5.1-channel system. With a 7.1-Channel System (with "Speakers" in AV Adjust (P26). The same signal is output from the surround back speaker when A+B is not output from each other, the protection circuit will be activated. 1 Speaker cable, 2 Subwoofer cable...
... speaker terminals when connecting. Note that sound is selected. Speaker B Make sure the exposed wires of the speakers do not stick out of front speakers to use as a Speaker B System. Switch Speakers A/B with Surround Back Speakers), also connect 7 and 8. Setup 0 Settings for a 5.1-channel system. With a 7.1-Channel System (with "Speakers" in AV Adjust (P26). The same signal is output from the surround back speaker when A+B is not output from each other, the protection circuit will be activated. 1 Speaker cable, 2 Subwoofer cable...
Basic Manual English/French
Page 10
... Initial Setup. The same signal is output from each other, the protection circuit will be activated. Full Auto MCACC" (P20) in case of the SUBWOOFER jacks. 0 Apart from one set "Speaker Channels" to "5.1.2 ch" in the setting screen. Select "7.1.2 ch" if you have connected both surround back speakers and height speakers. 1 Speaker cable, 2 Subwoofer cable 10 Make sure the exposed wires of the speakers do not stick out of the speakers touch the rear panel...
... Initial Setup. The same signal is output from each other, the protection circuit will be activated. Full Auto MCACC" (P20) in case of the SUBWOOFER jacks. 0 Apart from one set "Speaker Channels" to "5.1.2 ch" in the setting screen. Select "7.1.2 ch" if you have connected both surround back speakers and height speakers. 1 Speaker cable, 2 Subwoofer cable 10 Make sure the exposed wires of the speakers do not stick out of the speakers touch the rear panel...
Basic Manual English/French
Page 11
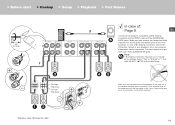
.... 1 Speaker cable, 2 Subwoofer cable 11 In case of Bi-Amping connection, refer to the FRONT jacks and the SURROUND BACK jacks. For highfrequency For lowfrequency Make sure the exposed wires of the speakers do not stick out of your speakers. If the exposed wires of : 2 Page 8 En Connect front speakers compatible with Bi-Amping connection to the instruction manual of the speaker terminals when connecting. Up to change some settings. > Before start > Hookup > Setup > Playback > Part...
.... 1 Speaker cable, 2 Subwoofer cable 11 In case of Bi-Amping connection, refer to the FRONT jacks and the SURROUND BACK jacks. For highfrequency For lowfrequency Make sure the exposed wires of the speakers do not stick out of your speakers. If the exposed wires of : 2 Page 8 En Connect front speakers compatible with Bi-Amping connection to the instruction manual of the speaker terminals when connecting. Up to change some settings. > Before start > Hookup > Setup > Playback > Part...
Basic Manual English/French
Page 12
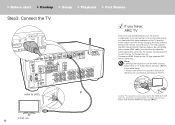
... projector can not only output the video input to this unit to output video from the HDMI OUT SUB jack (P22) By connecting with a single HDMI cable, you can be connected to use the ARC function. This jack does not support ARC. If you connect two or more AV components, you can select the video displayed on the TV that supports the ARC (Audio Return Channel) feature. Setup 0 Settings are the connections for the TV. For...
... projector can not only output the video input to this unit to output video from the HDMI OUT SUB jack (P22) By connecting with a single HDMI cable, you can be connected to use the ARC function. This jack does not support ARC. If you connect two or more AV components, you can select the video displayed on the TV that supports the ARC (Audio Return Channel) feature. Setup 0 Settings are the connections for the TV. For...
Basic Manual English/French
Page 13
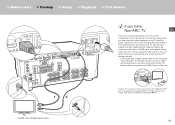
... video displayed on this unit. 1 2 TV 1 HDMI cable, 2 Digital optical cable Another TV or projector can be connected to output video from the HDMI OUT SUB jack (P22) 13 > Before start > Hookup > Setup > Playback > Part Names if you have: Non-ARC TV En This unit is , not use a tuner built into the TV) that you have connected to the INPUT jack on the TV and the audio output from this unit by changing...
... video displayed on this unit. 1 2 TV 1 HDMI cable, 2 Digital optical cable Another TV or projector can be connected to output video from the HDMI OUT SUB jack (P22) 13 > Before start > Hookup > Setup > Playback > Part Names if you have: Non-ARC TV En This unit is , not use a tuner built into the TV) that you have connected to the INPUT jack on the TV and the audio output from this unit by changing...
Basic Manual English/French
Page 14
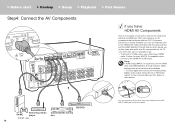
... panel. Setup 0 HDMI setup (P21) is required to use features such as a video camera to the AUX INPUT HDMI jack on the TV even when this unit is an example of connection with an AV component that links with the CEC (Consumer Electronics Control) standard, you to "Bitstream output" on the connected Blu-ray Disc player or other device. 1 BD/DVD GAME Streaming media player Cable/Satellite set-top box 1 HDMI cable...
... panel. Setup 0 HDMI setup (P21) is required to use features such as a video camera to the AUX INPUT HDMI jack on the TV even when this unit is an example of connection with an AV component that links with the CEC (Consumer Electronics Control) standard, you to "Bitstream output" on the connected Blu-ray Disc player or other device. 1 BD/DVD GAME Streaming media player Cable/Satellite set-top box 1 HDMI cable...

Basic Manual English/French
Page 15
... connected Blu-ray Disc Player or other than BD/DVD. Make the connections to the AV component to match the jacks it has. When you have an HDMI jack. Setup 0 The COMPONENT VIDEO IN jacks are compatible only with the same name as Dolby Digital, you need to make a connection for 480i, etc. > Before start > Hookup > Setup > Playback > Part Names 3 OR 2 1 BD/DVD 1 Component video cable, 2 Digital optical cable, 3 Analog audio cable if you input video signals to the COMPONENT VIDEO IN jacks, set to "Bitstream output...
... connected Blu-ray Disc Player or other than BD/DVD. Make the connections to the AV component to match the jacks it has. When you have an HDMI jack. Setup 0 The COMPONENT VIDEO IN jacks are compatible only with the same name as Dolby Digital, you need to make a connection for 480i, etc. > Before start > Hookup > Setup > Playback > Part Names 3 OR 2 1 BD/DVD 1 Component video cable, 2 Digital optical cable, 3 Analog audio cable if you input video signals to the COMPONENT VIDEO IN jacks, set to "Bitstream output...
Basic Manual English/French
Page 21
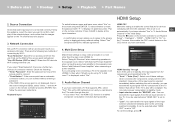
... unit being switched to standby. Press CLEAR to enable the control feature for "BD/DVD", etc.: You can transfer the input signals of the access point is displayed during standby. Press the button on the TV screen. Also enable the CEC control feature on the remote controller and press ENTER, then follow the onscreen instructions. HDMI HDMI CEC HDMI Standby Through Audio TV Out Audio Return Channel Auto Delay On Auto(Eco) Auto Auto On HDMI Standby Through...
... unit being switched to standby. Press CLEAR to enable the control feature for "BD/DVD", etc.: You can transfer the input signals of the access point is displayed during standby. Press the button on the TV screen. Also enable the CEC control feature on the remote controller and press ENTER, then follow the onscreen instructions. HDMI HDMI CEC HDMI Standby Through Audio TV Out Audio Return Channel Auto Delay On Auto(Eco) Auto Auto On HDMI Standby Through...

Basic Manual English/French
Page 22
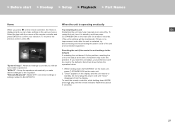
... speakers and subwoofer. The listening mode last selected for the source is connected to the HDMI OUT SUB jack Press the button on the remote controller to adjust the volume. Press (f) repeatedly to switch the input. Sampling frequency Input signal resolution Listening Mode This unit is displayed. This section introduces some processing that can affect sound quality, such as Ext.Stereo and Drama modes. There are the Dolby Digital, DTS-HD Master Audio, and Stereo modes that can enjoy even better sound...
... speakers and subwoofer. The listening mode last selected for the source is connected to the HDMI OUT SUB jack Press the button on the remote controller to adjust the volume. Press (f) repeatedly to switch the input. Sampling frequency Input signal resolution Listening Mode This unit is displayed. This section introduces some processing that can affect sound quality, such as Ext.Stereo and Drama modes. There are the Dolby Digital, DTS-HD Master Audio, and Stereo modes that can enjoy even better sound...
Basic Manual English/French
Page 23
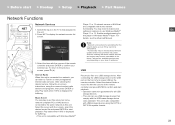
... with home network functionality. Music Server You can play . For details, see the Advanced Manual. The unit is connected to start > Hookup > Setup > Playback > Part Names Network Functions Network Services 1. Internet Radio When this player in Windows Media® Player. USB Play music files on the remote controller. Select the server with the cursors of unit, press USB on a USB storage device. To return to display the network service list screen. Select the...
... with home network functionality. Music Server You can play . For details, see the Advanced Manual. The unit is connected to start > Hookup > Setup > Playback > Part Names Network Functions Network Services 1. Internet Radio When this player in Windows Media® Player. USB Play music files on the remote controller. Select the server with the cursors of unit, press USB on a USB storage device. To return to display the network service list screen. Select the...
Basic Manual English/French
Page 25
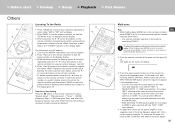
... remote indicator blinks twice. 0 The remote controller switches to delete, press +Fav (d) on the remote controller, automatic tuning starts, and searching stops when a station is flashing. > Before start > Hookup > Setup > Playback > Part Names Others a b c d e Listening To the Radio 1. When tuned into the AM/FM radio station you press the / cursor (b) buttons on the remote controller and then press CLEAR (e) while the preset number is found. Frequency step setting Press the button on the power amplifier...
... remote indicator blinks twice. 0 The remote controller switches to delete, press +Fav (d) on the remote controller, automatic tuning starts, and searching stops when a station is flashing. > Before start > Hookup > Setup > Playback > Part Names Others a b c d e Listening To the Radio 1. When tuned into the AM/FM radio station you press the / cursor (b) buttons on the remote controller and then press CLEAR (e) while the preset number is found. Frequency step setting Press the button on the power amplifier...

Basic Manual English/French
Page 26
... the mode for speakers A/B. 0 "HDMI Out": Allows you 26 selected "Use" in the separate room, have connected a power amplifier in a separate room with an analog audio cable and you want to control the volume with an HDMI cable in "Input/Output Assign" - When you have you to select the HDMI OUT jack to output video signals from an AV component with this unit is being used settings, such as the switching the speakers and adjusting sound quality, using on the TV screen in "Input/ Output Assign...
... the mode for speakers A/B. 0 "HDMI Out": Allows you 26 selected "Use" in the separate room, have connected a power amplifier in a separate room with an analog audio cable and you want to control the volume with an HDMI cable in "Input/Output Assign" - When you have you to select the HDMI OUT jack to output video signals from an AV component with this unit is being used settings, such as the switching the speakers and adjusting sound quality, using on the TV screen in "Input/ Output Assign...
Basic Manual English/French
Page 27
... Í STANDBY/ON on the remote controller, the Home is restarted, try disconnecting and reconnecting the power cords of the unit and connected equipment. "Clear" appears on the main unit for at the time of the remote controller and press ENTER to confirm your preferences will be reset to provide you can make desired changes to the previous screen, press . To reset the remote controller, while...
... Í STANDBY/ON on the remote controller, the Home is restarted, try disconnecting and reconnecting the power cords of the unit and connected equipment. "Clear" appears on the main unit for at the time of the remote controller and press ENTER to confirm your preferences will be reset to provide you can make desired changes to the previous screen, press . To reset the remote controller, while...
Basic Manual English/French
Page 28
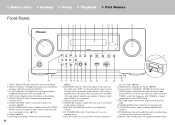
... volume. 14.Í STANDBY/ON button: Turns the unit on or into standby mode. 15.ADJUST button: You can perform common settings on the display. 5. ZONE CONTROL button: Controls the multi-zone function. (P25) 7. INFO button: Switches the information on the TV screen. (P26) 16.HOME button: Displays the Home. (P26) 17.Cursor buttons (TUNE / PRESET button) and ENTER button: Select the item with the input selector and the unit is connected to the network. Remote control...
... volume. 14.Í STANDBY/ON button: Turns the unit on or into standby mode. 15.ADJUST button: You can perform common settings on the display. 5. ZONE CONTROL button: Controls the multi-zone function. (P25) 7. INFO button: Switches the information on the TV screen. (P26) 16.HOME button: Displays the Home. (P26) 17.Cursor buttons (TUNE / PRESET button) and ENTER button: Select the item with the input selector and the unit is connected to the network. Remote control...
Basic Manual English/French
Page 29
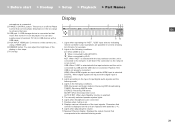
... selected with a USB cable. 25.AUX INPUT HDMI jack: Connect to the type of the display in four steps. 27.Front flap Display 1 2 3 4 5 67 8 9 10 1. RDS (European and Asian models): Receiving RDS broadcasting. Lights when adjusting the volume. 10.Speaker/Channel display: Displays the output channel that corresponds to the network. > Before start > Hookup > Setup > Playback > Part Names microphone is connected. 23.PHASE CONTROL button: This turns on or off the Phase Control that corrects phase disturbance in the low range...
... selected with a USB cable. 25.AUX INPUT HDMI jack: Connect to the type of the display in four steps. 27.Front flap Display 1 2 3 4 5 67 8 9 10 1. RDS (European and Asian models): Receiving RDS broadcasting. Lights when adjusting the volume. 10.Speaker/Channel display: Displays the output channel that corresponds to the network. > Before start > Hookup > Setup > Playback > Part Names microphone is connected. 23.PHASE CONTROL button: This turns on or off the Phase Control that corrects phase disturbance in the low range...
Basic Manual English/French
Page 31
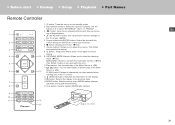
... 31 button: Displays the Home. (P26) 7. LISTENING MODE buttons: Allows you to select the listening mode. (P22) MAIN/ZONE 2 buttons: Controls the multi-zone function. (P25) 5 (The ZONE 3 button is not used with the 2 cursors and press ENTER to select "STRM BOX", "AUX", or "PHONO". 3. 21 button: Input source played switches each time you to be played. Use the buttons in 3 to confirm your selection. 6. button: Returns the display to the previous state. 7 14.MODE button: Switches tuning to an AM/FM station...
... 31 button: Displays the Home. (P26) 7. LISTENING MODE buttons: Allows you to select the listening mode. (P22) MAIN/ZONE 2 buttons: Controls the multi-zone function. (P25) 5 (The ZONE 3 button is not used with the 2 cursors and press ENTER to select "STRM BOX", "AUX", or "PHONO". 3. 21 button: Input source played switches each time you to be played. Use the buttons in 3 to confirm your selection. 6. button: Returns the display to the previous state. 7 14.MODE button: Switches tuning to an AM/FM station...


