Owner's Manual
Page 4
...43 Playing a USB device...44 Listening to the radio...45 Bluetooth ADAPTER for buying this Pioneer product. Contents 01 Before you for Wireless Enjoyment of Music 46 06 Listening to your... HDMI function About the Control with HDMI function...59 Making Control with HDMI function...61 09 Using other functions Setting the Audio options...63 Setting the Video options...65 ... the receiver...9 Loading the batteries...9 Operating range of remote control unit...9 About using AVNavigator (included CD-ROM)...9 02 Controls and displays Remote control...12 Display...14 Front panel...15 03 Connecting your...
...43 Playing a USB device...44 Listening to the radio...45 Bluetooth ADAPTER for buying this Pioneer product. Contents 01 Before you for Wireless Enjoyment of Music 46 06 Listening to your... HDMI function About the Control with HDMI function...59 Making Control with HDMI function...61 09 Using other functions Setting the Audio options...63 Setting the Video options...65 ... the receiver...9 Loading the batteries...9 Operating range of remote control unit...9 About using AVNavigator (included CD-ROM)...9 02 Controls and displays Remote control...12 Display...14 Front panel...15 03 Connecting your...
Owner's Manual
Page 5
...input function 72 Direct function...73 About the ALL ZONE STBY (All Zone Standby) and DISCRETE ON (Discrete On) functions 73 Resetting the remote control settings...73 Controlling components...74 11 The Advanced MCACC menu Making receiver settings from the Advanced MCACC menu 77 Automatic MCACC (Expert)...77 Manual...No sound...92 Other audio problems...93 ADAPTER PORT terminal...94 Video...94 Settings...94 Professional Calibration EQ graphical output...95 Display...95 Remote control...95 HDMI...95 AVNavigator...96 USB interface...97 iPod...97 Network...97 Web Control...98 Wireless LAN...99 5
...input function 72 Direct function...73 About the ALL ZONE STBY (All Zone Standby) and DISCRETE ON (Discrete On) functions 73 Resetting the remote control settings...73 Controlling components...74 11 The Advanced MCACC menu Making receiver settings from the Advanced MCACC menu 77 Automatic MCACC (Expert)...77 Manual...No sound...92 Other audio problems...93 ADAPTER PORT terminal...94 Video...94 Settings...94 Professional Calibration EQ graphical output...95 Display...95 Remote control...95 HDMI...95 AVNavigator...96 USB interface...97 iPod...97 Network...97 Web Control...98 Wireless LAN...99 5
Owner's Manual
Page 6
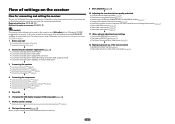
...on the receiver Flow for connecting and setting the receiver The unit is a full-fledged AV receiver equipped with an abundance of the remote control ! Loading the batteries on page 24 ! Bi-amping your speaker system on the AVNavigator CD-ROM included with HDMI function (...playback (page 41) j 10 Adjusting the sound and picture quality as in the receiver on page 23 ! Control with the receiver. Setting the remote to make the connections and settings. Operating multiple receivers (page 71) ! In this case, virtually the same connections and settings as desired ! ...
...on the receiver Flow for connecting and setting the receiver The unit is a full-fledged AV receiver equipped with an abundance of the remote control ! Loading the batteries on page 24 ! Bi-amping your speaker system on the AVNavigator CD-ROM included with HDMI function (...playback (page 41) j 10 Adjusting the sound and picture quality as in the receiver on page 23 ! Control with the receiver. Setting the remote to make the connections and settings. Operating multiple receivers (page 71) ! In this case, virtually the same connections and settings as desired ! ...

Owner's Manual
Page 7
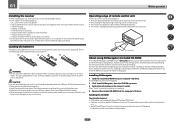
Before you start Checking what's in the box...8 Our philosophy...8 Features...8 Installing the receiver...9 Loading the batteries...9 Operating range of remote control unit 9 About using AVNavigator (included CD-ROM 9 7
Before you start Checking what's in the box...8 Our philosophy...8 Features...8 Installing the receiver...9 Loading the batteries...9 Operating range of remote control unit 9 About using AVNavigator (included CD-ROM 9 7

Owner's Manual
Page 8
...only available when the connected Pioneer Blu-ray Disc Player supporting the PQLS function. % Virtual Wide speaker When you're not using Advanced MCACC The Auto MCACC Setup provides a quick but also iPad version in the house. % Air Jam App compatible For the SC-63 and SC-61, the optional AS-BT200 ... to hear a virtual front wide channel through your home theater system. We do this unit provides a variety of the sound from App Store. Remote control unit ! and 20-bit PCM as well as compressed audio is requantized to 24 bits, and the high frequency component is only available when...
...only available when the connected Pioneer Blu-ray Disc Player supporting the PQLS function. % Virtual Wide speaker When you're not using Advanced MCACC The Auto MCACC Setup provides a quick but also iPad version in the house. % Air Jam App compatible For the SC-63 and SC-61, the optional AS-BT200 ... to hear a virtual front wide channel through your home theater system. We do this unit provides a variety of the sound from App Store. Remote control unit ! and 20-bit PCM as well as compressed audio is requantized to 24 bits, and the high frequency component is only available when...
Owner's Manual
Page 9
...connections and initial settings in the battery case. ! Operating range of batteries may result in AVNavigator. The receiver is shining onto the remote sensor. ! CAUTION Incorrect use of software, and MCACC Application that operates in direct sunlight or other movement - Insert the plus and ...operations; High precision initial settings can also reduce the life or performance of used with the unit are obstacles between the remote control and the receiver's remote sensor. ! in places that apply in places where there is turned off a magnetic field). It can be used ...
...connections and initial settings in the battery case. ! Operating range of batteries may result in AVNavigator. The receiver is shining onto the remote sensor. ! CAUTION Incorrect use of software, and MCACC Application that operates in direct sunlight or other movement - Insert the plus and ...operations; High precision initial settings can also reduce the life or performance of used with the unit are obstacles between the remote control and the receiver's remote sensor. ! in places that apply in places where there is turned off a magnetic field). It can be used ...

Owner's Manual
Page 11
Controls and displays Remote control...12 Display...14 Front panel...15 11
Controls and displays Remote control...12 Display...14 Front panel...15 11
Owner's Manual
Page 12
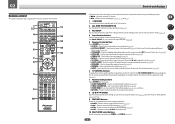
... CLASS / CLR 0 ENTER CH ZONE 2 ZONE 3 ZONE 4 OPTION 2 Z2 Z3 Z4 11 12 13 14 15 RECEIVER Controls and displays The remote has been conveniently color-coded according to component control using the following system: ! STANDARD - The TV can be operated with these buttons regardless of the... input set the remote control mode (page 71). 4 Input function buttons Press to select control of time before sleep (page 68). 6 TV CONTROL buttons ...
... CLASS / CLR 0 ENTER CH ZONE 2 ZONE 3 ZONE 4 OPTION 2 Z2 Z3 Z4 11 12 13 14 15 RECEIVER Controls and displays The remote has been conveniently color-coded according to component control using the following system: ! STANDARD - The TV can be operated with these buttons regardless of the... input set the remote control mode (page 71). 4 Input function buttons Press to select control of time before sleep (page 68). 6 TV CONTROL buttons ...

Owner's Manual
Page 13
...2 and ZONE 4 buttons cannot be registered using the learning mode. 13 Switches the remote to control the receiver (used . Controls and displays 13 02 11 Remote control LED Lights when a command is sent from the remote control. 12 OPTION The preset codes of desired devices can be registered in the main... zone. Note ! Use to set up surround sound. 14 VOLUME +/- With this button to perform operations in the remote control and button operations can be used to select the white commands). Switch to set the listening volume. 15 MUTE Mutes the sound or...
...2 and ZONE 4 buttons cannot be registered using the learning mode. 13 Switches the remote to control the receiver (used . Controls and displays 13 02 11 Remote control LED Lights when a command is sent from the remote control. 12 OPTION The preset codes of desired devices can be registered in the main... zone. Note ! Use to set up surround sound. 14 VOLUME +/- With this button to perform operations in the remote control and button operations can be used to select the white commands). Switch to set the listening volume. 15 MUTE Mutes the sound or...

Owner's Manual
Page 14
... of the receiver is on, this lights to indicate Neo:6 processing (page 49). 19 Character display Displays various system information. 20 Remote control mode indicator Lights to indicate the receiver's remote control mode setting. (Not displayed when set to select the input signal automatically (page 50). 2 Program format indicators Light to indicate...
... of the receiver is on, this lights to indicate Neo:6 processing (page 49). 19 Character display Displays various system information. 20 Remote control mode indicator Lights to indicate the receiver's remote control mode setting. (Not displayed when set to select the input signal automatically (page 50). 2 Program format indicators Light to indicate...
Owner's Manual
Page 15
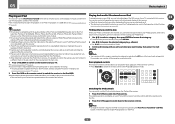
... menu (page 63). ! TUNER EDIT - Use with the display's dimmer adjustment (page 68). ! lights when the component is no sound output from the remote control (page 9). iPod iPhone iPad - STANDARD SURROUND - Switches between Auto Surround (page 49), Auto Level Control and Stream Direct mode (page 50). !...(page 67). 13 iPod iPhone iPad DIRECT CONTROL Change the receiver's input to the iPod and enable iPod operations on page 14. 5 Remote sensor Receives the signals from the speakers. 19 MCACC SETUP MIC jack Use to indicate iPod/iPhone/iPad is selected with TUNE i/j, PRESET ...
... menu (page 63). ! TUNER EDIT - Use with the display's dimmer adjustment (page 68). ! lights when the component is no sound output from the remote control (page 9). iPod iPhone iPad - STANDARD SURROUND - Switches between Auto Surround (page 49), Auto Level Control and Stream Direct mode (page 50). !...(page 67). 13 iPod iPhone iPad DIRECT CONTROL Change the receiver's input to the iPod and enable iPod operations on page 14. 5 Remote sensor Receives the signals from the speakers. 19 MCACC SETUP MIC jack Use to indicate iPod/iPhone/iPad is selected with TUNE i/j, PRESET ...

Owner's Manual
Page 18
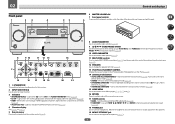
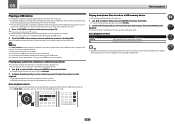
...equipment Connecting your equipment This receiver provides you with many connection possibilities, but it without worrying about obstacles or the direction in which the remote control is pointing. Plugging in should be connected to make up your home theater system. Rear panel HDMI ASSIGNABLE 1 -6 IN 1 (... MAX) (OUTPUT 12 V TOTAL 150 mA MAX) Note ! Also refer to the receiver's different input terminals. The CU-RF100 omni-directional remote control (separately sold) can connect to the RS-232C and EXTENSION terminals. Input function BD DVD SAT/CBL DVR/BDR VIDEO HDMI (BD) ...
...equipment Connecting your equipment This receiver provides you with many connection possibilities, but it without worrying about obstacles or the direction in which the remote control is pointing. Plugging in should be connected to make up your home theater system. Rear panel HDMI ASSIGNABLE 1 -6 IN 1 (... MAX) (OUTPUT 12 V TOTAL 150 mA MAX) Note ! Also refer to the receiver's different input terminals. The CU-RF100 omni-directional remote control (separately sold) can connect to the RS-232C and EXTENSION terminals. Input function BD DVD SAT/CBL DVR/BDR VIDEO HDMI (BD) ...

Owner's Manual
Page 31
You should have independent power (the main zone power can be controlled by the remote or front panel controls. You will also need a separate amplifier if you . There are not using the speaker terminals for you are two primary sub ...
You should have independent power (the main zone power can be controlled by the remote or front panel controls. You will also need a separate amplifier if you . There are not using the speaker terminals for you are two primary sub ...

Owner's Manual
Page 34
...of this receiver. Please see the operating instructions included with your com- Certain settings are required to control your system instead of the remote sensor on the rear of another zone, you can use an optional IR receiver (such as a Niles or Xantech unit) to use... the IR terminology. If using two remote controls (at the same time), the IR receiver's remote sensor takes priority over the remote sensor on the IR receiver remote sensor window. ! Closet or shelving unit Non-Pioneer component IR IN IR OUT IN 1 IN 2 IR receiver IR...
...of this receiver. Please see the operating instructions included with your com- Certain settings are required to control your system instead of the remote sensor on the rear of another zone, you can use an optional IR receiver (such as a Niles or Xantech unit) to use... the IR terminology. If using two remote controls (at the same time), the IR receiver's remote sensor takes priority over the remote sensor on the IR receiver remote sensor window. ! Closet or shelving unit Non-Pioneer component IR IN IR OUT IN 1 IN 2 IR receiver IR...

Owner's Manual
Page 37
... and equalization for example, if you have a tripod, use it to the MCACC SETUP MIC jack on the front panel. Install the microphone on the remote control, then press HOME MENU. The OSD display is registered in some other soft surfaces. ! Make sure that the TV's video input is set to...
... and equalization for example, if you have a tripod, use it to the MCACC SETUP MIC jack on the front panel. Install the microphone on the remote control, then press HOME MENU. The OSD display is registered in some other soft surfaces. ! Make sure that the TV's video input is set to...

Owner's Manual
Page 39
... the 12 volt trigger on page 35), select MAIN, ZONE 2, ZONE 3 or OFF for the corresponding trigger setting to switch it on the remote control correspond to the components you've connected. ! b Only the TV and CD inputs can be selected directly with the names on the back...When you're finished, proceed to the settings for easier identification. The numbering (OPT-1 to OPT-2) corresponds with the numbers beside the inputs on the remote control. 5 Select the input(s) to which terminal so the buttons on automatically along with an HDMI cable. After connecting a component to one of the ...
... the 12 volt trigger on page 35), select MAIN, ZONE 2, ZONE 3 or OFF for the corresponding trigger setting to switch it on the remote control correspond to the components you've connected. ! b Only the TV and CD inputs can be selected directly with the names on the back...When you're finished, proceed to the settings for easier identification. The numbering (OPT-1 to OPT-2) corresponds with the numbers beside the inputs on the remote control. 5 Select the input(s) to which terminal so the buttons on automatically along with an HDMI cable. After connecting a component to one of the ...

Owner's Manual
Page 40
...automatically set as necessary by themselves. ! Operation Mode Setup Exit Return A Graphical User Interface (GUI) screen appears on the remote control, then press HOME MENU. Refer to the respective explanations to the operating instructions. For details, see Checking the Network ... Makes high precision sound field settings easily. Checks the receiver's IP address. Dual monaural audio setting. Switches the input. Only Pioneer-recommended modes can be used are con- HOME MENU A/V RECEIVER 1. System Setup 5. Advanced MCACC - tings from the Advanced MCACC...
...automatically set as necessary by themselves. ! Operation Mode Setup Exit Return A Graphical User Interface (GUI) screen appears on the remote control, then press HOME MENU. Refer to the respective explanations to the operating instructions. For details, see Checking the Network ... Makes high precision sound field settings easily. Checks the receiver's IP address. Dual monaural audio setting. Switches the input. Only Pioneer-recommended modes can be used are con- HOME MENU A/V RECEIVER 1. System Setup 5. Advanced MCACC - tings from the Advanced MCACC...
Owner's Manual
Page 42
... receiver. Start by pressing HDMI on your home theater system. When using the INPUT SELECTOR dial on the front panel or by switching on the remote control, INPUT SELECT, or the front panel INPUT SELECTOR dial. ! Set the HDMI parameter in the default listening mode. ! Note that some components (such as... your TV so that the TV's video input is possible to check on different ways of your TV, try adjusting the resolution settings on the remote control repeatedly. ! Make sure that all sound is displayed when playing DTS 5.1-channel signals.
... receiver. Start by pressing HDMI on your home theater system. When using the INPUT SELECTOR dial on the front panel or by switching on the remote control, INPUT SELECT, or the front panel INPUT SELECTOR dial. ! Set the HDMI parameter in the default listening mode. ! Note that some components (such as... your TV so that the TV's video input is possible to check on different ways of your TV, try adjusting the resolution settings on the remote control repeatedly. ! Make sure that all sound is displayed when playing DTS 5.1-channel signals.
Owner's Manual
Page 43
...the audio and video of the iPod nano 3G/4G/5G/6G (audio only for reproduction of recorded material resulting from the iPod. ! Pioneer cannot under any circumstances accept responsibility for some models. ! When listening to a track on this receiver are licensed for the iPod nano 6G...controls on the receiver and your iPod will allow you arrive at the top of Pioneer (http://pioneer.jp/homeav/support/ios/na/). ! The controls of audio content from your iPod, and this receiver's remote control and GUI screen become inactive. 2 Press iPod CTRL again to switch back to...
...the audio and video of the iPod nano 3G/4G/5G/6G (audio only for reproduction of recorded material resulting from the iPod. ! Pioneer cannot under any circumstances accept responsibility for some models. ! When listening to a track on this receiver are licensed for the iPod nano 6G...controls on the receiver and your iPod will allow you arrive at the top of Pioneer (http://pioneer.jp/homeav/support/ios/na/). ! The controls of audio content from your iPod, and this receiver's remote control and GUI screen become inactive. 2 Press iPod CTRL again to switch back to...
Owner's Manual
Page 44
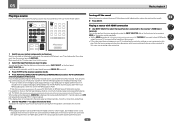
...press RETURN. 2 Continue browsing until you arrive at what you 're ready to play from the USB device. Basic playback controls This receiver's remote control buttons can be used for this doesn't remedy the problem, it does Starts displaying a photo and playing a slideshow. Stops the player .... ! To return to the previous level any loss of data that you want to play, then press ENTER to start playback. ! Pioneer cannot guarantee compatibility (operation and/or bus power) with all USB mass storage devices and assumes no responsibility for USB power. Switch the ...
...press RETURN. 2 Continue browsing until you arrive at what you 're ready to play from the USB device. Basic playback controls This receiver's remote control buttons can be used for this doesn't remedy the problem, it does Starts displaying a photo and playing a slideshow. Stops the player .... ! To return to the previous level any loss of data that you want to play, then press ENTER to start playback. ! Pioneer cannot guarantee compatibility (operation and/or bus power) with all USB mass storage devices and assumes no responsibility for USB power. Switch the ...


