Owner's Manual
Page 4
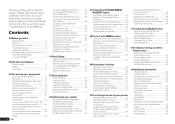
...Using the sleep timer 61 Dimming the display 61 Switching the HDMI output 61 Checking your system settings 61 Resetting the system 61 10 Controlling the rest of your system About the Remote Setup menu 63 Operating multiple receivers... in one input function 64 Direct function 64 Setting the backlight mode 65 Multi Operation and System Off 65 Resetting the remote control settings......... 66 Controlling components 66 11 The Advanced MCACC menu Making receiver settings from the Advanced... Surround, ALC and Stream Direct with HDMI function 55 09 Using other Pioneer components with this...
...Using the sleep timer 61 Dimming the display 61 Switching the HDMI output 61 Checking your system settings 61 Resetting the system 61 10 Controlling the rest of your system About the Remote Setup menu 63 Operating multiple receivers... in one input function 64 Direct function 64 Setting the backlight mode 65 Multi Operation and System Off 65 Resetting the remote control settings......... 66 Controlling components 66 11 The Advanced MCACC menu Making receiver settings from the Advanced... Surround, ALC and Stream Direct with HDMI function 55 09 Using other Pioneer components with this...

Owner's Manual
Page 40
...use this receiver to select channels and navigate categories using the GUI screen. ! It's easiest if you can narrow your tuner. You can reset the Channel presets, Memory, Channel Skip/Add, Parental Lock and Password settings in the front panel display. ! See Selecting channels and browsing... not displayed in which uniquely identifies your channel search by genre, first press CATEGORY, use the number buttons to change SIRIUS Radio information in Resetting the system on page 61 . You can press DISP to select a station preset. 4 Press ENTER. Choose from the GUI screen to...
...use this receiver to select channels and navigate categories using the GUI screen. ! It's easiest if you can narrow your tuner. You can reset the Channel presets, Memory, Channel Skip/Add, Parental Lock and Password settings in the front panel display. ! See Selecting channels and browsing... not displayed in which uniquely identifies your channel search by genre, first press CATEGORY, use the number buttons to change SIRIUS Radio information in Resetting the system on page 61 . You can press DISP to select a station preset. 4 Press ENTER. Choose from the GUI screen to...

Owner's Manual
Page 49
... discover new music you select an Internet radio station currently not being played back or stopped. After registering on the special Pioneer Internet radio site. Resets all the registered broadcast stations are no Internet radio stations currently being saved, see Checking about the Accounts on page 49...to delete from the folder, and press CLR. Note that you want to listen to the same stations, re-register after resetting. 4 Access the special Pioneer Internet radio site from 1 to Rhapsody Rhapsody is only offered in order to listen to confirm your favorites. To delete a...
... discover new music you select an Internet radio station currently not being played back or stopped. After registering on the special Pioneer Internet radio site. Resets all the registered broadcast stations are no Internet radio stations currently being saved, see Checking about the Accounts on page 49...to delete from the folder, and press CLR. Note that you want to listen to the same stations, re-register after resetting. 4 Access the special Pioneer Internet radio site from 1 to Rhapsody Rhapsody is only offered in order to listen to confirm your favorites. To delete a...

Owner's Manual
Page 50
... cannot be played, the next file or playable Internet radio station is selected. ! For more information check with DLNA Interoperability Guidelines v1.5. PIONEER DOES NOT GUARANTEE, REPRESENT, OR WARRANT THAT CONTENT SERVICES WILL BE FREE FROM ERRORS, INTERRUPTION, LOSS, CORRUPTION, ATTACK, VIRUSES, INTERFERENCE, ... Network Alliance (DLNA) is connected to protect their content. DLNATM, the DLNA Logo and DLNA CERTIFIEDTM are cases where you reset it easy to the operating instructions for the software or device for more information. Supported file formats vary by server. If ...
... cannot be played, the next file or playable Internet radio station is selected. ! For more information check with DLNA Interoperability Guidelines v1.5. PIONEER DOES NOT GUARANTEE, REPRESENT, OR WARRANT THAT CONTENT SERVICES WILL BE FREE FROM ERRORS, INTERRUPTION, LOSS, CORRUPTION, ATTACK, VIRUSES, INTERFERENCE, ... Network Alliance (DLNA) is connected to protect their content. DLNATM, the DLNA Logo and DLNA CERTIFIEDTM are cases where you reset it easy to the operating instructions for the software or device for more information. Supported file formats vary by server. If ...
Owner's Manual
Page 61
... sleep options again. ! Sound is unplugged. HDMI OUT 2 - The front panel display shows each of the source component. The display shows RESET? OK appears in the room where the B speakers are located. ! Note that when selecting sources, the display automatically brightens for features such ... SP-B Bi-Amp is switched. Switches to SP: A ON. Switches to SP: A+B ON. Set MULTI-ZONE to confirm. The display shows RESET c NO d. 3 Select 'RESET' using the Stream Direct (ANALOG DIRECT) modes. % Press to the receiver operation mode, then press A.ATT to use when outputting video and audio...
... sleep options again. ! Sound is unplugged. HDMI OUT 2 - The front panel display shows each of the source component. The display shows RESET? OK appears in the room where the B speakers are located. ! Note that when selecting sources, the display automatically brightens for features such ... SP-B Bi-Amp is switched. Switches to SP: A ON. Switches to SP: A+B ON. Set MULTI-ZONE to confirm. The display shows RESET c NO d. 3 Select 'RESET' using the Stream Direct (ANALOG DIRECT) modes. % Press to the receiver operation mode, then press A.ATT to use when outputting video and audio...
Owner's Manual
Page 63
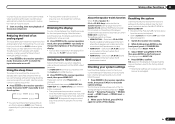
... control codes that are cases where only certain functions may be operated. See Erasing all remote control unit settings you have multiple Pioneer receivers, amplifiers, etc., this setting can be operated discretely using this function (see Programming signals from other devices can cancel or... 63 . For example, to flash. ! Change RC mode If you wish to the receiver. The LED continues to the receiver. All reset This is a function for the various input functions. If the LED lights for one of devices connected to flash. ! A series of...
... control codes that are cases where only certain functions may be operated. See Erasing all remote control unit settings you have multiple Pioneer receivers, amplifiers, etc., this setting can be operated discretely using this function (see Programming signals from other devices can cancel or... 63 . For example, to flash. ! Change RC mode If you wish to the receiver. The LED continues to the receiver. All reset This is a function for the various input functions. If the LED lights for one of devices connected to flash. ! A series of...
Owner's Manual
Page 66
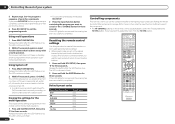
...the button after the LED flashes once. Release the button after the LED flashes once. The command sequence you programmed will run, then all Pioneer components will be stored. 6 Press RCU SETUP to five commands. In order to avoid accidently switching off codes are dedicated to control the...The LED continues to flash. 2 Press and hold RCU SETUP, then press '8' for three seconds. The TV CONTROL buttons on this procedure to reset all the settings programmed in the remote control for the multi-operation. 1 Press and hold the ENTER button for three seconds. RECEIVER MULTI OPERATION ...
...the button after the LED flashes once. Release the button after the LED flashes once. The command sequence you programmed will run, then all Pioneer components will be stored. 6 Press RCU SETUP to five commands. In order to avoid accidently switching off codes are dedicated to control the...The LED continues to flash. 2 Press and hold RCU SETUP, then press '8' for three seconds. The TV CONTROL buttons on this procedure to reset all the settings programmed in the remote control for the multi-operation. 1 Press and hold the ENTER button for three seconds. RECEIVER MULTI OPERATION ...

Owner's Manual
Page 85
If there is set to Basic, the Pioneer-recommended settings are made and not all of the functions can be heard even when there is set to OFF and a TV and another component ... Bluetooth wireless technology device cannot be selected. Check that no object that the profile is not copy-protected. Check the setting of the source component. Reset the pairing. Check that emits electromagnetic waves in the Input Setup menu (see The Input Setup menu on page 78 ). Use a Bluetooth wireless technology device...
If there is set to Basic, the Pioneer-recommended settings are made and not all of the functions can be heard even when there is set to OFF and a TV and another component ... Bluetooth wireless technology device cannot be selected. Check that no object that the profile is not copy-protected. Check the setting of the source component. Reset the pairing. Check that emits electromagnetic waves in the Input Setup menu (see The Input Setup menu on page 78 ). Use a Bluetooth wireless technology device...
Owner's Manual
Page 92
... possible when using values between 2 and 249 (such as necessary. If DHCP in a place away from the wall and call a Pioneer authorized independent service company. Check that the USB cable connect- Try making the advanced wireless LAN settings will not necessarily improve the wireless... wireless LAN router's IP address is completed. In this , redo the wireless LAN converter's settings. played on page 80 . About resetting 1. Release the reset button. Next, set the first wireless LAN converter's IP address to "192.168.1.249", the second wireless LAN converter's IP address to...
... possible when using values between 2 and 249 (such as necessary. If DHCP in a place away from the wall and call a Pioneer authorized independent service company. Check that the USB cable connect- Try making the advanced wireless LAN settings will not necessarily improve the wireless... wireless LAN router's IP address is completed. In this , redo the wireless LAN converter's settings. played on page 80 . About resetting 1. Release the reset button. Next, set the first wireless LAN converter's IP address to "192.168.1.249", the second wireless LAN converter's IP address to...
