
Owner's Manual
Page 3
FEDERAL COMMUNICATIONS COMMISSION DECLARATION OF CONFORMITY This device complies with other stand is may result in a particular installation. Product Name: Plasma Display Model Number: PRO-FHD1 Product Category: Class B Personal Computers & Peripherals Responsible Party Name: PIONEER ELECTRONICS SERVICE, INC. Address: 1925 E. This equipment generates, uses, and can be determined by one or more of California and other governmental entities to cause cancer...
FEDERAL COMMUNICATIONS COMMISSION DECLARATION OF CONFORMITY This device complies with other stand is may result in a particular installation. Product Name: Plasma Display Model Number: PRO-FHD1 Product Category: Class B Personal Computers & Peripherals Responsible Party Name: PIONEER ELECTRONICS SERVICE, INC. Address: 1925 E. This equipment generates, uses, and can be determined by one or more of California and other governmental entities to cause cancer...
Owner's Manual
Page 4
... 27 Using the 3DYC and I-P Mode 27 Sound adjustments 28 FOCUS 28 Front Surround 28 Power Control 29 10 Useful Adjustment Settings Switching the vertical drive frequency (AV mode only 30 Adjusting image positions (AV mode only 30 Adjusting image positions and clock automatically (PC mode only 30 Adjusting image positions and clock manually (PC mode only 30 Selecting an input signal type 31 Color system setting 31 Selecting a screen size automatically (AV mode only 32 Selecting a screen size for buying this Pioneer...
... 27 Using the 3DYC and I-P Mode 27 Sound adjustments 28 FOCUS 28 Front Surround 28 Power Control 29 10 Useful Adjustment Settings Switching the vertical drive frequency (AV mode only 30 Adjusting image positions (AV mode only 30 Adjusting image positions and clock automatically (PC mode only 30 Adjusting image positions and clock manually (PC mode only 30 Selecting an input signal type 31 Color system setting 31 Selecting a screen size automatically (AV mode only 32 Selecting a screen size for buying this Pioneer...
Owner's Manual
Page 6
... inappropriate installation site, improper assembly, installation, mounting, or operation of time, when using only parts and accessories designed by displaying static images for a prolonged period of time. • When playing a game, the "GAME" mode setting within "AV Selection" is strongly recommended. Any malfunction may cause uneven wear. 01 Important User Guidance Information Important User Guidance Information In order to obtain maximum enjoyment from this Pioneer PureVision PRO-FHD1 Plasma Display, please...
... inappropriate installation site, improper assembly, installation, mounting, or operation of time, when using only parts and accessories designed by displaying static images for a prolonged period of time. • When playing a game, the "GAME" mode setting within "AV Selection" is strongly recommended. Any malfunction may cause uneven wear. 01 Important User Guidance Information Important User Guidance Information In order to obtain maximum enjoyment from this Pioneer PureVision PRO-FHD1 Plasma Display, please...
Owner's Manual
Page 7
... card, still image or single color display) please contact Pioneer Customer Support Div. (USA) or Customer Satisfaction Dept. (CANADA). Plasma Display driving sound The screen of the Plasma Display is because the protection function of the Plasma Display automatically adjusts the brightness to received video signals. When condensation takes place, do not use the product for the purpose of cells. (Depending on and run the product occasionally. the supplied cleaning...
... card, still image or single color display) please contact Pioneer Customer Support Div. (USA) or Customer Satisfaction Dept. (CANADA). Plasma Display driving sound The screen of the Plasma Display is because the protection function of the Plasma Display automatically adjusts the brightness to received video signals. When condensation takes place, do not use the product for the purpose of cells. (Depending on and run the product occasionally. the supplied cleaning...
Owner's Manual
Page 9
.... 18. Power cord protection - Therefore, it must be read the following instructions when installing, operating and cleaning the product. For the same reason, do not place the product in electric shock and/or fire. When the product displays an abnormal condition. Wall or ceiling mounting - Do not use can cause overheating and/or shorten the life of power supply used in...
.... 18. Power cord protection - Therefore, it must be read the following instructions when installing, operating and cleaning the product. For the same reason, do not place the product in electric shock and/or fire. When the product displays an abnormal condition. Wall or ceiling mounting - Do not use can cause overheating and/or shorten the life of power supply used in...

Owner's Manual
Page 14
... 14 15 PLASMA DISPLAY When handling the remote control unit • Do not drop the remote control unit or expose it to moisture. • Do not use the remote control unit in a location subject to direct sunlight, heat radiation from a heater, or in operation or standby mode (page 21). 2 SCREEN SIZE button Press to select the screen size (page 23). 3 PC AUTO SET UP button When using computer signal input, automatically sets the "Position...
... 14 15 PLASMA DISPLAY When handling the remote control unit • Do not drop the remote control unit or expose it to moisture. • Do not use the remote control unit in a location subject to direct sunlight, heat radiation from a heater, or in operation or standby mode (page 21). 2 SCREEN SIZE button Press to select the screen size (page 23). 3 PC AUTO SET UP button When using computer signal input, automatically sets the "Position...

Owner's Manual
Page 15
... Pioneer installation technician. These connectors are used for Plasma Display setup adjustments. 3 CONTROL IN/OUT terminals 4 INPUT1 terminal (DVI-D) 5 INPUT2 terminal (HDMI) 6 INPUT3 terminal (HDMI) 7 INPUT4 terminals (COMPONENT VIDEO: Y, Pb/Cb, Pr/Cr, ANALOG RGB : G, B, R ,HD, VD) 11 12 8 INPUT5 terminal (S-VIDEO) 9 INPUT6 terminal (VIDEO) 10 AUDIO INPUT terminals Audio input connectors corresponding to INPUT1 to INPUT6 video input connectors. 11 AC IN Use to connect the supplied power cord to an AC outlet. 12 SPEAKER...
... Pioneer installation technician. These connectors are used for Plasma Display setup adjustments. 3 CONTROL IN/OUT terminals 4 INPUT1 terminal (DVI-D) 5 INPUT2 terminal (HDMI) 6 INPUT3 terminal (HDMI) 7 INPUT4 terminals (COMPONENT VIDEO: Y, Pb/Cb, Pr/Cr, ANALOG RGB : G, B, R ,HD, VD) 11 12 8 INPUT5 terminal (S-VIDEO) 9 INPUT6 terminal (VIDEO) 10 AUDIO INPUT terminals Audio input connectors corresponding to INPUT1 to INPUT6 video input connectors. 11 AC IN Use to connect the supplied power cord to an AC outlet. 12 SPEAKER...
Owner's Manual
Page 18
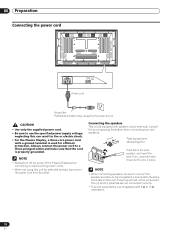
... connect the power cord to use of the Plasma Display when connecting or disconnecting power cords. • When not using this unit. NOTE • Always turn off the power of speakers with 8 Ω to the same terminals on this unit for efficient protection. NOTE • When connecting speakers, be produced if the (+) and (-) polarities are not connected correctly. • This unit supports the use the specified power supply voltage; L Power cord Noise...
... connect the power cord to use of the Plasma Display when connecting or disconnecting power cords. • When not using this unit. NOTE • Always turn off the power of speakers with 8 Ω to the same terminals on this unit for efficient protection. NOTE • When connecting speakers, be produced if the (+) and (-) polarities are not connected correctly. • This unit supports the use the specified power supply voltage; L Power cord Noise...
Owner's Manual
Page 21
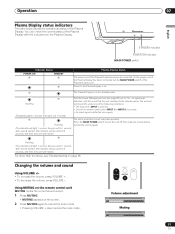
... standby mode. Press the MAIN POWER switch to the standby mode. Using MUTING on the remote control unit MUTING mutes the current sound output. 1 Press MUTING. • MUTING appears on . Or, the power cord of the Plasma Display has been connected but the MAIN POWER switch of the Plasma Display with the result that the unit switched to turn back ON, under one minute before turning the unit on the Plasma Display. The unit will light...
... standby mode. Press the MAIN POWER switch to the standby mode. Using MUTING on the remote control unit MUTING mutes the current sound output. 1 Press MUTING. • MUTING appears on . Or, the power cord of the Plasma Display has been connected but the MAIN POWER switch of the Plasma Display with the result that the unit switched to turn back ON, under one minute before turning the unit on the Plasma Display. The unit will light...
Owner's Manual
Page 22
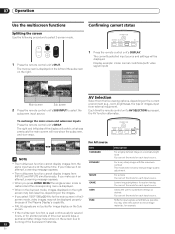
... the maximum contrast This mode does not allow manual image quality adjustment. STANDBY/ON SCREEN AUTO SIZE SETUP PC AV DISPLAY SELECTION For AV source Item STANDARD NOTE • The multiscreen function cannot display images from INPUT2 and INPUT3 simultaneously. Allows the user to check image materials, for each input source. If you press HOME MENU the single-screen mode is restored and the corresponding menu is used continuously for several days...
... the maximum contrast This mode does not allow manual image quality adjustment. STANDBY/ON SCREEN AUTO SIZE SETUP PC AV DISPLAY SELECTION For AV source Item STANDARD NOTE • The multiscreen function cannot display images from INPUT2 and INPUT3 simultaneously. Allows the user to check image materials, for each input source. If you press HOME MENU the single-screen mode is restored and the corresponding menu is used continuously for several days...
Owner's Manual
Page 25
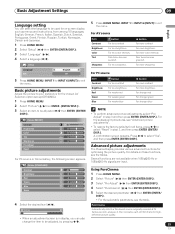
... adjusted, by pressing / . 25 En Picture MOVIE Contrast 40 Brightness 0 Color 0 Tint 0 Sharpness 0 NOTE • To perform advanced picture adjustments, select "Pro Adjust" in step 3, and then press ENTER (ENTER/ DISP.). Using PureCinema 1 Press HOME MENU. Press / to exit the menu. Several functions are not available when 1080p@50 Hz or 1080p@60 Hz signals are input. Red Green Blue Reset 0 2 Select "Picture" ( / then ENTER (ENTER/DISP.)). 0 3 Select "Pro Adjust...
... adjusted, by pressing / . 25 En Picture MOVIE Contrast 40 Brightness 0 Color 0 Tint 0 Sharpness 0 NOTE • To perform advanced picture adjustments, select "Pro Adjust" in step 3, and then press ENTER (ENTER/ DISP.). Using PureCinema 1 Press HOME MENU. Press / to exit the menu. Several functions are not available when 1080p@50 Hz or 1080p@60 Hz signals are input. Red Green Blue Reset 0 2 Select "Picture" ( / then ENTER (ENTER/DISP.)). 0 3 Select "Pro Adjust...

Owner's Manual
Page 28
... + SRS Description Deactivates both TruBass and SRS effects. 5 Press HOME MENU, INPUT 1 to INPUT 6 (INPUT) to exit the menu. NOTE • To restore the factory defaults for the chosen AV Selection option. This works for still images 7 Press HOME MENU, INPUT 1 to INPUT 6 (INPUT) to exit the menu. Selections 1 Optimum for video images 2 Standard setting 3 Optimum for both video and still images. A confirmation screen appears. Reproduces highly effective three-dimensional sound.
... + SRS Description Deactivates both TruBass and SRS effects. 5 Press HOME MENU, INPUT 1 to INPUT 6 (INPUT) to exit the menu. NOTE • To restore the factory defaults for the chosen AV Selection option. This works for still images 7 Press HOME MENU, INPUT 1 to INPUT 6 (INPUT) to exit the menu. Selections 1 Optimum for video images 2 Standard setting 3 Optimum for both video and still images. A confirmation screen appears. Reproduces highly effective three-dimensional sound.
Owner's Manual
Page 30
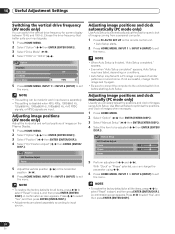
... input source. 10 Useful Adjustment Settings Useful Adjustment Settings Switching the vertical drive frequency (AV mode only) You can be adjusted ( / then ENTER (ENTER/ DISP.)). appears. • Even when "Auto Setup completed" appears, Auto Setup may have failed, depending on conditions. • Auto Setup may fail with a PC image composed of images on the remote control unit. • Auto Setup starts. 2 Press HOME MENU, INPUT 1 to INPUT 6 (INPUT) to select "Reset" in step 4, and then press ENTER (ENTER/ DISP.). Use Manual Setup...
... input source. 10 Useful Adjustment Settings Useful Adjustment Settings Switching the vertical drive frequency (AV mode only) You can be adjusted ( / then ENTER (ENTER/ DISP.)). appears. • Even when "Auto Setup completed" appears, Auto Setup may have failed, depending on conditions. • Auto Setup may fail with a PC image composed of images on the remote control unit. • Auto Setup starts. 2 Press HOME MENU, INPUT 1 to INPUT 6 (INPUT) to select "Reset" in step 4, and then press ENTER (ENTER/ DISP.). Use Manual Setup...
Owner's Manual
Page 31
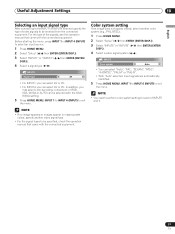
... a video signal system ( / ). NOTE • You need to be received from the connected equipment. XGA, WXGA or AUTO can select AV or PC. • For INPUT4, you may select color decoding, component, or RGB. INPUT1 Signal Type AV • For INPUT1, you can be specified, check the operation manual that came with the XGA/ WXGA setting. 5 Press HOME MENU, INPUT 1 to INPUT 6 (INPUT) to...
... a video signal system ( / ). NOTE • You need to be received from the connected equipment. XGA, WXGA or AUTO can select AV or PC. • For INPUT4, you may select color decoding, component, or RGB. INPUT1 Signal Type AV • For INPUT1, you can be specified, check the operation manual that came with the XGA/ WXGA setting. 5 Press HOME MENU, INPUT 1 to INPUT 6 (INPUT) to...

Owner's Manual
Page 33
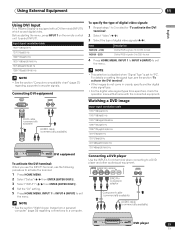
.... Using HDMI Input This Plasma Display is equipped with the connected equipment. Connections for the signal type. See page 31. • Refer to your decoder or VCR operation manual for Composite Connectors INPUT6 VIDEO INPUT6 R L Audio cable (commercially available) S-Video cable (commercially available) Use a SCART to select INPUT2 or INPUT3. Using External Equipment 11 Using External Equipment You can connect many types of external equipment to your Plasma Display, like a decoder, VCR, DVD player, personalcomputer, game...
.... Using HDMI Input This Plasma Display is equipped with the connected equipment. Connections for the signal type. See page 31. • Refer to your decoder or VCR operation manual for Composite Connectors INPUT6 VIDEO INPUT6 R L Audio cable (commercially available) S-Video cable (commercially available) Use a SCART to select INPUT2 or INPUT3. Using External Equipment 11 Using External Equipment You can connect many types of external equipment to your Plasma Display, like a decoder, VCR, DVD player, personalcomputer, game...

Owner's Manual
Page 34
... manual that results in natural color. • If the images do not come in clearly, specify another digital video signal type. • For the digital video signal types to identify the type of digital video signals when digital video signals are received. Item Auto Digital Analogue Description Automatically identifies input audio signals. 11 Using External Equipment Input signal correlation table 720*[email protected]/60 Hz 720(1440)*[email protected]/60 Hz For audio, the Plasma Display supports...
... manual that results in natural color. • If the images do not come in clearly, specify another digital video signal type. • For the digital video signal types to identify the type of digital video signals when digital video signals are received. Item Auto Digital Analogue Description Automatically identifies input audio signals. 11 Using External Equipment Input signal correlation table 720*[email protected]/60 Hz 720(1440)*[email protected]/60 Hz For audio, the Plasma Display supports...
Owner's Manual
Page 35
... signals (16 to 235) locked Didital RGB signals (0 to 255) locked 4 Press HOME MENU, INPUT 1 to INPUT 6 (INPUT) to a computer. Using External Equipment 11 English Using DVI Input This Plasma Display is set to "PC". INPUT4 COMPONENT VIDEO / ANAROG RGB Y Pb/Cb Pr/Cr INPUT4 R L G B R HD VD BNC/Pin conversion adaptor Component cable (commercially available) AUDIO cable (commercially available) DVD player 35 En Input signal correlation table 1920*1080i@50 Hz 720*576p@50 Hz 1280*720p@50...
... signals (16 to 235) locked Didital RGB signals (0 to 255) locked 4 Press HOME MENU, INPUT 1 to INPUT 6 (INPUT) to a computer. Using External Equipment 11 English Using DVI Input This Plasma Display is set to "PC". INPUT4 COMPONENT VIDEO / ANAROG RGB Y Pb/Cb Pr/Cr INPUT4 R L G B R HD VD BNC/Pin conversion adaptor Component cable (commercially available) AUDIO cable (commercially available) DVD player 35 En Input signal correlation table 1920*1080i@50 Hz 720*576p@50 Hz 1280*720p@50...

Owner's Manual
Page 36
... use the remote control unit's Auto setup function. 36 En 11 Using External Equipment Displaying a DVD image To watch an image coming from a personal computer Connecting a personal computer Use the INPUT1 or INPUT4 terminals to connect a personal computer. Personal computer Displaying an image from a personal computer To watch an image coming from the game console or camcorder, press INPUT 5 or INPUT 6 (INPUT) to select INPUT5 or INPUT6. When connecting to your DVD player operation manual for the signal...
... use the remote control unit's Auto setup function. 36 En 11 Using External Equipment Displaying a DVD image To watch an image coming from a personal computer Connecting a personal computer Use the INPUT1 or INPUT4 terminals to connect a personal computer. Personal computer Displaying an image from a personal computer To watch an image coming from the game console or camcorder, press INPUT 5 or INPUT 6 (INPUT) to select INPUT5 or INPUT6. When connecting to your DVD player operation manual for the signal...

Owner's Manual
Page 37
... the input switch linkage operation function and the DSP surround mode display function. NOTE • While in connection through SR+, the volume on this Plasma Display is disabled. Connecting control cords Connect control cords between the Plasma Display and other PIONEER equipment having the logo. Face the remote control units to the remote control sensor on the rear of the Plasma Display supports SR+ that allows linked operations with the PIONEER AV receiver supporting SR+. 1 Press HOME MENU. 2 Select "Setup...
... the input switch linkage operation function and the DSP surround mode display function. NOTE • While in connection through SR+, the volume on this Plasma Display is disabled. Connecting control cords Connect control cords between the Plasma Display and other PIONEER equipment having the logo. Face the remote control units to the remote control sensor on the rear of the Plasma Display supports SR+ that allows linked operations with the PIONEER AV receiver supporting SR+. 1 Press HOME MENU. 2 Select "Setup...
Owner's Manual
Page 38
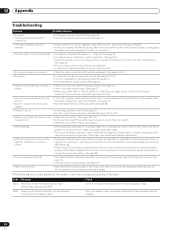
... minutes. Some signals may require to change the screen size setting. (See page 23) • Power is suddenly turned off . If the following error codes appear on the screen, check the corresponding items in speaker cable? Internal protection circuits activated, Is there a short in the table. However, displaying a still image for excessively long periods of time may cause permanent display deterioration. • Different brightness or colors on the...
... minutes. Some signals may require to change the screen size setting. (See page 23) • Power is suddenly turned off . If the following error codes appear on the screen, check the corresponding items in speaker cable? Internal protection circuits activated, Is there a short in the table. However, displaying a still image for excessively long periods of time may cause permanent display deterioration. • Different brightness or colors on the...


