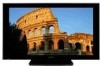

Owner's Manual
Page 3
...cause harmful interference to provide reasonable protection against harmful interference in instability causing possible injury. D1-4-2-6-1_En CAUTION: This Model PRO-FHD1 for help. Wash hands after handling. LONG BEACH, CA 90801-1760, U.S.A. These limits are used in a ...California and other governmental entities to comply with Canadian ICES-003. Product Name: Plasma Display Model Number: PRO-FHD1 Product Category: Class B Personal Computers & Peripherals Responsible Party Name: PIONEER ELECTRONICS SERVICE, INC. Address: 1925 E. D8-10-3a_En IMPORTANT NOTICE - Phone...
...cause harmful interference to provide reasonable protection against harmful interference in instability causing possible injury. D1-4-2-6-1_En CAUTION: This Model PRO-FHD1 for help. Wash hands after handling. LONG BEACH, CA 90801-1760, U.S.A. These limits are used in a ...California and other governmental entities to comply with Canadian ICES-003. Product Name: Plasma Display Model Number: PRO-FHD1 Product Category: Class B Personal Computers & Peripherals Responsible Party Name: PIONEER ELECTRONICS SERVICE, INC. Address: 1925 E. D8-10-3a_En IMPORTANT NOTICE - Phone...
Owner's Manual
Page 6
... the vents on the screen can be placed in the future during the manufacturing process and in front of the plasma panel, which furthers Pioneer's continued goal of the unit to remove dust build-up, by the manufacturer's limited warranties: • Permanent residual..., please limit its lifetime, the luminosity of the Pioneer PRO-FHD1 Plasma Display will diminish very slowly, such as such, are typical effects and characteristics of parts and accessories manufactured by the use to this Pioneer PureVision PRO-FHD1 Plasma Display, please first read and follow the usage guidances...
... the vents on the screen can be placed in the future during the manufacturing process and in front of the plasma panel, which furthers Pioneer's continued goal of the unit to remove dust build-up, by the manufacturer's limited warranties: • Permanent residual..., please limit its lifetime, the luminosity of the Pioneer PRO-FHD1 Plasma Display will diminish very slowly, such as such, are typical effects and characteristics of parts and accessories manufactured by the use to this Pioneer PureVision PRO-FHD1 Plasma Display, please first read and follow the usage guidances...
Owner's Manual
Page 12
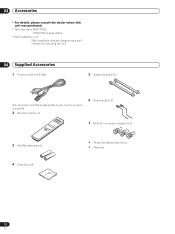
03 Accessories Accessories • For details, please consult the dealer where this unit was purchased. 1 Table top stand (PDK-TS23): PRO-FHD1 display stand. 2 Wall installation unit: Wall installation bracket designed as a wall interface for securing the unit. 04 Supplied Accessories 1 Power cord (2 m/6.6 feet) 5 Speed clamps (x 2) Only ...
03 Accessories Accessories • For details, please consult the dealer where this unit was purchased. 1 Table top stand (PDK-TS23): PRO-FHD1 display stand. 2 Wall installation unit: Wall installation bracket designed as a wall interface for securing the unit. 04 Supplied Accessories 1 Power cord (2 m/6.6 feet) 5 Speed clamps (x 2) Only ...
Owner's Manual
Page 23
...are dimmed. Unless doing so would infringe copyright restrictions, it is recommended to view full screen motion video. • When using the Plasma Display in a profit-making activity, or when exhibiting images publicly, using the screen size function to burning of input signals. AV ... En For 16:9 letterbox pictures. This may appear on each side, and you cannot select "Contrast", "Brightness", "Color", "Tint", "Sharpness", "Pro Adjust", and "Reset"; Full 16:9 screen display Matches input signal with same number of the screen. • It is progressively stretched toward each side...
...are dimmed. Unless doing so would infringe copyright restrictions, it is recommended to view full screen motion video. • When using the Plasma Display in a profit-making activity, or when exhibiting images publicly, using the screen size function to burning of input signals. AV ... En For 16:9 letterbox pictures. This may appear on each side, and you cannot select "Contrast", "Brightness", "Color", "Tint", "Sharpness", "Pro Adjust", and "Reset"; Full 16:9 screen display Matches input signal with same number of the screen. • It is progressively stretched toward each side...
Owner's Manual
Page 24
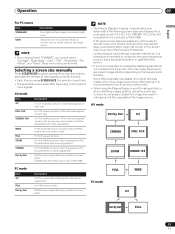
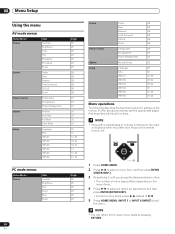
.... 08 Menu Setup Menu Setup Using the menu AV mode menus Home Menu Picture Sound Power Control Option Setup Item Contrast Brightness Color Tint Sharpness Pro Adjust Reset Treble Bass Balance Front Surround FOCUS Reset Energy Save No Signal off Power Management Position Auto Size 4:3 Mode Drive Mode Language SR+ INPUT1...
.... 08 Menu Setup Menu Setup Using the menu AV mode menus Home Menu Picture Sound Power Control Option Setup Item Contrast Brightness Color Tint Sharpness Pro Adjust Reset Treble Bass Balance Front Surround FOCUS Reset Energy Save No Signal off Power Management Position Auto Size 4:3 Mode Drive Mode Language SR+ INPUT1...
Owner's Manual
Page 25
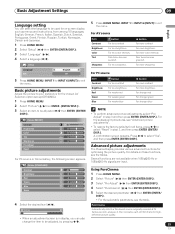
... stronger green 1 Press HOME MENU. Picture STANDARD Contrast 40 Brightness 0 Advanced picture adjustments The Plasma Display provides various advanced functions for high- Red Green Blue Reset 0 2 Select "Picture" ( / then ENTER (ENTER/DISP.)). 0 3 Select "Pro Adjust" ( / then ENTER (ENTER/DISP.)). 0 4 Select "PureCinema" ( / then ... Press HOME MENU, INPUT 1 to INPUT 6 (INPUT) to exit the menu. Several functions are not available when 1080p@50 Hz or 1080p@60 Hz signals are input. PureCinema Contrast 40 Automatically detects a film-based source (originally encoded at...
... stronger green 1 Press HOME MENU. Picture STANDARD Contrast 40 Brightness 0 Advanced picture adjustments The Plasma Display provides various advanced functions for high- Red Green Blue Reset 0 2 Select "Picture" ( / then ENTER (ENTER/DISP.)). 0 3 Select "Pro Adjust" ( / then ENTER (ENTER/DISP.)). 0 4 Select "PureCinema" ( / then ... Press HOME MENU, INPUT 1 to INPUT 6 (INPUT) to exit the menu. Several functions are not available when 1080p@50 Hz or 1080p@60 Hz signals are input. PureCinema Contrast 40 Automatically detects a film-based source (originally encoded at...
Owner's Manual
Page 26
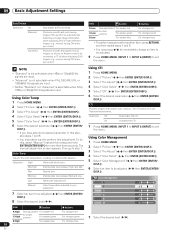
.../ DISP.)). Then go to perform fine adjustment. Using Color Management 1 Press HOME MENU. 2 Select "Picture" ( / then ENTER (ENTER/DISP.)). 3 Select "Pro Adjust" ( / then ENTER (ENTER/DISP.)). 4 Select "Color Detail" ( / then ENTER (ENTER/DISP.)). 5 Select "Color Management" ( / then ENTER ...8226; Neither "Standard" nor "Advanced" is selectable when 576p, 1080p or 720p@ 50 Hz signals are input. B 0 8 Select the desired level ( / ). Using CTI 1 Press HOME MENU. 2 Select "Picture" ( / then ENTER (ENTER/DISP.)). 3 Select "Pro Adjust" ( / then ENTER (ENTER/DISP.)). 4 Select "Color Detail" ( ...
.../ DISP.)). Then go to perform fine adjustment. Using Color Management 1 Press HOME MENU. 2 Select "Picture" ( / then ENTER (ENTER/DISP.)). 3 Select "Pro Adjust" ( / then ENTER (ENTER/DISP.)). 4 Select "Color Detail" ( / then ENTER (ENTER/DISP.)). 5 Select "Color Management" ( / then ENTER ...8226; Neither "Standard" nor "Advanced" is selectable when 576p, 1080p or 720p@ 50 Hz signals are input. B 0 8 Select the desired level ( / ). Using CTI 1 Press HOME MENU. 2 Select "Picture" ( / then ENTER (ENTER/DISP.)). 3 Select "Pro Adjust" ( / then ENTER (ENTER/DISP.)). 4 Select "Color Detail" ( ...

Owner's Manual
Page 27
...DISP.)). Selections Off Deactivates the Dynamic Contrast. Reducing the noise in images 1 Press HOME MENU. 2 Select "Picture" ( / then ENTER (ENTER/DISP.)). 3 Select "Pro Adjust" ( / then ENTER (ENTER/DISP.)). 4 Select "NR" ( / then ENTER (ENTER/DISP.)). 5 Select an item to green • You can select ... DNR stands for images. Using the Dynamic Range Expander (DRE) functions 1 Press HOME MENU. 2 Select "Picture" ( / then ENTER (ENTER/DISP.)). 3 Select "Pro Adjust" ( / then ENTER (ENTER/DISP.)). 4 Select "DRE" ( / then ENTER (ENTER/DISP.)). 5 Select an item to be adjusted ( / then ENTER ...
...DISP.)). Selections Off Deactivates the Dynamic Contrast. Reducing the noise in images 1 Press HOME MENU. 2 Select "Picture" ( / then ENTER (ENTER/DISP.)). 3 Select "Pro Adjust" ( / then ENTER (ENTER/DISP.)). 4 Select "NR" ( / then ENTER (ENTER/DISP.)). 5 Select an item to green • You can select ... DNR stands for images. Using the Dynamic Range Expander (DRE) functions 1 Press HOME MENU. 2 Select "Picture" ( / then ENTER (ENTER/DISP.)). 3 Select "Pro Adjust" ( / then ENTER (ENTER/DISP.)). 4 Select "DRE" ( / then ENTER (ENTER/DISP.)). 5 Select an item to be adjusted ( / then ENTER ...


