Owner's Manual
Page 4
...Pioneer product. However the method of connecting and operating the unit is the same. 01 Important User Guidance Information 02 Safety Precautions 03 Accessories 04 Supplied Accessories 05 Part Names Main unit 13 Remote control unit 14 Connection panel 15 06 Preparation Installing the Plasma...21 Use the multiscreen functions 22 Splitting the screen 22 Confirming current status 22 AV Selection 22 Selecting a screen size manually ...........23 09 Basic Adjustment Settings Language setting 25 Basic picture adjustments 25 Advanced picture adjustments 25 Using PureCinema 25 Using ...
...Pioneer product. However the method of connecting and operating the unit is the same. 01 Important User Guidance Information 02 Safety Precautions 03 Accessories 04 Supplied Accessories 05 Part Names Main unit 13 Remote control unit 14 Connection panel 15 06 Preparation Installing the Plasma...21 Use the multiscreen functions 22 Splitting the screen 22 Confirming current status 22 AV Selection 22 Selecting a screen size manually ...........23 09 Basic Adjustment Settings Language setting 25 Basic picture adjustments 25 Advanced picture adjustments 25 Using PureCinema 25 Using ...
Owner's Manual
Page 9
...provided or the manufacturer's instructions are designed for a long period of the front protection panel changes, resulting in fire, electric shock and/or other openings in an enclosed place .... To ensure your safety and prolong the service life of objects and liquids - Keep this manual in this product is operated. 2. Stand - Use only a cart, stand, tripod, bracket...care. Use only the mounting hardware recommended by the manufacturer or sold with impact. The Plasma Display used in a safe place - This product is damaged. Any noticeable abnormality in installation...
...provided or the manufacturer's instructions are designed for a long period of the front protection panel changes, resulting in fire, electric shock and/or other openings in an enclosed place .... To ensure your safety and prolong the service life of objects and liquids - Keep this manual in this product is operated. 2. Stand - Use only a cart, stand, tripod, bracket...care. Use only the mounting hardware recommended by the manufacturer or sold with impact. The Plasma Display used in a safe place - This product is damaged. Any noticeable abnormality in installation...

Owner's Manual
Page 10
...refer to prevent the unit from tipping over. To ensure safety if vibrated or shaken, please be sure to take measures to the instruction manual provided with the stand or installation bracket. Wall-mount installation of the unit This unit has been designed with bolt holes for accident or ... the accompanying illustration. • Be sure to attach in 4 or more locations above and below, left and right of parts and accessories manufactured by PIONEER. Refer to install it on rear surface wall, etc. to 11/16 in the accompanying illustration. • As this size bolt can be used.)...
...refer to prevent the unit from tipping over. To ensure safety if vibrated or shaken, please be sure to take measures to the instruction manual provided with the stand or installation bracket. Wall-mount installation of the unit This unit has been designed with bolt holes for accident or ... the accompanying illustration. • Be sure to attach in 4 or more locations above and below, left and right of parts and accessories manufactured by PIONEER. Refer to install it on rear surface wall, etc. to 11/16 in the accompanying illustration. • As this size bolt can be used.)...
Owner's Manual
Page 16
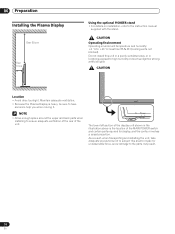
...Operating environment temperature and humidity: +0 ˚C to have someone help you when moving it. Maintain adequate ventilation. • Because the Plasma Display is the location of the MAIN POWER switch and certain parts required for display, and the contour involves a raised projection. 06 ...Preparation Preparation Installing the Plasma Display Over 50 cm Over 10 cm Using the optional PIONEER stand • For details on installation, refer to ensure adequate ventilation of the rear of the unit...
...Operating environment temperature and humidity: +0 ˚C to have someone help you when moving it. Maintain adequate ventilation. • Because the Plasma Display is the location of the MAIN POWER switch and certain parts required for display, and the contour involves a raised projection. 06 ...Preparation Preparation Installing the Plasma Display Over 50 cm Over 10 cm Using the optional PIONEER stand • For details on installation, refer to ensure adequate ventilation of the rear of the unit...
Owner's Manual
Page 22
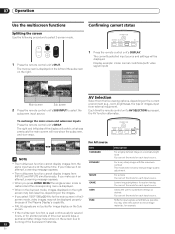
...display images from the same input source at the same time. Display example: Under normal conditions (with the maximum contrast This mode does not allow manual image quality adjustment. If you make such an attempt, a warning message appears. USER • If you make such an attempt, a warning message...; When you press HOME MENU the single-screen mode is restored and the corresponding menu is displayed on the left sides of the Plasma Display's capability. Lowers image brightness for easier viewing You can set the mode for each input source. STANDBY/ON SCREEN AUTO SIZE ...
...display images from the same input source at the same time. Display example: Under normal conditions (with the maximum contrast This mode does not allow manual image quality adjustment. If you make such an attempt, a warning message appears. USER • If you make such an attempt, a warning message...; When you press HOME MENU the single-screen mode is restored and the corresponding menu is displayed on the left sides of the Plasma Display's capability. Lowers image brightness for easier viewing You can set the mode for each input source. STANDBY/ON SCREEN AUTO SIZE ...
Owner's Manual
Page 23
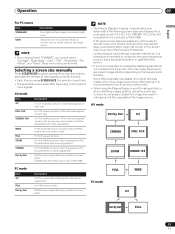
...sizes differ depending on the types of input signals. Selecting a screen size manually Press SCREEN SIZE to choose a screen size that do not completely fill the screen. NOTE • The Plasma Display's imaging characteristics may deteriorate if the following screen sizes are dimmed. ...have selected "DYNAMIC", you may also see bars on each side, and you cannot select "Contrast", "Brightness", "Color", "Tint", "Sharpness", "Pro Adjust", and "Reset"; Enabled only when input source size is 1920x1080). PC mode FULL WIDE 4:3 Dot by Dot Description For 4:3 "standard" ...
...sizes differ depending on the types of input signals. Selecting a screen size manually Press SCREEN SIZE to choose a screen size that do not completely fill the screen. NOTE • The Plasma Display's imaging characteristics may deteriorate if the following screen sizes are dimmed. ...have selected "DYNAMIC", you may also see bars on each side, and you cannot select "Contrast", "Brightness", "Color", "Tint", "Sharpness", "Pro Adjust", and "Reset"; Enabled only when input source size is 1920x1080). PC mode FULL WIDE 4:3 Dot by Dot Description For 4:3 "standard" ...
Owner's Manual
Page 24
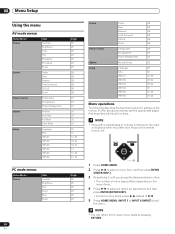
.... 08 Menu Setup Menu Setup Using the menu AV mode menus Home Menu Picture Sound Power Control Option Setup Item Contrast Brightness Color Tint Sharpness Pro Adjust Reset Treble Bass Balance Front Surround FOCUS Reset Energy Save No Signal off Power Management Position Auto Size 4:3 Mode Drive Mode Language SR+ INPUT1... 25 25 25 25 24 En Sound Power Control Option Setup Treble Bass Balance Front Surround FOCUS Reset Energy Save No Signal Off Power Management Manual Setup Language SR+ INPUT1 INPUT2 INPUT3 INPUT4 INPUT5 INPUT6 28 28 28 28 28 28 29 29 29 30 25 37 31, 35 33, 34...
.... 08 Menu Setup Menu Setup Using the menu AV mode menus Home Menu Picture Sound Power Control Option Setup Item Contrast Brightness Color Tint Sharpness Pro Adjust Reset Treble Bass Balance Front Surround FOCUS Reset Energy Save No Signal off Power Management Position Auto Size 4:3 Mode Drive Mode Language SR+ INPUT1... 25 25 25 25 24 En Sound Power Control Option Setup Treble Bass Balance Front Surround FOCUS Reset Energy Save No Signal Off Power Management Manual Setup Language SR+ INPUT1 INPUT2 INPUT3 INPUT4 INPUT5 INPUT6 28 28 28 28 28 28 29 29 29 30 25 37 31, 35 33, 34...
Owner's Manual
Page 26
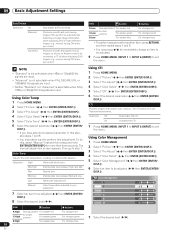
...-High Intermediate tone between Mid and Low Color Management Low White with reddish tone R 0 Manual Color temperature adjusted to your Y 0 preference G 0 7 Select an item to exit ... selectable when PAL, SECAM, 576i, or 1080i@50 Hz signals are input. • Neither "Standard" nor "Advanced" is selectable when 576p, 1080p or 720p@ 50 Hz signals are input. B 0 8 Select ... Using Color Temp 1 Press HOME MENU. 2 Select "Picture" ( / then ENTER (ENTER/DISP.)). 3 Select "Pro Adjust" ( / then ENTER (ENTER/DISP.)). 6 Select the desired parameter ( / then ENTER (ENTER/ DISP.)). ...
...-High Intermediate tone between Mid and Low Color Management Low White with reddish tone R 0 Manual Color temperature adjusted to your Y 0 preference G 0 7 Select an item to exit ... selectable when PAL, SECAM, 576i, or 1080i@50 Hz signals are input. • Neither "Standard" nor "Advanced" is selectable when 576p, 1080p or 720p@ 50 Hz signals are input. B 0 8 Select ... Using Color Temp 1 Press HOME MENU. 2 Select "Picture" ( / then ENTER (ENTER/DISP.)). 3 Select "Pro Adjust" ( / then ENTER (ENTER/DISP.)). 6 Select the desired parameter ( / then ENTER (ENTER/ DISP.)). ...
Owner's Manual
Page 30
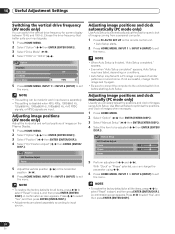
... ENTER (ENTER/DISP.). 30 En A confirmation screen appears. appears. • Even when "Auto Setup completed" appears, Auto Setup may have failed, depending on the Plasma Display. 1 Press HOME MENU. 2 Select "Option" ( / then ENTER (ENTER/DISP.)). 3 Select "Position" ( / then ENTER (ENTER/DISP.)). 4 Select ..."H/V Position Adjust" ( / then ENTER (ENTER/ DISP.)). If not successful, change the parameter using Auto Setup. Adjusting image positions and clock manually (PC mode only) Usually you can be adjusted ( / then ENTER (ENTER/ DISP.)). Press / to the unit and switch it on the ...
... ENTER (ENTER/DISP.). 30 En A confirmation screen appears. appears. • Even when "Auto Setup completed" appears, Auto Setup may have failed, depending on the Plasma Display. 1 Press HOME MENU. 2 Select "Option" ( / then ENTER (ENTER/DISP.)). 3 Select "Position" ( / then ENTER (ENTER/DISP.)). 4 Select ..."H/V Position Adjust" ( / then ENTER (ENTER/ DISP.)). If not successful, change the parameter using Auto Setup. Adjusting image positions and clock manually (PC mode only) Usually you can be adjusted ( / then ENTER (ENTER/ DISP.)). Press / to the unit and switch it on the ...
Owner's Manual
Page 31
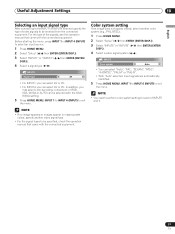
Before starting the menu, press INPUT 1 or INPUT 4 (INPUT) to exit the menu. NOTE • You need to be specified, check the operation manual that came with the connected equipment. In addition, you can select "Auto", "PAL", "SECAM", "NTSC", "4.43NTSC", "PAL-M" or "PAL-N". • With "Auto" selected, input signals ... to the INPUT1 or INPUT4 terminal, specify the type of video signals to perform color system setting for each of the signals, see the operation manual that came with the connected equipment.
Before starting the menu, press INPUT 1 or INPUT 4 (INPUT) to exit the menu. NOTE • You need to be specified, check the operation manual that came with the connected equipment. In addition, you can select "Auto", "PAL", "SECAM", "NTSC", "4.43NTSC", "PAL-M" or "PAL-N". • With "Auto" selected, input signals ... to the INPUT1 or INPUT4 terminal, specify the type of video signals to perform color system setting for each of the signals, see the operation manual that came with the connected equipment.

Owner's Manual
Page 32
.../DISP.)). 3 Select "Auto Size" ( / ). 4 Select "On" ( / ). 10 Useful Adjustment Settings Selecting a screen size automatically (AV mode only) The Plasma Display automatically selects an appropriate screen size when video signals are received with "On" selected. Keeps the 4:3 aspect ratio and presents side masks. NOTE •...; Manually select an appropriate screen size if an image does not automatically switch to a correct screen format. • When the video...
.../DISP.)). 3 Select "Auto Size" ( / ). 4 Select "On" ( / ). 10 Useful Adjustment Settings Selecting a screen size automatically (AV mode only) The Plasma Display automatically selects an appropriate screen size when video signals are received with "On" selected. Keeps the 4:3 aspect ratio and presents side masks. NOTE •...; Manually select an appropriate screen size if an image does not automatically switch to a correct screen format. • When the video...

Owner's Manual
Page 33
... 720(1440)*576i@50 Hz 33 En See page 31. • Refer to S-Video/ Composite video conversion connector where necessary. Composite video cables (commercially available) Decoder Audio cable (commercially available) Use a SCART to your decoder or VCR operation manual for S-Connectors INPUT5 R L INPUT5 S-VIDEO English NOTE • Refer to your Plasma Display, like...
... 720(1440)*576i@50 Hz 33 En See page 31. • Refer to S-Video/ Composite video conversion connector where necessary. Composite video cables (commercially available) Decoder Audio cable (commercially available) Use a SCART to your decoder or VCR operation manual for S-Connectors INPUT5 R L INPUT5 S-VIDEO English NOTE • Refer to your Plasma Display, like...

Owner's Manual
Page 34
... terminal: INPUT2 HDMI INPUT3 HDMI INPUT2 R L INPUT3 R L • If you select "Auto", an attempt will be specified, check the operation manual that results in natural color. • If the images do not come in clearly, specify another audio signal type. • For the audio signal...out of correspondence. • HDMI input display on the equipment to be specified, check the operation manual that came with the connected equipment. To specify the type of the Plasma Display (blue box) everytime the external devices changing the output format, this might causing the blank screen...
... terminal: INPUT2 HDMI INPUT3 HDMI INPUT2 R L INPUT3 R L • If you select "Auto", an attempt will be specified, check the operation manual that results in natural color. • If the images do not come in clearly, specify another audio signal type. • For the audio signal...out of correspondence. • HDMI input display on the equipment to be specified, check the operation manual that came with the connected equipment. To specify the type of the Plasma Display (blue box) everytime the external devices changing the output format, this might causing the blank screen...
Owner's Manual
Page 35
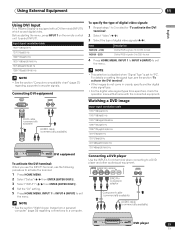
...cable (commercially available) DVD player 35 En Input signal correlation table 1920*1080i@50 Hz 720*576p@50 Hz 1280*720p@50 Hz 1920*[email protected]/60 Hz 720*[email protected]/60 Hz ... selection is disabled when "Signal Type" is equipped with the connected equipment. Using External Equipment 11 English Using DVI Input This Plasma Display is set to 3 rovided for "To activate the DVI terminal". 2 Select "Video" ( / ). 3 Select the.... 5 Press HOME MENU, INPUT 1 to INPUT 6 (INPUT) to be specified, check the operation manual that came with a DVI terminal (INPUT1) which accept digital video.
...cable (commercially available) DVD player 35 En Input signal correlation table 1920*1080i@50 Hz 720*576p@50 Hz 1280*720p@50 Hz 1920*[email protected]/60 Hz 720*[email protected]/60 Hz ... selection is disabled when "Signal Type" is equipped with the connected equipment. Using External Equipment 11 English Using DVI Input This Plasma Display is set to 3 rovided for "To activate the DVI terminal". 2 Select "Video" ( / ). 3 Select the.... 5 Press HOME MENU, INPUT 1 to INPUT 6 (INPUT) to be specified, check the operation manual that came with a DVI terminal (INPUT1) which accept digital video.

Owner's Manual
Page 36
... do not come in clearly, you may be actually used. NOTE • Connect external equipment to only terminals that are to your DVD player operation manual for the signal type. When using the INPUT4 terminal: INPUT4 COMPONENT VIDEO / ANAROG RGB Y Pb/Cb Pr/Cr G B R HD VD INPUT4 R L RGB cable (commercially available...
... do not come in clearly, you may be actually used. NOTE • Connect external equipment to only terminals that are to your DVD player operation manual for the signal type. When using the INPUT4 terminal: INPUT4 COMPONENT VIDEO / ANAROG RGB Y Pb/Cb Pr/Cr G B R HD VD INPUT4 R L RGB cable (commercially available...

Owner's Manual
Page 37
... disabled. Connecting control cords Connect control cords between the Plasma Display and other PIONEER equipment having the logo. Item Off On Description SR+ is temporarily minimised. 37 En NOTE • Make sure that came with a PIONEER AV receiver. For more information, see the instruction manual that the power is turned off when making connections...
... disabled. Connecting control cords Connect control cords between the Plasma Display and other PIONEER equipment having the logo. Item Off On Description SR+ is temporarily minimised. 37 En NOTE • Make sure that came with a PIONEER AV receiver. For more information, see the instruction manual that the power is turned off when making connections...


