
Owner's Manual
Page 3
...CONFORMITY This device complies with part 15 of the FCC Rules. Product Name: Plasma Display Model Number: PRO-FHD1 Product Category: Class B Personal Computers & Peripherals Responsible Party Name: PIONEER ELECTRONICS SERVICE, INC. Increase the separation between the equipment and receiver. -... Connect the equipment into an outlet on a circuit different from that to other stand is connected...
...CONFORMITY This device complies with part 15 of the FCC Rules. Product Name: Plasma Display Model Number: PRO-FHD1 Product Category: Class B Personal Computers & Peripherals Responsible Party Name: PIONEER ELECTRONICS SERVICE, INC. Increase the separation between the equipment and receiver. -... Connect the equipment into an outlet on a circuit different from that to other stand is connected...
Owner's Manual
Page 6
...cause the internal temperature to rise, and could result in the "WIDE" or "FULL" screen setting for more than the PIONEER stand or installation bracket may result in the future during the manufacturing process and in instability, and could cause injury. NOTE The following...The Pioneer PureVision PRO-FHD1 Plasma Display incorporates a very thin design. This improves the color/picture reproduction of the unit to remove dust build-up, by taking some basic precautions. This product should not be displayed for a physical glass panel to be placed in front of the plasma panel, ...
...cause the internal temperature to rise, and could result in the "WIDE" or "FULL" screen setting for more than the PIONEER stand or installation bracket may result in the future during the manufacturing process and in instability, and could cause injury. NOTE The following...The Pioneer PureVision PRO-FHD1 Plasma Display incorporates a very thin design. This improves the color/picture reproduction of the unit to remove dust build-up, by taking some basic precautions. This product should not be displayed for a physical glass panel to be placed in front of the plasma panel, ...
Owner's Manual
Page 12
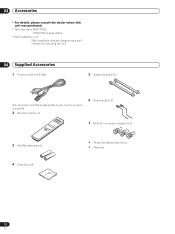
03 Accessories Accessories • For details, please consult the dealer where this unit was purchased. 1 Table top stand (PDK-TS23): PRO-FHD1 display stand. 2 Wall installation unit: Wall installation bracket designed as a wall interface for securing the unit. 04 Supplied Accessories 1 Power cord (2 m/6.6 feet) 5 Speed clamps (x 2) Only the power ...
03 Accessories Accessories • For details, please consult the dealer where this unit was purchased. 1 Table top stand (PDK-TS23): PRO-FHD1 display stand. 2 Wall installation unit: Wall installation bracket designed as a wall interface for securing the unit. 04 Supplied Accessories 1 Power cord (2 m/6.6 feet) 5 Speed clamps (x 2) Only the power ...
Owner's Manual
Page 26
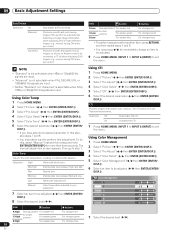
...• To perform adjustment for more than three seconds. The CTI stands for bright G High portions For weaker green For stronger red For stronger... adjustment screen appears. Using Color Management 1 Press HOME MENU. 2 Select "Picture" ( / then ENTER (ENTER/DISP.)). 3 Select "Pro Adjust" ( / then ENTER (ENTER/DISP.)). 4 Select "Color Detail" ( / then ENTER (ENTER/DISP.)). 5 Select "Color Management...when PAL, SECAM, 576i, or 1080i@50 Hz signals are input. • Neither "Standard" nor "Advanced" is selectable when 576p, 1080p or 720p@ 50 Hz signals are input. B 0 8 ...
...• To perform adjustment for more than three seconds. The CTI stands for bright G High portions For weaker green For stronger red For stronger... adjustment screen appears. Using Color Management 1 Press HOME MENU. 2 Select "Picture" ( / then ENTER (ENTER/DISP.)). 3 Select "Pro Adjust" ( / then ENTER (ENTER/DISP.)). 4 Select "Color Detail" ( / then ENTER (ENTER/DISP.)). 5 Select "Color Management...when PAL, SECAM, 576i, or 1080i@50 Hz signals are input. • Neither "Standard" nor "Advanced" is selectable when 576p, 1080p or 720p@ 50 Hz signals are input. B 0 8 ...

Owner's Manual
Page 27
...) to exit the menu. ACL Performs such compensation that results in images 1 Press HOME MENU. 2 Select "Picture" ( / then ENTER (ENTER/DISP.)). 3 Select "Pro Adjust" ( / then ENTER (ENTER/DISP.)). 4 Select "NR" ( / then ENTER (ENTER/DISP.)). 5 Select an item to be adjusted ( / then ENTER (...3. 7 Press HOME MENU, INPUT 1 to INPUT 6 (INPUT) to exit the menu. Selections Off Deactivates the 3DYC. The DNR stands for separating brightness signals and color signals. Selections Off Deactivates the MPEG NR. Selections Off Deactivates the DNR. Using the Dynamic Range Expander ...
...) to exit the menu. ACL Performs such compensation that results in images 1 Press HOME MENU. 2 Select "Picture" ( / then ENTER (ENTER/DISP.)). 3 Select "Pro Adjust" ( / then ENTER (ENTER/DISP.)). 4 Select "NR" ( / then ENTER (ENTER/DISP.)). 5 Select an item to be adjusted ( / then ENTER (...3. 7 Press HOME MENU, INPUT 1 to INPUT 6 (INPUT) to exit the menu. Selections Off Deactivates the 3DYC. The DNR stands for separating brightness signals and color signals. Selections Off Deactivates the MPEG NR. Selections Off Deactivates the DNR. Using the Dynamic Range Expander ...

